


工作中有pi系统有多个参数需要观察,可以设置参数超上下限后变成红色,但是没有提示声音,应用如下脚本辅助参数异常提醒。

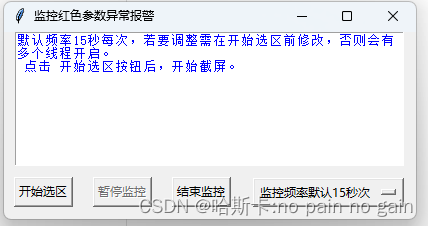
使用脚本框选出数字区域,完成检测操作。操作的界面如下:
大致的流程如下:

第一步 先建立屏幕的选区:获取鼠标按下的 xstart, ystart,鼠标拖动后松开的 xend, yend,固定该区域检测红色像素。截图主屏幕会变暗,框选的区域变亮,截图的外边缘有紫色的虚线。截图完成即刻开始下一步开始识别 start_recognition() 。
# 用鼠标获取选区
def select_screen_region():
    load_alarm_sound("alarm.mp3")  # 提前加载报警音,防止终止运行
    text_widget.delete(1.0, tk.END)
    print('点击开始选区后,使用鼠标左键托选出选区作为监控区域,' + '\n''松开鼠标即刻工作')  # 点击开始选区后 不可以重复点击 ,需要暂停后再次启动

    global xstart, ystart, xend, yend

    def button_1(event):  # 鼠标左键点击-
        global xstart, ystart, rectangle  # xstart, ystart存储了鼠标左键按下时的x,y轴坐标。按下左键创建rectangle
        xstart, ystart = event.x, event.y
        cv.config(highlightthickness=0)  # 无边框
        cv.place(x=event.x, y=event.y)  # 定位到什么位置 place(x =画布在窗口x轴的位置,y=画布在窗口y轴的位置), 以点击的位置作为画布的起点
        rectangle = cv.create_rectangle(0, 0, 0, 0, outline='blue', width=6,
                                        dash=(4, 4))  # 控件位置(x,y)中,任何一个参数小于0,这个控件就会显示不全或不显示

    def b1_Motion(event):  # 鼠标左键移动
        global xstart, ystart
        cv.configure(
            height=event.y - ystart)  # 在灰色的主窗口上拖动鼠标画出一个白色的画布。当前位置与鼠标左键按下时的 Y 轴位置之差。目的是为了使 Canvas 组件的高度等于鼠标的垂直移动距离,从而实现动态调整高度的效果。
        cv.configure(width=event.x - xstart)  # x+y轴鼠标拖拽过程中显示出矩形选框大小变化,
        cv.coords(rectangle, 0, 0, event.x - xstart,
                  event.y - ystart)  # 根据鼠标的位置变换矩形的大小,即矩形的宽与高,而起点不变为0,0  https://blog.csdn.net/m0_37264397/article/details/79179956

    def buttonRelease_1(event):  # 鼠标左键松开
        global xend, yend  # xend, yend存储了鼠标左键松开时的x,y轴坐标
        xend, yend = event.x, event.y
        cv.delete(rectangle)
        cv.place_forget()  # 该方法轻松地隐藏或移除Tkinter窗口中的小部件,如现在的用于绘制框选的画布。 https://deepinout.com/python/python-top-articles/1695446507_tr_place-forget-method-using-tkinter-in-python.html
        root.destroy()  # destroy() 终止mainloop并删除所有小部件。将主窗口销毁
        start_recognition()  # 松开鼠标 开始识别操作,如果截图大小有误,可以点击暂停,重新开始截图

    root = tk.Tk()  # tk.Tk()创建一个Tkinter主窗口实例。
    root.overrideredirect(True)  # 隐藏窗口的标题栏
    root.attributes("-alpha", 0.1)  # 窗口透明度10%
    root.geometry(f"{root.winfo_screenwidth()}x{root.winfo_screenheight()}+0+0")  # 主窗口为全屏幕大小
    root.configure(bg="black")  # 点击开始选区按钮后 主窗口全屏显示浅浅的灰

    cv = tk.Canvas(root)  # 在主窗口中创建一个Canvas组件,Canvas用于圈选

    root.bind("<Button-1>", button_1)  # 鼠标左键点击->显示子窗口
    root.bind("<B1-Motion>", b1_Motion)  # 鼠标左键移动->改变子窗口大小
    root.bind("<ButtonRelease-1>", buttonRelease_1)  # 鼠标左键释放->记录最后光标的位置
    root.mainloop()
第二步 开启识别线程:开始识别之后,“开始选区”按钮变灰色,禁止操作。确保未开启线程的情况下才能启动th_check线程。在Python中使用Tkinter库创建GUI应用时,可以通过设置daemon=True来将主线程的子线程变为守护线程。这样当主线程结束时,所有守护线程也会被自动关闭。th_check加入守护线程,root.destroy() # 退出主线程(包括守护线程),识别操作将立即停止。
def start_recognition():
    btn_suspend.config(state=tk.NORMAL)
    dropdown.config(state=tk.DISABLED)
    global should_exit
    global suspend
    suspend = False
    should_exit = False
    print("开始参数监控")
    if not check_thread_created:  # 检查线程是否已创建
        th_check = threading.Thread(target=check_the_exception)
        th_check.daemon = True
        th_check.start()  # 启动线程
第三步 定期检测框选区域红色像素:使用while not should_exit:来循环检测,除非要退出或暂停,否则一直在定期检查。
在Python的NumPy库中,np.where函数用于返回满足给定条件的元素的索引。img是一个三维数组(通常是一个彩色图像),其形状为(height, width, channels),其中channels代表颜色通道(如RGB)。
代码中的条件是用来过滤图像中的像素,通道0是红色,通道1是绿色,通道2是蓝色,调整阀值大小来检测不同纯度的红色。使用截图获取图像,像素会有失真,纯红色(255,0,0)需要一些阀值调整才能检测到:
img[:, :, 0] >= threshold_r:选择红色通道值大于或等于threshold_r的像素。
img[:, :, 1] <= threshold_g:选择绿色通道值小于或等于threshold_g的像素。
img[:, :, 2] <= threshold_b:选择蓝色通道值小于或等于threshold_b的像素。
np.where函数返回一个元组,其中包含满足条件的元素的索引。具体来说,ind是一个包含三个数组的元组,每个数组对应于图像的一个通道。每个数组的元素是满足相应条件的像素的行和列索引。
python的for遍历图像像素,循环效率很很低,等待时间长。所以能用np.where就用这个了。python pil像素遍历 python遍历图像像素点
def check_the_exception():
    global frequency, should_exit, is_alarm, check_thread_created

    # 设置标志变量,表示线程已创建
    check_thread_created = True

    btn_suspend['text'] = '暂停监控'
    if suspend == True:
        btn_create_region['text'] = '重建选区'
        btn_create_region.config(state=tk.NORMAL)
    else:
        btn_create_region.config(state=tk.DISABLED)

    while not should_exit:
        img = pyautogui.screenshot(region=[xstart + 20, ystart + 20, xend - xstart - 30, yend - ystart - 30])  # 校正一些偏差
        img = np.array(img)
        threshold_r = 250  # 红色通道的阈值范围
        threshold_g = 40  # 绿色通道的阈值范围
        threshold_b = 40  # 蓝色通道的阈值范围
        # 查找接近红色的像素  np.where(condition) 当where内只有一个参数时,参数表示条件,当条件等于True,where以元组的形式返回每个符合condition条件元素的坐标
        ind = np.where((img[:, :, 0] >= threshold_r) &  # 这些条件通过逻辑AND (&) 连接,意味着只有同时满足所有条件的像素才会被选中。
                       (img[:, :, 1] <= threshold_g) &
                       (img[:, :, 2] <= threshold_b))
        combineXY = list(zip(ind[0], ind[1]))  # 将满足红色像素条件的行索引x轴,列索引y轴坐标组合成列表

        if combineXY:  # 如果捕捉到红色像素
            is_alarm = True
            play_alarm()  # 播放报警音
            now = datetime.now()
            ts = now.strftime("%Y-%m-%d %H:%M:%S")
            print(ts + ":出现参数异常")

        # threading.Timer(frequency, reset_status).start()  python通过线程实现定时器timer的方法,可以代替while not, https://pythonjishu.com/ytxvkemcskemjeq/
        time.sleep(frequency)  # 等待15秒后再次检测  ,在这里如果开始检测被暂停之后,未到15秒又继续,将开启两个线程,所以加入check_thread_created

    if should_exit and suspend:
        print('暂停参数监控')
        check_thread_created = False
    else:  # should_exit 和 suspend 都是 False ,或者should_exit = not suspend
        cv2.destroyAllWindows()
所有的代码如下:
import sys
import tkinter as tk  # 创建图形用户界面(GUI)的标准库
import time
import cv2
import pyautogui  # 键鼠库
import pygame  # 播放报警音的库
import threading  # 线程库
import numpy as np
from datetime import datetime  # 格式化的时间


# 初始化pygame库
pygame.init()
pygame.mixer.init()

frequency = 15
suspend = False
should_exit = False
is_alarm = False

def print_to_text(*args):
    global is_alarm
    for arg in args:
        if not is_alarm:
            text_widget.tag_configure('red_text', foreground='blue')  # 正常字体
        if is_alarm:
            text_widget.tag_configure('red_text', foreground='red')  # 报警为红色
        text_widget.insert('end', str(arg), 'red_text')
    text_widget.insert('end', '\n')
    text_widget.yview_scroll(1, 'units')  # 向下滚动一格

# 将print的输出重定向到text_widget
print = print_to_text.__get__(None, print)

# 全局变量,加载MP3文件
def load_alarm_sound(file_path):
    try:
        pygame.mixer.music.load(file_path)
    except pygame.error:
        print(f"无法加载音频文件:{file_path},检查文件名称和后缀是否正确")


# 封装一个播放MP3警报的函数
def play_alarm():
    try:
        # 播放MP3文件
        pygame.mixer.music.play()
    except pygame.error:
        print("播放警报音频失败")

# 用鼠标获取选区
def select_screen_region():
    load_alarm_sound("alarm.mp3")  # 放到这里防止错误提示终止运行
    text_widget.delete(1.0, tk.END)
    print('点击开始选区后,使用鼠标左键托选出选区作为监控区域,' + '\n''松开鼠标即刻工作')  # 点击开始选区后 不可以重复点击 ,需要暂停后再次启动

    global xstart, ystart, xend, yend

    def button_1(event):  # 鼠标左键点击-
        global xstart, ystart, rectangle  # xstart, ystart存储了鼠标左键按下时的x,y轴坐标。按下左键创建rectangle
        xstart, ystart = event.x, event.y
        cv.config(highlightthickness=0)  # 无边框
        cv.place(x=event.x, y=event.y)  # 定位到什么位置 place(x =画布在窗口x轴的位置,y=画布在窗口y轴的位置), 以点击的位置作为画布的起点
        rectangle = cv.create_rectangle(0, 0, 0, 0, outline='blue', width=6,
                                        dash=(4, 4))  # 控件位置(x,y)中,任何一个参数小于0,这个控件就会显示不全或不显示

    def b1_Motion(event):  # 鼠标左键移动
        global xstart, ystart
        cv.configure(
            height=event.y - ystart)  # 在灰色的主窗口上拖动鼠标画出一个白色的画布。当前位置与鼠标左键按下时的 Y 轴位置之差。目的是为了使 Canvas 组件的高度等于鼠标的垂直移动距离,从而实现动态调整高度的效果。
        cv.configure(width=event.x - xstart)  # x+y轴鼠标拖拽过程中显示出矩形选框大小变化,
        cv.coords(rectangle, 0, 0, event.x - xstart,
                  event.y - ystart)  # 根据鼠标的位置变换矩形的大小,即矩形的宽与高,而起点不变为0,0  https://blog.csdn.net/m0_37264397/article/details/79179956

    def buttonRelease_1(event):  # 鼠标左键松开
        global xend, yend  # xend, yend存储了鼠标左键松开时的x,y轴坐标
        xend, yend = event.x, event.y
        cv.delete(rectangle)
        cv.place_forget()  # 该方法轻松地隐藏或移除Tkinter窗口中的小部件,如现在的用于绘制框选的画布。 https://deepinout.com/python/python-top-articles/1695446507_tr_place-forget-method-using-tkinter-in-python.html
        root.destroy()  # destroy() 终止mainloop并删除所有小部件。将主窗口销毁
        start_recognition()  # 松开鼠标 开始识别操作,如果截图大小有误,可以点击暂停,重新开始截图

    root = tk.Tk()  # tk.Tk()创建一个Tkinter主窗口实例。
    root.overrideredirect(True)  # 隐藏窗口的标题栏
    root.attributes("-alpha", 0.1)  # 窗口透明度10%
    root.geometry(f"{root.winfo_screenwidth()}x{root.winfo_screenheight()}+0+0")  # 主窗口为全屏幕大小
    root.configure(bg="black")  # 点击开始选区按钮后 主窗口全屏显示浅浅的灰

    cv = tk.Canvas(root)  # 在主窗口中创建一个Canvas组件,Canvas用于圈选

    root.bind("<Button-1>", button_1)  # 鼠标左键点击->显示子窗口
    root.bind("<B1-Motion>", b1_Motion)  # 鼠标左键移动->改变子窗口大小
    root.bind("<ButtonRelease-1>", buttonRelease_1)  # 鼠标左键释放->记录最后光标的位置
    root.mainloop()


# 全局变量,用于记录线程是否已经创建
check_thread_created = False


def check_the_exception():
    global frequency, should_exit, is_alarm, check_thread_created

    # 设置标志变量,表示线程已创建
    check_thread_created = True

    btn_suspend['text'] = '暂停监控'
    if suspend == True:
        btn_create_region['text'] = '重建选区'
        btn_create_region.config(state=tk.NORMAL)
    else:
        btn_create_region.config(state=tk.DISABLED)

    while not should_exit:
        img = pyautogui.screenshot(region=[xstart + 20, ystart + 20, xend - xstart - 30, yend - ystart - 30])  # 校正一些偏差
        img = np.array(img)
        threshold_r = 250  # 红色通道的阈值范围
        threshold_g = 40  # 绿色通道的阈值范围
        threshold_b = 40  # 蓝色通道的阈值范围
        # 查找接近红色的像素  np.where(condition) 当where内只有一个参数时,参数表示条件,当条件等于True,where以元组的形式返回每个符合condition条件元素的坐标
        ind = np.where((img[:, :, 0] >= threshold_r) &  # 这些条件通过逻辑AND (&) 连接,意味着只有同时满足所有条件的像素才会被选中。
                       (img[:, :, 1] <= threshold_g) &
                       (img[:, :, 2] <= threshold_b))
        combineXY = list(zip(ind[0], ind[1]))  # 将满足红色像素条件的行索引x轴,列索引y轴坐标组合成列表

        if combineXY:  # 如果捕捉到红色像素
            is_alarm = True
            play_alarm()  # 播放报警音
            now = datetime.now()
            ts = now.strftime("%Y-%m-%d %H:%M:%S")
            print(ts + ":出现参数异常")

        # threading.Timer(frequency, reset_status).start()  python通过线程实现定时器timer的方法,可以代替while not, https://pythonjishu.com/ytxvkemcskemjeq/
        time.sleep(frequency)  # 等待15秒后再次检测  ,在这里如果开始检测被暂停之后,未到15秒又继续,将开启两个线程,所以加入check_thread_created

    if should_exit and suspend:
        print('暂停参数监控')
        check_thread_created = False
    else:  # should_exit 和 suspend 都是 False ,或者should_exit = not suspend
        cv2.destroyAllWindows()

def start_recognition():
    btn_suspend.config(state=tk.NORMAL)
    dropdown.config(state=tk.DISABLED)
    global should_exit
    global suspend
    suspend = False
    should_exit = False
    print("开始参数监控")
    if not check_thread_created:  # 检查线程是否已创建
        th_check = threading.Thread(target=check_the_exception)
        th_check.daemon = True
        th_check.start()  # 启动线程

def suspend_recognition():  # 将暂停和继续放入同一个按钮
    global suspend
    global should_exit
    btn_create_region.config(state=tk.NORMAL)
    should_exit = not should_exit
    suspend = not suspend
    if suspend:
        btn_suspend['text'] = '继续监控'
        btn_create_region['text'] = '重建选区'
        btn_create_region.config(state=tk.NORMAL)
    else:
        btn_suspend['text'] = '暂停监控'
        btn_create_region.config(state=tk.DISABLED)
        start_recognition()

def end_program():
    global should_exit
    should_exit = True
    print("结束监控")
    sys.exit(1)  # 在pycharm调试Tkinter程序的时候,关闭右上角的X实际上并未退出进程,长期以往再大的内存也会被耗尽。

# 创建主窗口
root = tk.Tk()
root.title("监控红色参数异常报警")
root.wm_attributes('-topmost', True)
root.protocol("WM_DELETE_WINDOW", end_program)
text_widget = tk.Text(root, width=55, height=10)  # 设置文本框的最小宽度为40个字符,最小高度为10行
root.eval('tk::PlaceWindow . center')  # 界面居中显示
text_widget.pack()  # pack()只在左右居中,没有上下居中   https://blog.51cto.com/u_13303/6359424

# 添加按钮
print('默认频率15秒每次,若要调整需在开始选区前修改,否则会有多个线程开启。 \n 点击 开始选区按钮后,开始截屏。')
btn_create_region = tk.Button(root, text="开始选区", command=select_screen_region)
btn_suspend = tk.Button(root, text="暂停监控", command=suspend_recognition)
btn_end = tk.Button(root, text="结束监控", command=end_program)

# 使用pack布局并设置side参数为LEFT实现横向排列

btn_suspend.config(state=tk.DISABLED)  # 暂停按键停用
btn_create_region.pack(side=tk.LEFT, padx=10, pady=10)
btn_suspend.pack(side=tk.LEFT, padx=10, pady=10)
btn_end.pack(side=tk.LEFT, padx=10, pady=10)

# 创建一个下拉列表变量
root.var = tk.StringVar(root)
# 设置下拉列表的默认值
root.var.set("监控频率默认15秒次")
# 定义下拉列表的选项
options = ["5秒次", "15秒次", "30秒次", "60秒次", "150秒次"]
# 创建下拉列表
dropdown = tk.OptionMenu(root, root.var, *options)
# 将下拉列表放置到主窗口
dropdown.pack(side=tk.LEFT, padx=10, pady=10)

def option_selected(*args):
    global frequency
    text_widget.delete(1.0, tk.END)
    print(f"选项 {root.var.get()} 被选择了!")
    if root.var.get() == "5秒次":
        frequency = 5
    if root.var.get() == "15秒次":
        frequency = 15
    if root.var.get() == "30秒次":
        frequency = 30
    if root.var.get() == "60秒次":
        frequency = 60
    if root.var.get() == "150秒次":
        frequency = 150

root.var.trace("w", option_selected)

# 进入事件循环
root.mainloop()
在该基础上增加了后台监控,首先要取得窗口句柄的标题,使用win32gui.findwindow()找到对应的句柄,在多个窗口被覆盖也能监控到数据异常。但是不能最小化窗口,否则找不到对应的窗口。
hwnd = None # 初始化 hwnd 为 None

# 颜色检测逻辑
def detect_red_pixels(img, threshold_r, threshold_g, threshold_b):
    ind = np.where((img[:, :, 2] >= threshold_r) &  # 注意这里使用的是BGR通道,红色在第三通道
                     (img[:, :, 1] <= threshold_g) &
                     (img[:, :, 0] <= threshold_b))
    return list(zip(ind[0], ind[1]))
# 屏幕截图逻辑

def capture_screen(hwnd, xstart, ystart, xend, yend):
    hWndDC = win32gui.GetWindowDC(hwnd)
    mfcDC = win32ui.CreateDCFromHandle(hWndDC)
    saveDC = mfcDC.CreateCompatibleDC()
    saveBitMap = win32ui.CreateBitmap()
    saveBitMap.CreateCompatibleBitmap(mfcDC, xend - xstart, yend - ystart)
    saveDC.SelectObject(saveBitMap)
    saveDC.BitBlt((0, 0), (xend - xstart, yend - ystart), mfcDC, (xstart, ystart), win32con.SRCCOPY) # 保存图片转cv图像
    signedIntsArray = saveBitMap.GetBitmapBits(True)
    im_opencv = np.frombuffer(signedIntsArray, dtype='uint8')
    im_opencv.shape = (yend - ystart, xend - xstart, 4)
    img = cv2.cvtColor(im_opencv, cv2.COLOR_BGRA2BGR)  # 注意这里使用BGRA到BGR的转换
    win32gui.DeleteObject(saveBitMap.GetHandle())
    saveDC.DeleteDC() #上下文资源释放
    mfcDC.DeleteDC()
    win32gui.ReleaseDC(hwnd, hWndDC)
    return img

def check_the_exception():
    global frequency, should_exit, is_alarm, check_thread_created,hwnd

    # 设置标志变量,表示线程已创建
    check_thread_created = True

    btn_suspend['text'] = '暂停监控'
    if suspend == True:
        btn_create_region['text'] = '重建选区'
        btn_create_region.config(state=tk.NORMAL)
    else:
        btn_create_region.config(state=tk.DISABLED)

    while not should_exit:
        # 如果 hwnd 不存在,则重新查找窗口
        if hwnd is None or not win32gui.IsWindow(hwnd):
            hwnd = win32gui.FindWindow(None,'python-2024.docx - WPS Office') #第二个参数是窗口标题名称
        img = capture_screen(hwnd, xstart, ystart, xend, yend)

        # cv2.imshow("ii",img)    #用于显示截图
        # cv2.waitKey()

        combineXY =detect_red_pixels(img,240,30,30)

        if combineXY:  # 如果捕捉到红色像素
            is_alarm = True
            play_alarm()  # 播放报警音
            now = datetime.now()
            ts = now.strftime("%Y-%m-%d %H:%M:%S")
            print(ts + ":出现参数异常")

        time.sleep(frequency)

    if should_exit and suspend:
        print('暂停参数监控')
        check_thread_created = False
    else:
        cv2.destroyAllWindows()
参考了以下作者的文章:
【kimol君的无聊小发明】—用python写截屏小工具
python 手动选取屏幕一块区域 实时比对是否变化
Python实现指定区域桌面变化监控并报警


 851
851


 被折叠的 条评论
为什么被折叠?
被折叠的 条评论
为什么被折叠?
 到【灌水乐园】发言


