Python图形界面
七、文本元素参数设定
import PySimpleGUI as sg
text = '''悯农
唐 李绅
锄禾日当午,
汗滴禾下土。
谁知盘中餐,
粒粒皆辛苦?
'''
layout=[[sg.T(text,
key='-Text-',
size=(None, None),
font=('宋体',20),
auto_size_text=True,
enable_events=False,
relief='ridge',
border_width=None,
text_color="blue",
background_color='white',
justification=None,
pad=None,
right_click_menu=['1',['1','2','3']],
grab=True,
tooltip='这是一个提示文本',
visible=True
)]
]
window = sg.Window('Python GUI', layout)
while True:
event, values = window.read()
if event == None:
break
if event == '-Text-':
sg.popup('运行了一个点击事件')
window.close()
八、文本元素更新设定
1. 更新方法
window[key].update()
window[key].Update()
2. 文本元素可以更新的属性
update(
value=None,
background_color=None,
text_color=None,
font=None,
visible=None
)
3. 总结代码
import PySimpleGUI as sg
layout=[
[sg.T('小帽',key='-Text-'),sg.B('点赞')]
]
window = sg.Window('Python GUI', layout)
while True:
event, values = window.read()
if event == None:
break
if event == '点赞':
window['-Text-'].update(
value='谢谢支持!',
background_color = 'white',
text_color = 'black',
font = ('黑体', 30),
visible = None
)
window.close()
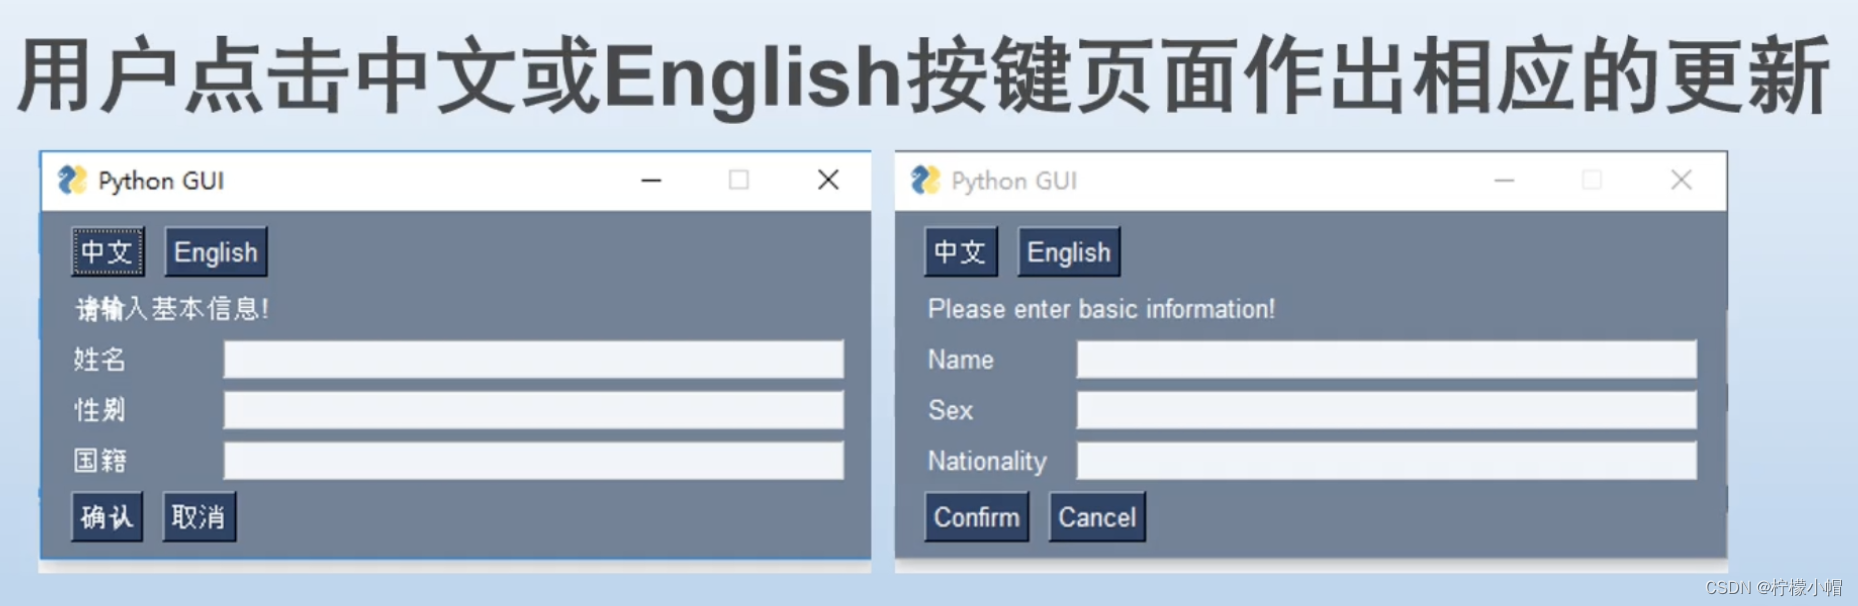
九、中英文切换页面(*)
import PySimpleGUI as sg
layout=[
[sg.B('中文'),sg.B('English')],
[sg.T('请输入基本信息', key='-TITLE-')],
[sg.T('姓名', key='-NAMETXT-',size=(8,1))]+[sg.In()]]+[
[sg.T('性别', key='-SEXTXT-',size=(8,1))]+[sg.In()]]+[
[sg.T('年龄', key='-AGETXT-',size=(8,1)),sg.In()],
[sg.B('确认', key='-CONF-'),sg.B('取消', key='-CANCEL-')]
]
window = sg.Window('Python GUI', layout)
while True:
event, values = window.read()
if event == None:
break
if event == 'English':
window['-TITLE-'].update("Please enter basic information")
window['-NAMETXT-'].update('Name')
window['-SEXTXT-'].update('Sex')
window['-AGETXT-'].update('Age')
window['-CONF-'].update('Confirm')
window['-CANCEL-'].update('Cancel')
if event == '中文':
window['-TITLE-'].update("请输入基本信息")
window['-NAMETXT-'].update('姓名')
window['-SEXTXT-'].update('性别')
window['-AGETXT-'].update('年龄')
window['-CONF-'].update('确定')
window['-CANCEL-'].update('取消')
window.close()
十、单行输入框元素的设定
import PySimpleGUI as sg
layout = [
[sg.T('账号:'), sg.In(
'请输入您的账号',
key='-INPUT-',
size=(30, None),
disabled=None,
password_char='',
justification='l',
background_color='black',
text_color="red",
font=('黑体', 15),
tooltip='这是一个提示文本',
border_width=5,
enable_events=False,
do_not_clear=True,
pad=None,
disabled_readonly_background_color='black',
disabled_readonly_text_color=None,
right_click_menu=None,
visible=True
)],
[sg.T('密码:'), sg.In('', focus=True)],
[sg.B('确定'), sg.B('取消')]
]
window = sg.Window('Python GUI', layout)
while True:
event, values = window.read()
if event == None:
break
if event == '-Text-':
sg.popup('运行了一个点击事件')
window.close()
十一、单行输入框元素的更新方法
1. update方法,用于元素的更新
- window[key].update()
- window[key].Update()
2. SetFocus方法,用于元素设置焦点
- window[key].SetFocus()
- window[key].set_focus()
3. SetTooltip方法,用于元素的更新
- window[key].SetTooltip(")
- window[key].set_tooltip(")
import PySimpleGUI as sg
layout = [
[[sg.In(i, key=i)] for i in 'abcd'],
[sg.B('确定'), sg.B('取消')]
]
window = sg.Window('Python GUI', layout)
while True:
event, values = window.read()
if event == None:
break
if event == '确定':
window['d'].SetFocus()
window['d'].SetTooltip('666')
window['d'].update(
value='123',
disabled=None,
select=None,
visible=None,
text_color=None,
background_color=None,
move_cursor_to="end"
)
window.close()
十二、编写一个登录窗口(*)
- 要求:
- 编写窗口
- 用字典嵌套列表的形式,建立用户数据
- 实现用户输入用户名和密码后,判断输入是否正确
- 确认后,弹出窗口“输入正确”或“输入错误”
import PySimpleGUI as sg
User1 = {'用户名':'abc', '密码':'123'}
User2 = {'用户名':'def', '密码':'456'}
UserList = [User1, User2]
layout = [
[sg.T('用户名', size=(8)),sg.In('请输入您的用户名', key='-user-')],
[sg.T('密码', size=(8)),sg.In('', tooltip='密码为3位数字',key='-pwd-',password_char='*')],
[sg.B('确认'),sg.B('取消')]
]
window = sg.Window('Python GUI', layout)
while True:
event, values = window.read()
if event == None:
break
if event == '确认':
for user in UserList:
if values['-user-'] == user['用户名'] and values['-pwd-'] == user['密码']:
msg = '输入正确'
break
else:
msg = '输入有误'
sg.Popup(msg)
window.close()
十三、按键元素的设定及更新方法
1. 按键元素的书写方法
sg.B('')
sg.Button('')
2. 按键元素的设定方法
sg.B('确定', image_filename=r'图片路径')
3. 按键元素的更新方法
window[key].Update()
window[key].update()
import PySimpleGUI as sg
image = b'iVBORw0KGgoAAAANSUhEUgAACMwAAAEoCAYAAACuQ/+XAAAMYmlDQ1BJQ0MgU='
layout = [
[sg.B(image_filename='/Users/alex/Downloads/python.png',key='-python-', bind_return_key=True)]
]
window = sg.Window('Python GUI', layout)
while True:
event, values = window.read()
print(event)
if event == None:
break
window.close()
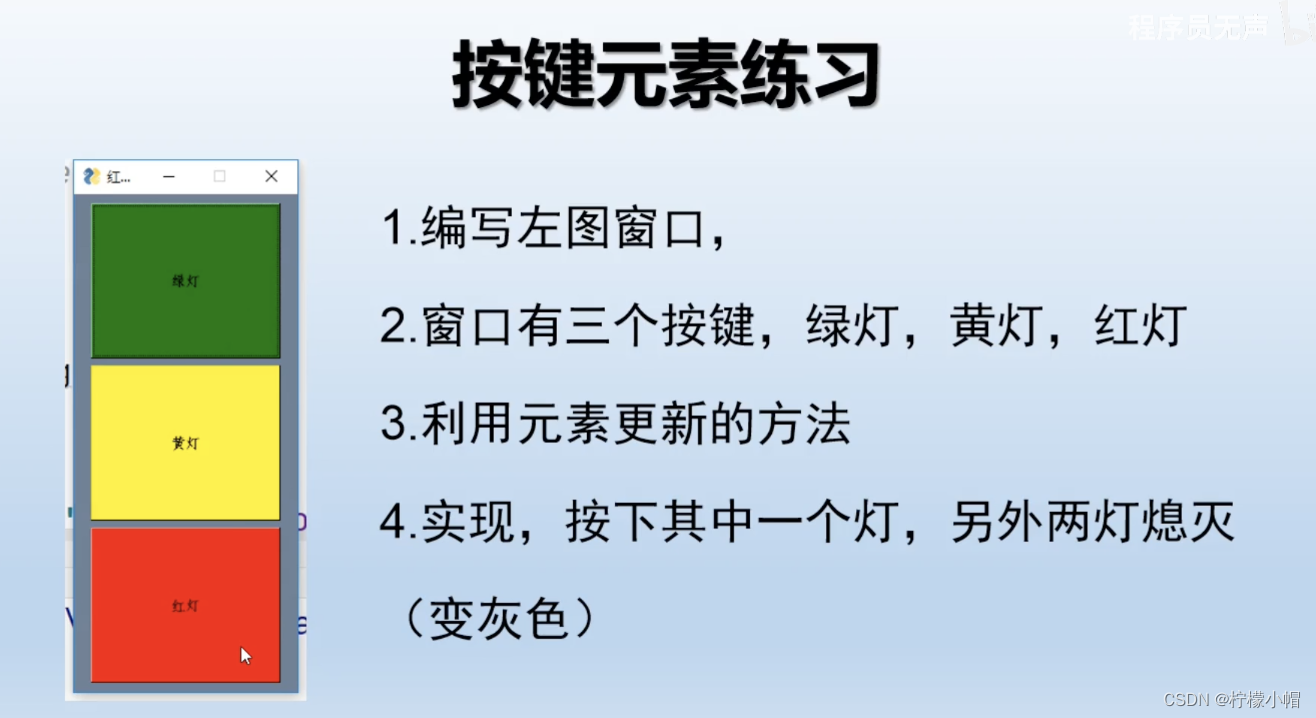
十四、编写一个红绿灯界面(*)
import PySimpleGUI as sg
layout = [
[sg.B('绿灯', key='-green-', button_color=('black','green'), size=(20,9))],
[sg.B('黄灯', key='-yellow-', button_color=('black','yellow'), size=(20,9))],
[sg.B('红灯', key='-red-', button_color=('black','red'), size=(20,9))]
]
window = sg.Window('红绿灯', layout)
while True:
event, values = window.read()
print(event)
if event == None:
break
if event == '-green-':
window["-green-"].update(button_color=('black','green'))
window["-yellow-"].update(button_color=('black', 'grey'))
window["-red-"].update(button_color=('black', 'grey'))
if event == '-yellow-':
window["-green-"].update(button_color=('black','grey'))
window["-yellow-"].update(button_color=('black', 'yellow'))
window["-red-"].update(button_color=('black', 'grey'))
if event == '-red-':
window["-green-"].update(button_color=('black','grey'))
window["-yellow-"].update(button_color=('black', 'grey'))
window["-red-"].update(button_color=('black', 'red'))
window.close()


 1395
1395


 被折叠的 条评论
为什么被折叠?
被折叠的 条评论
为什么被折叠?
 到【灌水乐园】发言


