


目录
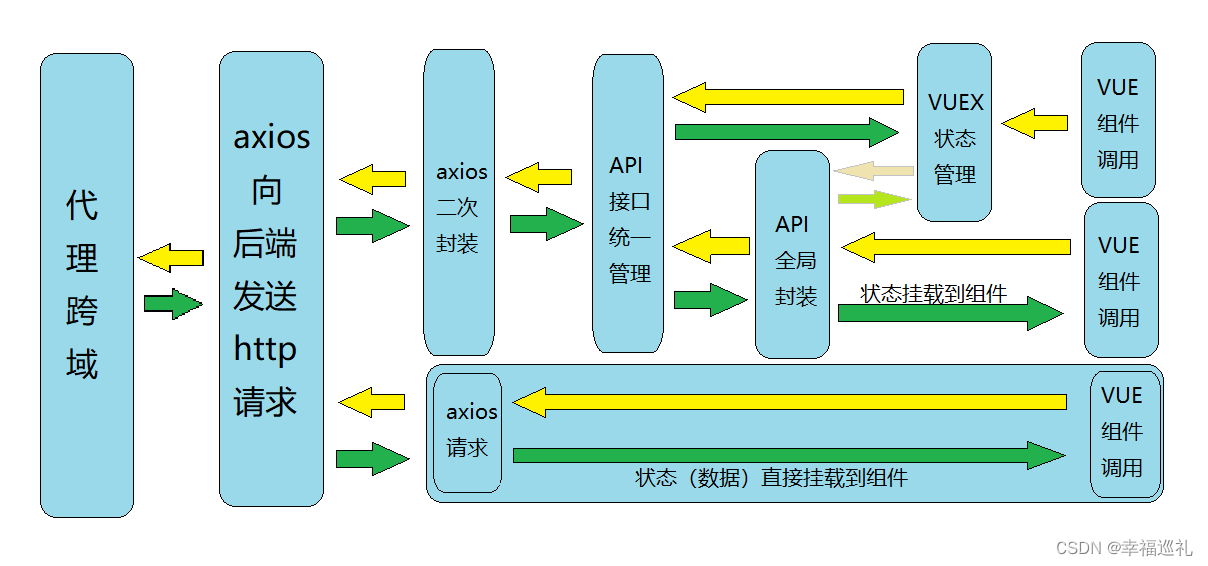
一、代理跨域
(一)为什么要代理跨域?
【前端项目通常会运行在不同的端口上,而后端API服务则运行在另一个端口上。由于浏览器的同源策略限制,直接在前端发送请求会被阻止。为了解决跨域问题,可以配置代理,将前端的请求代理到后端API的地址上。这样,在开发环境下,前端项目可以直接发送请求给代理服务器,代理服务器再将请求转发到后端API,从而实现跨域通信。】
(二)代理跨域的工作流程:
前端发起请求:前端应用发起跨域请求到同源的代理服务器上。
代理服务器接收请求:代理服务器接收到来自前端的请求。
修改请求头并转发请求:代理服务器可以修改请求头中的一些信息,比如将请求的目标地址修改为目标域名的地址。然后,代理服务器将经过修改后的请求发送给目标域名的服务器。
目标服务器响应:目标服务器收到经过代理服务器转发的请求,并根据请求处理逻辑生成响应。
代理服务器接收响应:目标服务器将生成的响应发送给代理服务器。
修改响应头并返回:代理服务器可以修改响应头中的一些信息,比如添加或修改
Access-Control-Allow-Origin等CORS相关的响应头。然后,代理服务器将经过修改后的响应返回给前端应用。前端应用接收响应:前端应用接收到经过代理服务器转发和修改后的响应。
通过代理服务器的转发,前端应用实际上是与代理服务器进行通信,而代理服务器负责将请求转发给目标域名,然后将响应返回给前端应用。由于同源策略只存在于浏览器端,代理服务器可以绕过同源策略的限制,实现跨域请求。
(三)实际案例
从这里 http://localhost:8080/ ----前端项目本地服务器
向这里发请求 http://localhost:8989/ ---- 后台服务器
//vue.config.js
const { defineConfig } = require('@vue/cli-service')
module.exports = {
  //  关闭eslint
    lintOnSave: false,
    // 代理跨域
    devServer: {
      proxy: {
        '/api': {
          target: 'http://localhost:8989',
          pathRewrite: { '^/api': '' }
        }
      }
    }
  }
/api是指代理路径前缀,即只有带有/api前缀的请求会被代理。
target指定了目标服务器地址为http://localhost:8989。
pathRewrite选项 重写路径,pathRewrite: { '^/api': '(将api改写为的路径)' } ,为空时 意味着当代理服务器收到以/api为前缀的请求时,会将其重写为不带/api前缀的路径
(四) 配置多个代理跨域
配置不同的 代理路径前缀
/dev-api、/dev-upload,即只有对应匹配的前缀的请求会被代理。
 devServer: {
    // 配置代理跨域
    proxy: {
      // 关于用户的接口
      '/dev-api': {
        target: 'http://gmall-h5-api.atguigu.cn',
        pathRewrite: { '^/dev-api': '' }
      },
       // 关于文件上传的接口
       "/dev-upload": {
        target: "http://localhost:8888",
        pathRewrite: { '^/dev-upload': '' }
      },
    },
    // mock 数据的接口
    after: require('./mock/mock-server.js')
  },
二、前端向后端发送HTTP请求的方式
(一)XMLHttpRequest
XMLHttpRequest (XHR):XHR 是一种在 AJAX 中常用的 API,它可以创建 HTTP 请求,发送请求并处理响应。XHR 可以发送 GET、POST、PUT、DELETE 等请求类型,也可以设置请求头和请求体。
//使用 XMLHttpRequest 发送 GET 请求

const xhr = new XMLHttpRequest();
xhr.open('GET', 'http://localhost:8989/data', true);
xhr.onreadystatechange = function() {
  if (xhr.readyState === XMLHttpRequest.DONE) {
    if (xhr.status === 200) {
      console.log(xhr.responseText);
    } else {
      console.error(xhr.statusText);
    }
  }
};
xhr.send();
(二)Fetch API
Fetch API 是原生的 JavaScript API,用于发送网络请求和获取资源。Fetch API 提供了一种简单、灵活的方式来发送 HTTP 请求,它使用 Promise 以异步方式处理响应。
//使用 Fetch API 发送 get 请求

fetch('http://localhost:8989/data', {
  method: 'GET',
})
  .then(response => {
    if (response.ok) {
      return response.json();
    } else {
      throw new Error('Network response was not ok');
    }
  })
  .then(data => {
    console.log(data);
  })
  .catch(error => {
    console.error(error);
  });
(三)jQuery AJAX
jQuery AJAX 是 jQuery 提供的一个 AJAX 模块,它提供了一种方便的方式来发送 HTTP 请求和处理响应。jQuery AJAX 支持 GET、POST、PUT、DELETE 等请求类型,可以设置请求头和请求体,还可以使用回调函数处理响应。
//使用 jQuery AJAX 发送 get请求

$.ajax({
  url: 'http://localhost:8989/data',
  method: 'GET',
  success: function(response) {
    console.log(response);
  },
  error: function(xhr, status, error) {
    console.error(error);
  }
});
(四)Axios(推荐使用)
Axios 是一个流行的基于 Promise 的 HTTP 客户端,可以在浏览器和 Node.js 中使用。Axios 支持所有主要的 HTTP 请求方法,自动转换 JSON 数据,可以设置请求头和请求体,还可以处理请求和响应的拦截器。
//使用 Axios 发送 get请求:

import axios from 'axios';

axios.get('http://localhost:8989/data')
  .then(response => {
    console.log(response.data);
  })
  .catch(error => {
    console.error(error);
  });
(五)在Vue.js框架中使用Axios
// 安装Axios库:npm install axios

import axios from 'axios';

export default {
  methods: {
    fetchData() {
      axios.get('http://localhost:8989/data')
        .then(response => {
          console.log(response.data);
        })
        .catch(error => {
          console.error(error);
        });
    }
  }
}
(六)优缺点对比
对比一下使用原生的XMLHttpRequest、Fetch API、Axios和jQuery AJAX这几种方法:
原生的XMLHttpRequest:
- 优点:原生支持,无需引入额外的库,适用于简单的请求。
- 缺点:语法繁琐,需要手动处理请求状态和错误处理。
Fetch API:
- 优点:现代浏览器原生支持,提供了更简洁的语法和链式调用,支持Promise,易于使用。
- 缺点:在低版本浏览器中不完全支持,需要进行polyfill或降级处理。
jQuery AJAX:
- 优点:简化了原生的XMLHttpRequest操作,提供了更简洁的语法和跨浏览器的支持,适用于旧版项目或需要兼容性处理的情况。
- 缺点:引入了额外的jQuery库,增加了项目的体积,可能不适用于使用其他框架的项目。
Axios:
- 优点:第三方库,提供了更高级的功能和配置选项,支持Promise,广泛应用于前端项目,可用于浏览器和Node.js环境。
- 缺点:需要额外引入库文件,增加了项目的体积。
三、axios进行二次封装
【作用】在请求拦截器中可以设置请求头、进行权限验证等操作;在响应拦截器中可以统一处理错误、对响应数据进行处理等。二次封装后的axios可以简化请求的编写,提高代码的可维护性和可读性。
src/api/request.js:
前端使用axios库来发送HTTP请求,并配置【请求和响应拦截器】。通过对axios进行二次封装,可以在请求发送前和响应接收后添加通用的处理逻辑。
// src/api/request.js

// 对于axios进行二次封装
import axios from 'axios';

// 1. 利用axios对象的方法create,去创建一个axios实例
// 2. request就是axios,只不过稍微配置一下
const requests = axios.create({
    // 配置对象
    // 基础路径,发请求的时候,路径当中会出现基础api
    baseURL:'/api',
    // 代表请求超时的时间5s,在5s之内没有响应就失败了
    timeout:5000,
});

// 请求拦截器:在发请求之前,请求拦截器可以检测到,可以在请求发出去之前做一些事情
requests.interceptors.request.use((config)=>{
    // config:配置对象,对象立马有一个属性很重要,headers请求头
    return config;
})

// 响应拦截器
requests.interceptors.response.use((res)=>{
    // 成功的回调函数:服务器相应数据回来以后,相应拦截器可以检测到,可以做一些事情
    return res.data;
},(error)=>{
    // 服务器响应失败的回调函数
    return Promise.reject(new Error('failed'))
})

// 对外暴露
export default requests;
四、api接口统一管理
src/api/user.js
【作用】为了方便管理和调用后端API接口,将所有的接口请求函数集中管理,统一封装,然后在需要的地方进行调用,通过接口统一管理,可以将所有的接口请求函数集中管理,避免了代码重复和维护困难的问题,同时也方便了代码的组织和扩展,便于团队协作和代码复用。
通常,接口统一管理包括以下几个步骤:
(1)创建一个 api 目录,用于存放所有的接口请求函数。
(2)在 api 目录下,创建一个 request.js 文件,用于封装 axios 实例,包括设置一些默认参数和拦截器。
(3)在 api 目录下,创建一个或多个文件,用于存放不同功能模块的接口请求函数。
(4)在需要使用接口数据的组件中,引入接口请求函数,并调用它们来获取数据或更新状态。
(一) 实现接口统一管理案例
user.js
// 当前这个模块:api进行统一管理
import requests from "./request";

// 示例:获取用户列表接口
export const getUsers = params => {
  return axios.get('/users', { params });
};

// 示例:创建用户接口
export const createUser = data => {
  return axios.post('/users', data);
};

// 其他接口...
UserList.vue (实现了接口统一管理,没有使用VUEX)
// UserList.vue

<template>
  <div>
    <h2>User List</h2>
    <ul>
      <li v-for="user in users" :key="user.id">
        {{ user.name }} - {{ user.email }}
      </li>
    </ul>
    <form @submit.prevent="createUser">
      <input type="text" v-model="name" placeholder="name">
      <input type="email" v-model="email" placeholder="email">
      <button type="submit">Create User</button>
    </form>
  </div>
</template>

<script>
import { getUsers, createUser } from "@/api/user";

export default {
  data() {
    return {
      users: [],
      name: "",
      email: "",
    };
  },
  methods: {
    fetchUsers() {
      getUsers().then((response) => {
        this.users = response.data;
      });
    },
    createUser() {
      createUser({ name: this.name, email: this.email }).then(() => {
        this.fetchUsers();
        this.name = "";
        this.email = "";
      });
    },
  },
  mounted() {
    this.fetchUsers();
  },
};
</script>
在这个案例中,通过
api.js统一管理了所有的接口请求函数,并将其导出。在组件中,使用这些导出的函数来发送 HTTP 请求,来获取数据和更新状态。
(二) 没有实现接口统一管理的案例
UserList.vue
// UserList.vue

<template>
  <div>
    <h2>User List</h2>
    <ul>
      <li v-for="user in users" :key="user.id">
        {{ user.name }} - {{ user.email }}
      </li>
    </ul>
    <form @submit.prevent="createUser">
      <input type="text" v-model="name" placeholder="name">
      <input type="email" v-model="email" placeholder="email">
      <button type="submit">Create User</button>
    </form>
  </div>
</template>

<script>
import axios from "axios";

export default {
  data() {
    return {
      users: [],
      name: "",
      email: "",
    };
  },
  methods: {
    fetchUsers() {
      axios.get('/users').then((response) => {
        this.users = response.data;
      });
    },
    createUser() {
      axios.post('/users', { name: this.name, email: this.email }).then(() => {
        this.fetchUsers();
        this.name = "";
        this.email = "";
      });
    },
  },
  mounted() {
    this.fetchUsers();
  },
};
</script>
在这个案例中,没有统一管理接口请求函数,而是在组件中直接使用
axios库来发送 HTTP 请求。
五、状态管理的方式(挂载数据的方式)
在 Vue 项目中,可以选择使用 Vuex 或将状态直接挂载到组件来实现状态管理的方式。
【Vuex】 是官方推荐的用于状态管理的库,它提供了一个集中式的存储容器,用于管理应用程序的所有组件的状态数据。通过使用 Vuex,你可以将状态独立于组件,并实现在组件之间共享和修改数据的能力。Vuex 提供了一些核心概念如 state、mutations、actions 和 getters,以及一些额外的功能如模块化、插件等。
【直接挂载到组件】除了使用 Vuex,在VUE2.x 可以直接将状态数据挂载到每个组件上作为组件的实例属性。通过这种方式,每个组件都有自己的状态数据,并且负责管理自己的状态。 【注意】Vue.observable 是 Vue.js 3.0 新增的一个 API,用于创建可响应式的对象。与 Vuex 不同,Vue.observable 可以直接在组件中使用,不需要额外的安装和配置,可以方便地实现简单的状态管理逻辑。
【使用场景】Vue.js 2.x 中可以直接将状态数据挂载到每个组件上,但适用于简单的状态管理场景,而对于复杂的状态管理需求,建议使用 Vuex 等状态管理库来进行管理。
通过一个案例来展示使用 Vuex 和直接挂载到组件之间的区别
(一)使用 Vuex 的示例:
1、在项目中安装 Vuex:
npm install vuex
2、在入口文件(main.js)引入总仓库并注册仓库(在src下store文件夹)
//引入总仓库并注册
import store from './store'

new Vue({
  // 注册仓库:组件实例的身上会多一个属性$store属性
  store,
  render: h => h(App)
}).$mount('#app')3、在src下store文件夹index.js 中引入Vuex和小仓库(在src下store文件夹下新建use文件夹-index.js 用来存储user的状态数据)
import Vuex from 'vuex';引入小仓库
import user from './user'store/index.js 如下:
import Vue from 'vue'
import Vuex from 'vuex'

Vue.use(Vuex)

// 引入小仓库
import user from './user'


// 对外暴露Store类的一个实例

export default new Vuex.Store ({
    // 实现Vuex仓库模块式开发存储数据
    modules:{
       user,

    }

});
4、新建user仓库,通过vuex发起ajax请求,将数据存储在仓库中
import { getUsers, createUser } from '@/api';
// state【仓库当中的商品】 (提供唯一的公共数据源)数据状态
const state = {
    users: [] // 用户列表
}
// mutations【操作商品的工人】 函数,同步操作(用于变更store中的数据)不能执行异步操作,延时器
const mutations = {
    setUsers(state, users) {
        state.users = users;
    },
    addUser(state, user) {
        state.users.push(user);
    }

}
// actions【发送命令的老板】 用于处理异步任务,必须通过context.commit()触发某个mutations方式间接的变更数据。
const actions = {
    fetchUsers(context, params) {
        return getUsers(params)
            .then(response => {
                context.commit('setUsers', response.data);
            })
            .catch(error => {
                console.error('Failed to fetch users:', error);
            });
    },
    addUser(context, data) {
        return createUser(data)
            .then(response => {
                context.commit('addUser', response.data);
            })
            .catch(error => {
                console.error('Failed to create user:', error);
            });
    }

}
//  getters【二次加工】  (用于对store中的数据进行加工处理形成新的数据)(不会修改state中的数据)
const getters = {
    getUsers(state) {
        return state.users;
    }

}

export default {
    state,
    actions,
    mutations,
    getters
}
5、现在仓库已经有数据了,在组件中引入仓库中的数据并使用
<template>
  <div>
    <h2>User List</h2>
    <ul>
      <li v-for="user in users" :key="user.id">
        {{ user.name }} - {{ user.email }}
      </li>
    </ul>
    <form @submit.prevent="createUser">
      <input type="text" v-model="name" placeholder="name">
      <input type="email" v-model="email" placeholder="email">
      <button type="submit">Create User</button>
    </form>
  </div>
</template>

<script>
import { mapActions, mapGetters } from "vuex";

export default {
  computed: {
    // 映射 `getUsers` getter 到组件的 `users` 计算属性
    ...mapGetters(["getUsers"]),
  },
  methods: {
    // 映射 `fetchUsers` 和 `addUser` actions 到组件的方法
    ...mapActions(["fetchUsers", "addUser"]),
    createUser() {
      this.addUser({ name: this.name, email: this.email });
      this.name = "";
      this.email = "";
    },
  },
  data() {
    return {
      name: "",
      email: "",
    };
  },
  mounted() {
    // 在组件挂载时获取用户列表数据
    this.fetchUsers();
  },
};
</script>
【扩展知识】在 Vue 组件中,可以通过以下几种方式调用 Vuex 中的 actions:
1、使用
mapActions辅助函数将 actions 映射为组件的方法:import { mapActions } from "vuex"; export default { methods: { // 将 "fetchData" 和 "updateData" actions 映射为组件的方法 ...mapActions(["fetchData", "updateData"]), handleClick() { // 调用 "fetchData" action this.fetchData(); }, }, };2、使用
this.$store.dispatch方法调用 actions:export default { methods: { handleClick() { // 调用 "fetchData" action this.$store.dispatch("fetchData"); }, }, };3、直接在 actions 中调用其他 actions:
export default {
  actions: {
    fetchData({ commit, dispatch }) {
      // 异步请求数据
      // 在请求成功后调用 updateData action 更新数据
      dispatch("updateData", data);
    },
    updateData({ commit }, data) {
      // 更新数据
      commit("SET_DATA", data);
    },
  },
};
【注意】一般来说,
(1)如果需要在组件中调用多个 actions,使用
mapActions可能更加合适;(2)如果只需要调用一个 action,或者需要在 action 中调用其他 actions,使用
this.$store.dispatch可能更加合适。
所以可以通过 this.$store.dispatch 来调用 Vuex 中的 actions,而不需要使用 mapActions 辅助函数将 actions 映射为组件的方法。因此,可以将原来使用 mapActions 映射的代码:
methods: {
  ...mapActions(["fetchUsers", "addUser"]),
  createUser() {
    this.addUser({ name: this.name, email: this.email });
    this.name = "";
    this.email = "";
  },
},
改为使用 this.$store.dispatch:
methods: {
  fetchUsers() {
    this.$store.dispatch("fetchUsers");
  },
  addUser() {
    this.$store.dispatch("addUser", { name: this.name, email: this.email });
    this.name = "";
    this.email = "";
  },
},
这样可以减少代码的复杂度,使代码更加简洁。注意,使用 this.$store.dispatch 调用 actions 时,需要传递一个包含 type 和 payload 属性的对象作为参数,其中 type 表示 action 的名称,payload 表示要传递给 action 的数据。
(二)状态直接挂载到组件实例上的方式来实现状态管理
在Vue组件中,可以使用
data属性来定义组件的初始状态。当组件被创建时,这些初始状态将会被挂载到组件实例上,并且可以通过this关键字来访问和修改这些状态。
// UserList.vue

<template>
  <div>
    <h2>User List</h2>
    <ul>
      <li v-for="user in users" :key="user.id">
        {{ user.name }} - {{ user.email }}
      </li>
    </ul>
    <form @submit.prevent="createUser">
      <!-- 输入框用于输入用户的姓名 -->
      <input type="text" v-model="name" placeholder="姓名">
      <!-- 输入框用于输入用户的电子邮件 -->
      <input type="email" v-model="email" placeholder="电子邮件">
      <!-- 提交按钮,点击后创建新用户 -->
      <button type="submit">创建用户</button>
    </form>
  </div>
</template>


<script>
import { getUsers, createUser } from "@/api/user";

export default {
  data() {
    return {
      users: [], // 用户列表
      name: "", // 用户姓名
      email: "", // 用户电子邮件
    };
  },
  methods: {
    fetchUsers() {
      // 获取用户列表
      getUsers().then((response) => {
        this.users = response.data;
      });
    },
    createUser() {
      // 创建新用户
      createUser({ name: this.name, email: this.email }).then(() => {
        this.fetchUsers();
        this.name = "";
        this.email = "";
      });
    },
  },
  mounted() {
    this.fetchUsers(); // 组件挂载后自动获取用户列表
  },
};
</script>
在给定的代码示例中,
data函数被用来定义了组件的初始状态:
data() {
  return {
    users: [], // 用户列表
    name: "", // 用户姓名
    email: "", // 用户电子邮件
  };
},
在
data函数内部,返回一个对象,该对象包含了组件的初始状态,即users、name和例如,在
fetchUsers()方法中,我们通过this.users访问和修改users状态:
fetchUsers() {
  getUsers().then((response) => {
    this.users = response.data; // 修改users状态
  });
},
同样,我们在
createUser()方法中使用this.name和this.email来访问和修改name和
createUser() {
  createUser({ name: this.name, email: this.email }).then(() => {
    this.fetchUsers();
    this.name = ""; // 清空name状态
    this.email = ""; // 清空email状态
  });
},
由于状态直接被挂载到组件实例上,因此可以在组件的其他方法和生命周期钩子中使用和修改这些状态。通过修改这些状态,Vue会自动更新DOM,以反映出新的状态。
这种方式实现了简单的状态管理,使得组件内部可以维护和控制自己的状态,并且具有响应式的特性,即当状态发生改变时,相关的视图会自动更新。
六、全局封装api
main.js :
【全局封装api】:为了在组件中方便地使用API接口,可以将API接口封装为全局对象,并挂载到Vue实例的原型上。这样,在组件中就可以通过this.$api访问到API接口。
全局封装API的好处是,在状态直接挂载到组件实例上的方式,在组件中无需频繁地引入和管理API接口文件,从而简化了代码结构,提高了开发效率。
import Vue from 'vue'
import App from './App.vue'
import router from './router'
import store from './store'

import ElementUI from 'element-ui';
import 'element-ui/lib/theme-chalk/index.css';

Vue.use(ElementUI);

//统一引入所有的api
import * as API from '@/api' ;

Vue.config.productionTip = false

new Vue({
  router,
  store,
   beforeCreate(){
    //所有的 API 并将其挂载到 Vue.prototype 上
    Vue.prototype.$API = API;
  },
  render: h => h(App)
}).$mount('#app')
(一)不配置全局封装api
如果项目不配置全局封装api ,在项目中有 user.js 、 order.js、product.js 等其他功能模块的接口请求函数,那么如果需要使用的时候就需要引入多个接口请求函数,例如:
import { getUsers, createUser } from "@/api/user";
import { getCartList, addCartItem} from "@/api/cart";
(二)配置全局封装api 组件的使用
如果项目配置了全局封装api ,在任何组件中可以不用引入而直接使用使用this.
$api对象来调用 API 接口。例如,在某个组件中可以这样使用:
export default {
  // ...
  methods: {
    getUsers() {
      this.$api.getUsers({ page: 1, pageSize: 10 })
        .then(response => {
          // 处理响应数据
        })
        .catch(error => {
          // 处理错误
        });
    },
    createUser() {
      const data = { name: 'John', age: 18 };
      this.$api.createUser(data)
        .then(response => {
          // 处理响应数据
        })
        .catch(error => {
          // 处理错误
        });
    },
    // 其他方法...
  },
};
七、全局事件总线$bus
【全局事件总线bus】:全局事件总线是一个事件调度中心,用于实现组件之间的通信。 在Vue中,可以通过全局事件总线bus来实现组件之间的数据传递或方法调用。
(1)任何一个组件都可以通过bus.bus.emit()方法发送事件,
(2)其他组件则可以通过bus.bus.on()方法监听并响应该事件。
这样,就实现了解耦和灵活的组件通信方式。
在 main.js 文件中,我们将一个新的 Vue 实例 $bus 挂载到 Vue.prototype 上:
import Vue from 'vue'
import App from './App.vue'


import router from './router'

//引入总仓库并注册
import store from './store'

//引入ElementUI及样式
import ElementUI from 'element-ui';
import 'element-ui/lib/theme-chalk/index.css';

//统一引入所有的api
import * as API from '@/api' ;


Vue.use(ElementUI);

Vue.config.productionTip = false

new Vue({
  router,
  // 注册仓库:组件实例的身上会多一个属性$store属性
  store,
  beforeCreate(){
    // 全局事件总线
    Vue.prototype.$bus = this;
    Vue.prototype.$API = API;
  },
  render: h => h(App)
}).$mount('#app')
然后,在组件 A 中触发一个事件,并传递一些数据:
export default {
  methods: {
    handleClick() {
      this.$bus.$emit('event-name', { key: 'value' });
    },
  },
};
在上述代码中,我们通过 $bus.$emit 方法触发了一个名为 event-name 的事件,并传递了一个对象 { key: 'value' }。接下来,在组件 B 中监听该事件,并在事件触发时响应:
export default {
  mounted() {
    this.$bus.$on('event-name', (data) => {
      console.log(data); // { key: 'value' }
    });
  },
};
在上述代码中,我们通过 $bus.$on 方法监听了 event-name 事件,并在事件触发时打印了传递的数据对象 { key: 'value' }。
【需要注意的是】在应用程序的生命周期中,全局事件总线 $bus 始终存在,因此需要及时清理不再需要的事件监听,以避免内存泄漏问题。可以通过 $bus.$off 方法来取消事件监听,或者在组件销毁时自动取消事件监听。例如,在组件 B 中销毁时取消事件监听:
export default {
  mounted() {
    this.$bus.$on('event-name', this.handleEvent);
  },
  beforeDestroy() {
    this.$bus.$off('event-name', this.handleEvent);
  },
  methods: {
    handleEvent(data) {
      console.log(data);
    },
  },
};
在上述代码中,我们在组件 B 的 mounted 钩子函数中通过 $bus.$on 方法监听了 event-name 事件,并将事件响应函数 handleEvent 作为回调函数。在组件 B 被销毁之前,我们在 beforeDestroy 钩子函数中通过 $bus.$off 方法取消了事件监听。
这样,在组件销毁时就会自动取消事件监听,避免了内存泄漏问题。


 3151
3151


 被折叠的 条评论
为什么被折叠?
被折叠的 条评论
为什么被折叠?
 到【灌水乐园】发言


