


环境是xcode4.3
首先要弄懂几个基本的概念。
一)三个结构体:CGPoint、CGSize、CGRect
1. CGPoint

- /* Points. */
- struct CGPoint {
- CGFloat x;
- CGFloat y;
- };
- typedef struct CGPoint CGPoint;
看到这个想必你已经懂了,不再解释。
2. CGSize
- /* Sizes. */
- struct CGSize {
- CGFloat width;
- CGFloat height;
- };
- typedef struct CGSize CGSize;
不解释。
3.CGRect
- /* Rectangles. */
- struct CGRect {
- CGPoint origin;//偏移是相对父窗口的
- CGSize size;
- };
- typedef struct CGRect CGRect;
同样 不解释。
这三个结构体均在一个头文件里:CGGeometry.h
二)几个方法
1.CGRectMake
- CG_INLINE CGRect
- CGRectMake(CGFloat x, CGFloat y, CGFloat width, CGFloat height)
- {
- CGRect rect;
- rect.origin.x = x; rect.origin.y = y;
- rect.size.width = width; rect.size.height = height;
- return rect;
- }
没错,这个方法就是make一个rect,定好origin(起点,左上角),宽与高,就可以画出一个位置与大小确定的rect(矩形)这个函数被声明为内联函数,一是因为它比较小,二是因为在画界面时我们要求一定的效率。这个函数还是藏在刚刚那个头文件里面:CGGeometry.h
三)几个基本界面元素:window(窗口)、视图(view)
要在屏幕上显示内容首先要创建一个窗口承载内容,要创建一个窗口,需要一个边框(frame),含有边框信息的底层 结构就CGRect。每个能够在屏幕上显示自己的对象都有一个边框,定义了他的显示区域,不过许多高层的视图类会自动计算这一信息。其他的那些类则在视图初始化时通过一个initWithFrame的初始化方法来设置。
再来认识一个类:UIScreen。UIScreen类代表了屏幕,通过这个类我们可以获取一些想要的东东。
- CGrect screenBounds = [ [UIScreen mainScreen]bounds];//返回的是带有状态栏的Rect
- CGRect viewBounds = [ [UIScreen mainScreen]applicationFrame];//不包含状态栏的Rect
- //screenBounds 与 viewBounds 均是相对于设备屏幕来说的
- //所以 screenBounds.origin.x== 0.0 ; screenBounds.oringin.y = 0.0;
- screenBounds.size.width == 320; screenBounds.size.height == 480(或者其他分辨率有所差异)
- //所以 screenBounds.origin.x== 0.0 ; screenBounds.oringin.y = 20.0;(因为状态栏的高度是20像素) screenBounds.size.width == 320; screenBounds.size.height == 480
UIView
下面来认识一下UIView类,这个类继承自UIResponder,看这个名字我们就知道它是负责显示的画布,如果说把window比作画框的话。我们就是不断地在画框上移除、更换或者叠加画布,或者在画布上叠加其他画布,大小当然 由绘画者来决定了。有了画布,我们就可以在上面任意施为了。很多简单的东西我会把库里面的内容贴出来,如果东西太多贴出来就不太好,朋友们自己去库文件里面看吧。这个类在UIView.h里面。下面我们先学习一些基础的东西,其他的东东会在以后慢慢展开。
- UIView* myView =[[ UIView alloc]initWithFrame:CGRectMake(0.0,0.0,200.0,400.0)];//这里创建了一块画布,定义了相对于父窗口的位置, 以及大小。
我们可以把这块画布加到其他画布上,具体方法后面会讲到。我们还可以在这块画布上画上其它好玩的东东,具体情形后面会一一讲解。
UIWindow
UIWindow继承自UIView,关于这一点可能有点逻辑障碍,画框怎么继承自画布呢?不要过于去专牛角尖,画框的形状不就是跟画布一样吗?拿一块画布然后用一些方法把它加强,是不是可以当一个画框用呢?这也是为什么 一个view可以直接加到另一个view上去的原因了。
看一下系统的初始化过程(在application didFinishLauchingWithOptions里面):
- self.window = [[[UIWindow alloc] initWithFrame:[[UIScreen mainScreen] bounds]] autorelease];
- self.window.backgroundColor = [UIColor grayColor];//给window设置一个背景色
- [self.window makeKeyAndVisible];//让window显示出来
实战演练:
没结束我会用一个综合的 例子来总结我的学习成果,彻底理解所学,我觉得既然选择写代码,就要理解原理,否则只知其然不知其所以然是不能做一个好的程序员的。
1)新建一个工程选择Empty Application 名字为LW1
2)在application didFinishLaunchingWithOptions里面,你会发现系统已经建好一个画框了,我们现在就用系统帮我们建好的画框,你当然也可以自己建一个画框,不过没这个必要了,忘了讲了,一个应用程序只能有一个画框。
- - (BOOL)application:(UIApplication *)application didFinishLaunchingWithOptions:(NSDictionary *)launchOptions
- {
- self.window = [[UIWindow alloc] initWithFrame:[[UIScreen mainScreen] bounds]];
- // Override point for customization after application launch.
- CGRect bound = [[UIScreen mainScreen]bounds];
- NSLog(@"boundwith:%f boundheight:%f",bound.size.width,bound.size.height);
- NSLog(@"boundx:%f boundy:%f",bound.origin.x,bound.origin.y);
- CGRect appBound = [[UIScreen mainScreen]applicationFrame];
- NSLog(@"appBoundwith:%f boundheight:%f",appBound.size.width,appBound.size.height);
- NSLog(@"appBoundx:%f boundy:%f",appBound.origin.x,appBound.origin.y);
- //画第一块画布然涂成蓝色,大小是320 X 100
- CGRect CGone = CGRectMake(0.0, 0.0, 320, 100);//画个矩形,初始化位置与大小
- UIView *v_one = [[UIView alloc]initWithFrame:CGone];//初始化view
- v_one.backgroundColor = [UIColor blueColor];// 涂成蓝色
- [self.window addSubview:v_one];//直接加到画框上
- //第二块注意它的位置
- CGRect CGtwo = CGRectMake(0.0, 100, 160, 100);//画个矩形、初始化位置与大小
- UIView *v_two = [[UIView alloc]initWithFrame:CGtwo];//初始化view
- v_two.backgroundColor = [UIColor redColor];//涂成红色
- [self.window addSubview:v_two];//叠加到画框
- //第三块注意他的位置
- CGRect CGthree = CGRectMake(160, 100, 160, 100);//
- UIView *v_three = [[UIView alloc]initWithFrame:CGthree];//
- v_three.backgroundColor = [UIColor greenColor];//
- [self.window addSubview:v_three];//
- //第四块注意它的位置
- CGRect CGfour = CGRectMake(0.0, 260, 320, 200);//
- UIView *v_four = [[UIView alloc]initWithFrame:CGfour];//
- v_four.backgroundColor = [UIColor orangeColor];//
- [self.window addSubview:v_four];//
- //第五块,计算一下它的位置,看看它的效果,
- //你可以让试一下把这段代码移到第一快初始化的上面试试,会有意想不到的效果
- CGRect CGfive = CGRectMake(100, 150, 160, 200);
- UIView *v_five = [[UIView alloc]initWithFrame:CGfive];
- v_five.backgroundColor = [UIColor yellowColor];
- [self.window addSubview:v_five];
- self.window.backgroundColor = [UIColor grayColor];//
- [self.window makeKeyAndVisible];//
- //最后记得release
- v_one = nil;
- v_two = nil;
- v_three = nil;
- v_four = nil;
- v_five = nil;
- return YES;
- //self.window.backgroundColor = [UIColor whiteColor];
- //[self.window makeKeyAndVisible];
- //return YES;
- }
来源:http://blog.csdn.net/iukey/article/details/7083165
取得画面工作区域的大小
iOS 可以在很多 Apple 的装置上执行,然而每个装置所提供的工作区域大小 Application Frame 也不尽香同,下面提供一个简单的方法,帮助你可以快速找出目前工作区域的画面的大小,程式码如下。
首先是状态列 Status Bar 的部份。
- //取得StatusBar的位置和大小
- [self.view addSubview:theToolbar];
- CGRect statusBarRect = [[UIApplication sharedApplication]statusBarFrame];
- NSLog(@\"%@\", NSStringFromCGRect(statusBarRect));
再来是可工作区域的大小,如果你的应用程式包含状态列,那么可工作区域的大小就会是整个画面的减去状态列所剩下的区域。
- //取得工作区域的位置和大小
- CGRect workSpaceRect = [[UIScreen mainScreen]applicationFrame];
- NSLog(@\"%@\", NSStringFromCGRect(workSpaceRect));
最后就是整个画面的大小。
- //取得整个画面的位置和大小
- CGRect windowRect = [[UIScreen mainScreen]bounds];
- NSLog(@\"%@\", NSStringFromCGRect(windowRect));
上述程式码皆是将取得的大小范围资讯储存在 CGRect 型态的变数中,再将此变数以字串的方式显示出来。
来源:http://furnacedigital.blogspot.com/2011/10/blog-post_13.html
一些 UIView 中管理 Subview 常用的方法
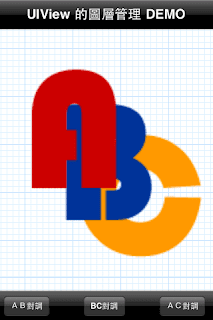
一个 UIView 里面可以包含许多的 Subview(其他的 UIView),而这些 Subview 彼此之间是有所谓的阶层关系,这有点类似绘图软体中图层的概念,下面程式码示演示了几个在管理图层(Subview)上常用的方法,其程式码如下。
首先是大家最常使用的新增和移除 Subview。
- //将Subview从当前的UIView中移除
- [Subview removeFromSuperview];
- //替UIView增加一个Subview
- [UIView addSubview:Subview];
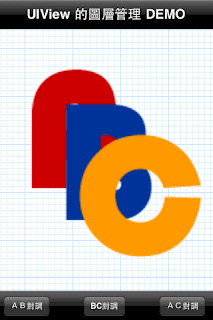
在 UIView 中将 Subview 往前或是往后移动一个图层,往前移动会覆盖住较后层的 Subview,而往后移动则会被较上层的 Subview 所覆盖。
- //将Subview往前移动一个图层(与它的前一个图层对调位置)
- [UIView bringSubviewToFront:Subview];
- //将Subview往后移动一个图层(与它的后一个图层对调位置)
- [UIView sendSubviewToBack:Subview];
在 UIView 中使用索引 Index 交换两的 Subview 彼此的图层层级。
- //交换两个图层
- [UIView exchangeSubviewAtIndex:indexA withSubviewAtIndex:indexB];
使用 Subview 的变数名称取得它在 UIView 中的索引值(Index )。
- //取得Index
- NSInteger index = [[UIView subviews] indexOfObject:Subview名称];
替 Subview 加上 NSInteger 的註记 (Tag),好让之后它们分辨彼此。
- //加上註记
- [Subview setTag:NSInteger];
最后是取得 UIView 中所有的 Subview,呼叫此方法会传回一个 NSArray,并以由后往前的顺序列出这些 Subview,下图中是列出范例图片里 Root 中所有的 Subview。
- //取的UIView下的所有Subview
- [UIView subviews]


 6121
6121

 被折叠的 条评论
为什么被折叠?
被折叠的 条评论
为什么被折叠?
 到【灌水乐园】发言


