


一、mybatis-generator介绍
mybatis-geneator 是一款 mybatis 自动代码生成工具,生成的文件包含三类:
(1)Model实体文件,一个数据库表对应生成一个 Model 实体;
(2)Mapper接口文件Dao,数据数操作方法都在此接口中定义;
(3)Mapper 和 XML 配置文件
二、mybatis-generator集成
1.在pom.xml文件中添加依赖
pom.xml文件
<?xml version="1.0" encoding="UTF-8"?>
<project xmlns="http://maven.apache.org/POM/4.0.0" xmlns:xsi="http://www.w3.org/2001/XMLSchema-instance"
xsi:schemaLocation="http://maven.apache.org/POM/4.0.0 https://maven.apache.org/xsd/maven-4.0.0.xsd">
<modelVersion>4.0.0</modelVersion>
<parent>
<groupId>org.springframework.boot</groupId>
<artifactId>spring-boot-starter-parent</artifactId>
<version>2.7.5</version>
<relativePath/> <!-- lookup parent from repository -->
</parent>
<groupId>com.hng</groupId>
<artifactId>example</artifactId>
<version>0.0.1-SNAPSHOT</version>
<name>example</name>
<description>Demo project for Spring Boot</description>
<properties>
<java.version>17</java.version>
</properties>
<dependencies>
<dependency>
<groupId>org.springframework.boot</groupId>
<artifactId>spring-boot-starter-data-jpa</artifactId>
</dependency>
<dependency>
<groupId>org.springframework.boot</groupId>
<artifactId>spring-boot-starter-web</artifactId>
</dependency>
<dependency>
<groupId>com.mysql</groupId>
<artifactId>mysql-connector-j</artifactId>
<scope>runtime</scope>
</dependency>
<dependency>
<groupId>org.springframework.boot</groupId>
<artifactId>spring-boot-starter-test</artifactId>
<scope>test</scope>
</dependency>
<dependency>
<groupId>org.mybatis.spring.boot</groupId>
<artifactId>mybatis-spring-boot-starter</artifactId>
<version>2.1.4</version>
</dependency>
</dependencies>
<build>
<plugins>
<plugin>
<groupId>org.apache.maven.plugins</groupId>
<artifactId>maven-compiler-plugin</artifactId>
<configuration>
<source>15</source>
<target>15</target>
</configuration>
</plugin>
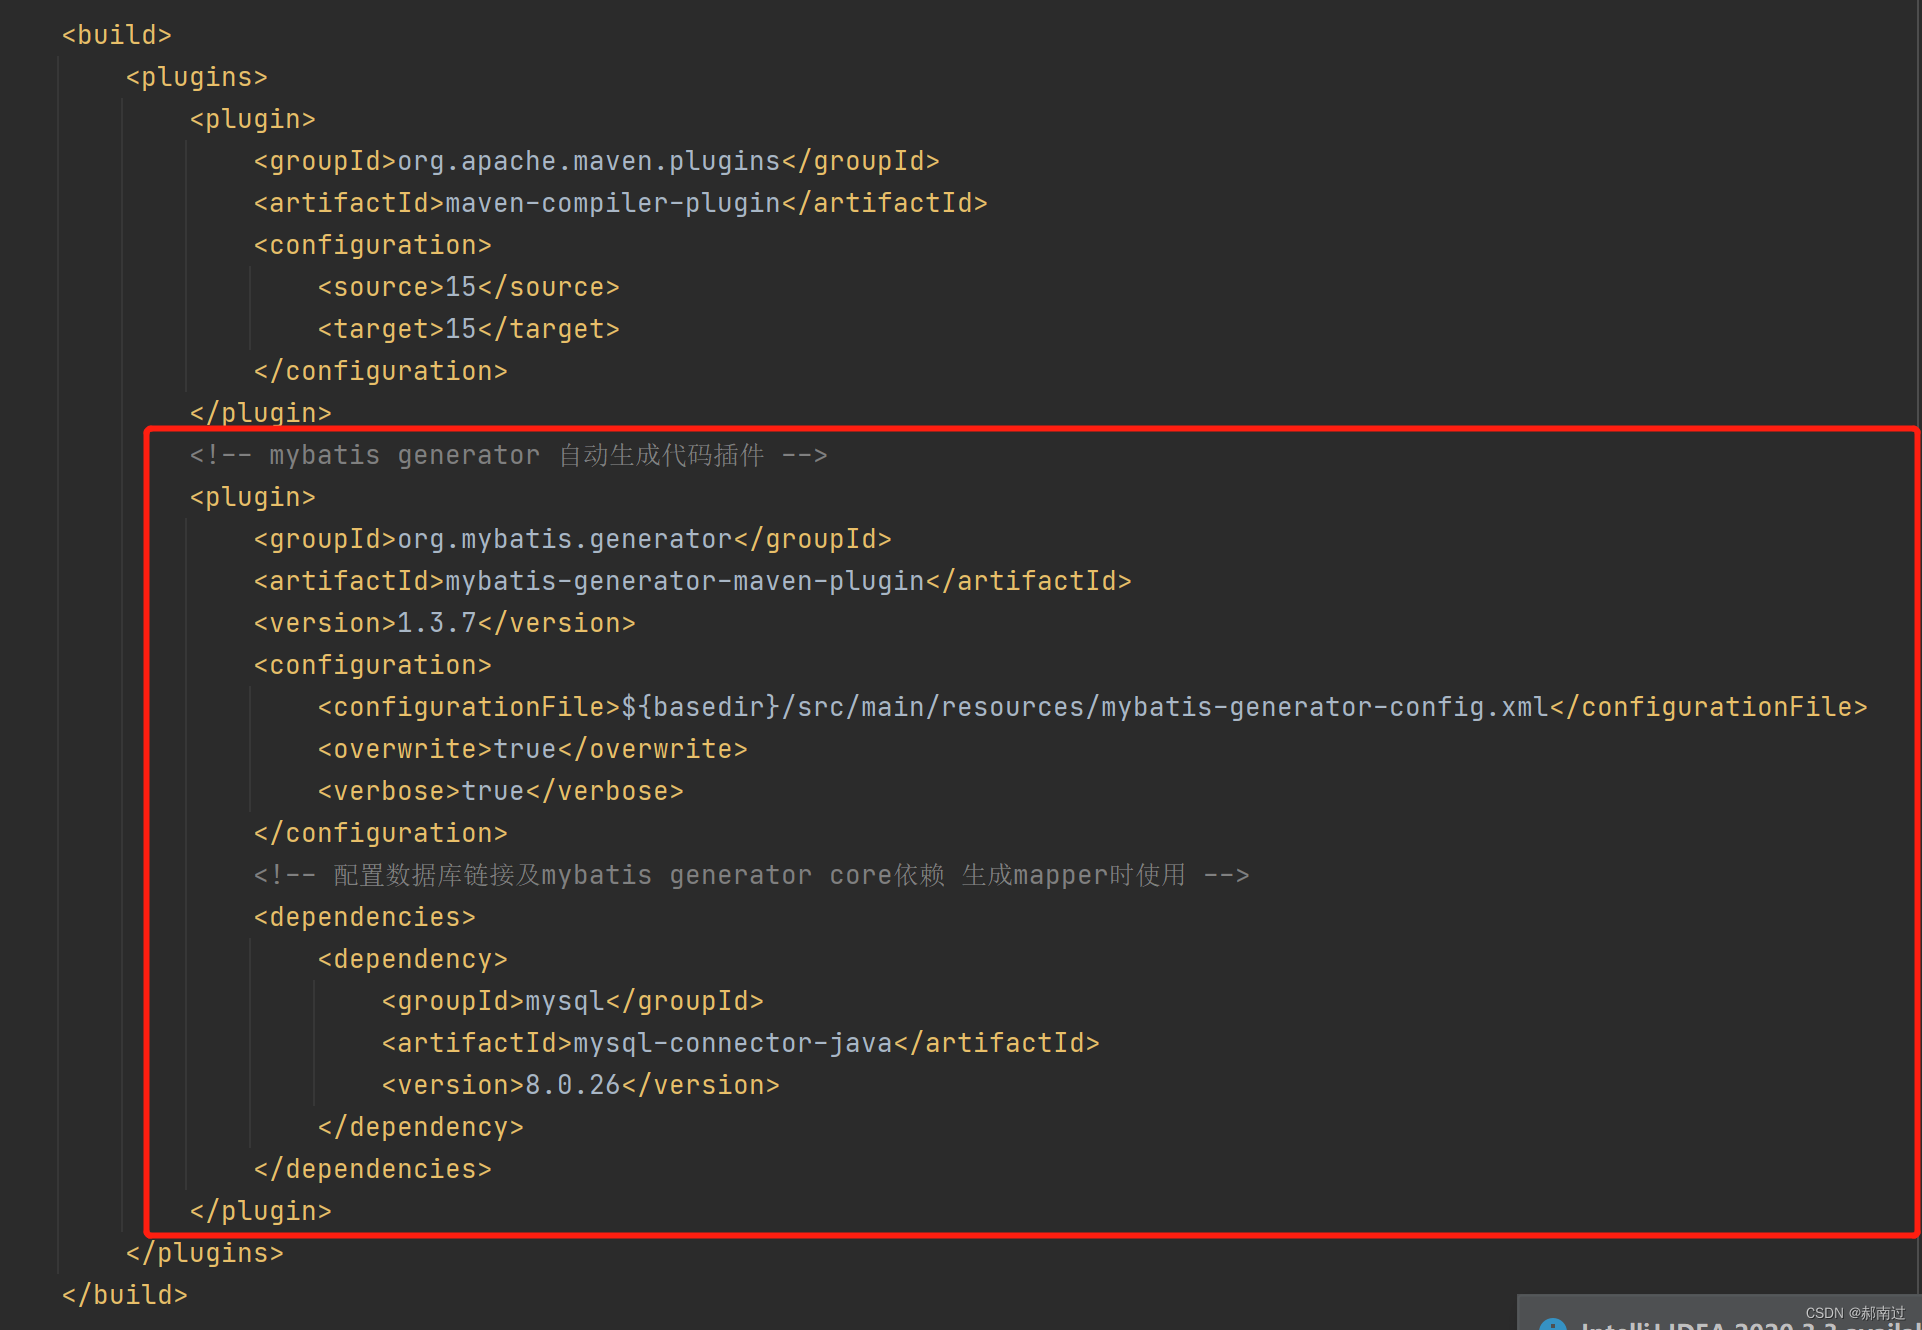
<!-- mybatis generator 自动生成代码插件 -->
<plugin>
<groupId>org.mybatis.generator</groupId>
<artifactId>mybatis-generator-maven-plugin</artifactId>
<version>1.3.7</version>
<configuration>
<configurationFile>${basedir}/src/main/resources/mybatis-generator-config.xml</configurationFile>
<overwrite>true</overwrite>
<verbose>true</verbose>
</configuration>
<!-- 配置数据库链接及mybatis generator core依赖 生成mapper时使用 -->
<dependencies>
<dependency>
<groupId>mysql</groupId>
<artifactId>mysql-connector-java</artifactId>
<version>8.0.26</version>
</dependency>
</dependencies>
</plugin>
</plugins>
</build>
</project>2.创建mybatis-generator-config.xml文件
<?xml version="1.0" encoding="UTF-8" ?>
<!DOCTYPE generatorConfiguration PUBLIC "-//mybatis.org//DTD MyBatis Generator Configuration 1.0//EN"
"http://mybatis.org/dtd/mybatis-generator-config_1_0.dtd">
<generatorConfiguration>
<!--导入配置文件-->
<properties resource="application.properties"></properties>
<!--导入本地mysql jar-->
<!-- <classPathEntry-->
<!-- location="D:\0_Works\tools\libs\mysql-connector-java-8.0.21\mysql-connector-java-8.0.21.jar" />-->
<!-- 一个数据库一个context -->
<context id="default">
<!-- 注释生成设置 -->
<commentGenerator>
<!-- 是否生成注释代时间戳-->
<property name="suppressDate" value="true" />
<!-- 是否取消注释 -->
<property name="suppressAllComments" value="true" />
</commentGenerator>
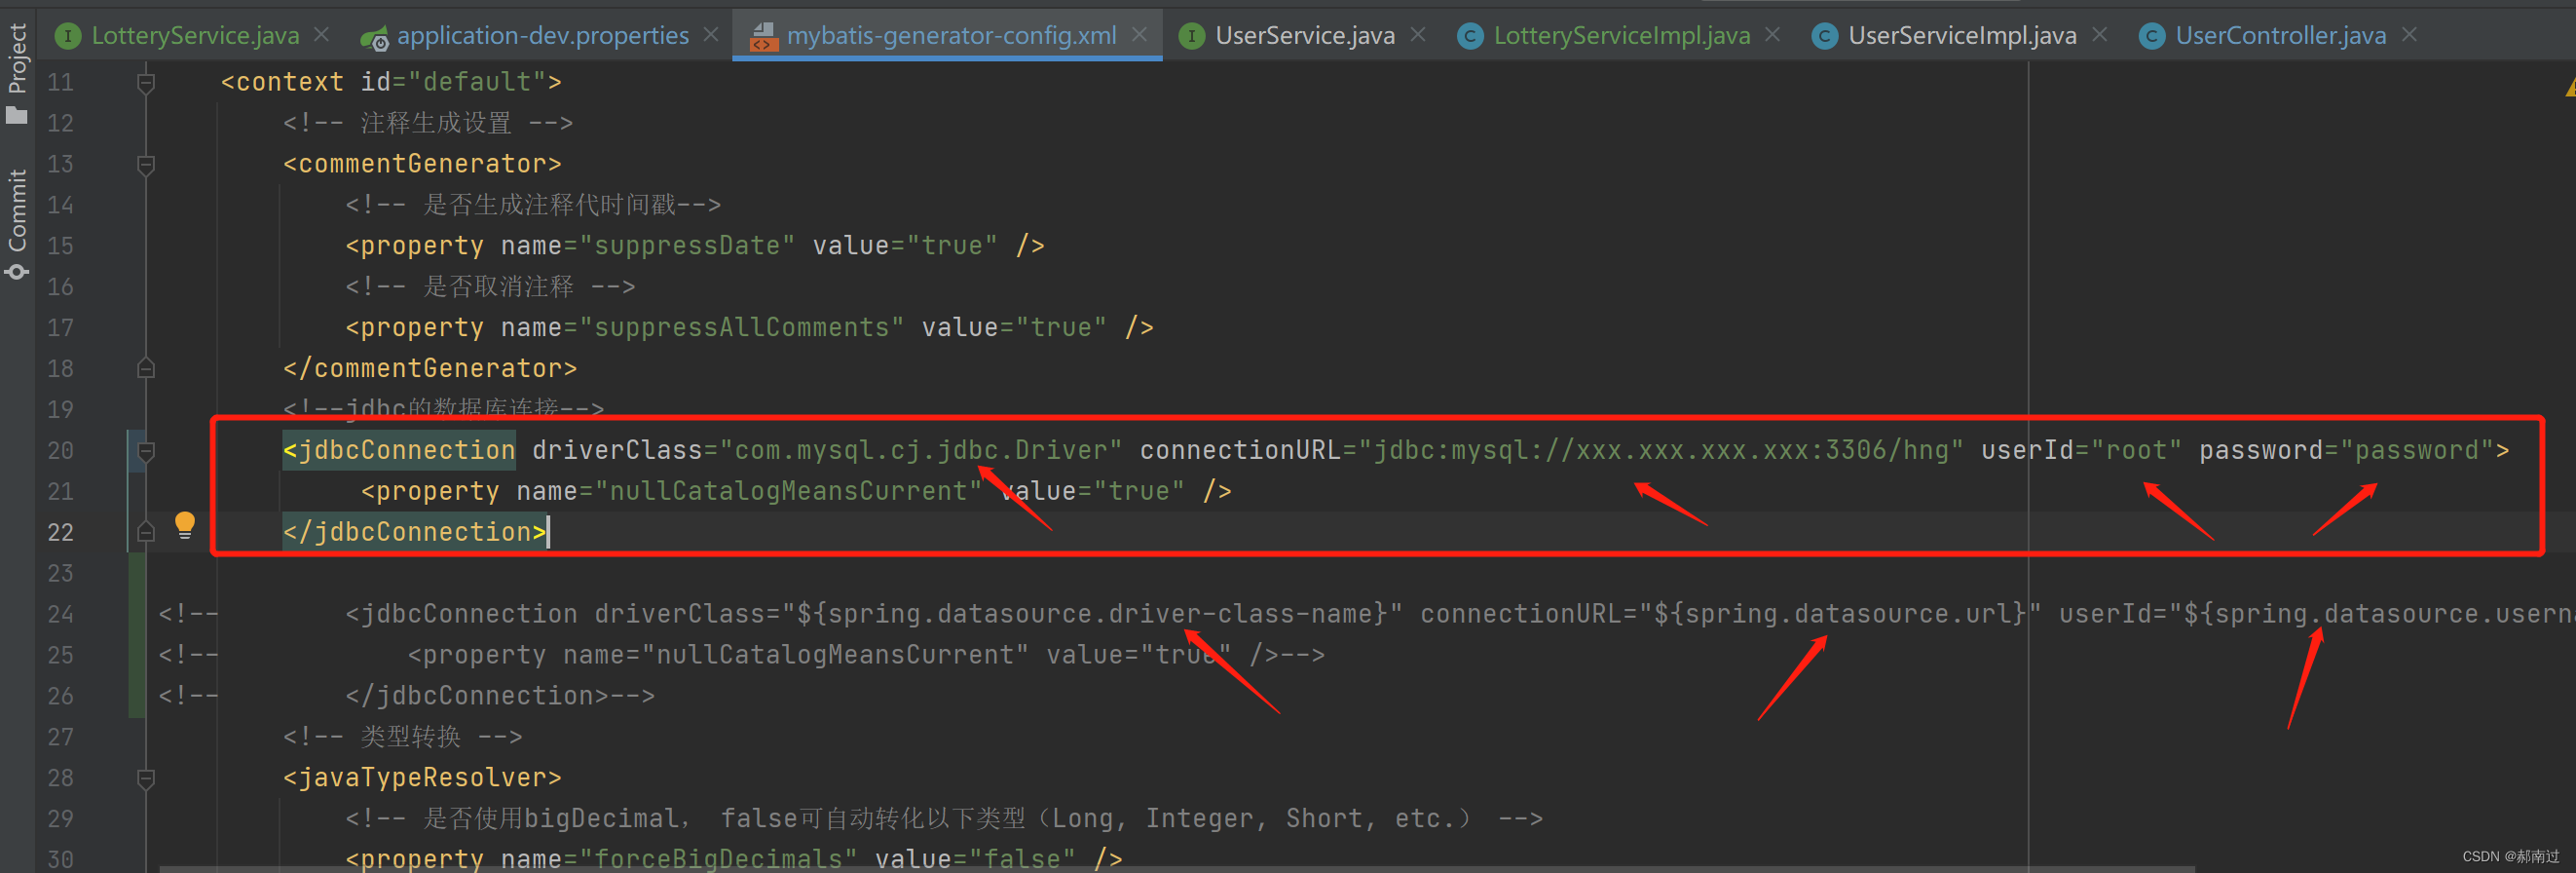
<!--jdbc的数据库连接-->
<jdbcConnection driverClass="${spring.datasource.driver-class-name}" connectionURL="${spring.datasource.url}" userId="${spring.datasource.username}" password="${spring.datasource.password}">
<property name="nullCatalogMeansCurrent" value="true" />
</jdbcConnection>
<!-- 类型转换 -->
<javaTypeResolver>
<!-- 是否使用bigDecimal, false可自动转化以下类型(Long, Integer, Short, etc.) -->
<property name="forceBigDecimals" value="false" />
</javaTypeResolver>
<!-- targetPackage:生成的实体类所在的包 -->
<!-- targetProject:生成的实体类所在的硬盘位置 -->
<javaModelGenerator targetPackage="com.hng.example.entity" targetProject="src/main/java">
<!-- 是否允许子包 -->
<property name="enableSubPackages" value="false" />
<!-- 是否对modal添加构造函数 -->
<property name="constructorBased" value="true" />
<!-- 是否清理从数据库中查询出的字符串左右两边的空白字符 -->
<property name="trimStrings" value="true" />
<!-- 建立modal对象是否不可改变 即生成的modal对象不会有setter方法,只有构造方法 -->
<property name="immutable" value="false" />
</javaModelGenerator>
<!-- targetPackage 和 targetProject:生成的 mapper xml 文件的包和位置 -->
<sqlMapGenerator targetPackage="mapper" targetProject="src/main/resources">
<!-- 是否在当前路径下新加一层schema,ex:false路径com.hng.example.entity, com.hng.example.entity.[schemaName] -->
<property name="enableSubPackages" value="false" />
<!-- 是否针对string类型的字段在set的时候进行trim调用 -->
<property name="trimStrings" value="true"/>
</sqlMapGenerator>
<!-- targetPackage 和 targetProject:生成的 java interface 文件的包和位置 -->
<javaClientGenerator type="XMLMAPPER" targetPackage="com.hng.example.repository" targetProject="src/main/java">
<!-- 是否在当前路径下新加一层schema,ex:false路径com.hng.example.entity, com.hng.example.entity.[schemaName] -->
<property name="enableSubPackages" value="false" />
</javaClientGenerator>
<!-- 配置表信息 -->
<!-- schema即为数据库名 tableName为对应的数据库表 domainObjectName是要生成的实体类 enable*ByExample, 是否生成 example类 -->
<!-- 不同的表,修改tableName和domainObjectName就可以 -->
<table schema="" tableName="${tableName}" domainObjectName="${entityName}" enableCountByExample="false"
enableUpdateByExample="false" enableDeleteByExample="false" enableSelectByExample="false"
selectByExampleQueryId="false"/>
</context>
</generatorConfiguration>
三、编写application.properties
# 数据库
spring.datasource.url=jdbc:mysql://xxx.xxx.xxx.xxx:3306/hng
spring.datasource.username=root
spring.datasource.password=password
spring.datasource.driver-class-name=com.mysql.cj.jdbc.Driver

# mybatis-generator 表
tableName = user
entityName = User
四、生成代码
IDEA右侧Maven,项目名->Plugins->mybatis-generator:generates双击运行,即可生成代码
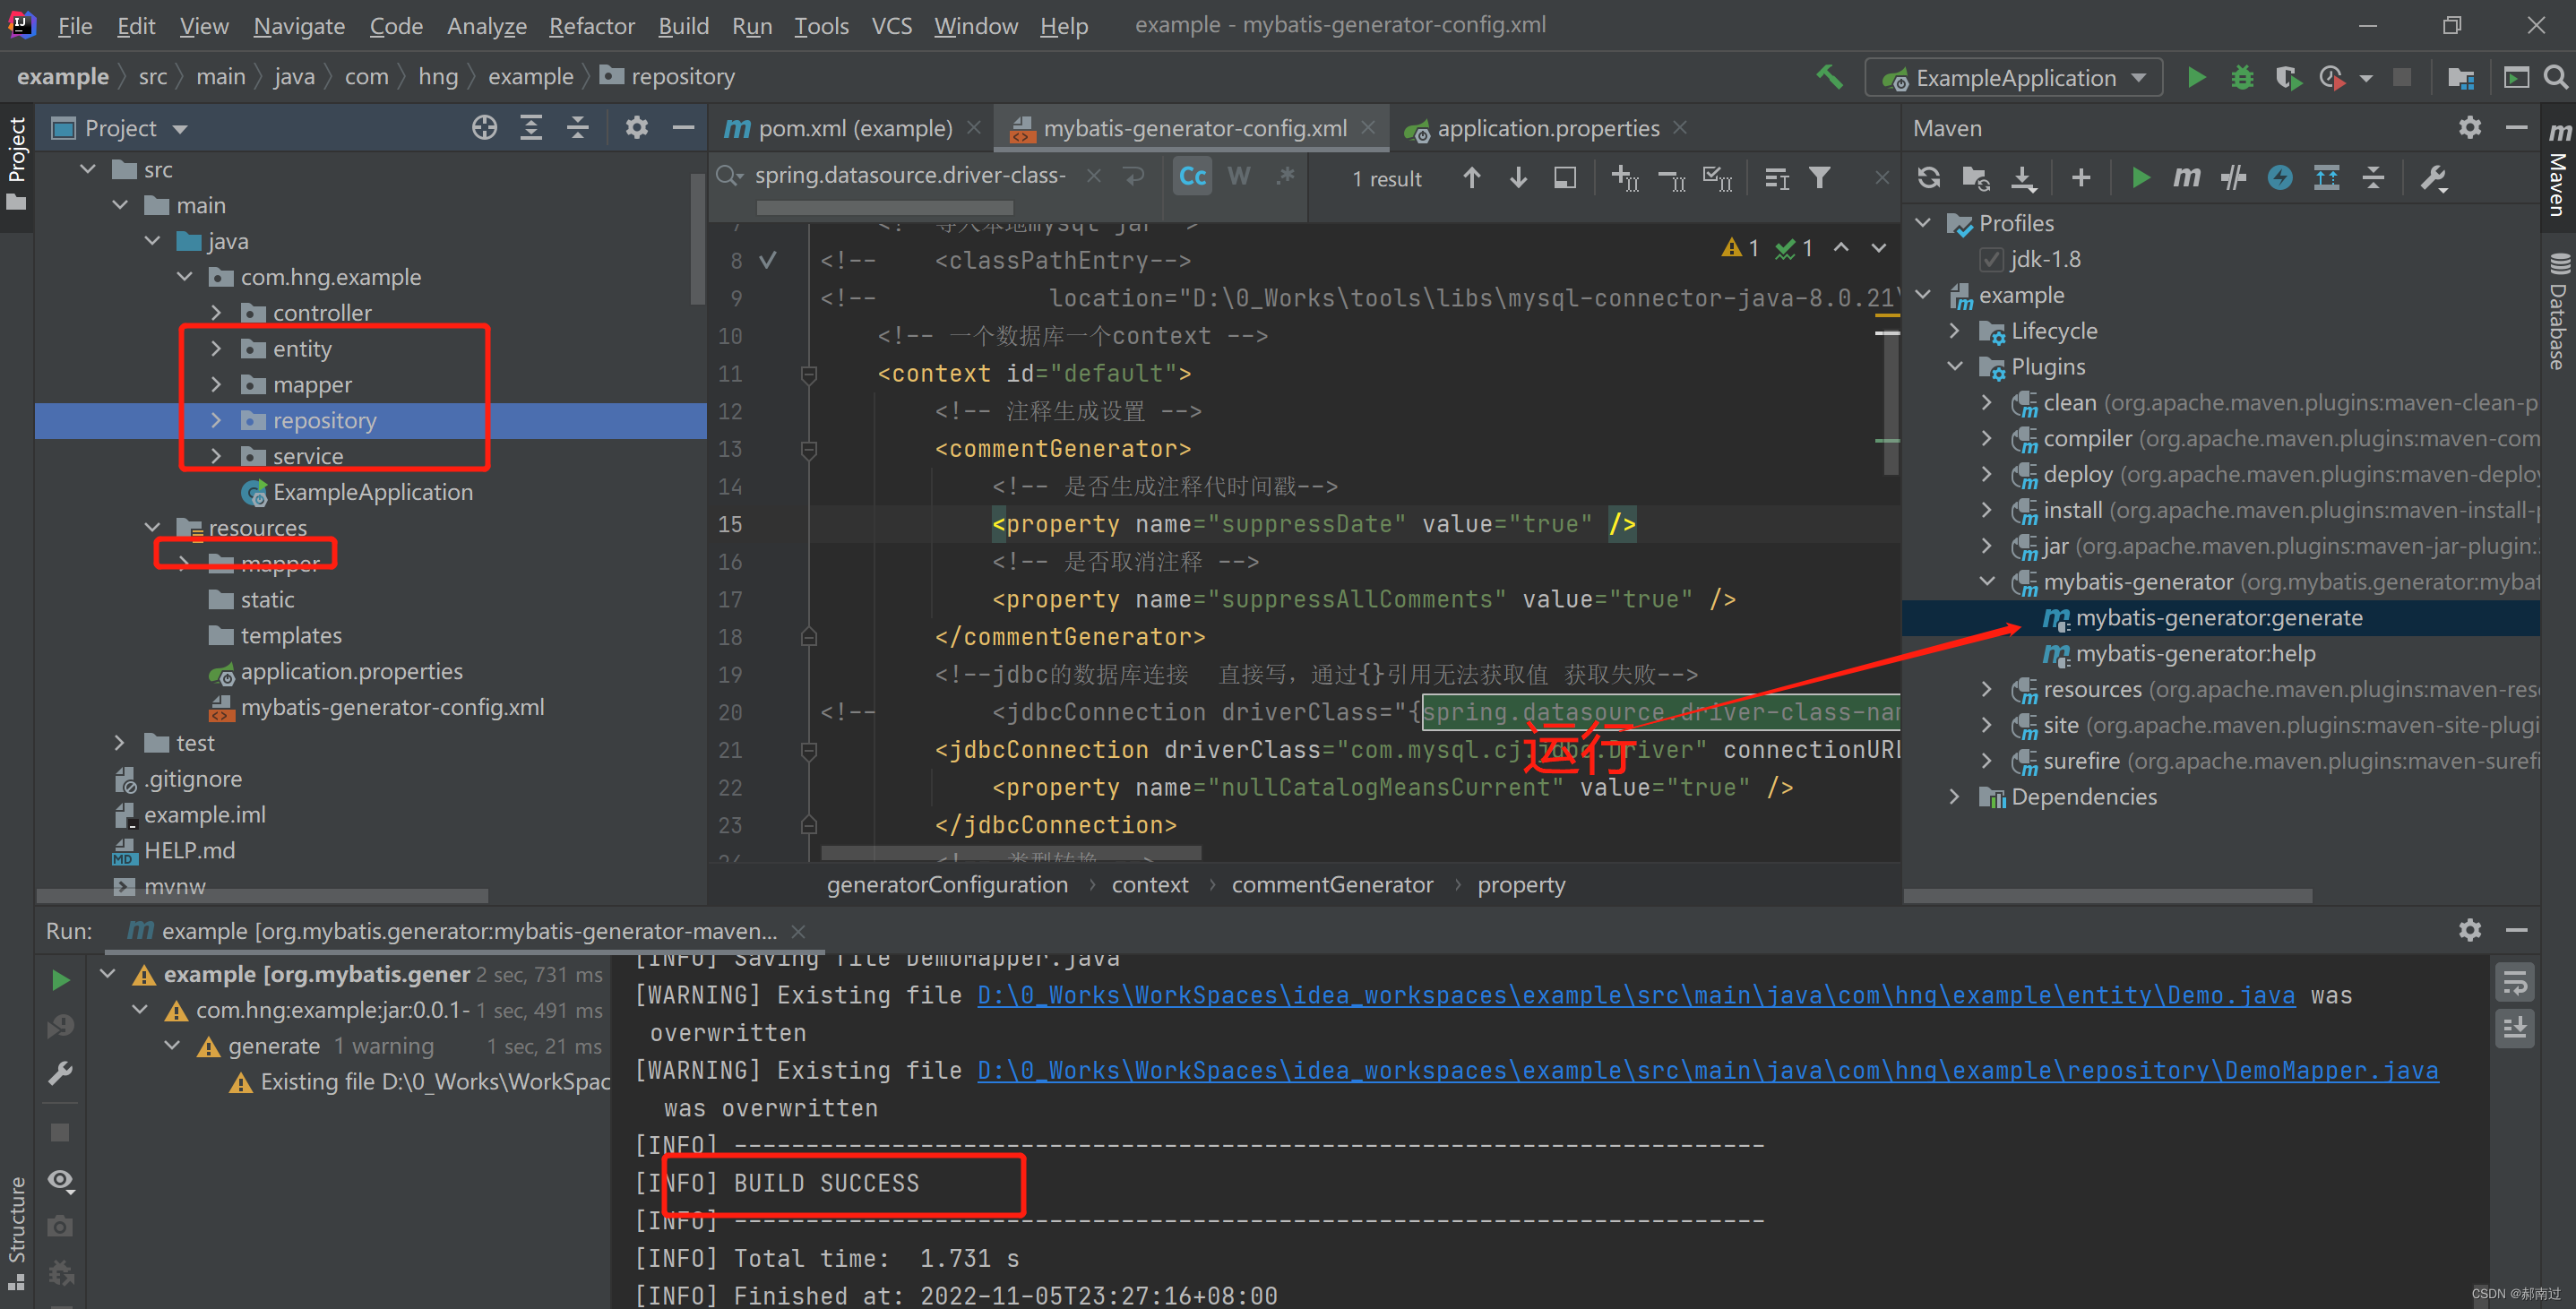
至此,集成完毕。
若报以下错误:

说明是数据库信息获取失败,最简单的方法就是在mybatis-generator-config.xml中把数据库信息直接写上,不使用引用获取的方式


 578
578


 被折叠的 条评论
为什么被折叠?
被折叠的 条评论
为什么被折叠?
 到【灌水乐园】发言


