


springboot中aop的代理模式
参考网址:
https://mp.weixin.qq.com/s/G9hhDR-RTodwev8mhACyZg
前置知识
java的动态代理分类
- 静态代理
- 动态代理
- jdk动态代理
- cgllib动态代理
springboot aop代理模式
pring Boot 中对这个问题的处理,以 Spring Boot2.0 为节点,前后不一样
找到自动类 AopAutoConfiguration.java
1.x
在 Spring Boot2.0 之前,关于 Aop 的自动化配置代码是这样的(Spring Boot 1.5.22.RELEASE):
@Configuration
@ConditionalOnClass({ EnableAspectJAutoProxy.class, Aspect.class, Advice.class })
@ConditionalOnProperty(prefix = "spring.aop", name = "auto", havingValue = "true", matchIfMissing = true)
public class AopAutoConfiguration {

 @Configuration
 @EnableAspectJAutoProxy(proxyTargetClass = false)
 @ConditionalOnProperty(prefix = "spring.aop", name = "proxy-target-class", havingValue = "false",
   matchIfMissing = true)
 public static class JdkDynamicAutoProxyConfiguration {

 }

 @Configuration
 @EnableAspectJAutoProxy(proxyTargetClass = true)
 @ConditionalOnProperty(prefix = "spring.aop", name = "proxy-target-class", havingValue = "true",
   matchIfMissing = false)
 public static class CglibAutoProxyConfiguration {

 }

}
可以看到,这个自动化配置主要是在讨论 application.properties 配置文件中的 spring.aop.proxy-target-class 属性的值。
具体起作用的是 @ConditionalOnProperty 注解,关于这个注解中的几个属性,松哥也来稍微说下:
- prefix:配置文件的前缀。
- name:配置文件的名字,和 prefix 共同组成配置的 key。
- having:期待配置的值,如果实际的配置和 having 的值相同,则这个配置就会生效,否则不生效。
- matchIfMissing:如果开发者没有在 application.properties 中进行配置,那么这个配置类是否生效。
基于如上介绍,我们很容易看出:
- 如果开发者设置了
spring.aop.proxy-target-class为 false,则使用 JDK 代理。 - 如果开发者设置了
spring.aop.proxy-target-class为 true,则使用 Cglib 代理。 - 如果开发者一开始就没配置
spring.aop.proxy-target-class属性,则使用 JDK 代理。
这是 Spring Boot 2.0 之前的情况。
2.x
@Configuration
@ConditionalOnClass({ EnableAspectJAutoProxy.class, Aspect.class, Advice.class,
  AnnotatedElement.class })
@ConditionalOnProperty(prefix = "spring.aop", name = "auto", havingValue = "true", matchIfMissing = true)
public class AopAutoConfiguration {

 @Configuration
 @EnableAspectJAutoProxy(proxyTargetClass = false)
 @ConditionalOnProperty(prefix = "spring.aop", name = "proxy-target-class", havingValue = "false", matchIfMissing = false)
 public static class JdkDynamicAutoProxyConfiguration {

 }

 @Configuration
 @EnableAspectJAutoProxy(proxyTargetClass = true)
 @ConditionalOnProperty(prefix = "spring.aop", name = "proxy-target-class", havingValue = "true", matchIfMissing = true)
 public static class CglibAutoProxyConfiguration {

 }

}
可以看到,大部分配置都是一样的,有一个地方不太相同,那就是 matchIfMissing 属性的值。可以看到,从 Spring Boot2.0 开始,如果用户什么都没有配置,那么默认情况下使用的是 Cglib 代理。
测试
测试环境
springboot2.x
pom.xml
<?xml version="1.0" encoding="UTF-8"?>
<project xmlns="http://maven.apache.org/POM/4.0.0" xmlns:xsi="http://www.w3.org/2001/XMLSchema-instance"
         xsi:schemaLocation="http://maven.apache.org/POM/4.0.0 https://maven.apache.org/xsd/maven-4.0.0.xsd">
    <modelVersion>4.0.0</modelVersion>
    <parent>
        <groupId>org.springframework.boot</groupId>
        <artifactId>spring-boot-starter-parent</artifactId>
        <version>2.3.4.RELEASE</version>
<!--        <version>1.5.10.RELEASE</version>-->
        <relativePath/> <!-- lookup parent from repository -->
    </parent>
    <groupId>com.example</groupId>
    <artifactId>springboot-demo</artifactId>
    <version>0.0.1-SNAPSHOT</version>
    <name>springboot-demo</name>
    <description>Demo project for Spring Boot</description>
    <properties>
        <java.version>1.8</java.version>
    </properties>
    <dependencies>
        <dependency>
            <groupId>org.springframework.boot</groupId>
            <artifactId>spring-boot-autoconfigure</artifactId>
        </dependency>
    </dependencies>
</project>
测试接口和实现类
MyService.java
public interface MyService {
    public void sayHi();
}
MyServiceImpl.java
public class MyServiceImpl implements MyService{
    @Override
    public void sayHi() {
        System.out.println("MyServiceImpl.sayHi------------> MyService sayHi 方法的实现");
    }
}
配置类
SpringConfig.java
@Configuration
public class SpringConfig {

    @Bean
    public MyService myService(){
        return new MyServiceImpl();
    }
}
切面类
CustomAop.java
import org.aspectj.lang.JoinPoint;
import org.aspectj.lang.annotation.Aspect;
import org.aspectj.lang.annotation.Before;
import org.aspectj.lang.annotation.Pointcut;
import org.springframework.stereotype.Component;

@Component
@Aspect
public class CustomAop {
    @Pointcut("within(com.example.proxy.MyServiceImpl)")
    public void pointcut(){
        System.out.println("CustomAop.pointcut");
    }

    @Before("pointcut()")
    public void before(JoinPoint joinPoint){
        System.out.println("CustomAop.before=============>");
    }
}
主启动类进行测试
@SpringBootApplication
@ComponentScan("com.example.proxy")
public class SpringbootDemoApplication {

    public static void main(String[] args) {
        ConfigurableApplicationContext ac = SpringApplication.run(SpringbootDemoApplication.class, args);
        SpringConfig config = ac.getBean(SpringConfig.class);
        System.out.println(config);
        MyService myService = config.myService();
        System.out.println(myService);
        myService.sayHi();
        System.out.println(myService);

    }


}
jdk动态代理
application.properties
spring.aop.proxy-target-class=true # 默认为true
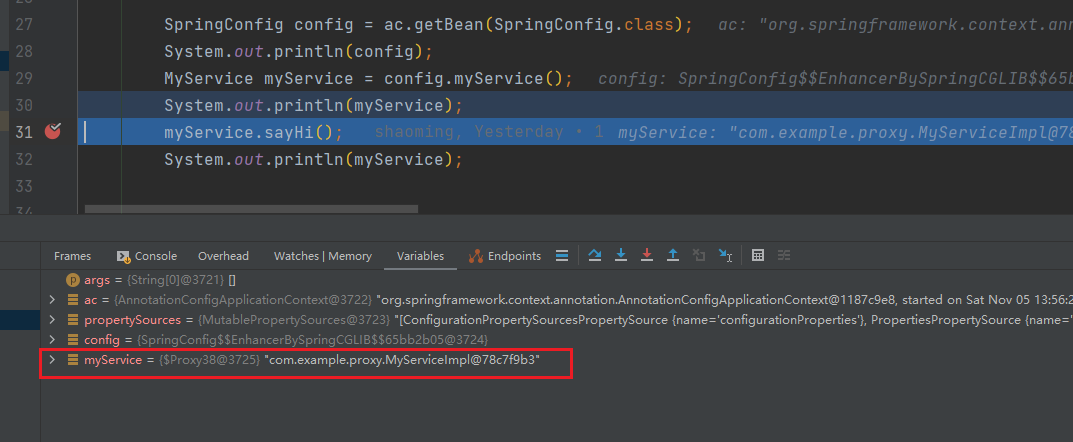
cglib动态代理(默认)
application.properties
spring.aop.proxy-target-class=false # 默认为true,此配置可以省略
总结
总结一下:
- Spring 中的 AOP,有接口就用 JDK 动态代理,没有接口就用 Cglib 动态代理。
- Spring Boot 中的 AOP,2.0 之前和 Spring 一样;2.0 之后首选 Cglib 动态代理,如果用户想要使用 JDK 动态代理,需要自己手动配置。


 418
418


 被折叠的 条评论
为什么被折叠?
被折叠的 条评论
为什么被折叠?
 到【灌水乐园】发言


