


文章目录
一、TensorFlow基本概念
1. 什么是TensorFlow
TensorFlow 是一个由 Google 开发的开源机器学习框架,可以用于构建各种类型的人工智能应用程序,例如图像识别、语音识别、自然语言处理等。它通过数据流图的方式来描述计算任务,使得开发者可以轻松地搭建和训练各种复杂的模型。TensorFlow 支持分布式计算,可以在多个CPU或GPU上运行,从而加快模型的训练速度。同时,TensorFlow 社区也提供了丰富的文档和示例代码,方便开发者学习和使用。
2. TensorFlow的组成
TensorFlow 由两个主要组件组成:图(Graph)和会话(Session)。
-
图(Graph)是 TensorFlow 的核心概念,它描述了各种计算任务之间的依赖关系,可以看作是一个有向无环图(DAG)。在 TensorFlow 中,每个节点(Node)表示一种操作(Operation),每条边(Edge)表示数据(Tensor)的传递。开发者通过创建图来定义模型的结构和计算流程。 -
会话(Session)则负责执行图中的计算任务。它可以将计算任务分配到不同的设备上,并管理计算过程中的资源分配和释放。开发者通过创建会话来运行模型并获取结果。
3. TensorFlow的三个重要模型
-
数据模型:TensorFlow 中的基本数据单位是张量(Tensor),它可以看作是一个多维数组,支持各种数值类型。在 TensorFlow 中,所有的中间结果和参数都以张量的形式存在,开发者可以通过操作张量来定义模型的计算流程。 -
编程模型:TensorFlow 提供了一种类似于数据流图的编程模型,开发者需要先构建一个计算图(Graph),图中的节点(Node)表示各种计算操作(Operation),边(Edge)表示数据(Tensor)的依赖关系。然后,开发者可以创建一个会话(Session),将计算任务分配到各种设备上并执行计算。TensorFlow 还提供了灵活的控制流和函数定义方式,方便开发者实现各种复杂的模型。 -
执行模型:TensorFlow 的计算过程主要由两个阶段组成,即构建阶段和执行阶段。在构建阶段,开发者通过定义计算图来描述模型的计算流程,并设置各种参数和超参数。在执行阶段,开发者创建一个会话并运行计算图,通过输入不同的数据来获取计算结果。同时,TensorFlow 还支持异步计算和分布式计算,可以加快模型的训练速度。
二、TensorFlow的重要底层库
在实际开发中,我们会经常与这些名词打交道,主要有:张量、常量、操作、占位符、变量、数据流图、计算图、多cpu或者GPU训练等。这些耳熟能详的名词概念,是我们构造更高级的TensorFlow模块的重要基石。
1. 先简单来个 helloWord
有个大致感觉
import tensorflow as tf

#TODO 创建一个会话
test = tf.Session()

#TODO 创建一个常数张量
hello = tf.constant("hello word")

#TODO 运行
print(test.run(hello))

在TensorFlow中有两种会话:Session()和InteractiveSession(),在上面的例子中使用方式一样,但是在实际开发中我使用Session()更多。
2. 张量
什么是张量
张量是tf进行计算的基本元素和基本数据结构,基本上我们只用弄清楚这一个数据结构就能熟练使用tf。张量是一个n维数据集合,有秩、形状和类型来标识。
秩是张量的维数;
形状表示每个维度大小的列表;
例如:[1,2,3,4] 形状是 (1,4)的二维张量,也就是一个包含 4 个元素的行向量(row vector)
[1,2,3,4] 是一个一维数组,也可以称为向量(vector),因此它的秩为 1。在 TensorFlow 中,秩指的是张量(Tensor)的维数,例如标量的秩为 0,向量的秩为 1,矩阵的秩为 2,以此类推。
import tensorflow as tf
#一个包含 4 个元素的行向量(row vector)
x = tf.constant([[1, 2, 3, 4]])
print(x.shape)  # 输出 (1, 4)
   在例如:
   [8,] 表示一个形状为 (8,) 的一维张量,也就是一个包含 8 个元素的向量(vector)。在 TensorFlow 中,可以用以下代码创建一个形状为 (8,) 的张量:
import tensorflow as tf
x = tf.constant([8])
print(x.shape)  # 输出 (1,)
如何创建张量
一般创建张量比较常用的手段有:
- 通过定义常数,操作,变量的手段
- 构建模型是用的比较多的 占位符手段
- 以及一些特别的 将数组,列表等数据类型转换为张量
创建张量
(1). 通过定义常量来进行创建张量
张量是一个n维数据集合,由秩、形状和类型来标识。
tf.constant() 源代码

@tf_export(v1=["constant"])
def constant_v1(
    value,
    dtype=None,
    shape=None,
    name="Const",
    verify_shape=False):
完美贴合概念…
看下实践代码:
import tensorflow as tf
#TODO value, dtype=None, shape=None, name="Const", verify_shape=False
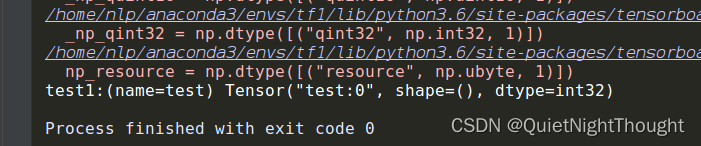
test1 = tf.constant(5,name='test')
print("test1:(name=test)",test1)
最后的打印结果,对照张量是一个n维数据集合,由秩、形状和类型来标识。
 如果运行结果的话:需要创建会话,然后执行运算:
import tensorflow as tf


#TODO 创建一个会话
test = tf.Session()

#TODO value, dtype=None, shape=None, name="Const", verify_shape=False
test1 = tf.constant(5,name='test')

print("test1:(name=test)",test1)

print("run test1:",test.run(test1))

(2). 通过操作张量来进行创建张量
#TODO 创建一个会话
test = tf.Session()

#TODO value, dtype=None, shape=None, name="Const", verify_shape=False
test1 = tf.constant(5,name='test1')

test2 = tf.constant(8,name="test1")
'''
tf中有很多运算函数,这里仅仅是一个代表。可以看tf社区
'''

op1 = tf.add(test1,test2)  #执行加法
print("op1:",op1) #打印张量信息
print("run op1:",test.run(op1)) #运算结果
打印结果:

(3). 通过占位符来进行创建张量
这个是很重要的,因为在实际构建模型中会经常用到这个.
tf.placeholder() #来看下源代码
@tf_export(v1=["placeholder"])
def placeholder(dtype, shape=None, name=None):
#构造的时候要定义函数中信息
例如:
import tensorflow as tf
#TODO 创建一个会话
test = tf.Session()

#TODO
test1 = tf.placeholder(tf.float32,shape=(1,),name='test1')
test2 = tf.placeholder(tf.float32,shape=(1,),name='test2')

op1 = tf.add(test1,test2)
print('tensor test1:',test1)
print('tensor test1:',test2)
print('tensor op1:',op1)
print('run tensor op1:',test.run(op1,feed_dict={test1:[5],test2:[8]}))  #占位符号运算需要传值
'''
传值使用的run()操作中的 feed_dict参数,指定字典

'''

(4). 通过python对象来进行创建张量
上面有说到:特别的 将数组,列表等数据类型转换为张量
主要使用的函数就是, tf.convert_to_tensor()
该函数可以将如:列表,数组等转换为张量
@tf_export(v1=["convert_to_tensor"])
def convert_to_tensor(value,
                      dtype=None,
                      name=None,
                      preferred_dtype=None,
                      dtype_hint=None):
创建0维张量
import tensorflow as tf


#TODO 创建一个会话
test = tf.Session()

#TODO value,dtype=None,name=None,preferred_dtype=None,dtype_hint=None):

test1 = tf.convert_to_tensor(9.0,dtype=tf.float32)
print('test1:',test1)
print('run test1:',test.run(test1))

通过列表,数组来定义1维张量
import tensorflow as tf
import numpy as np
from pprint import pprint

#TODO 创建一个会话
test = tf.Session()

#TODO value,dtype=None,name=None,preferred_dtype=None,dtype_hint=None):
data = np.array([1,5,8,9,65]) #创建数组
print('data shape:',data.shape)
test1 = tf.convert_to_tensor(data,dtype=tf.float32)
print('test1:',test1)
print('run test1:',test.run(test1))

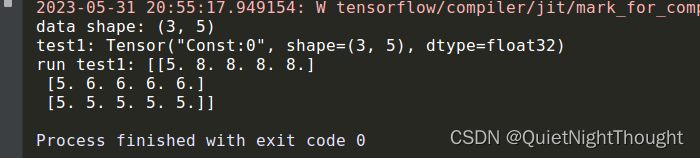
通过矩阵定义2维
#TODO 创建一个会话
test = tf.Session()

#TODO value,dtype=None,name=None,preferred_dtype=None,dtype_hint=None):

data = np.array([[5,8,8,8,8],[5,6,6,6,6],[5,5,5,5,5]])
print('data shape:',data.shape)
test1 = tf.convert_to_tensor(data,dtype=tf.float32)
print('test1:',test1)
print('run test1:',test.run(test1))
创建3维,这个在nlp中会经常用到
import tensorflow as tf
import numpy as np
from pprint import pprint

#TODO 创建一个会话
test = tf.Session()

#TODO value,dtype=None,name=None,preferred_dtype=None,dtype_hint=None):
data = np.array([[[1,5,8,9,65],
                  [1,5,8,9,65]],
                 [[1,5,8,9,65],
                  [1,5,8,9,65]],
                 [[1,5,8,9,65],
                  [1,5,8,9,65]]]) #创建数组
print('data shape:',data.shape)
test1 = tf.convert_to_tensor(data,dtype=tf.float32)
print('test1:',test1)
print('run test1:',test.run(test1))

无缝转换
注意:TensorFlow可以将numpy的ndarray无缝转换为TensorFlow张量,反之亦然。
import tensorflow as tf
import numpy as np

#将 NumPy 数组转换为 TensorFlow 张量
a = np.array([1, 2, 3])
b = tf.convert_to_tensor(a)
print(b)  # 输出 Tensor("Const:0", shape=(3,), dtype=int64)

# 将 TensorFlow 张量转换为 NumPy 数组
c = b.numpy()
print(c)  # 输出 [1 2 3]
但是:NumPy 数组和 TensorFlow 张量的类型必须一致,例如都是浮点型或者整型。如果类型不一致,则需要进行类型转换。
3. 变量
下次咱们一起讨论,重要概念:变量以及通过定义变量来创建张量,以及如何过去变量


 963
963


 被折叠的 条评论
为什么被折叠?
被折叠的 条评论
为什么被折叠?
 到【灌水乐园】发言


