


原创文章,转载请注明: 转载自系统技术非业余研究
本文链接地址: MYSQL数据库网卡软中断不平衡问题及解决方案
最近公司在MySQL的数据库上由于采用了高速的如PCIe卡以及大内存,去年在压力测试的时候突然发现数据库的流量可以把一个千M网卡压满了。随着数据库的优化,现在流量可以达到150M,所以我们采用了双网卡,在交换机上绑定,做LB的方式,提高系统的吞吐量。
但是在最近压测试的一个数据库中,mpstat发现其中一个核的CPU被软中断耗尽:
Mysql QPS 2W左右
——– —–load-avg—- —cpu-usage— —swap— -QPS- -TPS- -Hit%-
time | 1m 5m 15m |usr sys idl iow| si so| ins upd del sel iud| lor hit|
13:43:46| 0.00 0.00 0.00| 67 27 3 3| 0 0| 0 0 0 0 0| 0 100.00|
13:43:47| 0.00 0.00 0.00| 30 10 60 0| 0 0| 0 0 0 19281 0| 326839 100.00|
13:43:48| 0.00 0.00 0.00| 28 10 63 0| 0 0| 0 0 0 19083 0| 323377 100.00|
13:43:49| 0.00 0.00 0.00| 28 10 63 0| 0 0| 0 0 0 19482 0| 330185 100.00|
13:43:50| 0.00 0.00 0.00| 26 9 65 0| 0 0| 0 0 0 19379 0| 328575 100.00|
13:43:51| 0.00 0.00 0.00| 27 9 64 0| 0 0| 0 0 0 19723 0| 334378 100.00|
mpstat -P ALL 1说:

针对这个问题,我们利用工具,特别是systemtap, 一步步来调查和解决问题。
首先我们来确认下网卡的设置:
</pre><div class="line alt1" style="font-family: Consolas, 'Bitstream Vera Sans Mono', 'Courier New', Courier, monospace !important; line-height: 1.1em !important; color: rgb(85, 85, 85); margin: 0px !important; padding: 0px !important; border: 0px !important; outline: 0px !important; float: none !important; vertical-align: baseline !important; position: static !important; left: auto !important; top: auto !important; right: auto !important; bottom: auto !important; height: auto !important; width: auto !important; direction: ltr !important; background-image: none !important;"><pre name="code" class="plain">$uname -r
2.6.32-131.21.1.tb399.el6.x86_64
$ lspci -vvvv
01:00.0 Ethernet controller: Broadcom Corporation NetXtreme II BCM5709 Gigabit Ethernet (rev 20)
        Subsystem: Broadcom Corporation NetXtreme II BCM5709 Gigabit Ethernet
        Control: I/O- Mem+ BusMaster+ SpecCycle- MemWINV- VGASnoop- ParErr- Stepping- SERR- FastB2B-
        Status: Cap+ 66MHz- UDF- FastB2B- ParErr- DEVSEL=fast >TAbort- <TAbort- <MAbort- >SERR- <PERR-
        Latency: 0, Cache Line Size: 256 bytes
        Interrupt: pin A routed to IRQ 114
        Region 0: Memory at f6000000 (64-bit, non-prefetchable) [size=32M]
        Capabilities: <access denied>

01:00.1 Ethernet controller: Broadcom Corporation NetXtreme II BCM5709 Gigabit Ethernet (rev 20)
        Subsystem: Broadcom Corporation NetXtreme II BCM5709 Gigabit Ethernet
        Control: I/O- Mem+ BusMaster+ SpecCycle- MemWINV- VGASnoop- ParErr- Stepping- SERR- FastB2B-
        Status: Cap+ 66MHz- UDF- FastB2B- ParErr- DEVSEL=fast >TAbort- <TAbort- <MAbort- >SERR- <PERR-
        Latency: 0, Cache Line Size: 256 bytes
        Interrupt: pin B routed to IRQ 122
        Region 0: Memory at f8000000 (64-bit, non-prefetchable) [size=32M]
        Capabilities: <access denied>

$cat /proc/net/bonding/bond0
Ethernet Channel Bonding Driver: v3.6.0 (September 26, 2009)

Bonding Mode: fault-tolerance (active-backup)
Primary Slave: None
Currently Active Slave: em1
MII Status: up
MII Polling Interval (ms): 100
Up Delay (ms): 0
Down Delay (ms): 0

Slave Interface: em1
MII Status: up
Link Failure Count: 0
Permanent HW addr: 78:2b:cb:1f:eb:c9
Slave queue ID: 0

Slave Interface: em2
MII Status: up
Link Failure Count: 0
Permanent HW addr: 78:2b:cb:1f:eb:ca
Slave queue ID: 0
从上面的信息我们可以确认二块 Broadcom Corporation NetXtreme II BCM5709 Gigabit Ethernet (rev 20)网卡在做bonding。
我们的系统内核组维护的是RHEL 6.1, 很容易可以从/proc/interrupts和/proc/softirqs得到中断和软中断的信息的信息。
我们特别留意下softirq, 由于CPU太多,信息太乱,我只列出7个核心的情况:
$cat /proc/softirqs|tr -s ' ' '\t'|cut -f 1-8
        CPU0    CPU1    CPU2    CPU3    CPU4    CPU5    CPU6
        HI:     0       0       0       0       0       0
        TIMER:  401626149       366513734       274660062       286091775       252287943       258932438
        NET_TX: 136905  10428   17269   25080   16613   17876
        NET_RX: 1898437808      2857018450      580117978       26443   11820   15545
        BLOCK:  716495491       805780859       113853932       132589667       106297189       104629321
BLOCK_IOPOLL:   0       0       0       0       0       0       0
        TASKLET:        190643874       775861235       0       0       1       0
        SCHED:  61726009        66994763        102590355       83277433        144588168       154635009
        HRTIMER:        1883420 1837160 2316722 2369920 1721755 1666867
        RCU:    391610041       365150626       275741153       287074106       253401636       260389306
从上面我们粗粗可以看出网卡的软中断接收和发送都不平衡。
单单这些信息还不够,还是无法区别为什么一个核心被压垮了,因为我们的机器上还有个中断的大户:fusionIO PCIe卡,在过去的测试中该卡也会吃掉大量的CPU,所以目前无法判断就是网卡引起的,因而我们用stap来double check下:
$cat i.stp
global hard, soft, wq

probe irq_handler.entry {
hard[irq, dev_name]++;
}

probe timer.s(1) {
println("==irq number:dev_name")
foreach( [irq, dev_name] in hard- limit 5) {
printf("%d,%s->%d\n", irq, kernel_string(dev_name), hard[irq, dev_name]);
}

println("==softirq cpu:h:vec:action")
foreach( 1 in soft- limit 5) {
printf("%d:%x:%x:%s->%d\n", c, h, vec, symdata(action), soft1);
}

println("==workqueue wq_thread:work_func")
foreach( [wq_thread,work_func] in wq- limit 5) {
printf("%x:%x->%d\n", wq_thread, work_func, wq[wq_thread, work_func]);
}

println("\n")
delete hard
delete soft
delete wq
}

probe softirq.entry {
soft[cpu(), h,vec,action]++;
}

probe workqueue.execute {
wq[wq_thread, work_func]++
}


probe begin {
println("~")
}
$sudo stap i.stp
==irq number:dev_name
73,em1-6->7150
50,iodrive-fct0->7015
71,em1-4->6985
74,em1-7->6680
69,em1-2->6557
==softirq cpu:h:vec:action
1:ffffffff81a23098:ffffffff81a23080:0xffffffff81411110->36627
1:ffffffff81a230b0:ffffffff81a23080:0xffffffff8106f950->2169
1:ffffffff81a230a0:ffffffff81a23080:0xffffffff81237100->1736
0:ffffffff81a230a0:ffffffff81a23080:0xffffffff81237100->1308
1:ffffffff81a23088:ffffffff81a23080:0xffffffff81079ee0->941
==workqueue wq_thread:work_func
ffff880c14268a80:ffffffffa026b390->51
ffff880c1422e0c0:ffffffffa026b390->30
ffff880c1425f580:ffffffffa026b390->25
ffff880c1422f540:ffffffffa026b390->24
ffff880c14268040:ffffffffa026b390->23

#上面软中断的action的符号信息:
$addr2line -e /usr/lib/debug/lib/modules/2.6.32-131.21.1.tb411.el6.x86_64/vmlinux ffffffff81411110
/home/ads/build22_6u0_x64/workspace/kernel-el6/origin/taobao-kernel-build/kernel-2.6.32-131.21.1.el6/linux-2.6.32-131.21.1.el6.x86_64/net/core/ethtool.c:653

$addr2line -e /usr/lib/debug/lib/modules/2.6.32-131.21.1.tb411.el6.x86_64/vmlinux ffffffff810dc3a0
/home/ads/build22_6u0_x64/workspace/kernel-el6/origin/taobao-kernel-build/kernel-2.6.32-131.21.1.el6/linux-2.6.32-131.21.1.el6.x86_64/kernel/relay.c:466

$addr2line -e /usr/lib/debug/lib/modules/2.6.32-131.21.1.tb411.el6.x86_64/vmlinux ffffffff81079ee0
/home/ads/build22_6u0_x64/workspace/kernel-el6/origin/taobao-kernel-build/kernel-2.6.32-131.21.1.el6/linux-2.6.32-131.21.1.el6.x86_64/include/trace/events/timer.h:118

$addr2line -e /usr/lib/debug/lib/modules/2.6.32-131.21.1.tb411.el6.x86_64/vmlinux ffffffff8105d120
/home/ads/build22_6u0_x64/workspace/kernel-el6/origin/taobao-kernel-build/kernel-2.6.32-131.21.1.el6/linux-2.6.32-131.21.1.el6.x86_64/kernel/sched.c:2460
这次我们可以轻松的定位到硬中断基本上是平衡的,软中断都基本压在了1号核心上,再根据符号查找确认是网卡的问题。
好了,现在定位到了,问题解决起来就容易了:
1. 采用多队列万M网卡。
2. 用google的RPS patch来解决软中断平衡的问题, 把软中断分散到不同的核心去,参见这里.
我们还是用穷人的方案,写了个shell脚本来做这个事情:
$cat em.sh
#! /bin/bash

for i in `seq 0 7`
do
  echo f|sudo tee /sys/class/net/em1/queues/rx-$i/rps_cpus >/dev/null
  echo f|sudo tee /sys/class/net/em2/queues/rx-$i/rps_cpus >/dev/null
done

$sudo ./em.sh

$mpstat -P ALL 1
就可以看到我们的成果:

网卡的软中断成功分到二个核心上了,不再把一个核心拖死。
小结:多观察系统是好事。
后记:
——————————————————————————————————————
有同学留言说:
根据我们的测试,BCM5709应该是支持多队列的
从中断来看确实是平衡的,也就是说多队列在工作,但是为什么软中断不平衡呢,还有CPU1上还压着什么任务呢?继续调查!
好几个月过去了,今天我们线上又发现软中断的问题!
这次的网卡情况是这样的:
Network: em1 (igb): Intel I350 Gigabit, bc:30:5b:ee:b8:60, 1Gb/s
Network: em2 (igb): Intel I350 Gigabit, bc:30:5b:ee:b8:60, 1Gb/s
Network: em3 (igb): Intel I350 Gigabit, bc:30:5b:ee:b8:62, no carrier
Network: em4 (igb): Intel I350 Gigabit, bc:30:5b:ee:b8:63, no carrier
intel多队列网卡,从dmesg我们可以知道这个网卡有8个硬件中断:
# dmesg|grep igb
[ 6.467025] igb 0000:01:00.0: irq 108 for MSI/MSI-X
[ 6.467031] igb 0000:01:00.0: irq 109 for MSI/MSI-X
[ 6.467037] igb 0000:01:00.0: irq 110 for MSI/MSI-X
[ 6.467043] igb 0000:01:00.0: irq 111 for MSI/MSI-X
[ 6.467050] igb 0000:01:00.0: irq 112 for MSI/MSI-X
[ 6.467056] igb 0000:01:00.0: irq 113 for MSI/MSI-X
[ 6.467062] igb 0000:01:00.0: irq 114 for MSI/MSI-X
[ 6.467068] igb 0000:01:00.0: irq 115 for MSI/MSI-X
[ 6.467074] igb 0000:01:00.0: irq 116 for MSI/MSI-X
同样的软中断不平衡,在@普空和@炳天 同学的帮助下,大概知道了原来这款网卡硬件亲缘性绑定的时候只能一个中断一个core来绑定。
同时普空同学给到一个脚本set_irq_affinity.sh,我把它改了下支持从指定的core开始绑定, 脚本如下:
# cat set_irq_affinity.sh

# setting up irq affinity according to /proc/interrupts
# 2008-11-25 Robert Olsson
# 2009-02-19 updated by Jesse Brandeburg
#
# > Dave Miller:
# (To get consistent naming in /proc/interrups)
# I would suggest that people use something like:
#       char buf[IFNAMSIZ+6];
#
#       sprintf(buf, "%s-%s-%d",
#               netdev->name,
#               (RX_INTERRUPT ? "rx" : "tx"),
#               queue->index);
#
#  Assuming a device with two RX and TX queues.
#  This script will assign:
#
#       eth0-rx-0  CPU0
#       eth0-rx-1  CPU1
#       eth0-tx-0  CPU0
#       eth0-tx-1  CPU1
#
set_affinity()
{
        if [ $VEC -ge 32 ]
        then
                MASK_FILL=""
                MASK_ZERO="00000000"
                let "IDX = $VEC / 32"
                for ((i=1; i<=$IDX;i++))
                do
                        MASK_FILL="${MASK_FILL},${MASK_ZERO}"
                done

                let "VEC -= 32 * $IDX"
                MASK_TMP=$((1<<$VEC))
                MASK=`printf "%X%s" $MASK_TMP $MASK_FILL`
        else
                MASK_TMP=$((1<<(`expr $VEC + $CORE`)))
                MASK=`printf "%X" $MASK_TMP`
        fi

    printf "%s mask=%s for /proc/irq/%d/smp_affinity\n" $DEV $MASK $IRQ
    printf "%s" $MASK > /proc/irq/$IRQ/smp_affinity
}

if [ $# -ne 2 ] ; then
        echo "Description:"
        echo "    This script attempts to bind each queue of a multi-queue NIC"
        echo "    to the same numbered core, ie tx0|rx0 --> cpu0, tx1|rx1 --> cpu1"
        echo "usage:"
        echo "    $0 core eth0 [eth1 eth2 eth3]"
        exit
fi

CORE=$1

# check for irqbalance running
IRQBALANCE_ON=`ps ax | grep -v grep | grep -q irqbalance; echo $?`
if [ "$IRQBALANCE_ON" == "0" ] ; then
        echo " WARNING: irqbalance is running and will"
        echo "          likely override this script's affinitization."
        echo "          Please stop the irqbalance service and/or execute"
        echo "          'killall irqbalance'"
fi

#
# Set up the desired devices.
#
shift 1

for DEV in $*
do
  for DIR in rx tx TxRx
  do
     MAX=`grep $DEV-$DIR /proc/interrupts | wc -l`
     if [ "$MAX" == "0" ] ; then
       MAX=`egrep -i "$DEV:.*$DIR" /proc/interrupts | wc -l`
     fi
     if [ "$MAX" == "0" ] ; then
       echo no $DIR vectors found on $DEV
       continue
     fi
     for VEC in `seq 0 1 $MAX`
     do
        IRQ=`cat /proc/interrupts | grep -i $DEV-$DIR-$VEC"$"  | cut  -d:  -f1 | sed "s/ //g"`
        if [ -n  "$IRQ" ]; then
          set_affinity
        else
           IRQ=`cat /proc/interrupts | egrep -i $DEV:v$VEC-$DIR"$"  | cut  -d:  -f1 | sed "s/ //g"`
           if [ -n  "$IRQ" ]; then
             set_affinity
           fi
        fi
     done
  done
done
脚本参数是:set_irq_affinity.sh core eth0 [eth1 eth2 eth3]
可以一次设置多个网卡,core的意思是从这个号开始递增。
我们来演示下:
#./set_irq_affinity.sh 0 em1
no rx vectors found on em1
no tx vectors found on em1
em1 mask=1 for /proc/irq/109/smp_affinity
em1 mask=2 for /proc/irq/110/smp_affinity
em1 mask=4 for /proc/irq/111/smp_affinity
em1 mask=8 for /proc/irq/112/smp_affinity
em1 mask=10 for /proc/irq/113/smp_affinity
em1 mask=20 for /proc/irq/114/smp_affinity
em1 mask=40 for /proc/irq/115/smp_affinity
em1 mask=80 for /proc/irq/116/smp_affinity

#./set_irq_affinity.sh 8 em2
no rx vectors found on em2
no tx vectors found on em2
em2 mask=100 for /proc/irq/118/smp_affinity
em2 mask=200 for /proc/irq/119/smp_affinity
em2 mask=400 for /proc/irq/120/smp_affinity
em2 mask=800 for /proc/irq/121/smp_affinity
em2 mask=1000 for /proc/irq/122/smp_affinity
em2 mask=2000 for /proc/irq/123/smp_affinity
em2 mask=4000 for /proc/irq/124/smp_affinity
em2 mask=8000 for /proc/irq/125/smp_affinity
# cat em.sh
#! /bin/bash

for i in `seq 0 7`
do
  echo 0|sudo tee /sys/class/net/em1/queues/rx-$i/rps_cpus >/dev/null
  echo 0|sudo tee /sys/class/net/em2/queues/rx-$i/rps_cpus >/dev/null
done

#./em.sh
最后一定要记得关掉无用的关闭irqbalance, 除了捣乱没啥用途:
# service irqbalance stop
好吧,大功告成,收获的时候来了:
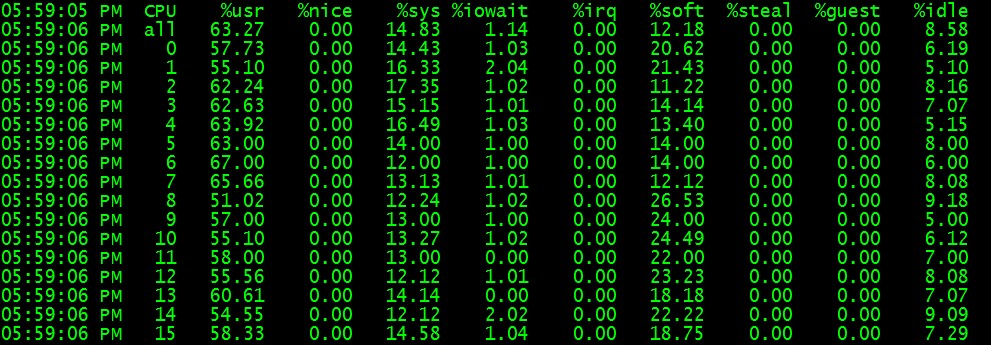
可见软中断已经摊开了!
补充:
在微博上大家讨论了很激烈,我总结下提高的点:
1. @孺风 同学说的网卡绑定的时候最好和一个物理CPU的核挨个绑定,这样避免L1,L2,L3践踏。 那么如何知道那个核心对应哪个CPU呢? lscpu能帮忙:
$ lscpu
Architecture: x86_64
CPU op-mode(s): 32-bit, 64-bit
Byte Order: Little Endian
CPU(s): 16
On-line CPU(s) list: 0-15
Thread(s) per core: 2
Core(s) per socket: 4
CPU socket(s): 2
NUMA node(s): 2
Vendor ID: GenuineIntel
CPU family: 6
Model: 44
Stepping: 2
CPU MHz: 2134.000
BogoMIPS: 4266.61
Virtualization: VT-x
L1d cache: 32K
L1i cache: 32K
L2 cache: 256K
L3 cache: 12288K
NUMA node0 CPU(s): 4-7,12-15
NUMA node1 CPU(s): 0-3,8-11
我们知道 4-7,12-15属于第一个CPU, 0-3,8-11属于第二个CPU。
2. 网卡为什么不能自动中断在多核心上,这个问题我们的@炳天同学在跟进调查,以期彻底解决问题。
3. RPS是不是有用? 网卡支持多队列的时候,RPS其实没有啥用途。RPS是穷人的解决方案。
祝玩得开心!


 156
156


 被折叠的 条评论
为什么被折叠?
被折叠的 条评论
为什么被折叠?
 到【灌水乐园】发言


