


BOM
BOM 学习目标
- 什么是BOM
- window 对象的常见事件
- 定时器
- JS执行机制
- location 对象
- navigator 对象
- history 对象
一、什么是BOM
1.1 DOM 和 BOM 的区别
| DOM | BOM |
|---|---|
| 文档对象模型 | 浏览器对象模型 |
| DOM 把 文档 当做一个 对象来看待 | BOM 把 浏览器 当做一个对象来看待 |
| 顶级对象是 document | 顶级对象是 window |
| 主要学习 操作页面的元素 | 主要学习 浏览器窗口交互的一些对象 |
| W3C标准 | 兼容性不太好 不同浏览器 参数会不同 |
BOM 包含 DOM:
BOM 就是一整个浏览器 全部都是
DOM 就是 里面的内容部分
1.2 BOM的构成
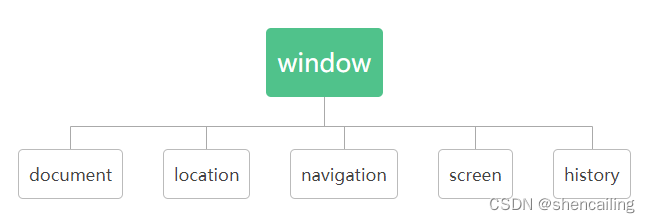
window 对象是浏览器的顶级对象
- 是JS访问浏览器窗口的接口
- 是一个全局对象。定义在全局作用域中的变量、函数 都会变成window对象的属性和方法。
在调用的时候 可以省略window 。 比如alert()
二、window对象的常见事件
2.1 onload
窗口加载事件,文档内容全部加载完 (包括页面的dom元素 图片 flash css等)才触发
window.onload 传统注册事件 只能写一次,如果有多个 前面的将会被覆盖掉 已最后一个为准
addEventListener 没有限制
window.addEventListener('load', (event) => {
  console.log('page is fully loaded');
});

window.onload = (event) => {
  console.log('page is fully loaded');
};
2.2 DOMContentLoaded
DOM加载完毕 不包括 图片 flash css 等就可以执行 加载速度比load更快一点
  document.addEventListener('DOMContentLoaded', (event) => {
    console.log('DOM fully loaded and parsed');
  });
2.3 resize
浏览器窗口变化大小的时候触发
2.3.1 window.innerWidth, window.innerHeight
window.onresize = function(){};

window.addEventListener("resize", () => {
   console.log("浏览器窗口变化",window.innerWidth, window.innerHeight);
})
//获得浏览器窗口的内容区域的宽度/高度,包含垂直/水平滚动条 (如果有的话)
2.4 setTimeout()定时器
window.setTimeout( 调用函数,延时时间)
1、window在调用的时候可以省略
    setTimeout(function () { console.log("终于显示了"); }, 2000)
//或
    function callBack() {
      console.log("终于显示了");
    }
    setTimeout(callBack, 2000);
2.5 clearTimeout 清除定时器
1、window在调用的时候可以省略
var timeoutID;

function delayedAlert() {
  timeoutID = window.setTimeout(slowAlert, 2000);
}

function slowAlert() {
  alert('That was really slow!');
}

//清除定时器
function clearAlert() {
  window.clearTimeout(timeoutID);
}
2.6 setInterval() clearInterval
1、window在调用的时候可以省略
方法重复调用一个函数或执行一个代码片段,在每次调用之间具有固定的时间间隔。
用法和上面定时器一样
2.7 this 的指向
1、全局作用域或者普通的函数中,this指向全局对象window(定时器里面的this指向window)
2、方法调用中 谁调用的 this 指向谁
3、构造函数 this指向的是实例对象
//1、全局作用域或者普通的函数中,this指向全局对象window(定时器里面的this指向window)
//1.1 全局作用域
console.log(this)//指向window
//1.2 普通的函数
function fn(){
console.log(this)//指向window
}
window.fn();

//2、方法调用中 谁调用的 this 指向谁
btn.onclick = function(){
	console.log(this) // 指向btn这个按钮
}

//3、构造函数 this指向的是实例对象
function fn(){
console.log(this); //指向的是fun这个实例对象
}
let fun = new fn();
2.8 location
2.8.1 url统一资源定位符
格式:
protocol : // host [:port] / path / [?query] #fragment
https://developer.mozilla.org/zh-CN/docs/Web/API/Location?id=1&name=2#方法
| 属性 | 说明 |
|---|---|
| protocol | 通信协议 http ftp 等 |
| host | 主机(域名) |
| port | 端口号 http默认端口号80 |
| path | 表示主机上的目录或文件地址 |
| query | 参数 (& 隔开) |
| fragment | 片段 #后面的内容 常用于链接锚点 |
2.8.2 location
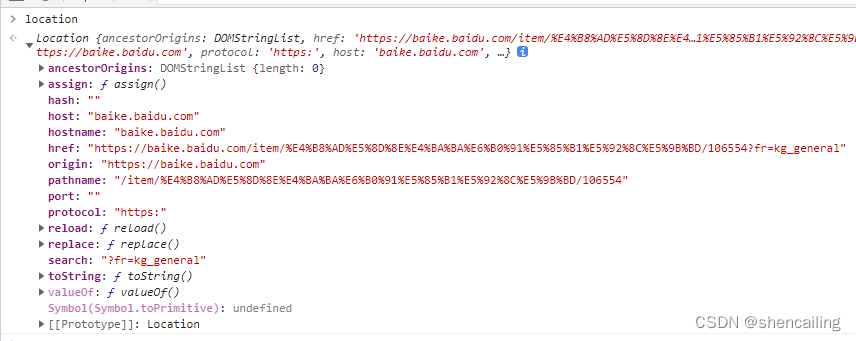
| location对象属性 | 返回值 |
|---|---|
| location.href | 获取或者设置 整个url |
| location.host | 返回主机(域名) |
| location.port | 返回端口号 没有返回空字符串 |
| location.pathname | 路径 |
| location.search | 返回参数 :?后面 的,&连接的内容 |
| location.hash | 返回片段 #后面内容 (常见于链接 锚点) |
//这样子 可以跳转到对应网址的网页
location.href = "http://..."
//跳转 和href一样 可以后退
location.assign(url);
//不可以 退回去
location.replace(url);
//方法用来刷新当前页面,就像刷新按钮一样。
//参数:
//()里面为空的 或者 false 表示刷新 f5 从缓存中刷新
//()里面为 true 强制刷新 ctrl + f5
location.reload()
2.9 Navigator对象
2.9.1 navigator.userAgent
返回当前浏览器的用户代理。可以知道是什么浏览器打开的页面

2.10 History
接口允许操作浏览器的曾经在标签页或者框架里访问的会话历史记录。
History.back();
history.go(-1)

History.forward()
History.go(1)
//如果当前页为第一页,前面已经没有页面了,我传参的值为-1,那么这个方法没有任何效果也不会报错。
//调用没有参数的 go() 方法或者参数值为 0 时,重新载入当前页面。
三、 offset
3.1 offsetTop 元素的顶部距离 offsetLeft 左边
offsetParent :返回一个指向最近的(指包含层级上的最近)包含该元素的定位元素或者最近的 table,td,th,body元素
<div id="container">
   <div id="content"></div>
</div>

.container {
  // position: absolute;
}

let container = document.querySelector("#container");
console.log("offsetParent  container:", container.offsetParent);
//自己是chrome浏览器,返回的是 <body> ... </body>

let content = document.querySelector("#content");
console.log("offsetParent  content:", content.offsetParent);
//设置了 position 属性值,只要不为 static,那么 content.offsetParent 就是 <div>...</div>;
//否则也是 <body>...</body>
offsetTop offsetLeft 相对的是 自己的offsetParent这个容器 不是所有都是相对于body的
var d = document.getElementById("div1");
var topPos = d.offsetTop;
3.2 offsetWidth元素的宽度 offsetHeight 元素的像素高度
- 只可读 包含元素的边框 (border)、水平线上的内边距 (padding)、竖直方向滚动条 (scrollbar)(如果存在的话)、以及 CSS 设置的宽度 (width) 的值
- 和style 的区别就是 style 是可读写的
四、client
4.1 clientHeight clientWidth
元素内部的高度/宽度 (单位像素):包括内边距 padding,但不包括边框 border、外边距 margin 和垂直、水平滚动条(如果有的话)
4.2 clientTop clientLeft
clientLeft表示一个元素的左边框的宽度,该属性包括滚动条的宽度。clientLeft 不包括左外边距和左内边距。clientLeft 是只读的。 clientTop一样 (左边框没有输出是0)
五、立即执行函数(立即调用函数表达式)
两种不同的写法,可以立即执行此函数。
// 1、方法1
(function(){})()
// 2、方法2
(function(){}())
六、scroll 元素被卷的
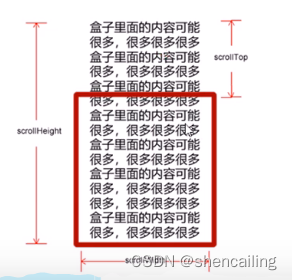
6.1 scrollHeight scrollWidth
这个只读属性是一个元素内容高度的度量,包括由于溢出导致的视图中不可见内容。不包括边框
6.2 scrollTop scrollLeft
- 被卷去的 上 / 左 侧的内容
- 比如 上图的scrollTop,是边框的下沿到内容的顶部
整个页面被卷:用window:
window.pageYOffset (Window.scrollY)
七、 动画
7.1 实现动画 缓动动画
    // 动画 + 回调函数
    function animate(obj, target, callBack) {
      // 多次连续点击 出现运动过快的问题 需要清除以前的定时器,只保留当前的一个定时器执行
      clearInterval(obj.timer);
      obj.timer = setInterval(function () {
        // 步长公式:(目标值 - 现在的位置) / 10;
        var step = (target - obj.offsetLeft) / 10;
        step = step > 0 ? Math.ceil(step) : Math.floor(step);
        console.log("step", step);
        if (obj.offsetLeft == target) {
          clearInterval(obj.timer);
          if (callBack) {
            console.log("callBack", callBack);
            callBack();
          }
        }
        // 缓动动画 step:步长值改为一个慢慢变小的值(步长公式在上面)
        obj.style.left = obj.offsetLeft + step + "px";
      }, 15)

      // clearInterval(obj.timer);
      // obj.timer = setInterval(function () {
      //   let step = (target - ani.offsetTop) / 10;
      //   step = step > 0 ? Math.ceil(step) : Math.floor(step);
      //   if (ani.offsetTop == target) {
      //     clearInterval(obj.timer)
      //   }
      //   ani.style.top = ani.offsetTop + step + "px";
      // }, 15)
    }

    var btn500 = document.querySelector(".btn500");
    var btn800 = document.querySelector(".btn800");
    var ani = document.querySelector("#animate");
    btn500.addEventListener("click", function () {
      animate(ani, 500, function () {
      //这里的回调函数 修改了停止动画时 动画对象的样式
        ani.style.backgroundColor = "yellow";
      })
    })
    btn800.addEventListener("click", function () {
      animate(ani, 800)
    })
7.2 动画函数 独立js文件 后续可以复用
1、将动画的内容 放到js文件中
export function animate(obj, target, callBack) {
    // 多次连续点击 出现运动过快的问题 需要清除以前的定时器,只保留当前的一个定时器执行
    clearInterval(obj.timer);
    obj.timer = setInterval(function () {
        // 步长公式:(目标值 - 现在的位置) / 10;
        var step = (target - obj.offsetLeft) / 10;
        step = step > 0 ? Math.ceil(step) : Math.floor(step);
        console.log("step", step);
        if (obj.offsetLeft == target) {
            clearInterval(obj.timer);
            if (callBack) {
                console.log("callBack", callBack);
                callBack();
            }
        }
        // 缓动动画 step:步长值改为一个慢慢变小的值(步长公式在上面)
        obj.style.left = obj.offsetLeft + step + "px";
    }, 15)
}
2、需要用的地方引入
import { animate } from "./animate";

btn500.addEventListener("mouseover", function () {
  animate(ani, 100);
})
//callback 可以有 可以没有
btn500.addEventListener("mouseover", function () {
  animate(ani, 100 , function(){
  //......
  });
})
7.3 动画 for循环重复使用
<div :id="'iconContainer'+index" style="position: relative; marginTop:2rem; width:50px; height:50px" v-for="i,index in 3">
      <div :id="'icon'+index">
        <van-icon name="arrow" size="50px" style="backgroundColor: #a5d6a7; position: absolute; left:0 ; z-index:999; display:inline-block"
          :id="'iconRight'+index" />
        <van-icon name="arrow-left" size="50px" style="backgroundColor: #a5d6a7; position: absolute; left:0 ; z-index:999; display:none"
          :id="'iconLeft'+index" />
      </div>
      <div style="width:200px; height:50px; backgroundColor:#4db6ac; position:absolute; left:-200px" :id="'content'+index">111111</div>
    </div>
//这个animate文件前面的同一个
import { animate } from "./animate";

    // 动画组件的循环使用
    for (const key of [0, 1, 2]) {
      console.log("key", key);
      let icon = document.querySelector(`#icon${key}`);
      let iconRight = document.querySelector(`#iconRight${key}`);
      let iconLeft = document.querySelector(`#iconLeft${key}`);
      let content = document.querySelector(`#content${key}`);

      icon.addEventListener("mouseover", function () {
        animate(content, 50, function () {
          iconRight.style.display = "none";
          iconLeft.style.display = "inline-block";
        })
      });
      icon.addEventListener("mouseleave", function () {
        animate(content, -200, function () {
          iconRight.style.display = "inline-block";
          iconLeft.style.display = "none";
        })
      });
    }
7.4 走马灯 js案例
<div class="focus">
<div class="arrow-l"><</div>
<div class="arrow-r">></div>
<ul>
<li style="backgroundColor:rgba(187,222,251,1)">111</li>
<li style="backgroundColor:rgba(77,208,225,1)">2222</li>
<li style="backgroundColor:rgba(129,199,132,1)">333</li>
<li style="backgroundColor:rgba(255,202,40,1)">444</li>
</ul>
<ol class="circle">
<!-- <li></li>
<li></li>
<li></li>
<li></li> -->
</ol>
</div>
<style lang="scss" scoped>
.focus {
  width: 300px;
  height: 200px;
  position: relative;
  overflow: hidden;
  .arrow-l {
    display: none;
    position: absolute;
    left: 0;
    top: 80px;
    width: 50px;
    height: 40px;
    line-height: 40px;
    font-size: 20px;
    background-color: rgba(224, 224, 224, 1);
    z-index: 9999;
  }
  .arrow-r {
    display: none;
    position: absolute;
    right: 0;
    top: 80px;
    width: 50px;
    height: 40px;
    line-height: 40px;
    font-size: 20px;
    background-color: rgba(224, 224, 224, 1);
    z-index: 9999;
  }
  ul {
    height: 200px;
    width: 1500px;
    position: absolute;
    li {
      float: left;
      width: 300px;
      height: 200px;
    }
  }
  .circle {
    position: absolute;
    bottom: 0;
    left: 50%;
    transform: translateX(-50%);
  }
  // 小圆圈动态生成 这个样式会不生效
  // .circle .current {
  //   background-color: rgb(128, 123, 123);
  //   float: left;
  //   margin-left: 5px;
  //   width: 10px;
  //   height: 10px;
  //   // border: 1px solid #000;
  //   border-radius: 50%;
  // }
  // .circle li {
  //   float: left;
  //   margin-left: 5px;
  //   width: 10px;
  //   height: 10px;
  //   // border: 1px solid #000;
  //   background-color: rgb(206, 204, 204);
  //   border-radius: 50%;
  // }
}
</style>

<style>
.focus .circle .current {
  background-color: rgb(128, 123, 123);
  float: left;
  margin-left: 5px;
  width: 10px;
  height: 10px;
  border-radius: 50%;
}
.focus .circle li {
  float: left;
  margin-left: 5px;
  width: 10px;
  height: 10px;
  background-color: rgb(206, 204, 204);
  border-radius: 50%;
}
</style>
主要内容:
  // 1、获取元素
    var arrow_l = document.querySelector(".arrow-l")
    var arrow_r = document.querySelector(".arrow-r")
    var focus = document.querySelector(".focus")
    // 显示用的盒子的宽度
    var focusWidth = focus.offsetWidth;
    // 2、鼠标经过focus 就显示隐藏左右按钮
    focus.addEventListener("mouseenter", function () {
      arrow_l.style.display = "block";
      arrow_r.style.display = "block";
    });
    focus.addEventListener("mouseleave", function () {
      arrow_l.style.display = "none";
      arrow_r.style.display = "none";
    });
    //3、动态生成小圆圈 有几张图片,就生成几个小圆圈
    var ul = focus.querySelector("ul");
    var ol = focus.querySelector(".circle");
    for (var i = 0; i < ul.children.length; i++) {
      //创建一个小li
      var li = document.createElement("li");
      //记录当前小圆圈的索引号 通过自定义属性来做
      li.setAttribute("data-index", i);
      // 把小li插入到ol里面
      ol.appendChild(li);
      //4、小圆圈的排他思想 生成小圆圈的同时绑定点击事件
      li.addEventListener("click", function () {
        // 干掉所有人 把所有的小li 清除current类型
        for (var i = 0; i < ol.children.length; i++) {
          ol.children[i].className = "";
        }
        //留下我自己(点击的小圆圈) 当前的li设置 current类名
        this.className = "current";
        //5、点击小圆圈、移动图片 移动的是ul
        // 移动的距离是 -(小圆圈的索引值 * 一张图片的宽度)
        // 点击哪个小li 就拿哪个小li的索引值
        var index = this.getAttribute("data-index");
        // 把点击的li的索引值 给num
        num = index;
        // 当我们点击某个小li 就要把这个小li 的索引值给circle
        circle = index;
        animate(ul, -index * focusWidth);
      })
    }
    // 把ol里面的第一个小li设置类名为current
    console.log("ol 下的 li", ol.children[0].style);
    ol.children[0].className = "current";
    //6、 循环播放用 克隆第一张图片li放到ul最后面
    var first = ul.children[0].cloneNode(true);
    ul.appendChild(first);
    //7、点击右侧按钮,图片滚动一张
    var num = 0;
    //circle 控制小圆圈的播放
    var circle = 0;
    arrow_r.addEventListener("click", function () {
      // 如果走到了最后复制的图片,此时 需要将 ul 快速复原 left 为 0
      if (num == ul.children.length - 1) {
        ul.style.left = 0;
        num = 0;
      }
      num++;
      animate(ul, -num * focusWidth);
      // 8. 点击右侧按钮 小圆圈随着变化 可以再声明一个变量控制小圆圈的播放
      circle++;
      // 如果circle == 4 说明 说明走到最后我们克隆的这张图片了 我们就复原
      if (circle == ol.children.length) {
        circle = 0;
      }
      //调用函数
      circleChange();

    })

    // 9. 左侧的按钮做法
    arrow_l.addEventListener("click", function () {
      if (num == 0) {
        num = ul.children.length - 1;
        ul.style.left = -num * focusWidth + "px";
      }
      num--;
      animate(ul, -num * focusWidth);
      //  点击左侧按钮 小圆圈随着变化 可以再声明一个变量控制小圆圈的播放
      circle--;
      // 如果circle < 4 说明 第一张 小圆圈要改成最后一个
      circle = circle < 0 ? ol.children.length - 1 : circle;
      //调用函数
      circleChange();
    })

    function circleChange() {
      // 先清除其他小圆圈的current类名
      for (var i = 0; i < ol.children.length; i++) {
        ol.children[i].className = "";
      }
      //留下当前 小圆圈的current类名
      ol.children[circle].className = "current";
    }
    // 10. 自动播放轮播图
    // var timer = setInterval(function () {
    //   //手动调用点击事件
    //   arrow_r.click();
    // }, 2000)
7.5 动画transition
transition是不同状态的过渡;
过渡的开始 过渡的结束 ontransitionrun ontransitionend ;
let box = document.querySelector(".box");
box.ontransitionrun = function(event) {
  box.textContent = "Zooming...";
}
box.ontransitionend = function(event) {
  box.textContent = "Done!";
}
八、本地存储
会有本地存储大量数据的需求
本地存储特性:
1、数据存储再用户浏览器中
2、设置、读取方便、甚至页面刷新不丢失数据
3、容量较大、sessionStorage约5M、localStorage约20M
4、只能存储字符串、可以将对象JSON.stringify()编码后存储
一下两种最大的**区别:**就是生命周期的区别
8.1 window.sessionStorage
1、生命周期为关闭浏览器窗口(就是浏览器关闭,里面的数据也是会没有的)
2、在同一个窗口(页面)下,数据可以共享
3、以键值对的形式存储使用
语法:
// 保存数据到 sessionStorage
sessionStorage.setItem('key', 'value');

// 从 sessionStorage 获取数据
let data = sessionStorage.getItem('key');

// 从 sessionStorage 删除保存的数据
sessionStorage.removeItem('key');

// 从 sessionStorage 删除所有保存的数据
sessionStorage.clear();
8.2 window.localStorage
1、生命周期永久生效,除非手动删除、否则关闭页面也会存在
2、可以多窗口(页面)共享(统一浏览器可以共享)
3、以键值对的形式存储
语法:
//保存数据
localStorage.setItem('myCat', 'Tom');

//该语法用于读取 localStorage 项,如下:
let cat = localStorage.getItem('myCat');

//该语法用于移除 localStorage 项,如下:
localStorage.removeItem('myCat');

// 移除所有
localStorage.clear();


 353
353


 被折叠的 条评论
为什么被折叠?
被折叠的 条评论
为什么被折叠?
 到【灌水乐园】发言


