


 该博客主要介绍了WDNet网络结构,它结合小波变换和双Branch设计,通过一系列卷积和ResidualDenseBlock处理图像,用于去除摩尔纹。此外,还讲解了DPM方向感知模块,该模块利用改进的irnn结构,考虑了图像的四个方向信息,增强了局部特征的捕捉。训练过程中采用了多个损失函数,包括L1损失和感知损失,以提升网络性能。
1.网络结构搭建
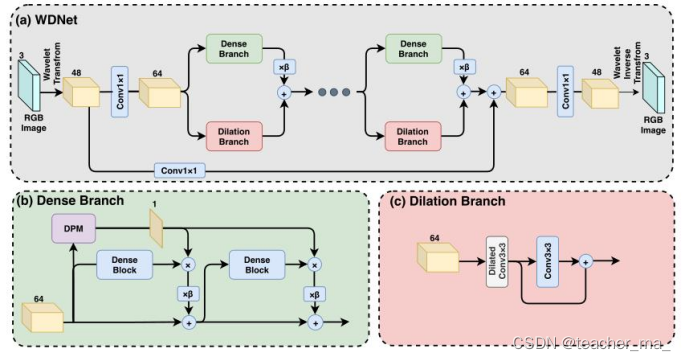
原始图像经小波变换后,输入到网络框架中,代码定义了一个WDNet class,根据网络结构,先经过一系列卷积操作,然后进入到双Branch结构,这个结构一共有七个,串联输入输出结构后,再经一系列卷积和逆小波变换得到最终输出结果。
class WDNet(nn.Module):
    def __init__(self,in_channel=3):
        super(WDNet,self).__init__()

        self.cascade1=nn.Sequential(
            Conv2d(48, 64 , 1 , stride=1, padding=0),

            nn.LeakyReLU(0.2, inplace=True),

            Conv2d(64, 64 , 3 , stride=1),

            nn.LeakyReLU(0.2, inplace=True),
        )

        self.cascade2=nn.Sequential(

            DMDB2(64, kernel_size=3, gc=32, stride=1, bias=True, pad_type='zero', \
            norm_type=None, act_type='leakyrelu', mode='CNA',delia=1),

            DMDB2(64, kernel_size=3, gc=32, stride=1, bias=True, pad_type='zero', \
            norm_type=None, act_type='leakyrelu', mode='CNA',delia=2),

            DMDB2(64, kernel_size=3, gc=32, stride=1, bias=True, pad_type='zero', \
            norm_type=None, act_type='leakyrelu', mode='CNA',delia=5),

            DMDB2(64, kernel_size=3, gc=32, stride=1, bias=True, pad_type='zero', \
            norm_type=None, act_type='leakyrelu', mode='CNA',delia=7),

            DMDB2(64, kernel_size=3, gc=32, stride=1, bias=True, pad_type='zero', \
            norm_type=None, act_type='leakyrelu', mode='CNA',delia=12),

            DMDB2(64, kernel_size=3, gc=32, stride=1, bias=True, pad_type='zero', \
            norm_type=None, act_type='leakyrelu', mode='CNA',delia=19),

            DMDB2(64, kernel_size=3, gc=32, stride=1, bias=True, pad_type='zero', \
            norm_type=None, act_type='leakyrelu', mode='CNA',delia=31)
        )

        self.final=nn.Sequential(
            conv_block(64,48, kernel_size=1, norm_type=None, act_type=None)
        )
        self.xbranch=nn.Sequential(
            conv_block(3,64, kernel_size=3, norm_type=None, act_type='leakyrelu')
        )


    def forward(self, x):
        x1 = self.cascade1(x)
        #pdb.set_trace()

        x1 = self.cascade2(x1)

        x = self.final(x1)

        return x
双分支结构定义了一个DMDB2 class,其中dense branch如文章结构所示,输入特征经过一个RDB模块,然后RDB模块输出与输入相加再输入到下一个RDB模块,最后乘以系数与扩张分支相加。
扩张分支比较简单,扩张卷积、正常卷积、扩展相加等。
class DMDB2(nn.Module):
    """
    DeMoireing  Dense Block
    """

    def __init__(self, nc, kernel_size=3, gc=32, stride=1, bias=True, pad_type='zero', \
            norm_type=None, act_type='leakyrelu', mode='CNA',delia=1):
        super(DMDB2, self).__init__()
        self.RDB1 = ResidualDenseBlock_5C(nc, kernel_size, gc, stride, bias, pad_type, \
            norm_type, act_type, mode)
        self.RDB2 = ResidualDenseBlock_5C(nc, kernel_size, gc, stride, bias, pad_type, \
            norm_type, act_type, mode)

        self.deli = nn.Sequential(
            Conv2d(64, 64 , 3, stride=1, dilation=delia),
            nn.LeakyReLU(0.2, inplace=True),
        )
        self.deli2 = nn.Sequential(
            Conv2d(64, 64 , 3, stride=1),
            nn.LeakyReLU(0.2, inplace=True),
        )
        #self.sam1 = SAM(64,64,1)
        #self.sam2 = SAM(64,64,1)
    def forward(self, x):
        #att1 = self.sam1(x)
        #att2 = self.sam2(x)

        out = self.RDB1(x)
        out = out+x
        out2 = self.RDB2(out)

        out3 = self.deli(x)+0.2*self.deli2(self.deli(x))
        return out2.mul(0.2)+ out3
2.DPM方向感知模块
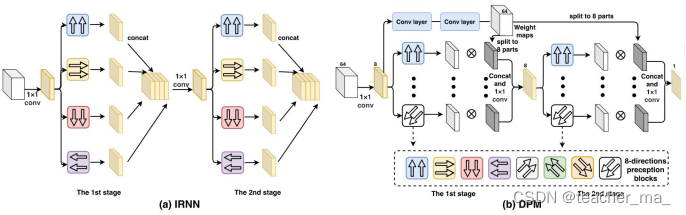
整个DPM分为两个stage,本文对irnn结构进行改进,增添了对角线四个方向,充分利用了局部信息。方向特征计算完后,乘以一个attention输出特征图,然后进行拼接操作,再经一个卷积层,输出到第二阶段,以此类推,根据论文的结构图可以详细理解代码内容。
class ChannelAttention(nn.Module):
    def __init__(self, in_planes, ratio=16):
        super(ChannelAttention, self).__init__()
        self.avg_pool = nn.AdaptiveAvgPool2d(1)
        self.max_pool = nn.AdaptiveMaxPool2d(1)

        self.fc1   = nn.Conv2d(in_planes, in_planes // 8, 1, bias=False)
        self.relu1 = nn.ReLU()
        self.fc2   = nn.Conv2d(in_planes // 8, in_planes, 1, bias=False)

        self.sigmoid = nn.Sigmoid()

    def forward(self, x):
        avg_out = self.fc2(self.relu1(self.fc1(self.avg_pool(x))))
        max_out = self.fc2(self.relu1(self.fc1(self.max_pool(x))))
        out = avg_out + max_out
        return self.sigmoid(out)

class irnn_layer(nn.Module):
    def __init__(self, in_channels):
        super(irnn_layer, self).__init__()
        self.left_weight = nn.Parameter(torch.tensor(1.0), True)
        self.right_weight = nn.Parameter(torch.tensor(1.0), True)
        self.up_weight = nn.Parameter(torch.tensor(1.0), True)
        self.down_weight = nn.Parameter(torch.tensor(1.0), True)

        self.zuoshang_weight = nn.Parameter(torch.tensor(1.0), True)
        self.zuoxia_weight = nn.Parameter(torch.tensor(1.0), True)
        self.youshang_weight = nn.Parameter(torch.tensor(1.0), True)
        self.youxia_weight = nn.Parameter(torch.tensor(1.0), True)

    def forward(self, x):
        _, _, H, W = x.shape
        top_left = x.clone()
        top_right = x.clone()
        top_up = x.clone()
        top_down = x.clone()
        top_zuoshang = x.clone()
        top_zuoxia = x.clone()
        top_youshang = x.clone()
        top_youxia = x.clone()

        for i in range(H - 1):
            top_down[:, :, i + 1, :] = F.relu(
                top_down[:, :, i, :].clone() * self.down_weight + top_down[:, :, i + 1, :], inplace=False)
            top_up[:, :, -(i + 2), :] = F.relu(
                top_up[:, :, -(i + 1), :].clone() * self.up_weight + top_up[:, :, -(i + 2), :], inplace=False)

            top_zuoxia[:, :, i + 1, 1:W] = F.relu(
                top_zuoxia[:, :, i, 0:W-1].clone() * self.down_weight + top_zuoxia[:, :, i + 1, 1:W], inplace=False)

            top_youxia[:, :, i + 1, 0:W-1] = F.relu(
                top_youxia[:, :, i, 1:W ].clone() * self.down_weight + top_youxia[:, :, i + 1, 0:W-1], inplace=False)

        for i in range(W - 1):
            top_right[:, :, :, i + 1] = F.relu(
                top_right[:, :, :, i].clone() * self.right_weight + top_right[:, :, :, i + 1], inplace=False)
            top_left[:, :, :, -(i + 2)] = F.relu(
                top_left[:, :, :, -(i + 1)].clone() * self.left_weight + top_left[:, :, :, -(i + 2)], inplace=False)

            top_zuoshang[:, :, 1:H,i + 1] = F.relu(
                top_zuoshang[:, :,0:H-1 ,i ].clone() * self.down_weight + top_zuoshang[:, :, 1:H,i + 1], inplace=False)

            top_youshang[:, :, 0:H- 1,i + 1 ] = F.relu(
                top_youshang[:, :, 1:H,i ].clone() * self.down_weight + top_youshang[:, :, 0:H - 1,i + 1], inplace=False)


        return (top_up, top_right, top_down, top_left,top_zuoxia,top_youxia,top_zuoshang,top_youshang)
class SAM(nn.Module):
    def __init__(self, in_channels, out_channels, attention=1):
        super(SAM, self).__init__()
        self.out_channels = out_channels
        self.irnn1 = irnn_layer(self.out_channels)
        self.irnn2 = irnn_layer(self.out_channels)
        self.conv_in = conv3x3(in_channels, self.out_channels)
        self.relu1 = nn.ReLU(True)

        self.conv1 = nn.Conv2d(64 , self.out_channels , kernel_size=1, stride=1, padding=0)
        self.conv2 = nn.Conv2d(self.out_channels * 8, self.out_channels, kernel_size=1, stride=1, padding=0)
        self.conv3 = nn.Conv2d(self.out_channels * 8, self.out_channels, kernel_size=1, stride=1, padding=0)
        self.relu2 = nn.ReLU(True)
        self.attention = attention
        if self.attention:
            self.attention_layer = Attention(in_channels)
        self.conv_out = conv1x1(self.out_channels, 1)
        self.sigmod = nn.Sigmoid()

    def forward(self, x):
        if self.attention:
            wight = self.attention_layer(x)
        out = self.conv1(x)
        top_up, top_right, top_down, top_left, top_zuoxia, top_youxia, top_zuoshang, top_youshang = self.irnn1(out)

        # direction attention
        if self.attention:
            top_up.mul(wight[:, 0:1, :, :])
            top_right.mul(wight[:, 1:2, :, :])
            top_down.mul(wight[:, 2:3, :, :])
            top_left.mul(wight[:, 3:4, :, :])

            top_zuoxia.mul(wight[:, 4:5, :, :])
            top_youxia.mul(wight[:, 5:6, :, :])
            top_zuoshang.mul(wight[:, 6:7, :, :])
            top_youshang.mul(wight[:, 7:8, :, :])

        out = torch.cat([top_up, top_right, top_down, top_left,top_zuoxia, top_youxia, top_zuoshang, top_youshang], dim=1)
        out = self.conv2(out)
        top_up, top_right, top_down, top_left,top_zuoxia, top_youxia, top_zuoshang, top_youshang = self.irnn2(out)

        # direction attention
        if self.attention:
            top_up.mul(wight[:, 0:1, :, :])
            top_right.mul(wight[:, 1:2, :, :])
            top_down.mul(wight[:, 2:3, :, :])
            top_left.mul(wight[:, 3:4, :, :])

            top_zuoxia.mul(wight[:, 4:5, :, :])
            top_youxia.mul(wight[:, 5:6, :, :])
            top_zuoshang.mul(wight[:, 6:7, :, :])
            top_youshang.mul(wight[:, 7:8, :, :])

        out = torch.cat([top_up, top_right, top_down, top_left,top_zuoxia, top_youxia, top_zuoshang, top_youshang], dim=1)
        out = self.conv3(out)
        out = self.relu2(out)
        #mask = self.sigmod(self.conv_out(out))
        mask = self.conv_out(out)
        #pdb.set_trace()
        return mask
3.训练和Loss计算
根据本文的Loss,一共设计了四个大Loss,但代码有所变化,用到的最终loss如下。loss_p为preceptual感知损失,loss_textures为论文里的Ldetail
loss_G = 0.001*loss_GAN + (  1*loss_p) + loss_sr.mul(100) + loss_lr.mul(10) + loss_textures.mul(5)  # +  loss_tv  loss_pixel
def loss_Textures(x, y, nc=3, alpha=1.2, margin=0):
  xi = x.contiguous().view(x.size(0), -1, nc, x.size(2), x.size(3))
  yi = y.contiguous().view(y.size(0), -1, nc, y.size(2), y.size(3))

  xi2 = torch.sum(xi * xi, dim=2)
  yi2 = torch.sum(yi * yi, dim=2)
  #pdb.set_trace()    #15*32*32
  out = nn.functional.relu(yi2.mul(alpha) - xi2 + margin)

  return torch.mean(out)

def compute_l1_loss(input, output):
    return torch.mean(torch.abs(input-output))

loss_lr = compute_l1_loss(wavelets_lr_fake_B[:,0:3,:,:],  wavelets_lr_b )
loss_sr = compute_l1_loss(wavelets_sr_fake_B,  wavelets_sr_b )

loss_pixel=criterion_pixelwise = torch.nn.L1Loss()#  smoothl1loss()

p0=compute_l1_loss(fake_B*255-tensor_c,real_B*255-tensor_c)*2
p1=compute_l1_loss(loss_fake_B['relu1'],loss_real_B['relu1'])/2.6
p2=compute_l1_loss(loss_fake_B['relu2'],loss_real_B['relu2'])/4.8
#p3=compute_l1_loss(loss_fake_B['relu3'],loss_real_B['relu3'])/3.7
#p4=compute_l1_loss(loss_fake_B['relu4'],loss_real_B['relu4'])/5.6
#p5=compute_l1_loss(loss_fake_B['relu5'],loss_real_B['relu5'])/5.6     #   *10/1.5
loss_p = p0+p1+p2   #+p3+p4+p5
至于本文的训练代码,就是torch一般的参数配置、数据处理、损失函数、反向传播等那一套代码流程,在此不过多阐述。


 2万+
2万+

 被折叠的 条评论
为什么被折叠?
被折叠的 条评论
为什么被折叠?
 到【灌水乐园】发言


