


1.简介
本文介绍了一种名为Matrix-Game的交互式世界基础模型,专门用于可控的游戏世界生成。
Matrix-Game通过一个两阶段的训练流程来实现:首先进行大规模无标签预训练以理解环境,然后进行动作标记训练以生成交互式视频。为此,研究者们构建了一个名为Matrix-Game-MC的综合Minecraft数据集,包含超过2700小时的无标签游戏视频片段和超过1000小时的高质量标记片段,这些片段具有精细的键盘和鼠标动作注释。Matrix-Game采用基于参考图像、运动上下文和用户动作的可控图像到世界生成范式,拥有超过170亿个参数,能够精确控制角色动作和摄像机运动,同时保持高视觉质量和时间连贯性。
为了评估性能,研究者们开发了GameWorld Score,这是一个统一的基准,用于衡量Minecraft世界生成的视觉质量、时间质量、动作可控性和物理规则理解。广泛的实验表明,Matrix-Game在所有指标上均优于现有的开源Minecraft世界模型,包括Oasis和MineWorld,特别是在可控性和3D一致性方面表现出色。双盲人类评估进一步证实了Matrix-Game的优越性,强调了其在多样化游戏场景中生成感知上逼真且精确可控的视频的能力。
github地址:GitHub - SkyworkAI/Matrix-Game: Matrix-Game: Interactive World Foundation Model
论文地址:Matrix-Game/assets/report.pdf at main · SkyworkAI/Matrix-Game · GitHub
权重地址:https://huggingface.co/Skywork/Matrix-Game
项目主页:Matrix-Game: Interactive World Foundation Model
基准测试:https://github.com/SkyworkAI/Matrix-Game/tree/main/GameWorldScore
-
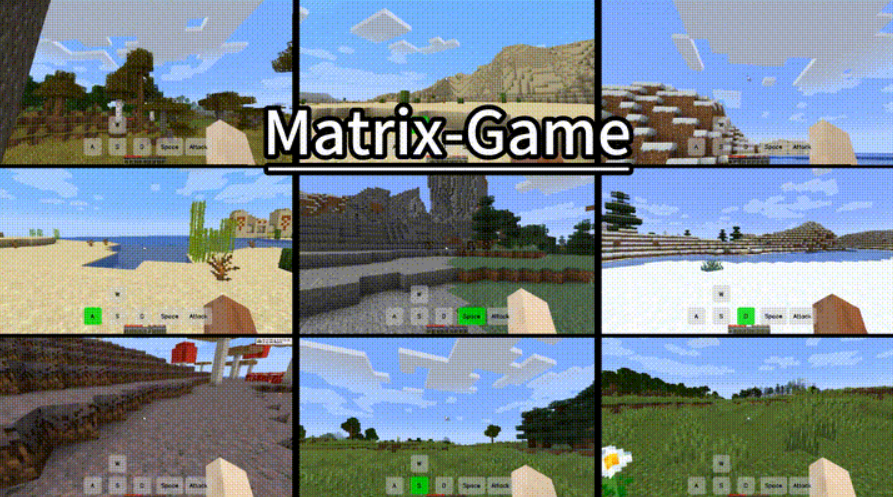
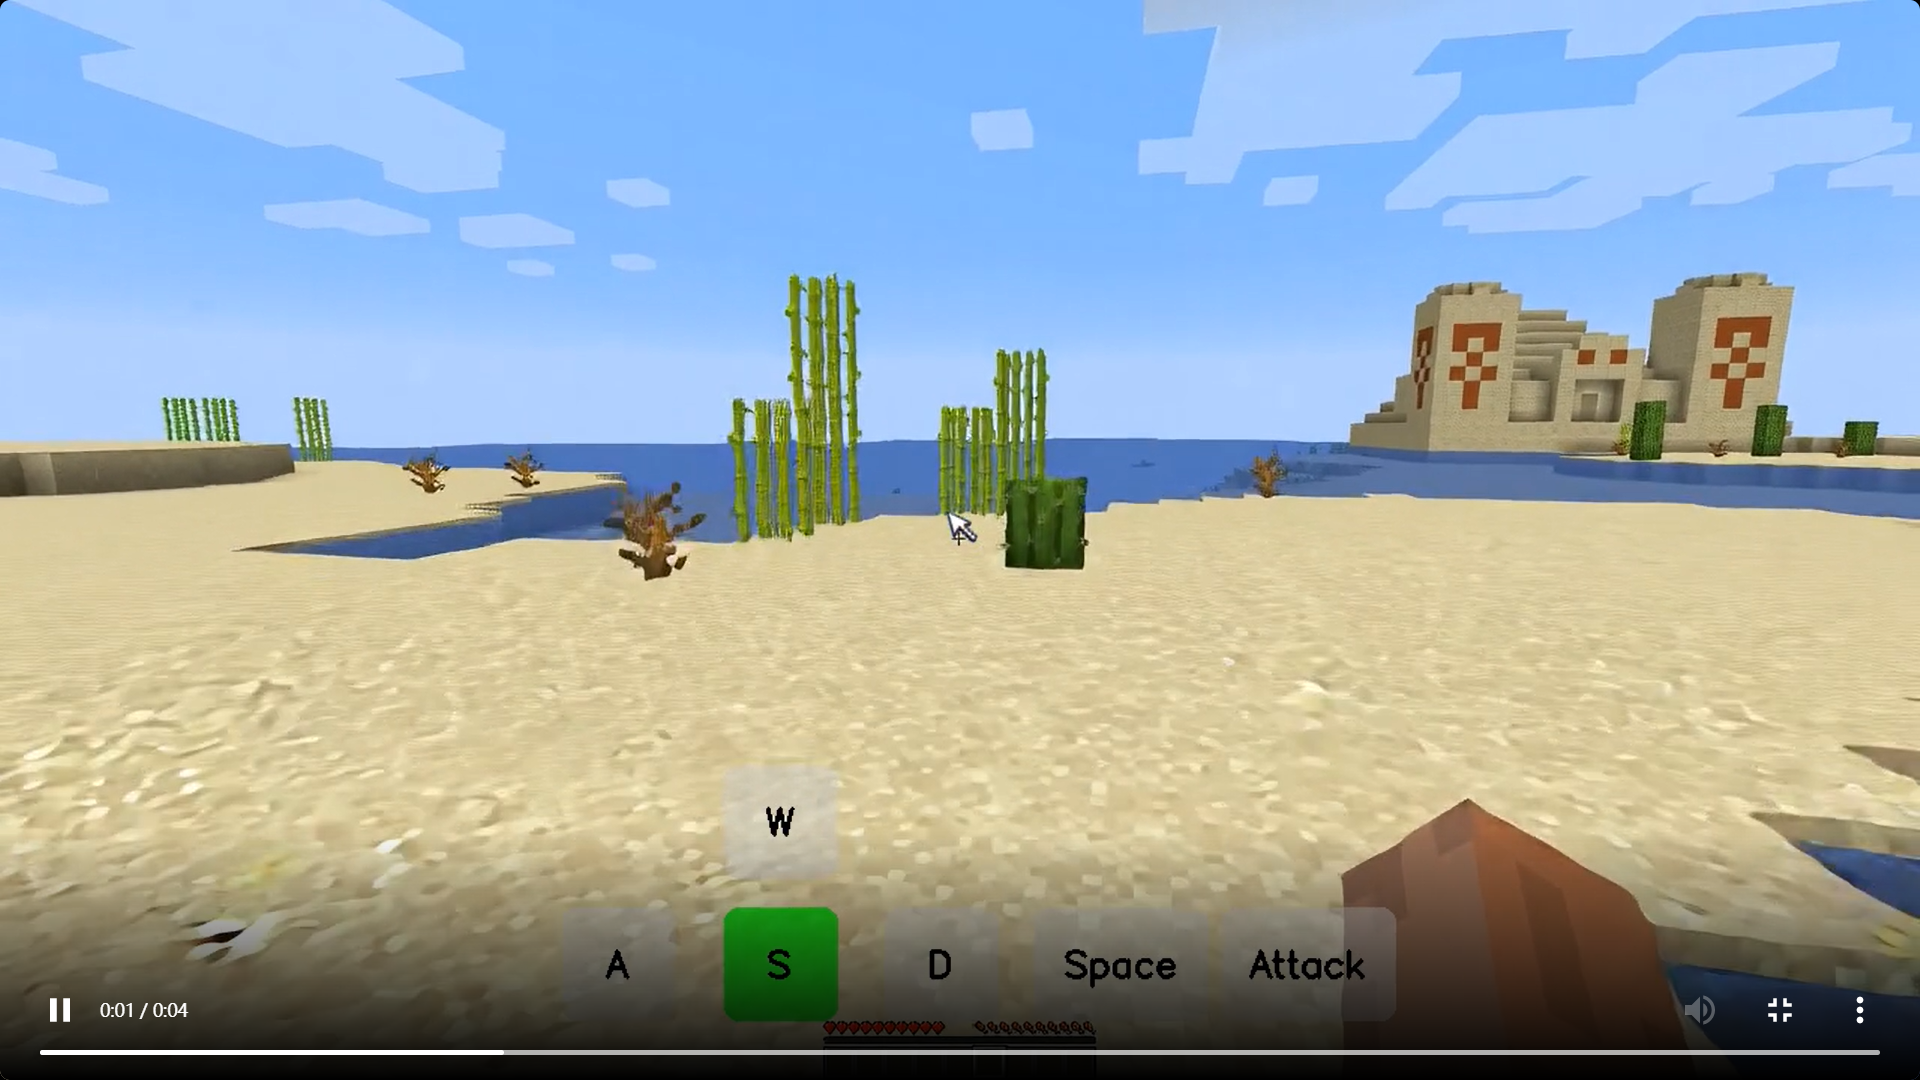
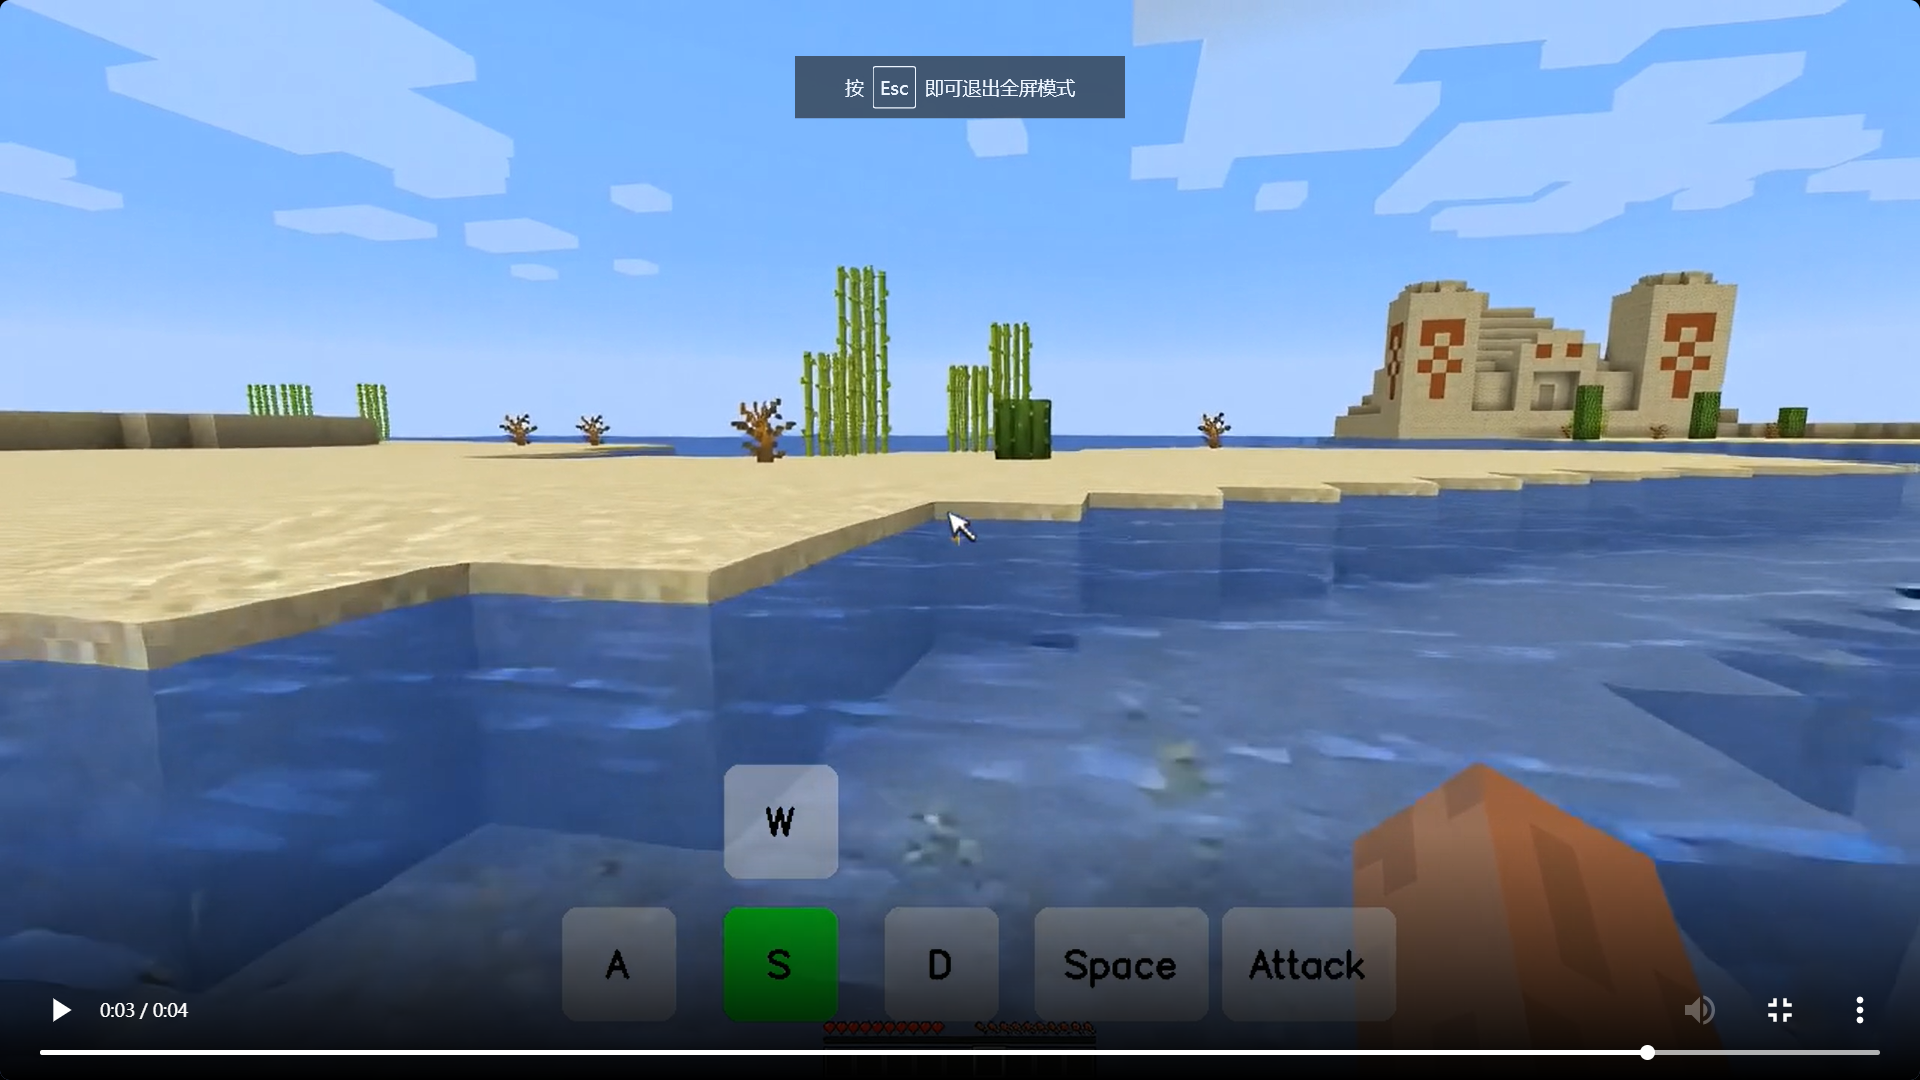
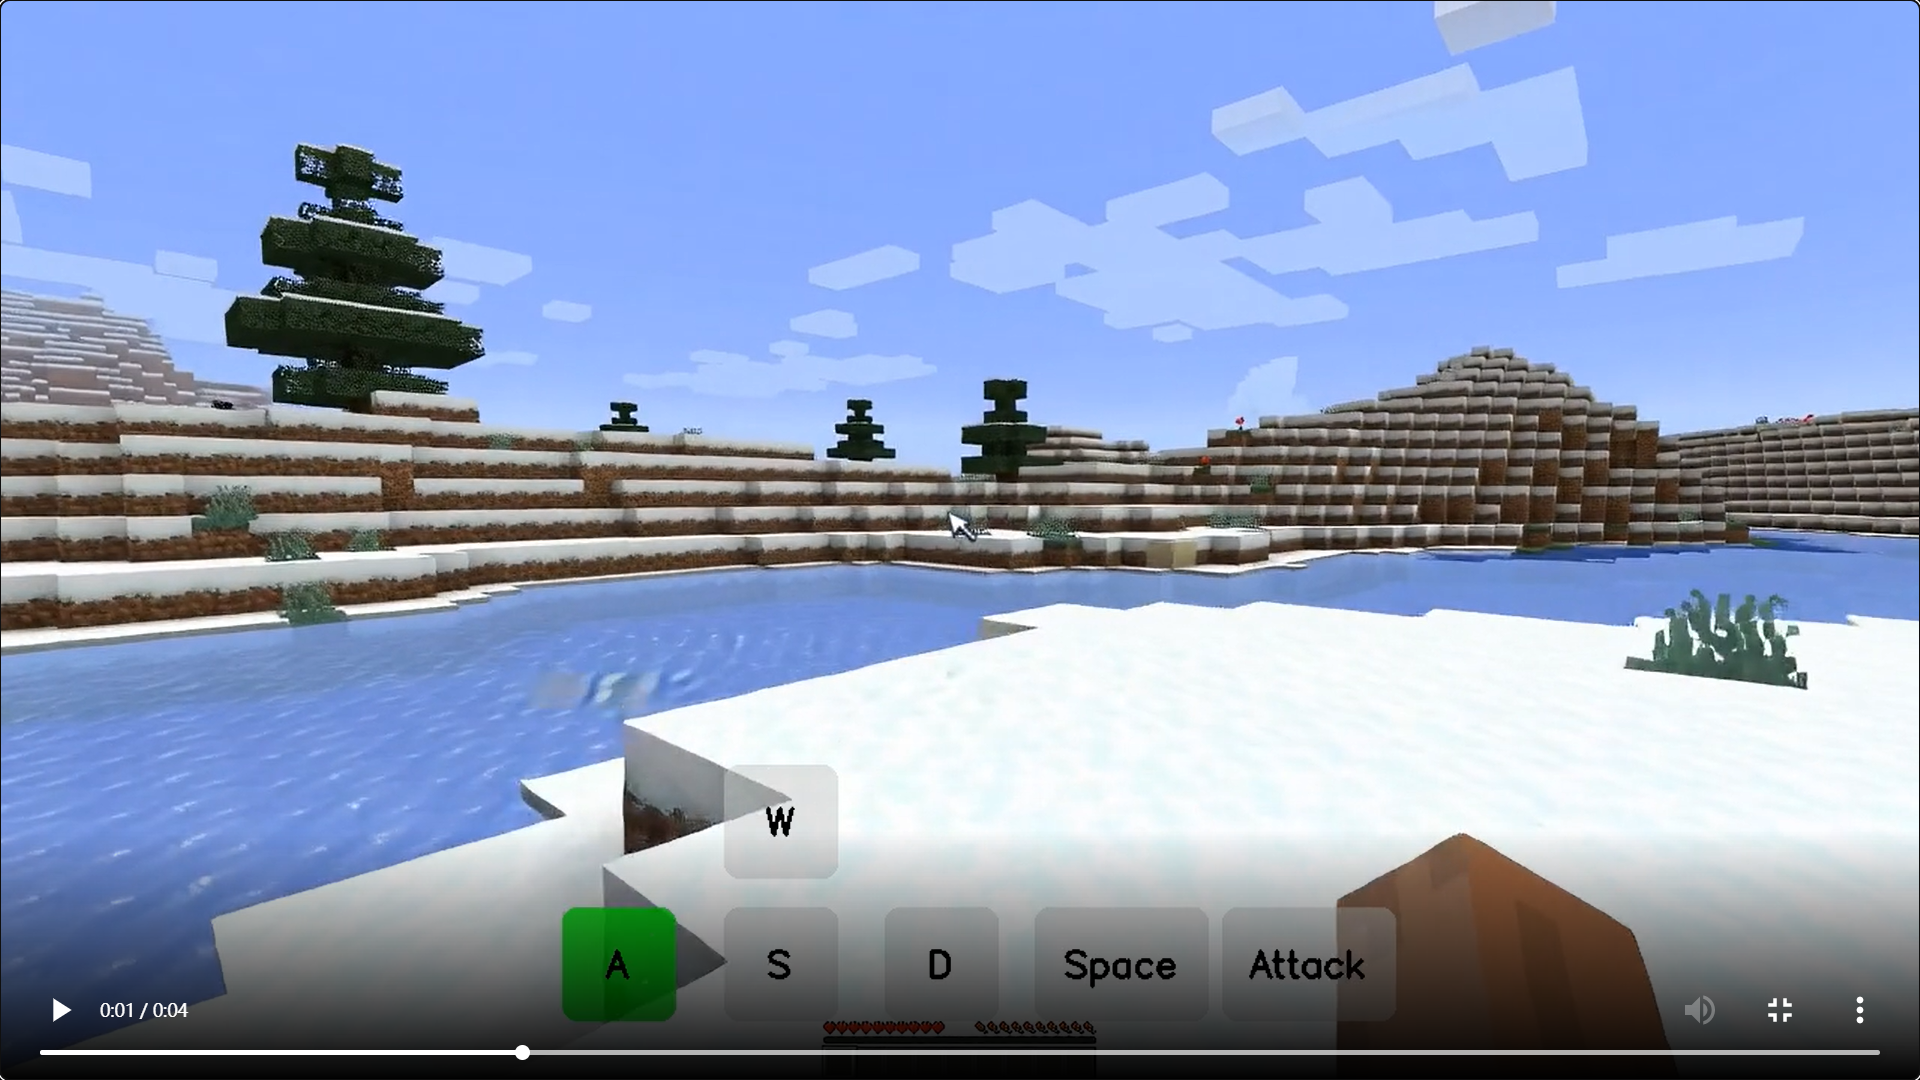
模型效果演示
-
-
2.论文详解
简介
世界模型是智能代理的基础,使它们能够感知、模拟和推理环境的动态。这些模型通过内化外部世界的结构和行为,支持自动驾驶、具身智能和生成式游戏引擎等多种下游任务。近年来,视频扩散模型因其能够学习精细的空间-时间动态并生成视觉连贯的视频而成为世界建模的领先范式。然而,获取高质量的训练数据并非易事,尤其是大规模的交互式视频数据集。此外,建模世界的物理动态并实现时间上的精细可控性也是一大挑战。最后,缺乏标准化的评估基准使得模型之间的客观比较变得困难。
Matrix-Game的核心包括三个部分:
-
Matrix-Game-MC数据集:这是一个大规模的Minecraft数据集,包含无标签的游戏视频片段和丰富的动作标记视频数据。该数据集通过自动化的管道以可扩展的方式生成精细的、动作标记的视频片段,支持在多样化场景中的可控模型训练。
-
Matrix-Game模型:这是一个基于扩散的图像到世界生成模型,支持基于用户输入(如键盘命令和鼠标驱动的摄像机运动)的交互式视频生成。该架构强调可控性、时间连贯性和视觉保真度。
-
GameWorld Score基准:这是一个统一的基准,涵盖多个评估维度(包括视觉质量、时间质量、可控性和物理规则理解),为Minecraft世界模型提供了一个全面的定量评估框架。
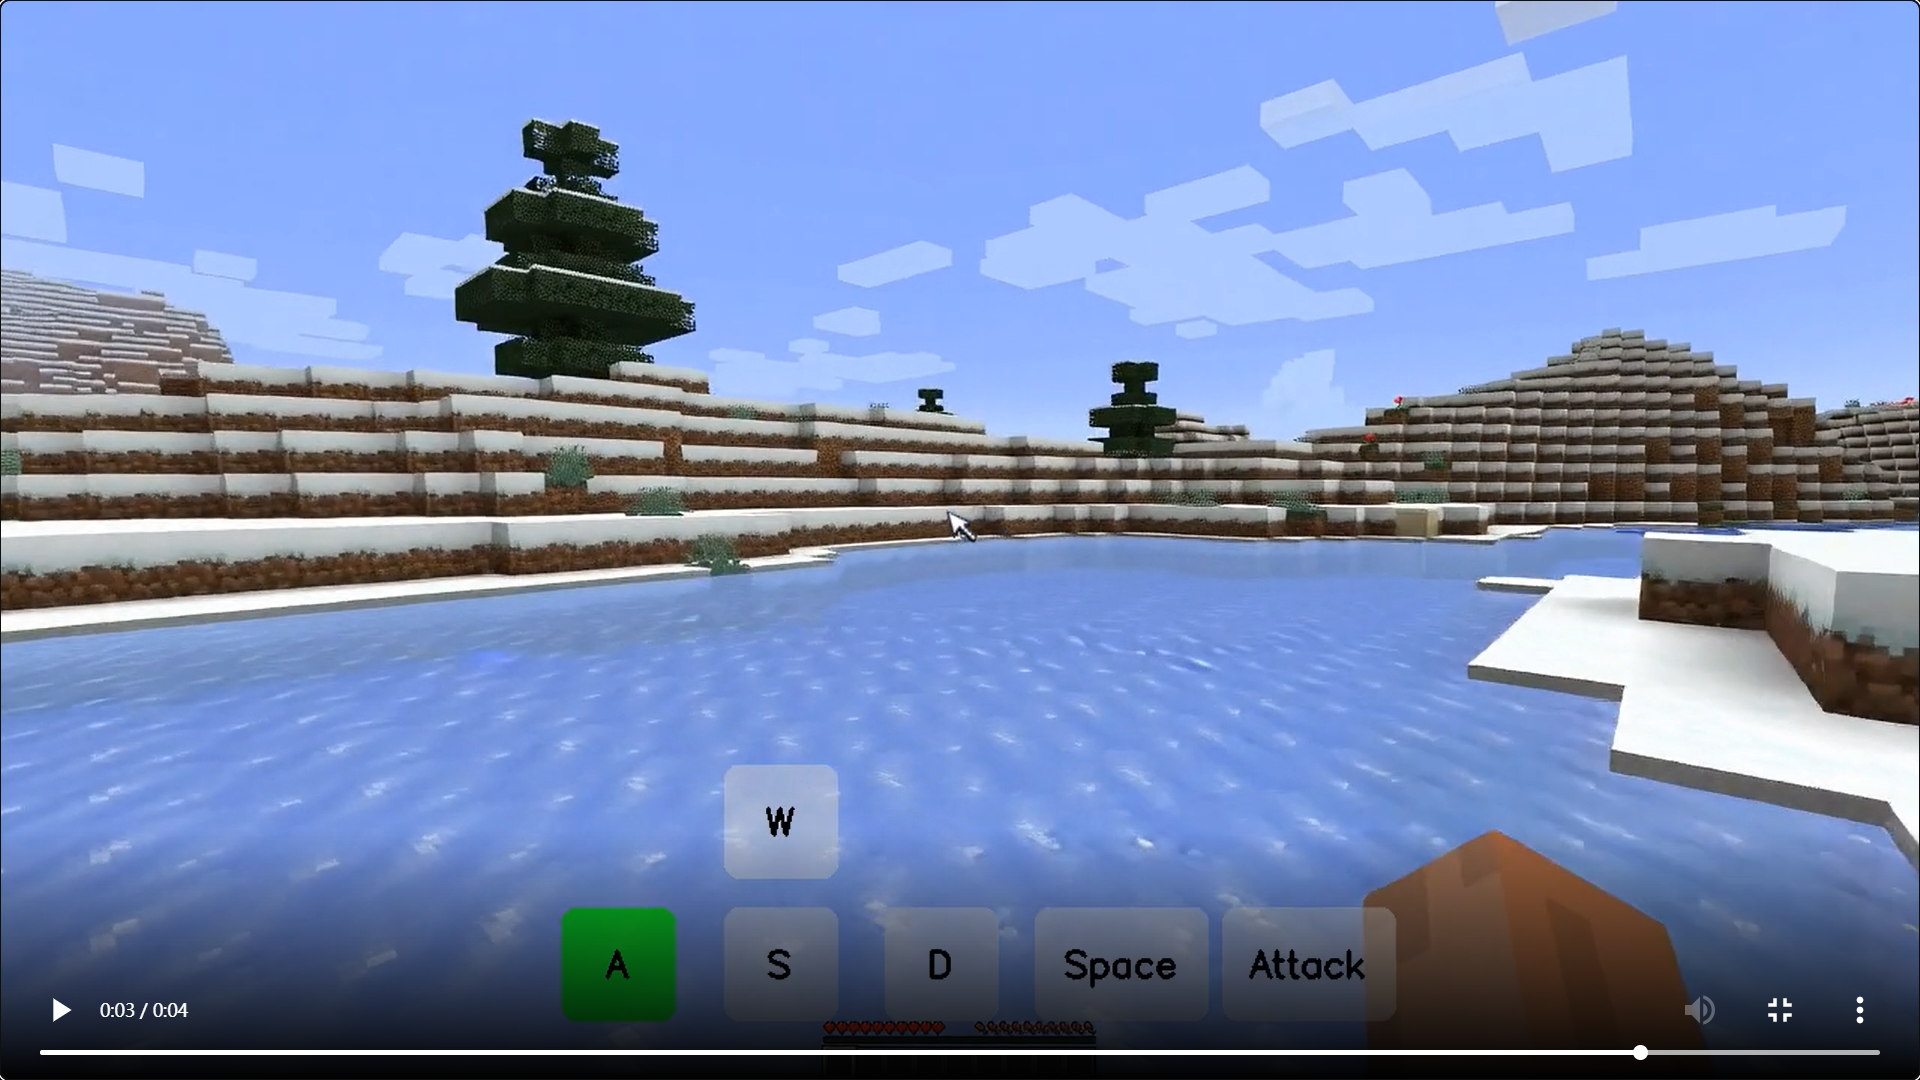
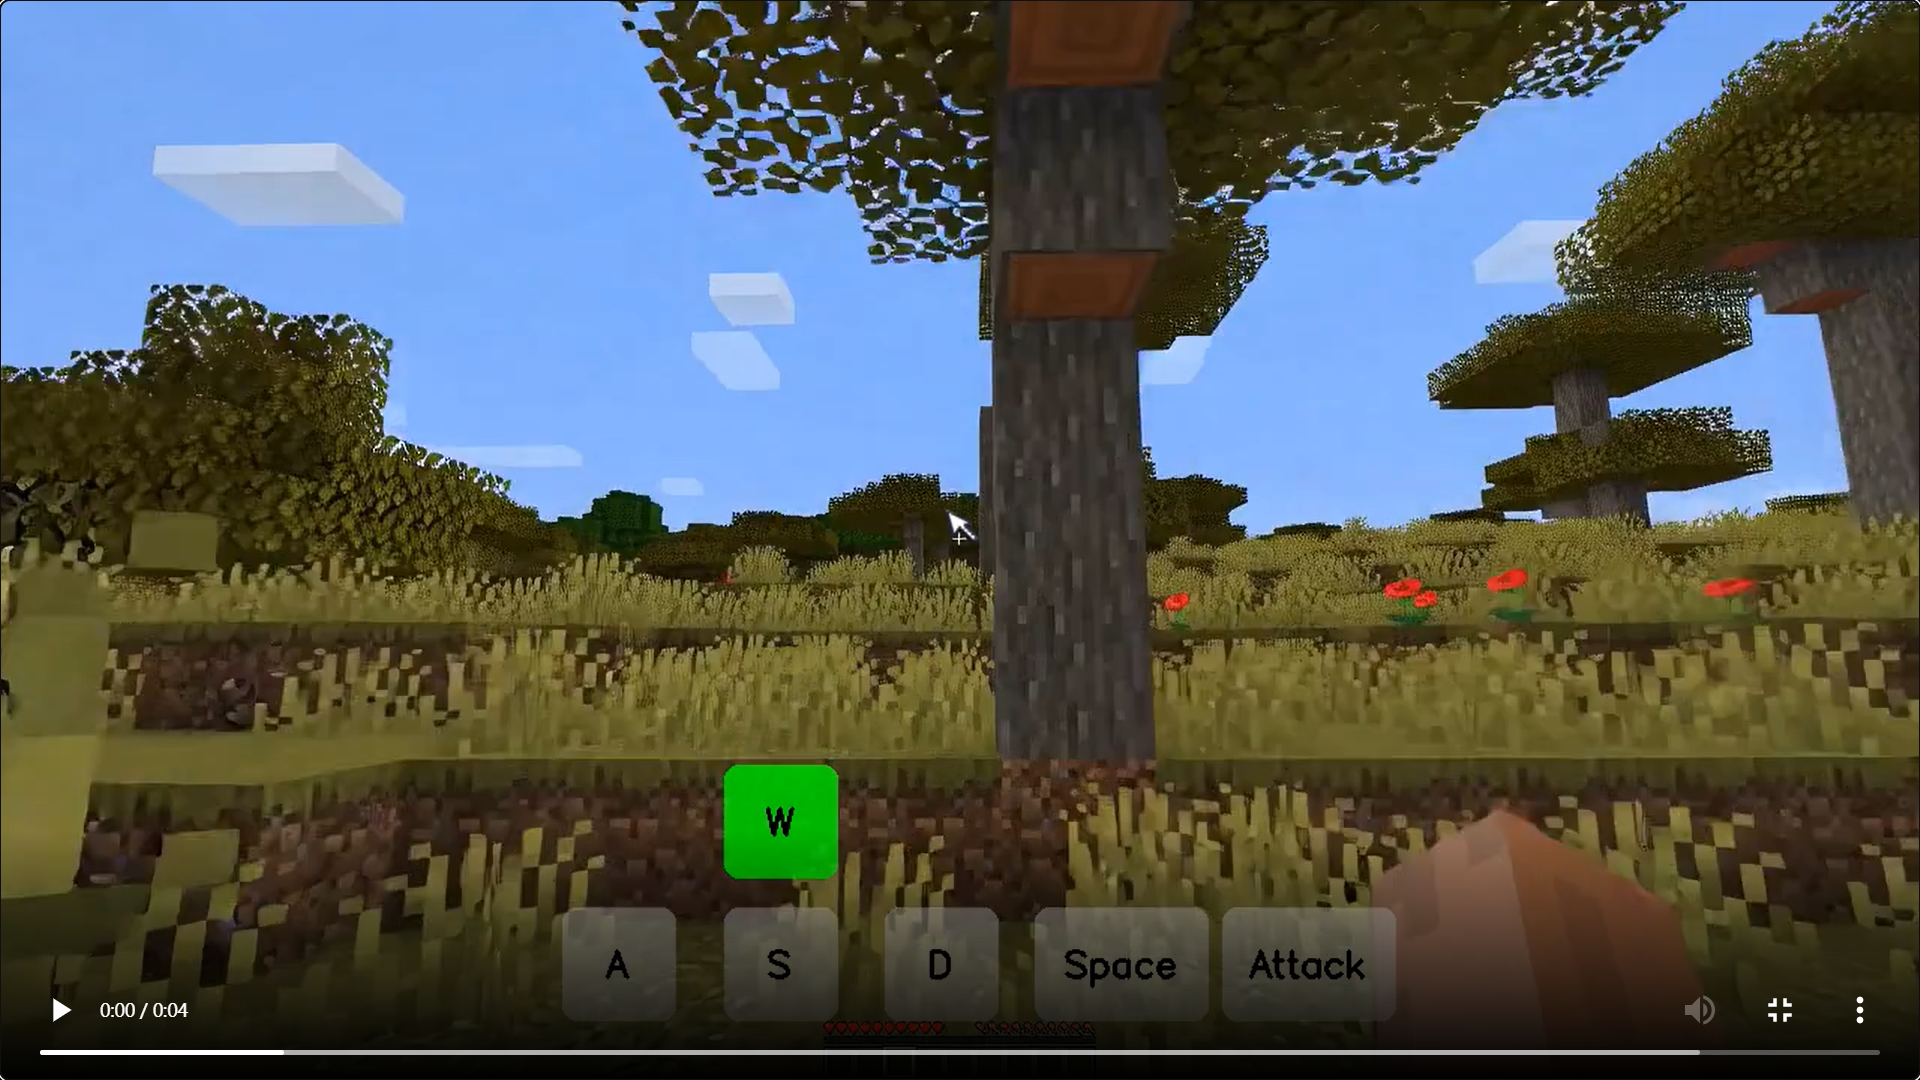
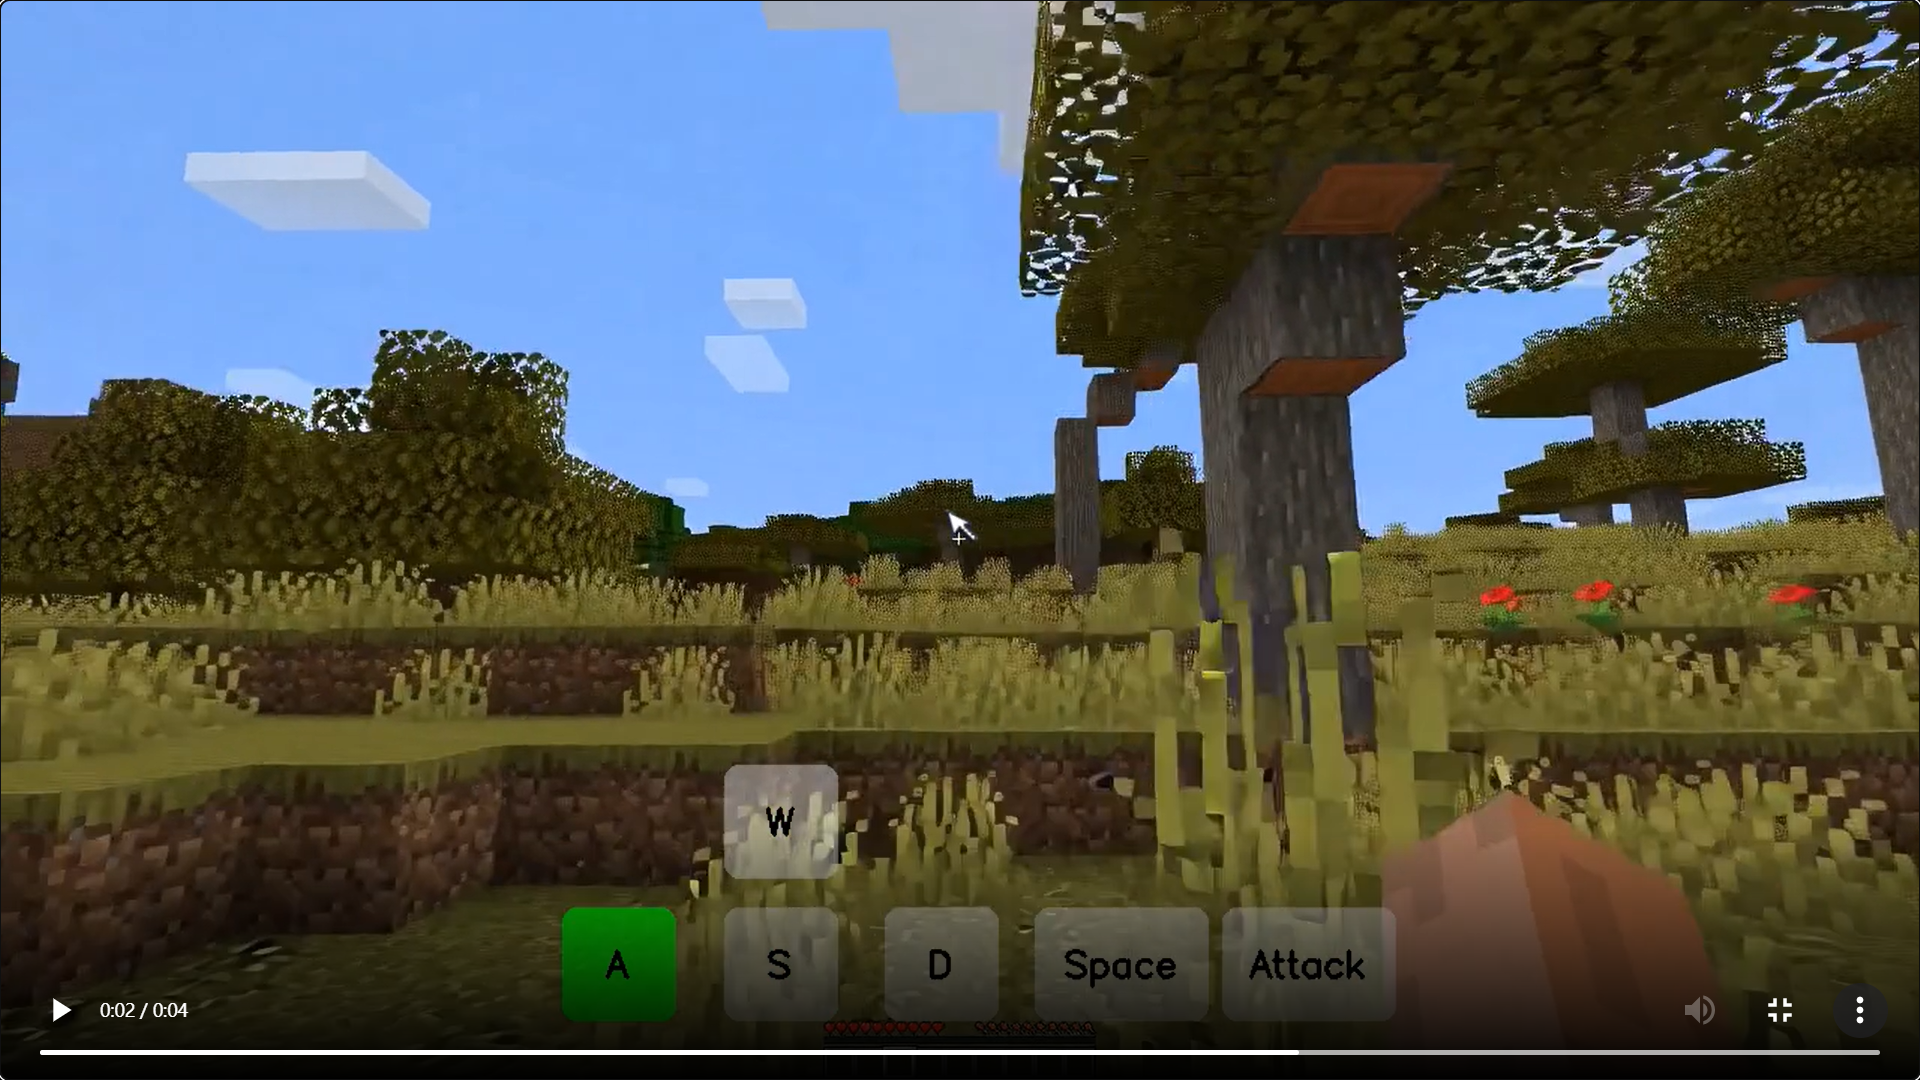
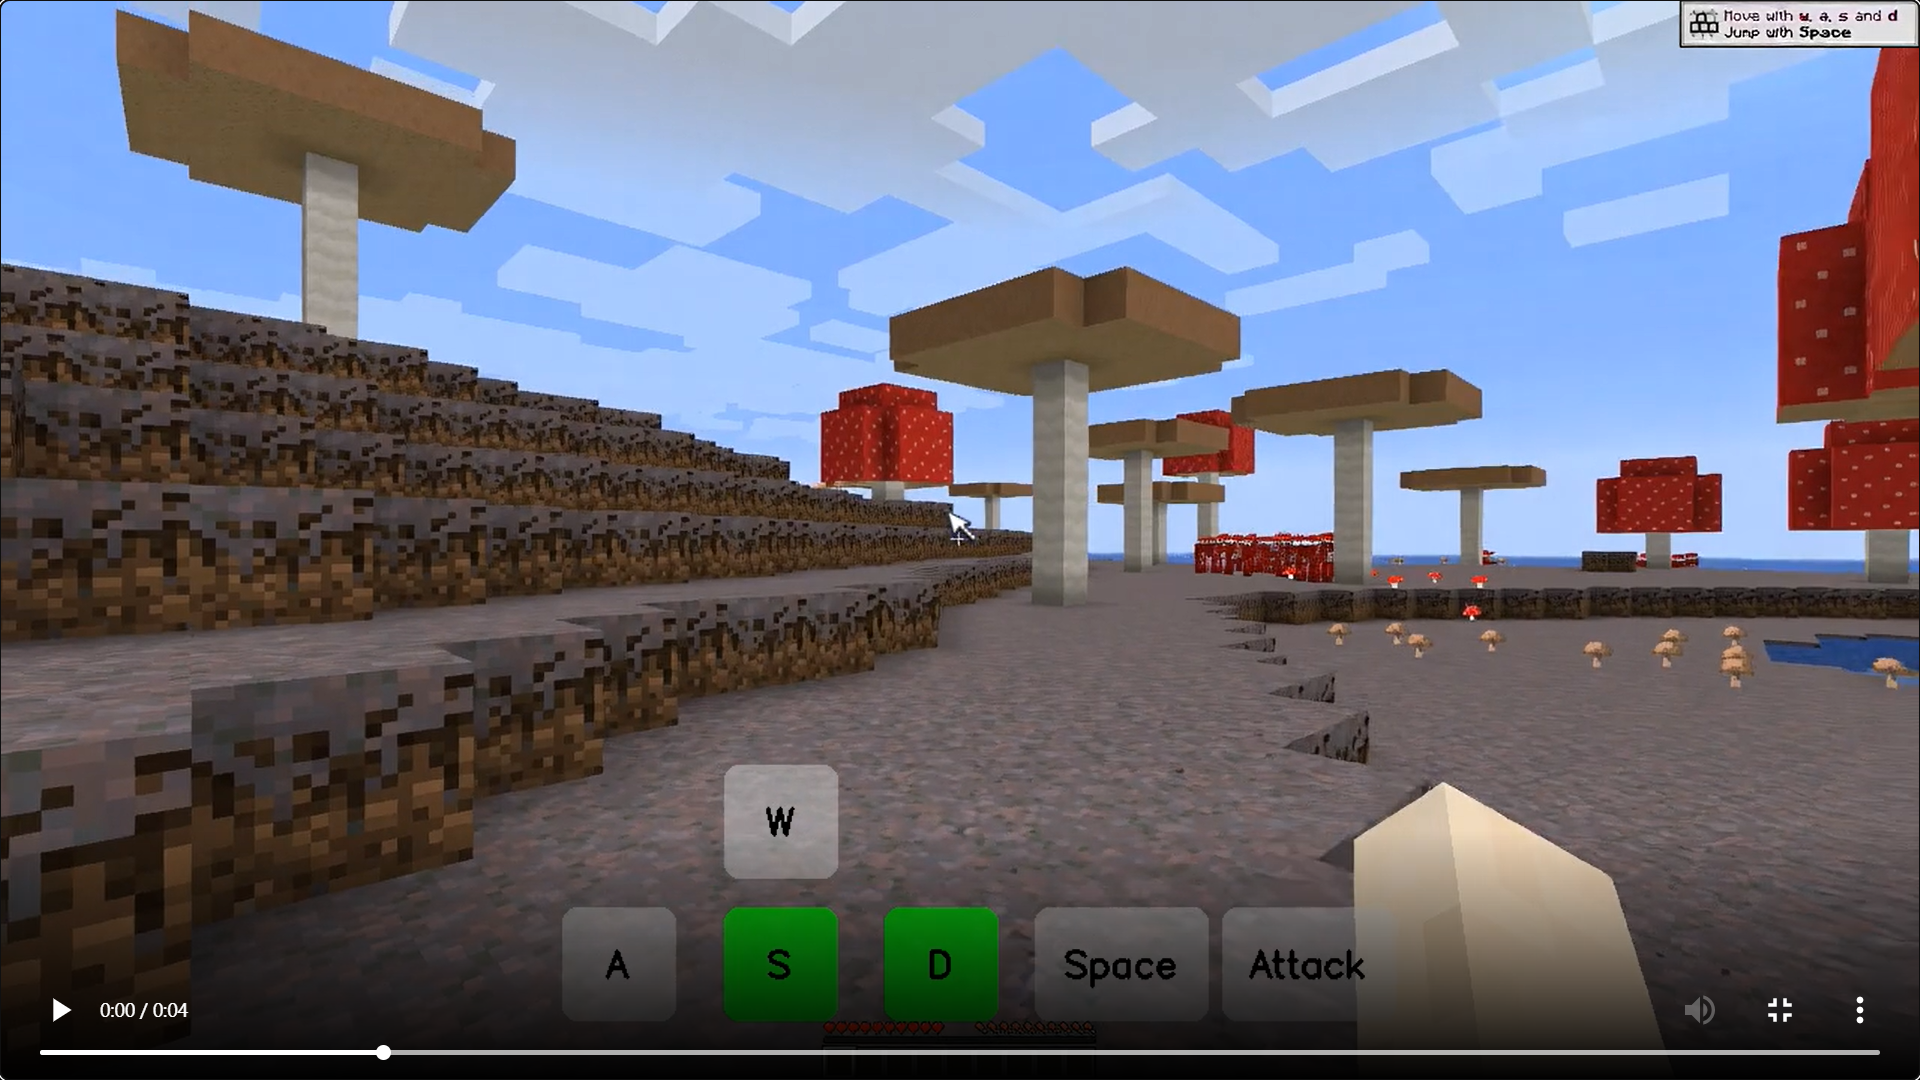
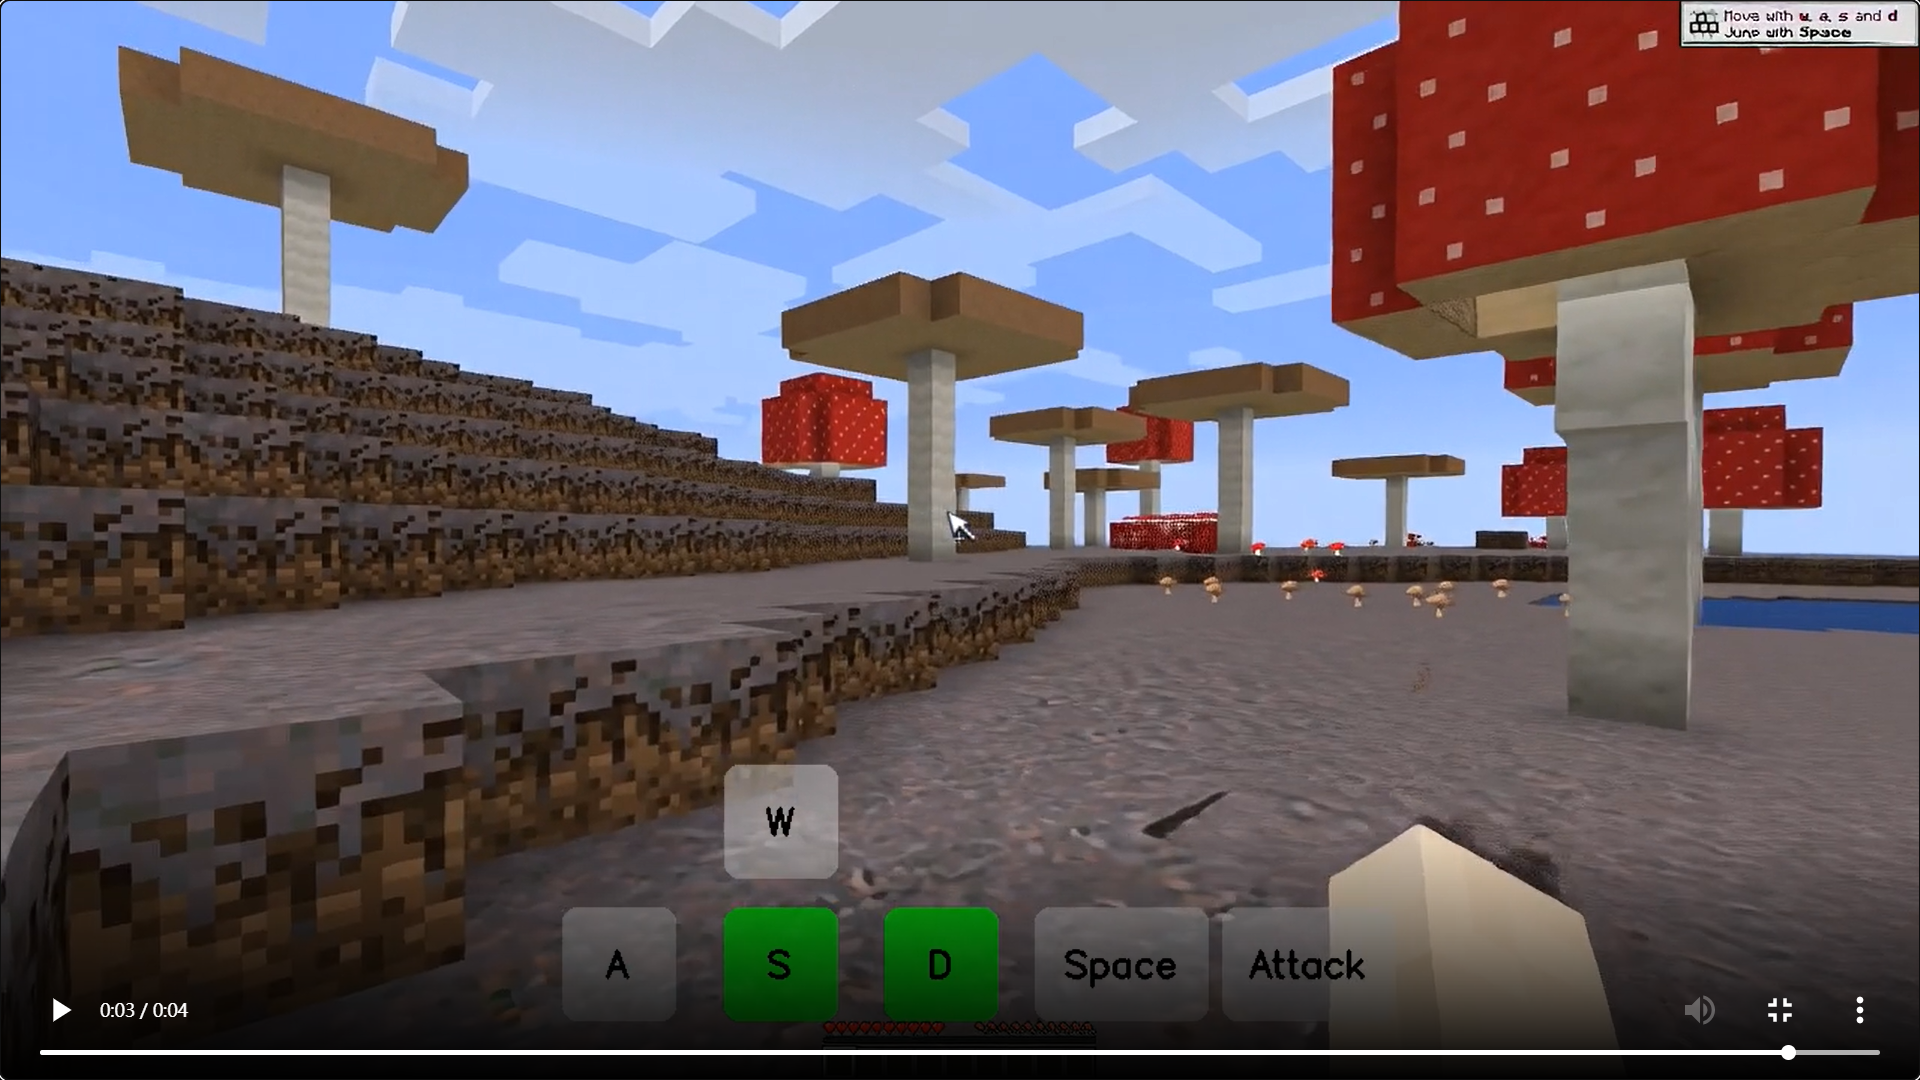
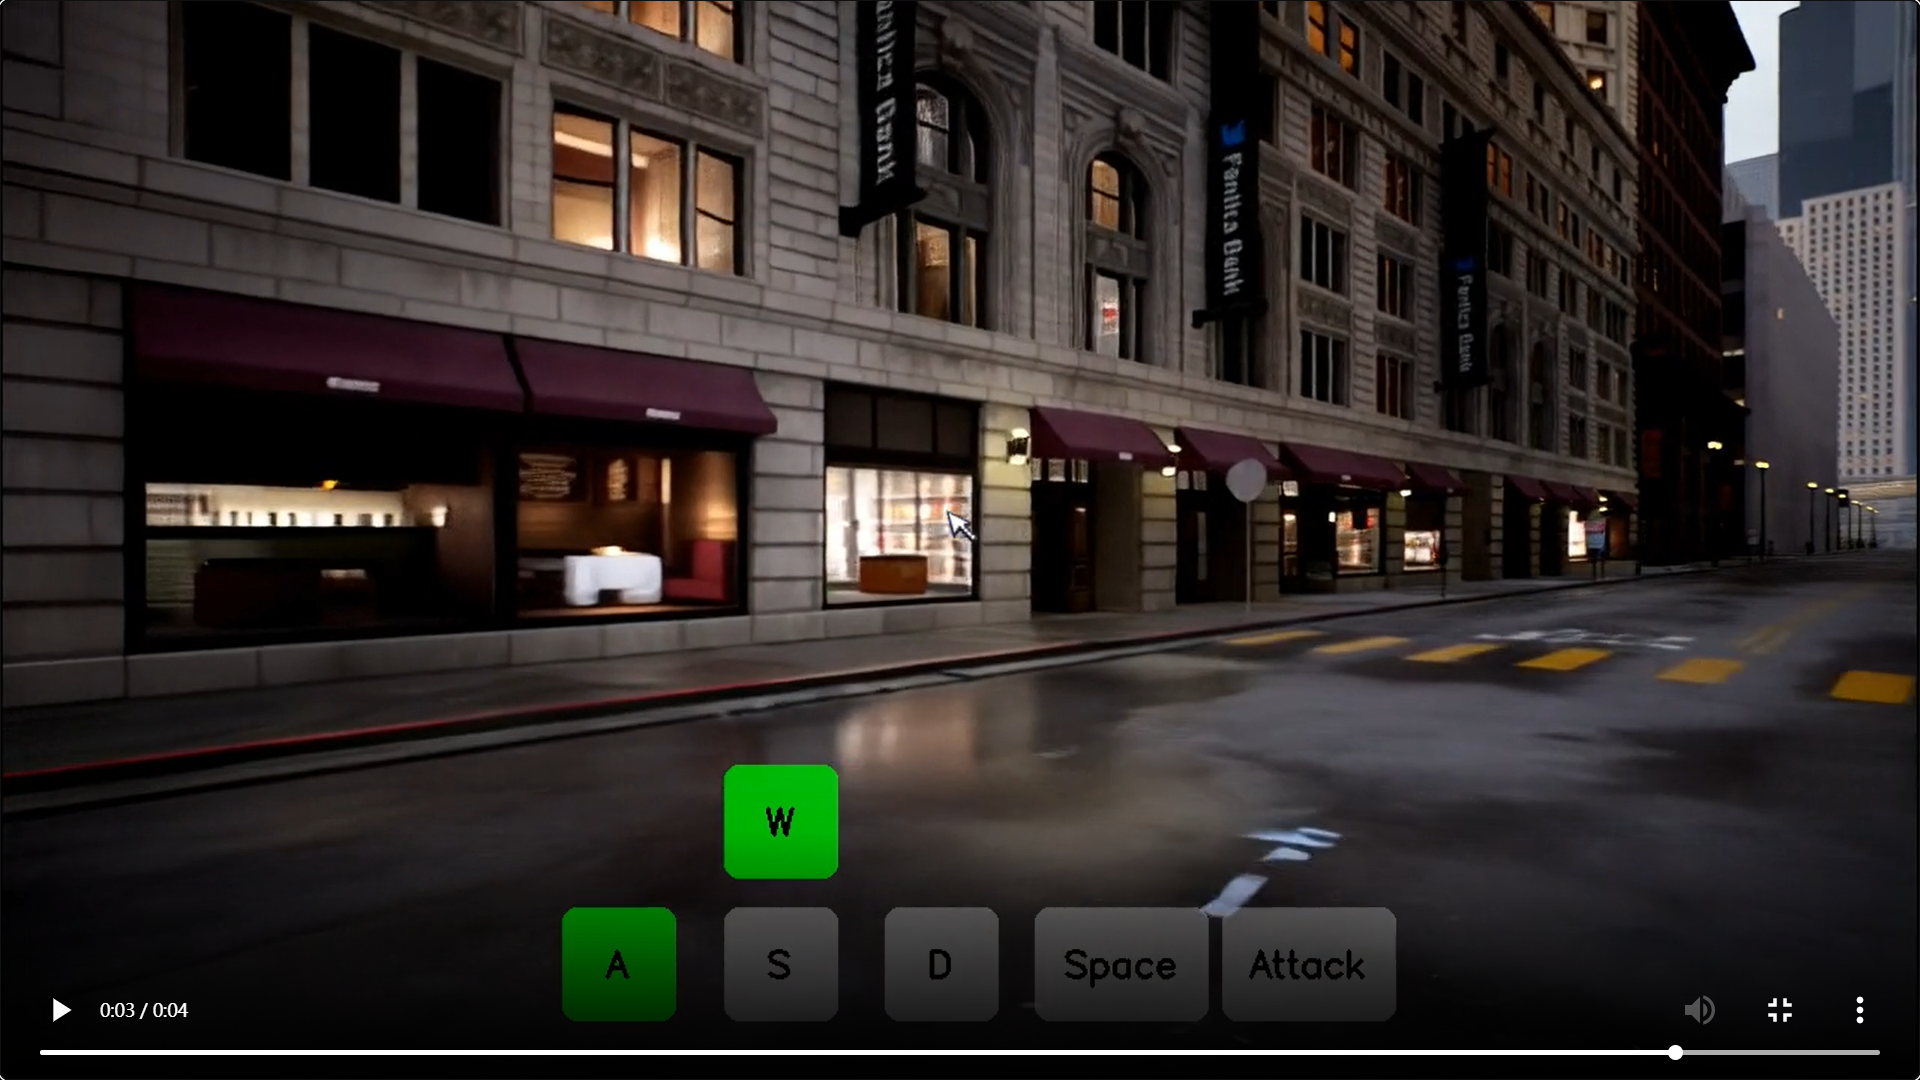
如图1所示,Matrix-Game可以生成高质量、可控的视频,这些视频与各种Minecraft场景中的游戏物理相一致。通过将视觉感知与细粒度的用户控制相结合,Matrix-Game将视频生成重新定义为探索和创建的交互过程,使用户能够从单个参考图像观察,指导和构建连贯的虚拟世界。
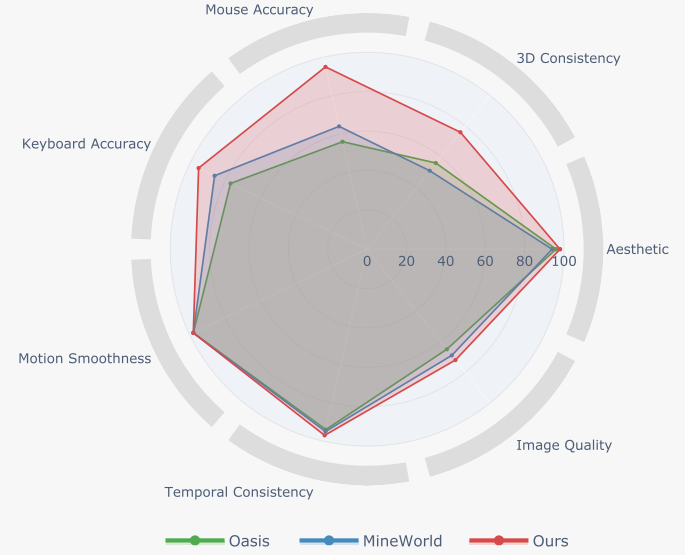
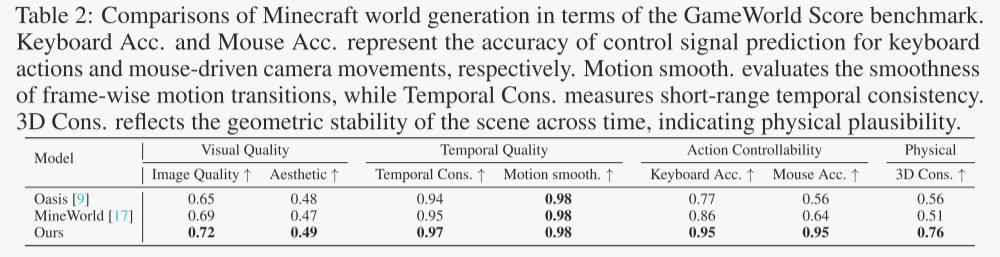
如图2和表2所示,它始终优于领先的开源Minecraft世界模型,如Oasis [9]和MineWorld [17],在动作可控性和物理规则理解方面有着特别强的优势。
-
Matrix-Game-MC
大规模、高质量的数据是必不作者的。我们采用Minecraft作为主要环境,因为它具有多样的生物群落,丰富的代理环境交互和开放式游戏,这使得它非常适合学习世界建模。
然而,通过手动游戏获取带有动作标签的Minecraft数据既耗时又耗费资源。为了解决这个问题,作者使用大量未标记的游戏视频来补充训练,以帮助模型学习运动动力学和环境规则。与此同时,作者构建了一个自动化的管道,以可扩展的方式生成细粒度的、带有动作标签的视频剪辑,从而在不同的场景中实现可控的模型训练。
无标签样本
未标记的数据采集方案。未标记的训练数据集是从MineDojo数据集中提供的视频资源中系统收集的。作者通过数据集的官方视频存储库检索了大约6,000小时的原始游戏画面,其中包括演示核心游戏机制的教程内容,非结构化游戏录制和环境交互演示。
这个多样化的集合跨越多个生物群落,包括森林,沙漠和雪地生态系统,为Minecraft环境提供广泛的视觉和物理覆盖。为了准备训练数据,作者首先使用TransNet V2来检测场景转换并将原始游戏视频分割为单镜头剪辑。在检测到的过渡边界处使用FFmpeg执行分割。在处理之前,所有视频数据都转换为libx264编码格式,以提高兼容性和效率。为了减轻逐渐过渡或不稳定的相机运动造成的伪影,作者丢弃每个分段剪辑的前四帧和后四帧。
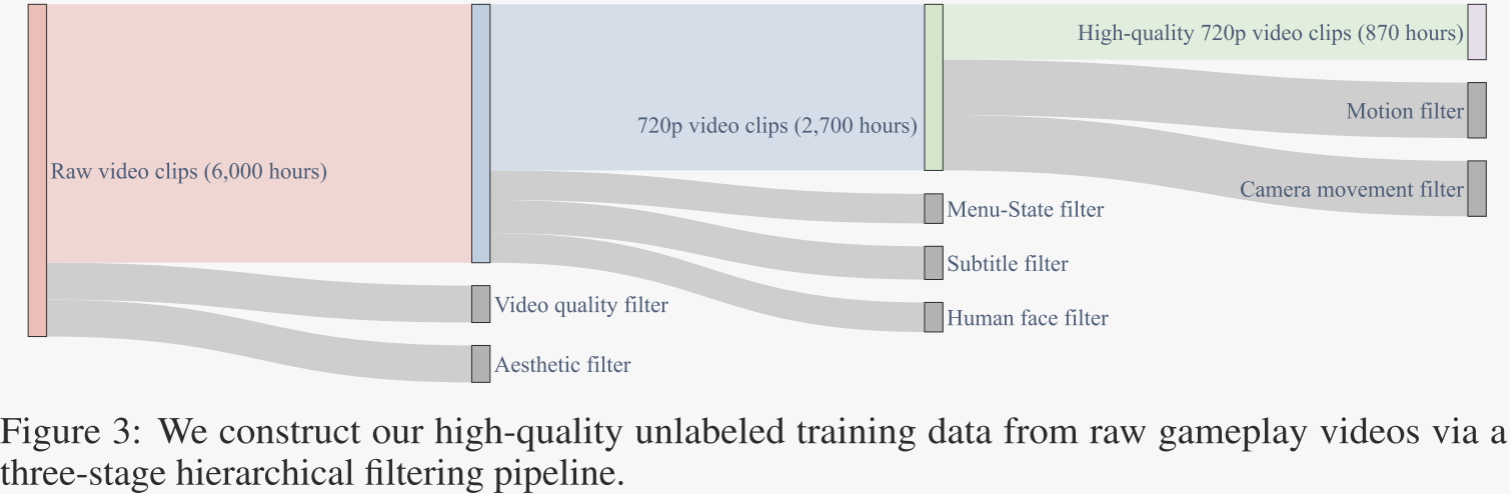
无标签数据过滤管道。作者引入了一个分层过滤框架(如图3所示),旨在从原始游戏画面中挑选高质量、信息丰富的剪辑。作者的数据过滤管道由三个连续的阶段组成。第一阶段侧重于视频质量过滤和美学过滤。第二阶段应用菜单状态过滤、字幕过滤和面部过滤来移除非信息性或分散注意力的内容。最后一个阶段涉及运动分析和相机运动过滤,以确保动态但视觉稳定的剪辑适合模型训练。
- 视频质量过滤。作者使用DOVER来评估视频质量,应用特定类型的阈值来适应不同游戏类型的风格多样性。这确保了视频的保留具有足够的分辨率,清晰度和一致性,以进行可靠的模型训练。
- 审美过滤。作者使用LAION预测器计算美学评分,对每个剪辑的采样帧进行平均评分。为了说明跨游戏类型的风格多样性,作者应用了自适应的、类型感知的阈值。这可确保所选视频保持视觉上的连贯性和吸引人的构图,从而支持逼真的生成。
- 菜单-状态过滤。作者使用逆动态模型(IDM)来检测没有玩家输入(如菜单、空闲状态或加载屏幕)的帧并排除它们。这确保了数据集专注于活跃的游戏玩法,增强了模型学习动作条件动态和可控时间转换的能力。
- 字幕过滤:作者应用CRAFT文本检测器来识别和删除具有侵入性字幕,流横幅或水印的视频。通过将检测集中在低屏幕和高风险区域,作者保留了游戏中的文本,同时排除了分散注意力的后期制作覆盖,确保了训练的清晰视觉输入。
- 人脸过滤。为了确保数据集集中在游戏环境中,作者使用DeepFace来检测和过滤包含流光面部摄像头或人类覆盖的视频。通过在多个帧中检查常见网络摄像头区域中的重复出现的人脸,作者消除了非游戏人类内容,保持了场景的纯度,并防止模型学习虚假的视觉线索。
- 运动过滤:为了确保有意义的时间动态,作者使用GMFlow应用运动滤波来计算每个剪辑的平均光流幅度。运动太少的视频(例如,静态屏幕)或过度运动(例如,快速旋转或场景假信号)被丢弃。这种双向过滤保留了运动平衡的序列,支持稳定的训练,并提高了模型学习时间一致和可控视频生成的能力。
- 相机移动过滤:为了移除具有过度激进的视点变化的剪辑,作者基于逆动力学模型(IDM)估计的角度变化应用相机运动过滤。具有过度偏航或俯仰旋转(通常由突然的鼠标移动引起)的视频将被丢弃。这个过滤步骤促进稳定和连贯的视点轨迹,帮助模型随着时间的推移学习一致的场景几何和空间对齐。
有标签样本
为了实现可控的视频生成,作者使用两种互补策略构建标记数据集:
- 从MineRL环境中的游戏中导出的探索代理轨迹。作者通过VPT代理扩展了MineRL平台,这些代理能够在Minecraft世界中执行长期任务。这些智能体会自主探索不同的游戏场景,产生各种各样的行为模式。作者从这些轨迹中提取每帧的键盘和鼠标动作,以构建一个以16Hz采样的动作标记数据集。
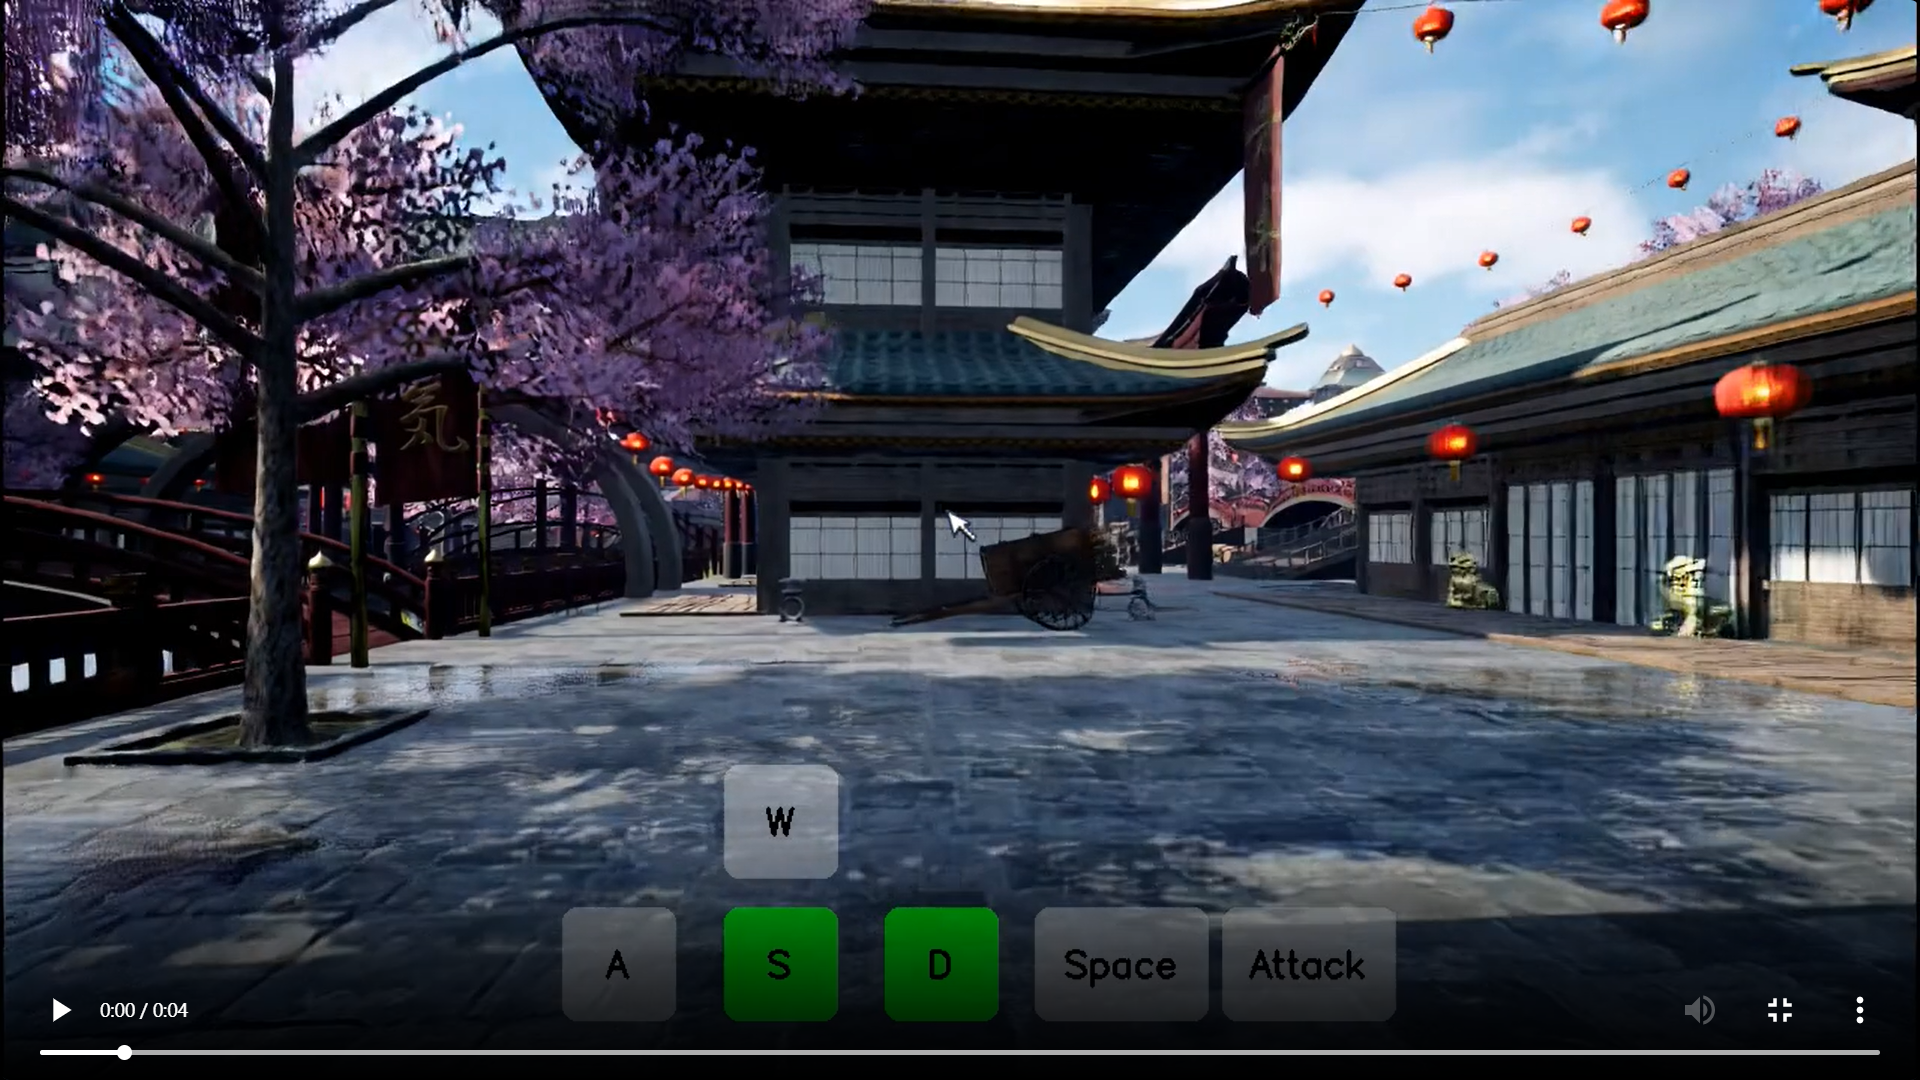
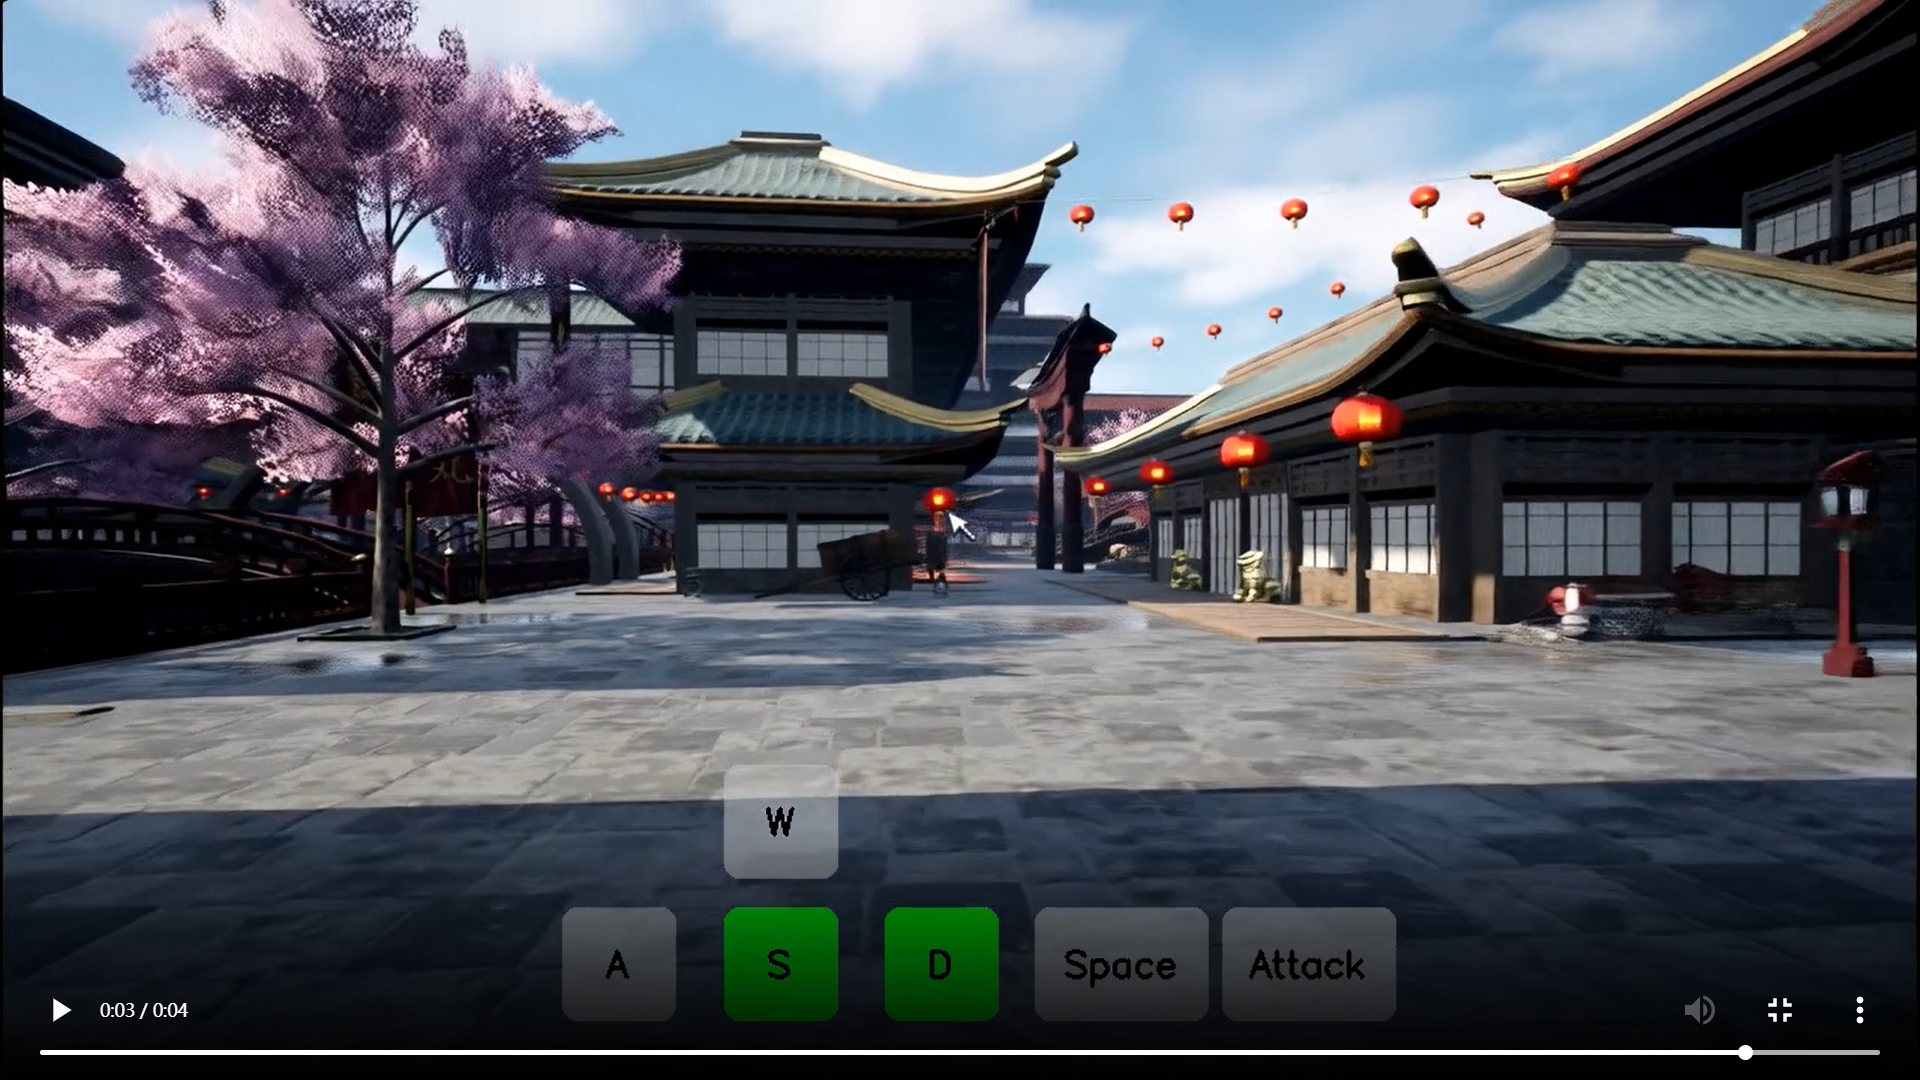
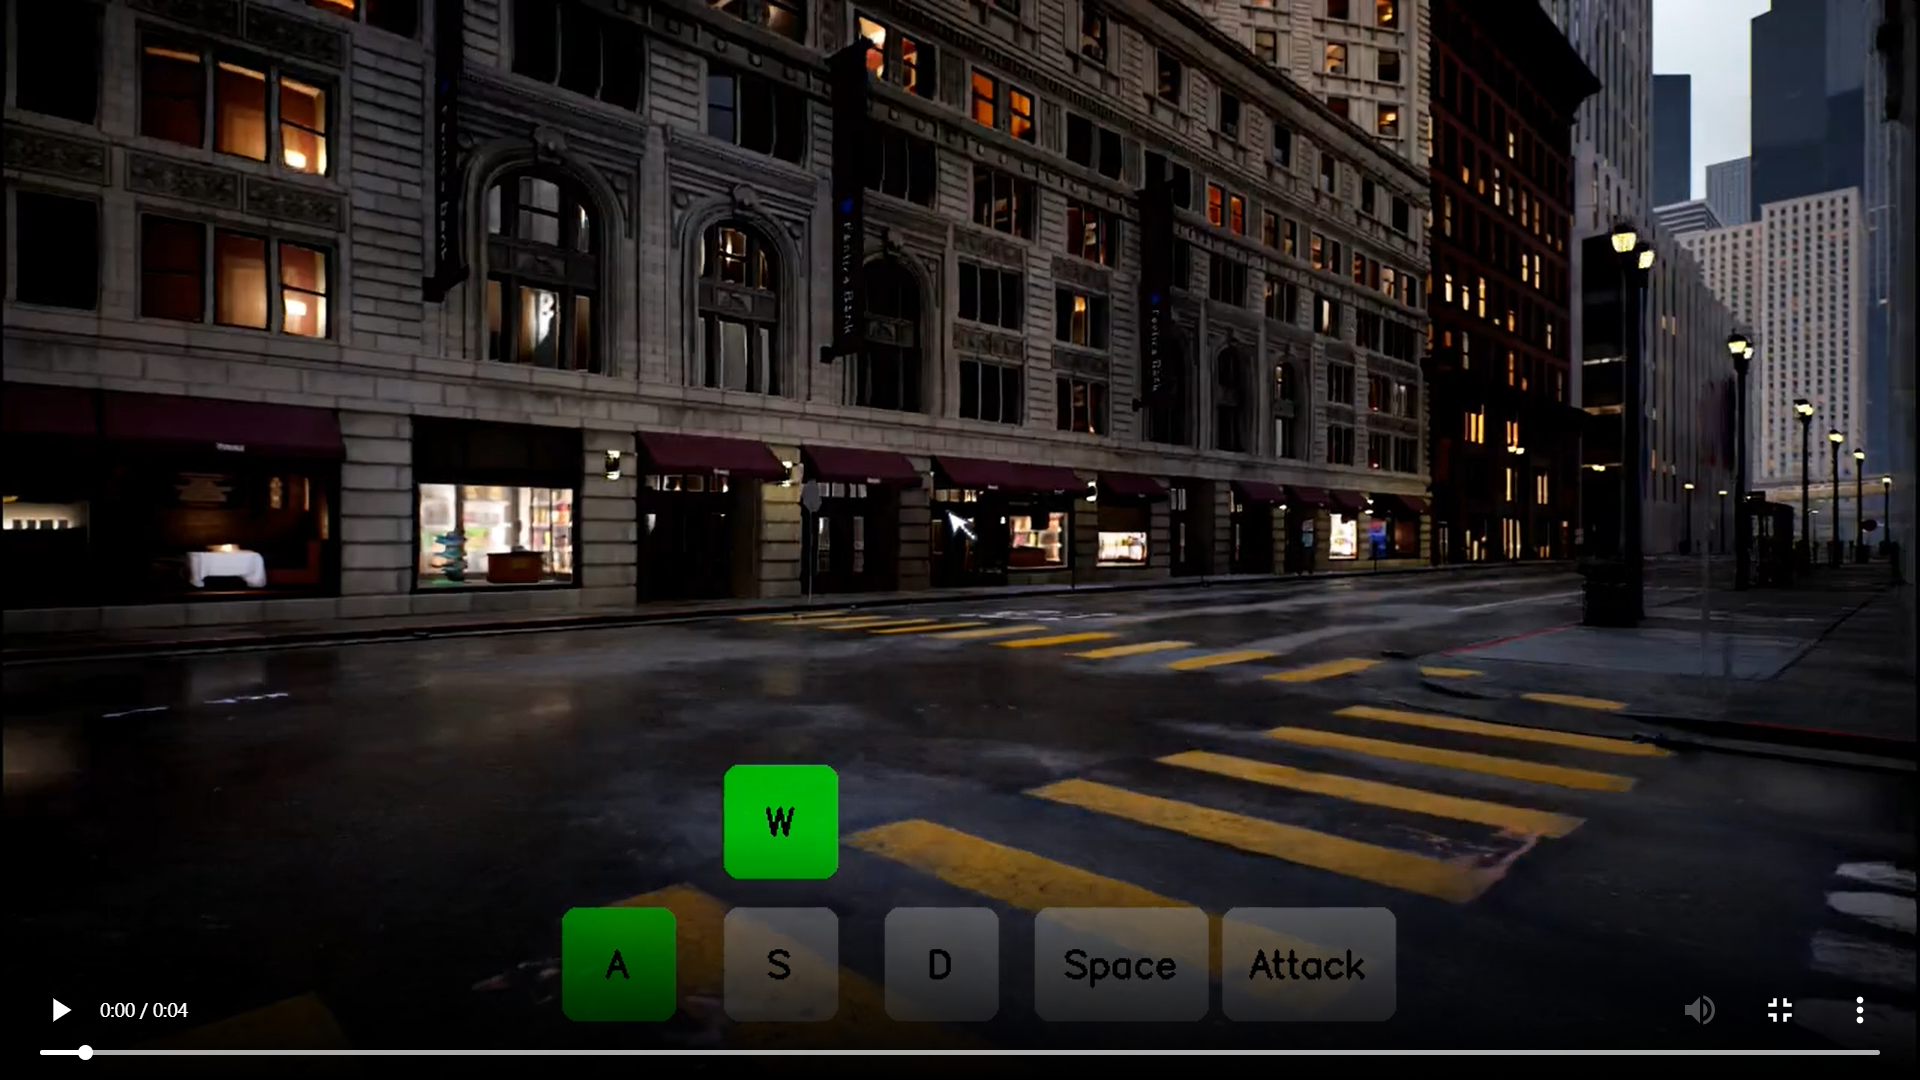
- 以及虚幻程序模拟。为了用高度结构化的演示来补充勘探数据,作者在虚幻引擎中构建了跨越各种生物群落的自定义环境,包括城市、沙漠和森林环境。每个环境都是以编程方式设计和检测的,以在每个帧提供详细的监督。具体来说,作者收集:(1)离散动作标签(例如,移动键和跳跃)和连续注视向量(相机俯仰/偏航)。(2)地面实况运动学信息,包括智能体的位置、速度和方向。(3)环境交互结果,例如块操作操作的成功或失败。这种程序生成的数据提供了一致的、无噪声的注释,使模型能够在各种可控条件下学习精确的动作-响应映射。
作者在使用MineRL探索代理构建标记的Minecraft轨迹时采用了三种关键策略。
- 摄像机运动限制。为了确保视点的稳定性,并促进学习的时间一致的视觉表示,作者明确地限制相机的运动幅度。具体来说,偏航角和俯仰角被限制在每帧15度以内,有效地避免了突然的相机旋转或迷失方向的视点移位。
-
为了确保视觉效果的一致性并消除渲染伪影,作者在数据生成过程中对MindRL引擎进行了针对性的修改。具体来说,作者禁用了视锥体基础的区块加载机制,这一机制会导致摄像机移动时新地形方块突然出现。这一改动避免了场景突然出现的视觉突变,从而不会破坏视觉流的空间连贯性。
此外,作者还实现了对代理健康状态和游戏界面状态的实时监控。当代理接近死亡、卡住,或者暂停/菜单界面被激活时,记录会自动终止。这些保障措施确保所有捕获的片段都能反映连续的、有意义的游戏互动,而不是无关的或低质量的部分。
-
场景多样化。作者精心挑选了14种《我的世界》(Minecraft)场景,每个场景都与特定的生物群落(例如森林、沙漠、海洋)相关联,涵盖了多样化的地形、光照和建筑结构。玩家在每个场景中执行离散的动作(如移动、跳跃、攻击),这些动作以平衡的方式进行采样。
通过将上述数据构建策略应用于基于MineRL的探索代理,作者为《我的世界》合成了一套高质量的标注数据集,这构成了可控训练语料库的重要部分。为了进一步提升视觉多样性与控制保真度,作者还引入了来自虚幻引擎(Unreal Engine)的程序生成视频。这些来源共同产生了一个全面的标注数据集,包含超过1026小时的视频片段,用于33帧的训练。
为了确保在不同环境中的平衡覆盖,我们还精心整理了一个扩展数据集,包含超过1200小时的视频,用于65帧的训练。值得注意的是,这个平衡数据集的大约一半来源于基于MineRL的场景,这些场景涵盖了14种不同的《我的世界》生物群落,例如森林、沙漠、冰雪和蘑菇群落,其分布情况详细记录在表1中。这些生成的数据集具有稳定的运动、密集的动作以及丰富的结构多样性,为训练稳健且可控的视频生成模型提供了强大且平衡的监督信号,使其能够泛化到各种不同的虚拟环境中。

-
模型
大多数现有的基于扩散的世界模型,例如SORA、HunyuanVideo I2V和Wan,依赖于文本提示和参考图像作为先验知识来指导生成过程。尽管这些方法可以生成高质量的结果,但文本的引入往往会引入语义偏见,限制空间解释能力,并降低模型仅通过视觉和物理线索来构建理解的能力。因此,模型可能会产生不切实际的内容,或者过度拟合语言先验,而不是忠实地建模视觉世界。受空间智能概念的启发,Matrix-Game探索了一种不同的路径:作者的模型不使用文本和图像作为条件,而是纯粹从原始图像中学习。它通过构建一个能够捕捉几何形状、物体运动以及事物之间物理交互的一致性场景来理解世界。
模型架构
如图4所示,Matrix-Game采用了一种从图像到世界的生成范式,以单张参考图像作为理解世界和生成视频的主要先验知识。该模型在一个由3D因果变分自编码器(3D Causal VAE)构建的时空压缩的潜在空间中进行训练,该空间将视频序列的空间和时间分辨率分别降低了8倍和4倍。参考图像经过视觉编码器或多模态骨干网络处理后,作为核心条件输入。在高斯噪声和可选用户动作的条件下,扩散变换器(Diffusion Transformer,简称DiT)生成潜在表示,这些表示随后通过3D VAE解码器被解码为连贯的视频序列。
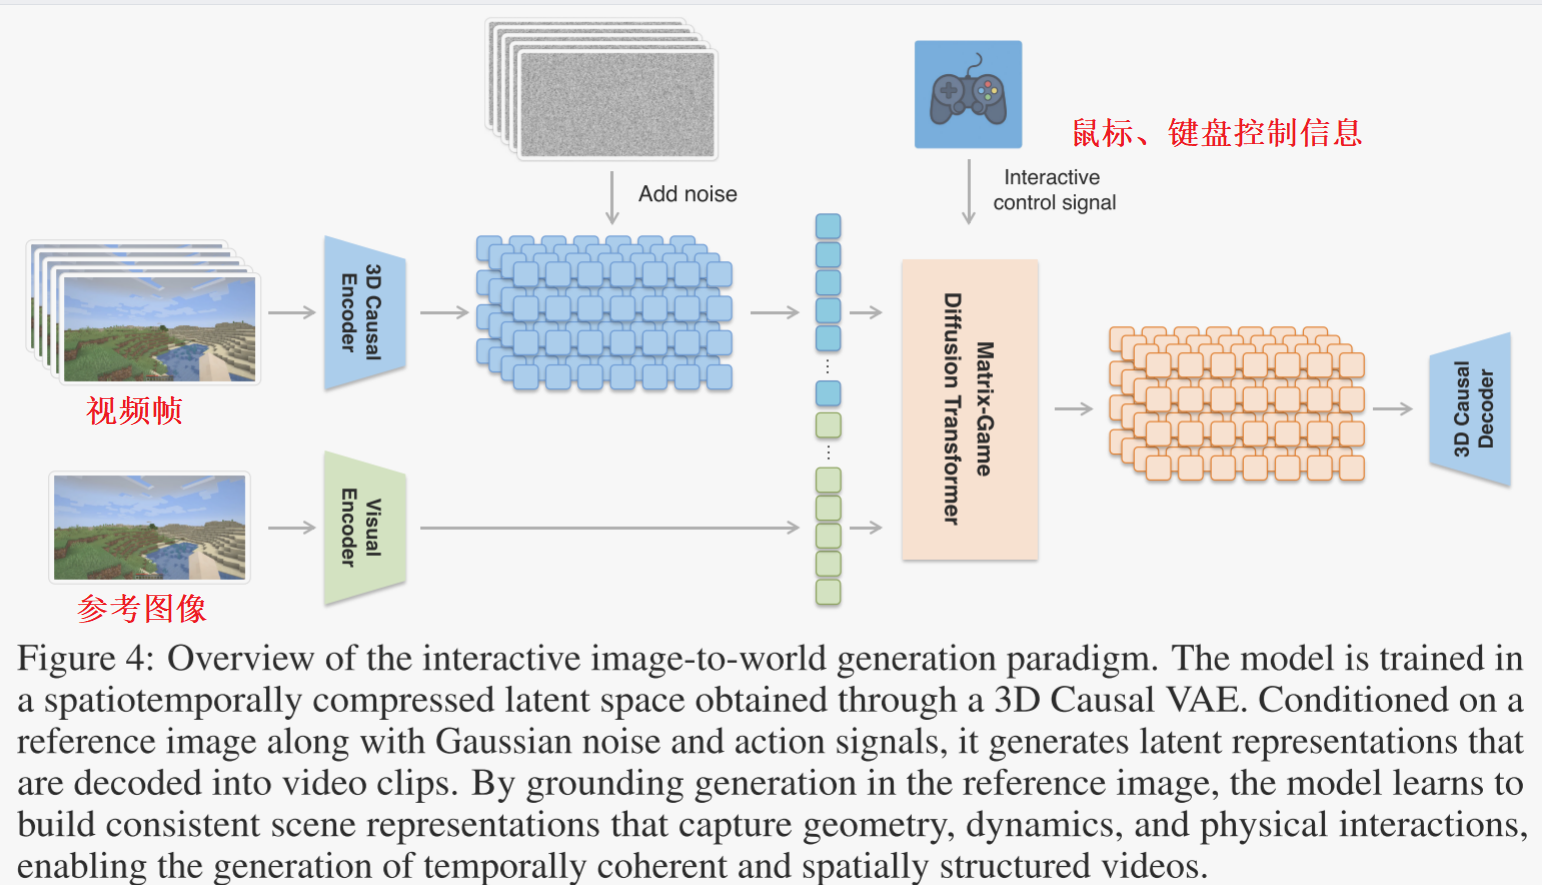 自回归生成与扩散变换器。为了实现高质量的生成,作者采用多模态扩散变换器(MMDiT)进行图像到世界的建模。像大多数当前的视频生成方法一样,如图4所示的图像到世界模型生成固定长度的视频片段,这限制了其在需要长期或连续世界建模的实际场景中的适用性。为了克服这一限制,并借鉴近期在长时视频生成方面的进展,作者采用了一种自回归策略:在每一步中,模型将之前生成的视频片段作为运动上下文,以生成下一个片段。如图5(a)所示,作者使用每个生成片段的最后k = 5帧作为生成后续片段的运动条件。这种设计使得模型能够在保持片段之间时间连贯性的同时,逐步扩展生成内容的时间跨度。
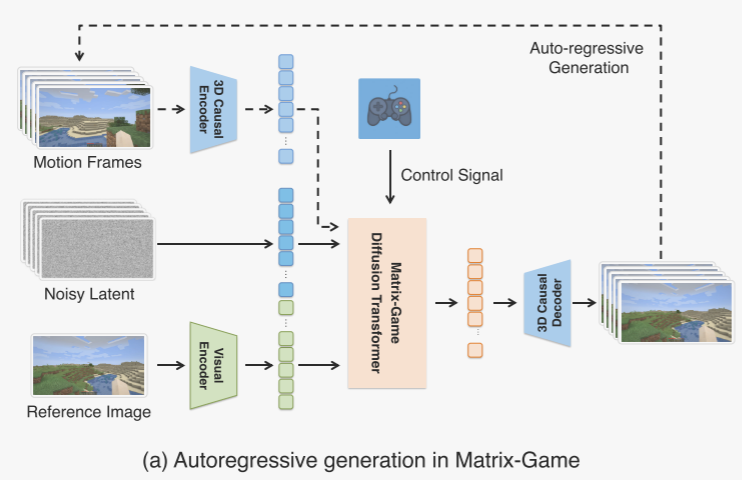
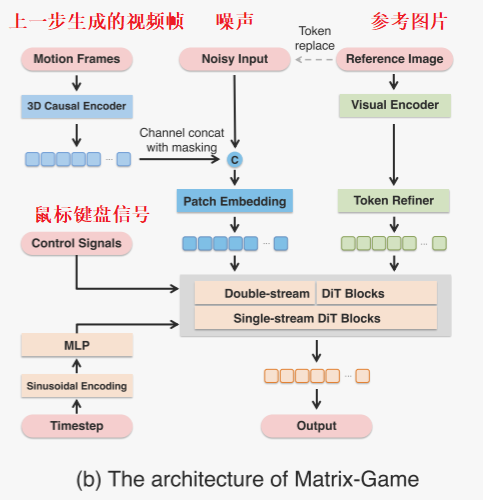
为此,如图5(b)所示,作者将运动帧的潜在表示与噪声潜在表示沿着通道维度拼接,以形成下一步生成的输入。一个二进制掩码被拼接以指示哪些帧包含有效的运动信息。然后,将合并后的潜在张量通过一个补丁嵌入层处理,并进一步沿着标记维度与图像标记拼接。最后,在用户控制信号作为额外指导输入的条件下,多模态扩散变换器生成一个新的视频片段。
然而,自回归生成的一个关键挑战是时间误差累积:最后几帧生成的伪影可能会在后续片段中传播并放大。为了提高自回归过程的鲁棒性,受Open-Sora计划 的启发,作者在训练过程中以0.2的概率向运动帧和参考图像引入高斯噪声。此外,作者在训练过程中对运动帧应用无分类器引导(Classifier-Free Guidance, CFG):运动帧的潜在表示以0.25的概率被替换为无条件信号(即零潜在表示)。这种CFG策略促使模型更有效地依赖运动上下文,从而实现更稳定、更可靠的自回归视频生成。
为可控视频生成注入动作。受Genie 2的启发,作者采用帧级控制信号来指导视频生成。如图6(a-b)所示,作者将控制模块集成到多模态扩散Transformer中,以实现动作可控生成,而动作控制模块的详细架构如图6(c)所示。
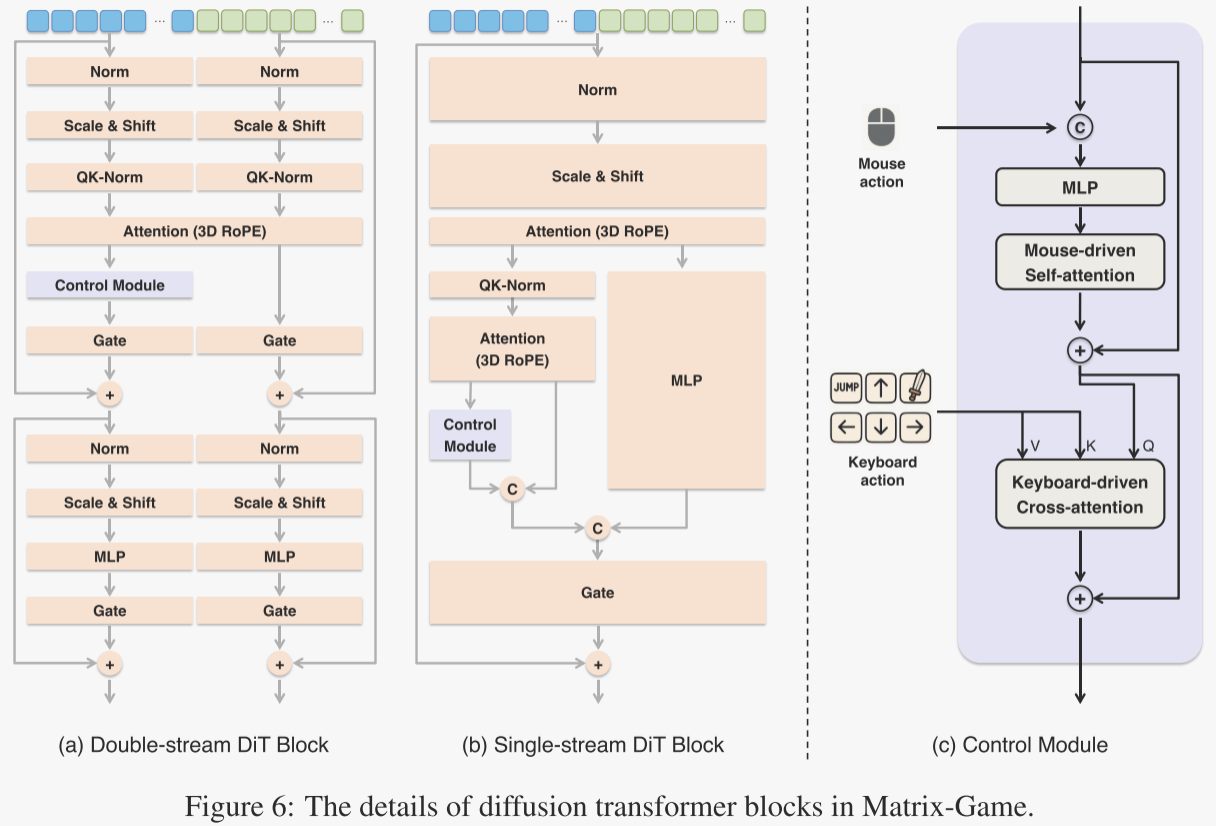
具体来说,作者使用离散编码来表示键盘操作,包括“上”“下”“左”“右”“跳跃”和“攻击”,并使用连续标量值来表示鼠标移动,定义为俯仰角的变化。为了将这些动作信号与3D因果变分自编码器(3D Causal VAE)生成的压缩潜在标记对齐,连续的鼠标动作与输入潜在表示拼接后,通过一个多层感知机(MLP)处理,随后经过时间自注意力模块,而离散的键盘动作则通过交叉注意力模块整合以引导扩散过程。此外,作者在训练过程中对动作信号应用无分类器引导(classifier-free guidance),以0.1的概率将动作信号替换为无条件信号。这有助于模型在提供动作信号时更有效地利用它们,从而在生成的视频中实现更好的控制和互动效果。
模型训练
为了提高训练的稳定性并实现更快的推理速度,Matrix-Game采用了流匹配范式,该范式在收敛性和采样效率方面优于传统的去噪扩散概率模型(DDPM)。为了支持复杂任务,例如建模世界知识、捕捉物理动态以及实现动作可控的生成,作者将训练过程分为两个逐步优化的阶段,每个阶段针对不同的学习目标进行优化。
第一阶段:无标签训练用于游戏世界理解
为了加速收敛,模型初始化时使用了HunyuanVideo I2V 的预训练权重。为了从文本驱动的生成转变为基于图像的条件世界建模,作者用图像分支替换了多模态扩散变换器中原有的文本分支。在这一阶段,排除了动作控制模块,专注于视觉世界理解。主要目标是让模型在大规模游戏环境中进行预训练,使其能够构建对虚拟世界的结构化理解,包括空间布局、物体动态以及直观的物理规则。为此,作者使用了2700小时的无标签《我的世界》视频(720p分辨率)作为丰富的视觉和物理线索来源。作者使用不同帧数(17、33和65)和宽高比(16:9、4:3和21:9)的多样化组合来训练模型,以增强其在不同时间和空间设置下的鲁棒性。
在初始的大规模预训练之后,作者通过精心挑选同一数据集中的870小时高质量视频片段,进一步优化模型的视觉和物理理解能力。这些片段的选择基于稳定的摄像机运动、干净的用户界面以及整体视觉清晰度。这种针对性的优化提升了Matrix-Game建模连贯空间结构、捕捉精细物理交互以及生成具有更高感知质量和时间连贯性的视频的能力。
第二阶段:动作标注训练用于交互式世界生成
在第二阶段,作者将动作控制模块集成到多模态扩散变换器中,以实现动作可控的视频生成。最终的模型Matrix-Game包含170亿个参数,并在来自《我的世界》和虚幻引擎环境的1200小时动作标注的720p 33帧视频片段上进行训练。为了确保在可控生成过程中的训练稳定性和效率,作者在早期训练阶段采用固定的720p分辨率和33帧设置。
为了缓解世界场景中的类别不平衡问题,作者在第二阶段的子阶段进一步优化训练数据。具体来说,作者通过整理来自8种不同《我的世界》生物群落的样本,精心挑选出一个更加平衡的数据集:海滩、沙漠、森林、丘陵、冰雪、蘑菇、平原和河流。结合虚幻引擎生成的数据,这最终形成了一个高质量、平衡的训练集,包含大约1200小时的720p 65帧视频片段。我们在65帧的设置下继续训练,以增强模型捕捉长距离时间依赖关系的能力,这对于在扩展序列中保持连贯的交互至关重要。
通过整合平衡的、动作丰富的数据和强大的视觉先验,Matrix-Game学会了精确地解释用户输入,并在多样化的交互环境中进行泛化。这种视觉理解与用户控制的紧密结合,将视频生成推进到一个用于世界探索和创造的交互式范式,使用户能够从单张参考图像出发,感知、修改并构建连贯的虚拟环境。
-
GameWorld Score:Minecraft世界模型的统一基准
随着世界模型的兴起,越来越多的研究开始关注《我的世界》(Minecraft)世界生成,目标是利用视频生成模型来生产不仅符合用户动作输入,同时也遵循游戏中固有物理规则的视频。然而,现有研究缺乏一个统一的评估基准,以一致地衡量和比较在动作输入设置下模型的性能。
为了更好地衡量和比较《我的世界》世界模型,作者开发了GameWorld Score,这是一个统一的基准测试,不仅评估生成视频的感知质量,还评估其可控性和物理合理性。具体来说,我们将世界模型性能的评估分解为八个维度,每个维度针对视频生成的一个特定方面。
在最高层级,GameWorld从四个关键支柱对模型进行评估:
- 视觉质量:评估每个单独帧与人类视觉系统(Human Visual System, HVS)一致的视觉保真度,重点关注静态图像的清晰度、连贯性和逼真度。
- 时间质量:衡量模型在时间上保持一致性和流畅性的能力,捕捉诸如运动连续性和时间连贯性等动态特性。
- 动作可控性:评估生成视频是否忠实地遵循用户提供的控制输入,例如移动指令和摄像机调整。
- 物理规则理解:评估视频是否遵循基本的物理原理,例如重力、碰撞和物体恒存性,特别关注在空间和时间上保持物体的三维一致性,反映模型模拟物理连贯环境的能力。
这四个支柱进一步细分为更精细的维度,如图7所示,使得在像《我的世界》这样具有交互性和物理驱动的环境中,能够对生成模型进行全面且结构化的评估。

视觉质量:帧级质量衡量单个帧的优劣,忽略它们在时间上的相互作用。作者从两个互补的视角分析每一帧:
- 美学质量。作者使用LAION美学预测器来评估单个帧的视觉吸引力,这是一个基于大规模人类美学偏好的训练模型。该分数反映了多种因素的综合,包括图像构图、色彩和谐、光影平衡、写实性以及风格一致性。更高的美学分数表明与人类对视觉吸引力的判断更一致,为像素级或结构化指标之外提供了补充视角。
- 图像质量。为了评估每一帧的感知保真度,作者使用MUSIQ预测器来检测低级视觉伪影,例如过曝、噪点、压缩失真和模糊。MUSIQ是一个无参考图像质量评估模型,基于SPAQ数据集 训练而成,反映了多样化的现实世界成像条件。这一指标为生成帧的清晰度、锐度和无伪影程度提供了定量衡量,是人类感知视觉质量的可靠代理。
时间质量:时间质量评估生成视频在连续帧之间保持一致性和逼真度的能力。这一方面对于确保连贯的运动、避免闪烁伪影以及随时间保持物体完整性至关重要。为了捕捉时间稳定性的不同方面,作者提出了两个互补的维度:
- 时间一致性。为了评估背景和场景随时间保持稳定的程度,作者计算从视频序列的每一帧中提取的CLIP特征之间的成对相似性。CLIP嵌入能够捕捉高层次的语义和视觉信息,使其适合于评估连续帧是否描绘了一个时间上连贯的场景。具体来说,作者计算相邻帧之间的平均余弦相似度来量化一致性。更高的相似度表明模型在时间上保持了静态元素(如背景布局),从而避免了常见的伪影,如闪烁、纹理漂移或突然的视觉变化。
- 运动流畅性。虽然时间一致性确保了帧之间外观的稳定性,但它并没有考虑到运动本身的质量。即使帧内容看起来连贯,仍然可能出现突然或抖动的过渡。为了解决这一问题,作者通过评估物体和摄像机的运动是否遵循物理上合理且时间上连续的轨迹来评估运动流畅性。作者利用视频帧插值网络所学习到的运动先验来检测不自然的动态。具体来说,作者将生成的视频输入到一个预训练的插值模型中,并测量实际帧与从相邻帧插值得到的帧之间的重建误差。高插值精度意味着运动在帧之间流畅过渡,而较大的差异则表明存在不规律性,如抖动、卡顿或帧级不连续性。这种方法为判断运动逼真度提供了一种代理,而无需密集的注释。
动作可控性:该模块旨在评估生成视频对输入动作条件的理解和遵循程度。理想情况下,生成视频的视觉内容应逐帧响应给定的类似玩家的控制信号,反映交互式游戏环境中的行为。作者采用逆动力学模型(Inverse Dynamics Model, IDM)来评估可控性,通过从给定的视频序列中推断出潜在的动作条件。IDM在1962小时的《我的世界》游戏数据上训练而成,在键盘预测方面达到了90.6%的准确率,鼠标运动回归的R²分数为0.97,这使其成为从视频中提取动作标签的可靠代理。可控性通过将推断出的动作与真实输入进行比较来衡量,评估生成视频对预期控制信号的反映是否准确。
- 键盘控制准确率:作者通过计算四个分组动作类别的精确度来评估键盘输入的可控性:(向前、向后、无操作)、(向左、向右、无操作)、(攻击、无操作)和(跳跃、无操作)。每个分组被视为一个多分类问题,其中的动作是互斥的。最终的键盘条件准确率是这四个分组的平均精确度。除了这个综合得分外,作者还报告每个单独动作(例如向前、向左、跳跃等)的每类精确度,这为分析模型对不同类型控制输入的响应提供了更细致的分析。这使作者能够分析模型对特定控制命令的遵循程度。
- 鼠标控制准确率:鼠标输入影响摄像机的旋转运动,这与键盘动作独立建模。对于每个轴(x轴和y轴),当旋转变化的绝对值超过预定义的阈值时,检测到方向运动。这导致了九个类别:上、下、左、右、左上、右上、左下、右下和无操作。如果生成视频中的运动方向与标记的条件匹配,则认为预测是正确的。最终准确率是所有正预测的精确度。
物理规则理解:为了评估模型对物理世界规则的理解,作者考察了其在帧间保持三维一致性的能力。
- 三维一致性。一个基于物理的模型应当能够在时间上保持场景的几何结构,即使存在纹理变化或光照改变。作者采用DROID-SLAM,一种密集的同步定位与建图(SLAM)算法,来估计每一帧的像素级深度图和摄像机姿态。随后,利用估计的深度和姿态信息,计算连续帧中共同可见像素对之间的重投影误差。由于DROID-SLAM本质上对外观变化具有鲁棒性,这一指标纯粹关注场景的几何稳定性。较低的重投影误差表明更强的三维一致性,反映了模型在帧间维持稳定场景几何结构和逼真摄像机运动的能力。因此,这一指标作为模型对物理规则(如物体恒存性、空间连续性和视角一致性结构)理解的一个间接但可靠的指标。
-
实验
实验目标。作者设计实验旨在从多个维度全面评估所提出的模型。具体来说,作者希望回答以下四个问题:
- GameWorld Score基准测试:在视觉质量、时间质量、动作可控性和物理规则理解等关键维度上,作者的模型是否优于现有的最先进的开源《我的世界》模型?
- 动作可控性:作者的模型对各种用户指令(尤其是键盘操作和鼠标移动)的响应程度如何?
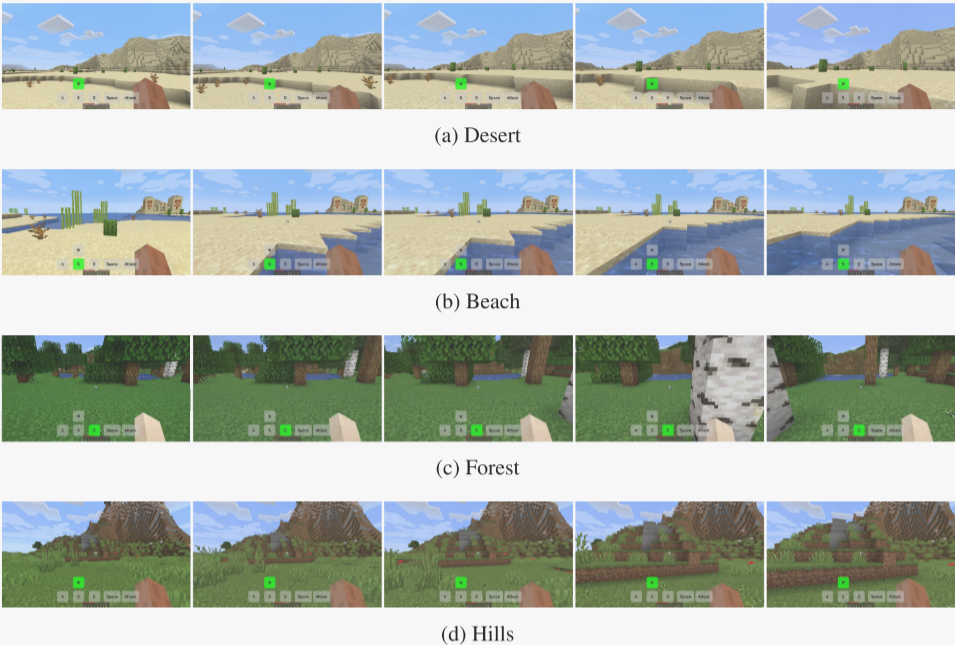
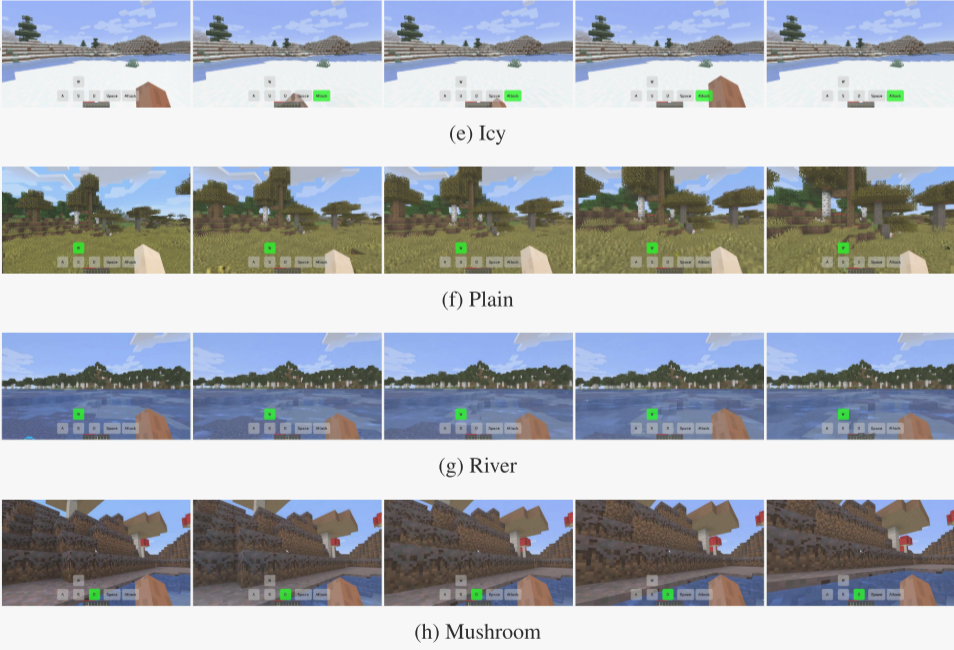
- 场景泛化能力:模型在多样化的《我的世界》场景(例如森林、沙漠、冰雪、蘑菇)中的表现如何?
- 自回归生成:在长时自回归视频生成过程中,作者的模型是否能够保持连贯且可控的行为?
实验细节。实验在NVIDIA H800 GPU上进行,每个GPU的批量大小为1。作者采用bf16混合精度以及全分片数据并行(FSDP)策略以实现高效的大规模训练。学习率设置为5×10⁻⁵,训练帧率为16 FPS,运动帧数为5帧。在推理阶段,作者对参考图像、运动帧和动作信号应用了无分类器引导(Classifier-Free Guidance, CFG)。CFG的尺度设置为6,采用流匹配采样,采样步数为50步,流匹配的偏移参数设置为15。
对比方法。为了建立坚实的对比基础,作者选择了两个最具代表性的开源世界模型作为基线:OASIS和MineWorld。这两项工作都是近期发布的,代码和模型均公开可用,并且在《我的世界》世界生成方面展示了具有竞争力的结果。这些模型为评估视觉质量、时间动态和可控性提供了合理的基准,使作者能够将所提出的方法与现有的公开系统进行对比。
评估指标。作者使用提出的GameWorld Score基准测试(参见第5节)来评估《我的世界》世界生成的性能。此外,为了补充标准定量指标(这些指标通常无法捕捉到感知质量的细微差异),作者还通过手动评分对所有基线输出进行了人工评估。该评估涵盖了四个关键方面:整体质量、可控性、视觉质量和时间一致性。评估以双盲方式进行,由两个独立的标注团队完成,两个团队均不知晓方法的身份,以确保公平性并尽量减少潜在偏见。
模型性能
在第6.1节中,研究者们通过提出的 GameWorld Score 统一基准对Matrix-Game模型的性能进行了全面评估,并与现有的开源Minecraft世界生成模型(如Oasis和MineWorld)进行了对比。评估涵盖了视觉质量、时间质量、动作可控性和物理规则理解等多个关键维度。
Matrix-Game在 GameWorld Score 基准的所有关键维度上均优于现有的开源Minecraft世界生成模型,特别是在动作可控性和3D一致性方面表现出色。该模型不仅在视觉质量和时间质量上保持了高水平,还在用户交互和物理规则理解方面展现了显著优势。这些结果表明Matrix-Game能够生成高质量、用户可控且物理上合理的Minecraft世界,适合复杂的交互式世界生成任务。
除了客观的量化评估,研究者们还进行了双盲人类评估,以验证Matrix-Game在主观质量上的优势。人类评估结果显示,Matrix-Game在 总体质量、可控性、视觉质量 和 时间连贯性 四个维度上均获得了极高的胜率,分别为 96.3%、93.8%、98.2% 和 89.6%。这些结果进一步证实了Matrix-Game在生成逼真、可控且连贯的Minecraft世界方面的优越性。

动作可控性评估
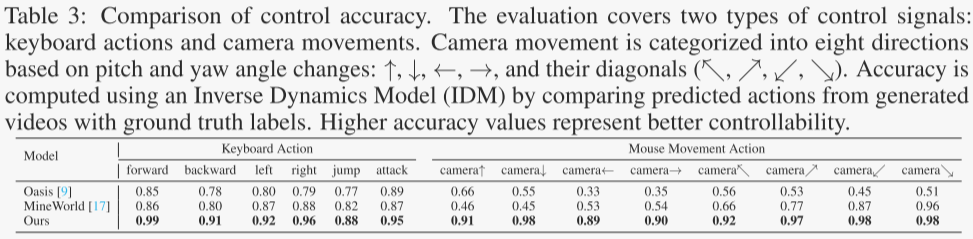
研究者们对Matrix-Game模型的动作可控性进行了详细的评估,重点关注模型对用户输入(键盘动作和鼠标移动)的响应能力,并与现有的开源Minecraft世界生成模型(如Oasis和MineWorld)进行了对比。
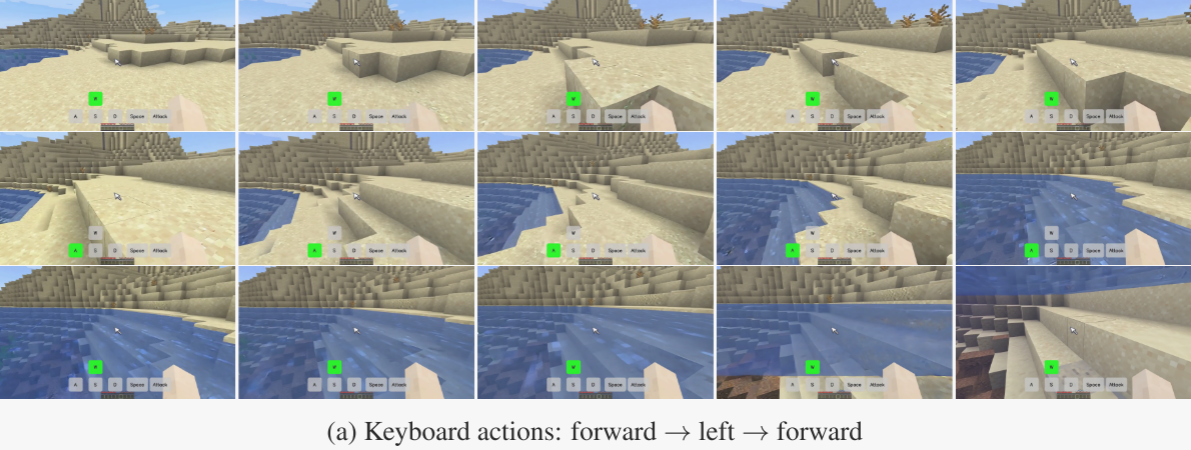
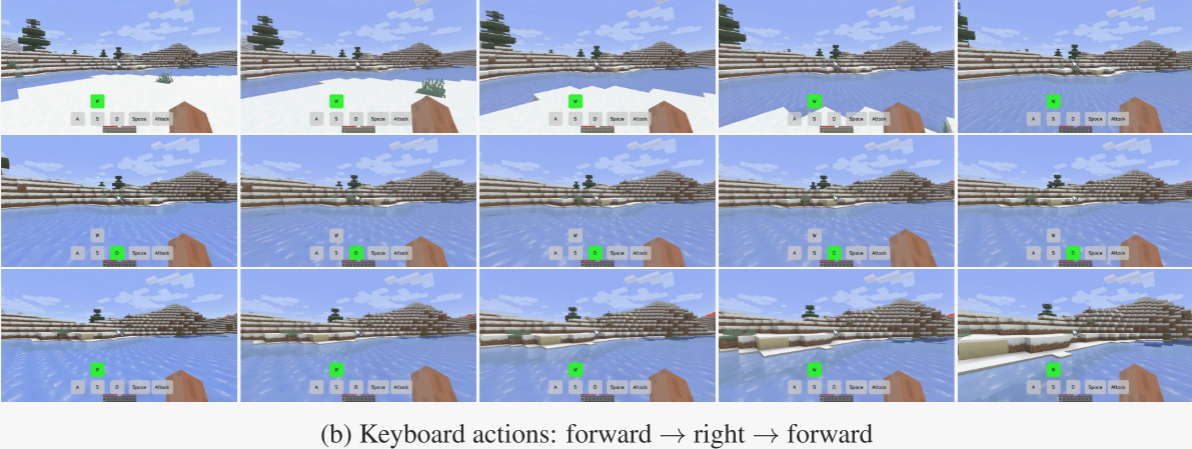
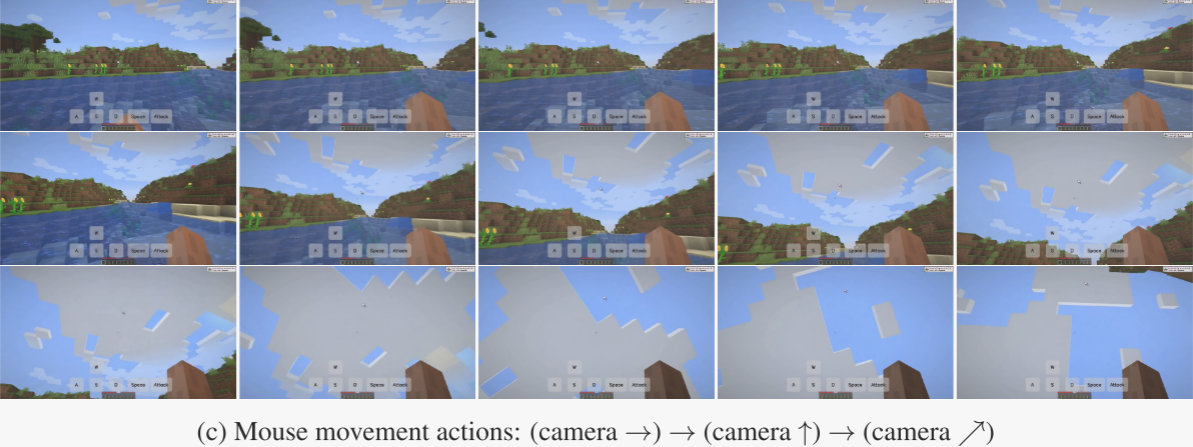
Matrix-Game在动作可控性方面表现出色,能够准确地将用户输入的动作信号转化为生成视频中的相应行为。与Oasis和MineWorld相比,Matrix-Game在键盘和鼠标动作的准确率上均取得了显著提升,特别是在一些需要精细控制的动作(如“前进”和“右移”)上表现尤为突出。这些结果表明Matrix-Game在交互式世界生成任务中具有更强的用户控制能力和更高的响应精度,能够更好地满足用户对游戏世界生成的实时交互需求。
场景泛化能力评估
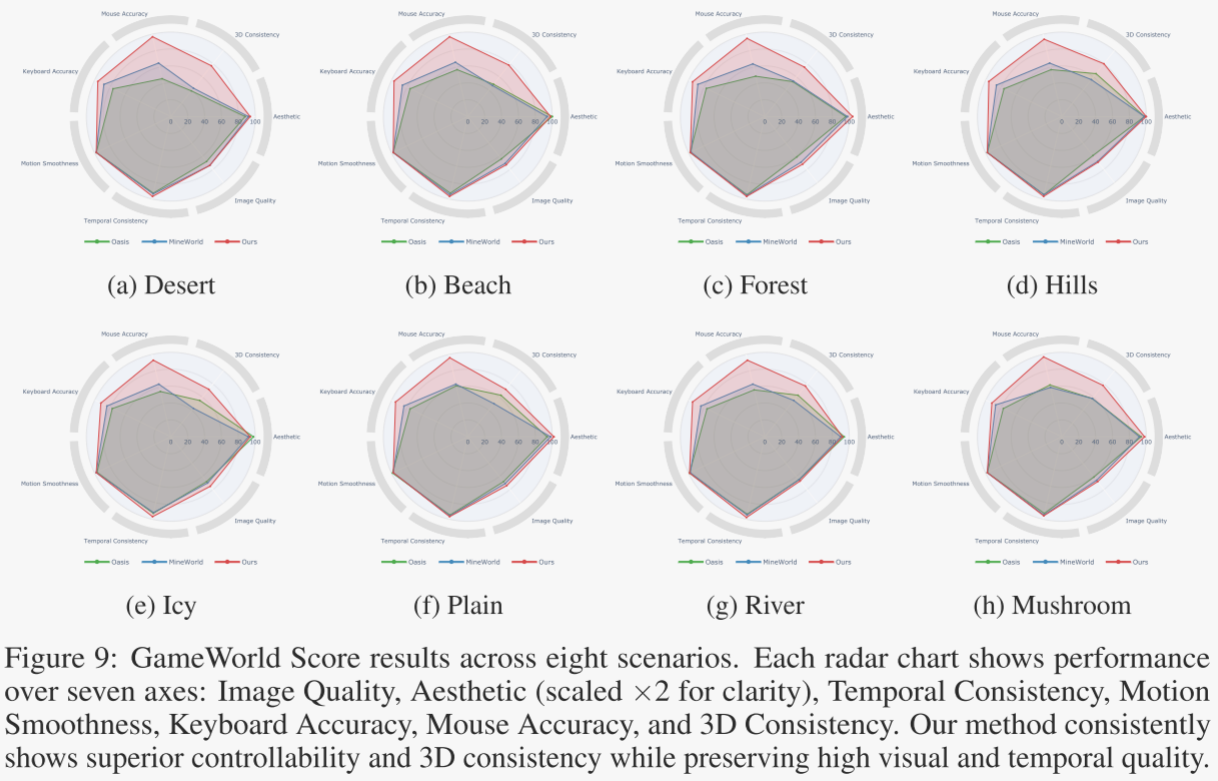
研究者们评估了Matrix-Game模型在多样化Minecraft场景中的泛化能力,以验证其在不同环境下的表现是否稳定且一致。这一部分的实验旨在测试模型是否能够适应多种不同的游戏场景,并在每个场景中保持高质量的生成效果。
Matrix-Game在多样化Minecraft场景中展现出强大的泛化能力,无论是在视觉质量、时间连贯性、动作可控性还是物理规则理解方面,均优于现有的开源模型。该模型能够适应不同环境的视觉和物理特性,生成高质量且符合用户意图的视频内容。这些结果表明Matrix-Game不仅在单一场景中表现出色,还能在多种复杂场景中保持一致的高性能,适合用于多样化的交互式世界生成任务。
长视频生成能力评估
研究者们评估了Matrix-Game模型在长视频生成任务中的表现,特别是其在多个视频片段之间维持时间连贯性和响应用户控制信号的能力。这一部分的实验旨在验证模型是否能够在长序列中保持一致性和交互性。
失败案例分析与讨论
研究者们对Matrix-Game模型在某些特定场景下的失败案例进行了分析,并讨论了模型的局限性以及未来改进的方向。这一部分的分析旨在识别模型在当前实现中存在的问题,并提出可能的解决方案。
边缘案例泛化问题:
-
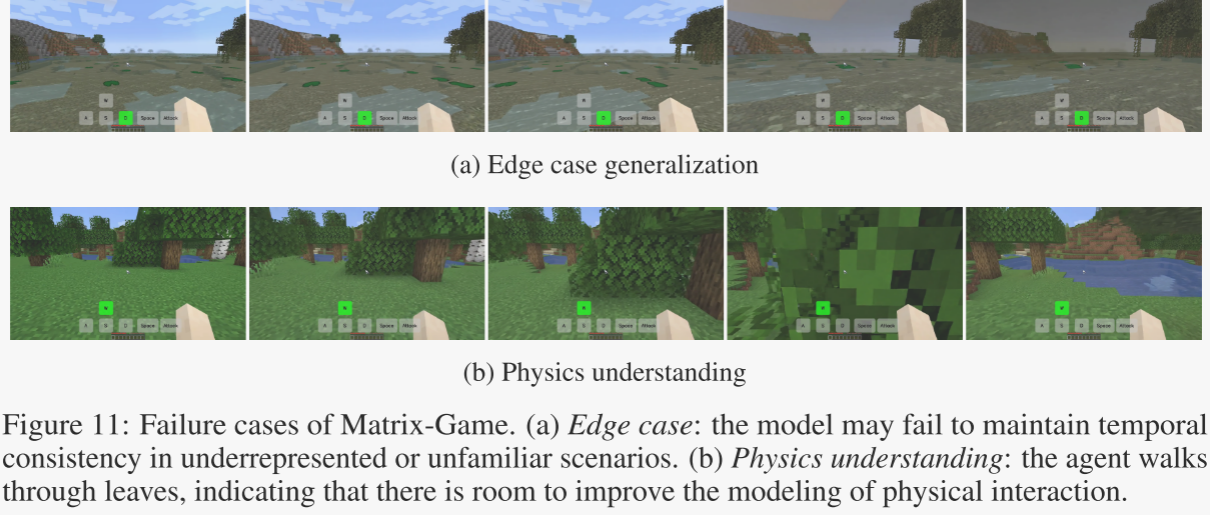
问题描述:在一些视觉复杂或数据覆盖不足的场景中(如罕见的生物群系或特殊地形),Matrix-Game可能会出现时间连贯性或空间一致性的问题。例如,模型可能无法准确地维持场景的几何结构或响应用户的控制信号。
-
原因分析:这些问题主要源于训练数据的局限性。尽管Matrix-Game的数据集已经涵盖了多种场景,但某些罕见或特殊的环境可能未被充分覆盖,导致模型在这些场景下的表现不佳。
-
改进方向:研究者们计划通过扩展训练数据集,增加更多罕见场景的数据,并采用持续训练策略,逐步适应新遇到的场景。
物理规则理解问题:
-
问题描述:尽管Matrix-Game在3D一致性方面表现出色,但在某些物理交互(如物体碰撞或地形穿越)的建模上仍有改进空间。例如,模型可能生成的角色会穿过树叶等物体,显示出对物理规则理解的不足。
-
原因分析:当前数据集中缺乏高保真度的物理监督数据,导致模型在这些复杂物理交互场景下的表现不够准确。
-
改进方向:研究者们计划通过增加更多物理规则相关的训练数据,并设计更明确的环境约束建模,来提升模型对物理规则的理解能力。
-
-
3.代码详解
环境配置
配置conda环境后安装必需包
pip install -r requirements.txt安装FlashAttention-3:https://github.com/Dao-AILab/flash-attention
然后运行即可推理:
bash run_inference.sh-
inference_bench.py
这段代码实现基于 MatrixGame 模型的图像到视频生成功能,
- main():主入口函数,设置 GPU 环境并启动视频生成流程。
- VideoGenerator 类负责初始化模型(VAE、DIT、文本编码器)、处理输入图像与条件、调用模型生成视频,并将结果保存为 MP4 文件。
首先来看模型初始化部分:
class VideoGenerator:
    def _init_models(self) -> None:
        """初始化视频生成所需的多个模型组件,并将它们移动到指定设备上。  Initialize all required models (VAE, text encoder, transformer)."""
        # 初始化 VAE       Initialize VAE
        vae_path = self.args.vae_path
        self.vae = get_vae("matrixgame", vae_path, torch.float16)
        self.vae.requires_grad_(False)
        self.vae.eval()
        self.vae.enable_tiling()

        # 初始化 Transformer (DIT)     Initialize DIT (Transformer)
        dit = MGVideoDiffusionTransformerI2V.from_pretrained(self.args.dit_path)
        dit.requires_grad_(False)
        dit.eval()

        # 初始化文本编码器      Initialize text encoder
        textenc_path = self.args.textenc_path
        weight_dtype = torch.bfloat16 if self.args.bfloat16 else torch.float32
        self.text_enc = get_text_enc('matrixgame', textenc_path, weight_dtype=weight_dtype, i2v_type='refiner')

        # 构建并移动 pipeline        Move models to devices
        self.pipeline = MatrixGameVideoPipeline(
            vae=self.vae.vae,
            text_encoder=self.text_enc,
            transformer=dit,
            scheduler=self.scheduler,
        ).to(weight_dtype).to(self.device)
在main()函数中会调用generate_videos()生成视频,其代码如下:
class VideoGenerator:
    def generate_videos(self) -> None:
        """批量生成视频,针对每种条件和图像组合调用处理函数。    Main method to generate videos for all conditions."""
        # 创建输出目录    Create output directory
        os.makedirs(self.args.output_path, exist_ok=True)

        # 加载预定义的条件列表    Load conditions
        conditions = Bench_actions_76()
        print(f"Found {len(conditions)} conditions to process")

        # 加载输入图像路径      Load sample images
        root_dir = self.args.image_path
        image_paths = self._load_images(root_dir)

        if not image_paths:
            print("No images found in the specified directory")
            return

        # 对每个条件和每张图像依次调用 _process_condition 方法进行处理          Process each condition
        for idx, condition in enumerate(conditions):
            for image_path in image_paths:
                print(f"Processing condition {idx+1}/{len(conditions)} with image {os.path.basename(image_path)}")
                self._process_condition(condition, image_path)
其中,Bench_actions_76()如下,该函数生成用于测试的复合动作及其对应的键盘和鼠标输入数据:
- 定义基础动作(前进、后退等)和摄像头方向;
- 构建组合动作列表 actions_to_test;
- 为每个动作创建65组输入数据,其中包含键盘按键状态和鼠标移动向量;
- 返回包含所有动作及其对应输入数据的列表。
def Bench_actions_76():
    # 1.定义基础动作(前进、后退等)和摄像头方向
    actions_single_action = ["forward","back","left","right","jump","attack"]
    actions_double_action = ["forward_attack","back_attack","left_attack","right_attack","jump_attack","forward_left","forward_right","back_left","back_right","forward_jump","back_jump","left_jump","right_jump",]

    actions_single_camera = [    "camera_up","camera_down","camera_l","camera_r","camera_ur","camera_ul","camera_dl","camera_dr"]
    # 2.构建组合动作列表
    actions_to_test = actions_double_action     # 构建组合动作列表
    for action in actions_single_action:
        for camera in actions_single_camera:
            double_action = f"{action}_{camera}"
            actions_to_test.append(double_action)

    print("length of actions: ", len(actions_to_test))
    base_action = actions_single_action + actions_single_camera

    KEYBOARD_IDX = {"forward": 0, "back": 1, "left": 2, "right": 3, "jump": 4,  "attack": 5}

    CAM_VALUE = 0.05
    CAMERA_VALUE_MAP = {"camera_up":  [CAM_VALUE, 0],"camera_down": [-CAM_VALUE, 0],"camera_l":   [0, -CAM_VALUE],"camera_r":   [0, CAM_VALUE],"camera_ur":  [CAM_VALUE, CAM_VALUE],"camera_ul":  [CAM_VALUE, -CAM_VALUE],"camera_dr":  [-CAM_VALUE, CAM_VALUE],"camera_dl":  [-CAM_VALUE, -CAM_VALUE],}


    # 3.为每个动作创建65组输入数据,其中包含键盘按键状态和鼠标移动向量
    num_samples_per_action = 65
    data = []

    for action_name in actions_to_test:
        # 前,后,左,右,跳跃,攻击
        keyboard_condition = [[0, 0, 0, 0, 0, 0] for _ in range(num_samples_per_action)]
        mouse_condition = [[0,0] for _ in range(num_samples_per_action)]

        for sub_act in base_action:
            if not sub_act in action_name: # 只处理action_name包含的动作
                continue
            print(f"action name: {action_name} sub_act: {sub_act}")
            if sub_act in CAMERA_VALUE_MAP:     # camera_dr     如果是摄像头动作,则设置鼠标输入
                mouse_condition = [CAMERA_VALUE_MAP[sub_act]
                                   for _ in range(num_samples_per_action)]

            elif sub_act == "attack":       # 如果是摄像头动作,则设置鼠标输入
                # to do 只有帧数 (idx % 16 >= 8) & (idx % 16 < 16)才为1
                for idx in range(num_samples_per_action):
                    if idx % 8 == 0:
                        keyboard_condition[idx][KEYBOARD_IDX["attack"]] = 1

            elif sub_act in KEYBOARD_IDX:       # 其他键盘动作则设置对应键位为1
                col = KEYBOARD_IDX[sub_act]
                for row in keyboard_condition:
                    row[col] = 1

        data.append({
            "action_name": action_name,
            "keyboard_condition": keyboard_condition,
            "mouse_condition": mouse_condition
        })

    return data     # 返回包含所有动作及其对应输入数据的列表
其中_process_condition()如下,该函数根据给定的键盘和鼠标条件,以指定图像为起点,生成一段带有动作模拟的视频,并保存为MP4文件。具体流程如下:
- 准备输入条件:将键盘和鼠标动作转换为PyTorch张量,并移动到指定设备(如GPU)。
- 图像预处理:加载图像并调整大小;使用VideoProcessor进行进一步处理;若配置了前置帧,则复制初始帧作为历史帧输入。
- 视频生成:调用pipeline模型,在无梯度模式下生成视频序列。
- 结果后处理与保存:将生成的视频张量转为图像数组,提取配置信息,构造输出路径,并调用process_video函数保存视频文件。
class VideoGenerator:
    def _process_condition(self, condition: Dict, image_path: str) -> None:
        """
        根据给定的键盘和鼠标条件,以指定图像为起点,生成一段带有动作模拟的视频,并保存为MP4文件。
        Process a single condition and generate video.

        Args:
            condition: Condition dictionary containing action and conditions
            image_path: Path to input image
        """
        # 1.将键盘和鼠标动作转换为PyTorch张量,并移动到指定设备(如GPU)   Prepare conditions
        keyboard_condition = torch.tensor(condition['keyboard_condition'], dtype=torch.float32).unsqueeze(0)
        mouse_condition = torch.tensor(condition['mouse_condition'], dtype=torch.float32).unsqueeze(0)

        # Move to device
        keyboard_condition = keyboard_condition.to(torch.bfloat16 if self.args.bfloat16 else torch.float16).to(self.device)
        mouse_condition = mouse_condition.to(torch.bfloat16 if self.args.bfloat16 else torch.float16).to(self.device)

        # 2.使用VideoProcessor进行进一步处理   Load and preprocess image
        image = Image.open(image_path).convert("RGB")
        new_width, new_height = self.args.resolution
        initial_image = self._resize_and_crop_image(image, (new_width, new_height))     # 调整大小
        semantic_image = initial_image
        vae_scale_factor = 2 ** (len(self.vae.config.block_out_channels) - 1)
        video_processor = VideoProcessor(vae_scale_factor=vae_scale_factor)
        initial_image = video_processor.preprocess(initial_image, height=new_height, width=new_width)

        if self.args.num_pre_frames > 0:
            past_frames = initial_image.repeat(self.args.num_pre_frames, 1, 1, 1)
            initial_image = torch.cat([initial_image, past_frames], dim=0)

        # 3.调用pipeline模型,在无梯度模式下生成视频序列。       Generate video
        with torch.no_grad():
            video = self.pipeline(
                height=new_height,
                width=new_width,
                video_length=self.video_length,
                mouse_condition=mouse_condition,
                keyboard_condition=keyboard_condition,
                initial_image=initial_image,
                num_inference_steps=self.args.inference_steps if hasattr(self.args, 'inference_steps') else 50,
                guidance_scale=self.guidance_scale,
                embedded_guidance_scale=None,
                data_type="video",
                vae_ver='884-16c-hy',
                enable_tiling=True,
                generator=torch.Generator(device="cuda").manual_seed(42),
                i2v_type='refiner',
                args=self.args,
                semantic_images=semantic_image
            ).videos[0]

        # 4.结果后处理与保存      Save video
        img_tensors = rearrange(video.permute(1, 0, 2, 3) * 255, 't c h w -> t h w c').contiguous()
        img_tensors = img_tensors.cpu().numpy().astype(np.uint8)

        config = (      # 从 keyboard_condition 和 mouse_condition 中提取 CPU 上的 NumPy 格式配置数据
            keyboard_condition[0].float().cpu().numpy(),
            mouse_condition[0].float().cpu().numpy()
        )

        # 输出路径构建
        action_name = condition['action_name']
        output_filename = f"{os.path.splitext(os.path.basename(image_path))[0]}_{action_name}.mp4"
        output_path = os.path.join(self.args.output_path, output_filename)

        process_video(      # 调用视频生成函数
            img_tensors,
            output_path,
            config,
            mouse_icon_path=self.args.mouse_icon_path,
            mouse_scale=self.args.mouse_scale,
            mouse_rotation=self.args.mouse_rotation,
            fps=self.args.fps
        )
-
Pipeline
MatrixGameVideoPipeline类的__call__()函数是代码的核心部分,该函数是生成视频的核心方法,主要完成以下功能:
- 参数检查与初始化:校验输入参数并设置默认值;
- 文本编码:将提示词(prompt)和负向提示词(negative prompt)编码为嵌入向量;
- 时间步准备:根据调度器配置推理步数和时间步;
- 潜变量初始化:基于初始图像或随机噪声构建潜空间表示;
- 去噪循环:迭代地使用Transformer模型预测噪声,并通过调度器更新潜变量;
- 解码输出:将最终潜变量解码为视频帧;
- 结果返回:按指定格式返回生成的视频。
class MatrixGameVideoPipeline(DiffusionPipeline):
    def __call__():
        ...

        # 1. 参数检查与初始化   Check inputs. Raise error if not correct
        self.check_inputs(
            prompt,
            height,
            width,
            video_length,
            callback_steps,
            negative_prompt,
            prompt_embeds,
            negative_prompt_embeds,
            callback_on_step_end_tensor_inputs,
            vae_ver=vae_ver,
        )

        self._guidance_scale = guidance_scale
        self._guidance_rescale = guidance_rescale
        self._clip_skip = clip_skip
        self._cross_attention_kwargs = cross_attention_kwargs
        self._interrupt = False
        self.args = args

        # 2. Define call parameters
        if prompt is not None and isinstance(prompt, str):
            batch_size = 1
        elif prompt is not None and isinstance(prompt, list):
            batch_size = len(prompt)
        else:
            batch_size = prompt_embeds.shape[0]

        device = self._execution_device

        # 3.   文本编码      Encode input prompt
        lora_scale = (
            self.cross_attention_kwargs.get("scale", None)
            if self.cross_attention_kwargs is not None
            else None
        )
        n_tokens = (height//16 * width // 16 * ((video_length-1)//4+1))

        if semantic_images is None:
            if args.num_pre_frames > 0:
                semantic_images = initial_image[:1,...] #semantic_images torch.Size([1, 3, 352, 640])  #
                # print("semantic_images", semantic_images.shape)
                semantic_images = (semantic_images / 2 + 0.5).clamp(0, 1).cpu().permute(0, 2, 3, 1).float().numpy() # b c h w -> b h w c
                semantic_images = numpy_to_pil(semantic_images)
            else:
                semantic_images = initial_image

        (
            prompt_embeds,
            negative_prompt_embeds,
            prompt_mask,
            negative_prompt_mask,
        ) = self.encode_prompt(
            prompt,
            device,
            num_videos_per_prompt,
            self.do_classifier_free_guidance,
            negative_prompt,
            prompt_embeds=prompt_embeds,
            attention_mask=attention_mask,
            negative_prompt_embeds=negative_prompt_embeds,
            negative_attention_mask=negative_attention_mask,
            lora_scale=lora_scale,
            clip_skip=self.clip_skip,
            data_type=data_type,
            semantic_images=semantic_images
        )
        prompt_embeds, prompt_embeds_2 = prompt_embeds
        negative_prompt_embeds, negative_prompt_embeds_2 = negative_prompt_embeds
        prompt_mask, prompt_mask_2 = prompt_mask
        negative_prompt_mask, negative_prompt_mask_2 = negative_prompt_mask
        prompt_embeds  = prompt_embeds[:,:144, ...]  # 144 is the number of img tokens after MLLM
        prompt_mask  = prompt_mask[:,:144, ...]
        negative_prompt_embeds = negative_prompt_embeds[:,:144, ...]
        negative_prompt_mask = negative_prompt_mask[:,:144, ...]

        # For classifier free guidance, we need to do two forward passes.
        # Here we concatenate the unconditional and text embeddings into a single batch
        # to avoid doing two forward passes
        if self.do_classifier_free_guidance:
            prompt_embeds = torch.cat([negative_prompt_embeds, prompt_embeds])
            if prompt_mask is not None:
                prompt_mask = torch.cat([negative_prompt_mask, prompt_mask])
            if prompt_embeds_2 is not None:
                prompt_embeds_2 = torch.cat([negative_prompt_embeds_2, prompt_embeds_2])
            if prompt_mask_2 is not None:
                prompt_mask_2 = torch.cat([negative_prompt_mask_2, prompt_mask_2])


        # 4. 时间步初始化     Prepare timesteps
        extra_set_timesteps_kwargs = self.prepare_extra_func_kwargs(
            self.scheduler.set_timesteps, {"n_tokens": n_tokens}
        )
        timesteps, num_inference_steps = retrieve_timesteps(
            self.scheduler,
            num_inference_steps,
            device,
            timesteps,
            sigmas,
            **extra_set_timesteps_kwargs,
        )

        if "884" in vae_ver:
            video_length = (video_length - 1) // 4 + 1
        elif "888" in vae_ver:
            video_length = (video_length - 1) // 8 + 1
        else:
            video_length = video_length


        if initial_image is not None:
            initial_image = initial_image.to(
                device, dtype=prompt_embeds.dtype
            )
            if i2v_type == 'concat':
                num_channels_latents = self.transformer.config.in_channels // 2
            else:
                num_channels_latents = self.transformer.config.in_channels // 2
        else:
            num_channels_latents = self.transformer.config.in_channels

        # 5. 潜变量初始化     Prepare latent variables
        if args.num_pre_frames > 0:
            latents, image_latents, concat_latents = self.prepare_latents(
            initial_image,
            batch_size * num_videos_per_prompt,
            num_channels_latents,
            height,
            width,
            video_length,
            prompt_embeds.dtype,
            device,
            generator,
            latents,
            i2v_type,
        )
        else:
            latents, image_latents = self.prepare_latents(
            initial_image,
            batch_size * num_videos_per_prompt,
            num_channels_latents,
            height,
            width,
            video_length,
            prompt_embeds.dtype,
            device,
            generator,
            latents,
            i2v_type,
        )

        # 6. Prepare extra step kwargs. TODO: Logic should ideally just be moved out of the pipeline
        extra_step_kwargs = self.prepare_extra_func_kwargs(
            self.scheduler.step,
            {"generator": generator, "eta": eta},
        )

        target_dtype = self.dtype
        autocast_enabled = target_dtype != torch.float32
        vae_dtype = self.dtype
        vae_autocast_enabled = vae_dtype != torch.float32

        # 7. 去噪循环       Denoising loop
        num_warmup_steps = len(timesteps) - num_inference_steps * self.scheduler.order
        self._num_timesteps = len(timesteps)
        if args.num_pre_frames > 0:
            concat_latents = (
                torch.cat([torch.zeros_like(concat_latents), concat_latents])
                if self.do_classifier_free_guidance
                else concat_latents
            )
        # if is_progress_bar:
        with self.progress_bar(total=num_inference_steps) as progress_bar:
            for i, t in enumerate(timesteps):
                if self.interrupt:
                    continue

                # expand the latents if we are doing classifier free guidance
                latent_model_input = (
                    torch.cat([latents] * 2)
                    if self.do_classifier_free_guidance
                    else latents
                )
                latent_model_input = self.scheduler.scale_model_input( #do nothing
                    latent_model_input, t
                )
                if image_latents is not None:
                    latent_image_input = torch.cat([image_latents] * 2) if self.do_classifier_free_guidance else image_latents
                    if i2v_type == 'concat':
                        latent_model_input = torch.cat([latent_model_input, latent_image_input], dim=1)
                    else:
                        if args.num_pre_frames > 0:
                            num_pre = latent_image_input.shape[2]
                            #print("latent_image_input", latent_image_input.shape)  #latent_image_input torch.Size([2, 16, 1, 44, 80])
                            #print("latent_model_input", latent_model_input.shape)   #latent_model_input torch.Size([2, 16, 5, 44, 80])
                            #print("concat_latents", concat_latents.shape)  #concat_latents torch.Size([1, 17, 5, 44, 80])
                            latent_model_input = torch.cat([latent_image_input, latent_model_input[:,:,num_pre:,...]], dim=2)

                            latent_model_input = torch.cat([latent_model_input, concat_latents], dim=1)
                        else:
                            num_pre = latent_image_input.shape[2]   # 如果多帧past frame需要修改
                            latent_model_input = torch.cat([latent_image_input, latent_model_input[:,:,num_pre:,...]], dim=2)

                t_expand = t.repeat(latent_model_input.shape[0])
                guidance_expand = (
                    torch.tensor(
                        [embedded_guidance_scale] * latent_model_input.shape[0],
                        dtype=torch.float32,
                        device=device,
                    ).to(target_dtype)
                    * 1000.0
                    if embedded_guidance_scale is not None
                    else None
                )
                if mouse_condition is not None:
                    mouse_condition_input = (
                        torch.cat([torch.full_like(mouse_condition, 1.0), mouse_condition])
                        if self.do_classifier_free_guidance
                        else mouse_condition
                    )
                    # torch.zeros_like(mouse_condition)
                    # torch.full_like(mouse_condition, 999.0)
                    keyboard_condition_input = (
                        torch.cat([torch.full_like(keyboard_condition, -1.0), keyboard_condition])
                        if self.do_classifier_free_guidance
                        else keyboard_condition
                    )
                    #torch.full_like(keyboard_condition, -1.0)
                    #torch.zeros_like(keyboard_condition)
                    # mouse_condition = torch.full_like(mouse_condition, 999.0)
                    # keyboard 是 6维,改成 -1
                    # keyboard_condition = torch.full_like(keyboard_condition, -1.0)
                else:
                    mouse_condition_input = None
                    keyboard_condition_input = None
                # predict the noise residual
                with torch.autocast(
                    device_type="cuda", dtype=target_dtype, enabled=autocast_enabled
                ):
                    # import ipdb;ipdb.set_trace()
                    noise_pred = self.transformer(  # For an input image (129, 192, 336) (1, 256, 256)
                        hidden_states = latent_model_input,  # [2, 16, 33, 24, 42]
                        timestep = t_expand,  # [2]
                        encoder_hidden_states=(prompt_embeds, prompt_embeds_2),  # [2, 256, 4096]
                        encoder_attention_mask=(prompt_mask, prompt_mask_2),  # [2, 256]
                        guidance=guidance_expand,
                        return_dict=True,
                        mouse_condition = mouse_condition_input,
                        keyboard_condition = keyboard_condition_input,
                    )["x"]

                # perform guidance
                if self.do_classifier_free_guidance:
                    noise_pred_uncond, noise_pred_text = noise_pred.chunk(2)
                    noise_pred = noise_pred_uncond + self.guidance_scale * (
                        noise_pred_text - noise_pred_uncond
                    )

                if self.do_classifier_free_guidance and self.guidance_rescale > 0.0:
                    # Based on 3.4. in https://arxiv.org/pdf/2305.08891.pdf
                    noise_pred = rescale_noise_cfg(
                        noise_pred,
                        noise_pred_text,
                        guidance_rescale=self.guidance_rescale,
                    )

                # compute the previous noisy sample x_t -> x_t-1
                if i2v_type == "concat":
                    latents = self.scheduler.step(
                        noise_pred, t, latents, **extra_step_kwargs, return_dict=False
                    )[0]
                else:
                    latents = self.scheduler.step(
                        noise_pred[:,:,1:,...], t, latents[:,:,1:,...], **extra_step_kwargs, return_dict=False
                    )[0]
                    latents = torch.concat(
                        [image_latents, latents], dim=2
                    )

                if callback_on_step_end is not None:
                    callback_kwargs = {}
                    for k in callback_on_step_end_tensor_inputs:
                        callback_kwargs[k] = locals()[k]
                    callback_outputs = callback_on_step_end(self, i, t, callback_kwargs)

                    latents = callback_outputs.pop("latents", latents)
                    prompt_embeds = callback_outputs.pop("prompt_embeds", prompt_embeds)
                    negative_prompt_embeds = callback_outputs.pop(
                        "negative_prompt_embeds", negative_prompt_embeds
                    )

                # call the callback, if provided
                if i == len(timesteps) - 1 or (
                    (i + 1) > num_warmup_steps and (i + 1) % self.scheduler.order == 0
                ):
                    if progress_bar is not None:
                        progress_bar.update()
                    if callback is not None and i % callback_steps == 0:
                        step_idx = i // getattr(self.scheduler, "order", 1)
                        callback(step_idx, t, latents)

        # 解码输出:将最终潜变量解码为视频帧;
        if not output_type == "latent":
            expand_temporal_dim = False
            if len(latents.shape) == 4:
                if isinstance(self.vae, AutoencoderKLCausal3D):
                    latents = latents.unsqueeze(2)
                    expand_temporal_dim = True
            elif len(latents.shape) == 5:
                pass
            else:
                raise ValueError(
                    f"Only support latents with shape (b, c, h, w) or (b, c, f, h, w), but got {latents.shape}."
                )

            if (
                hasattr(self.vae.config, "shift_factor")
                and self.vae.config.shift_factor
            ):
                latents = (
                    latents / self.vae.config.scaling_factor
                    + self.vae.config.shift_factor
                )
            else:
                latents = latents / self.vae.config.scaling_factor

            with torch.autocast(
                device_type="cuda", dtype=vae_dtype, enabled=vae_autocast_enabled
            ):
                if enable_tiling:
                    self.vae.enable_tiling()
                    image = self.vae.decode(
                        latents, return_dict=False, generator=generator
                    )[0]
                else:
                    image = self.vae.decode(
                        latents, return_dict=False, generator=generator
                    )[0]

            if expand_temporal_dim or image.shape[2] == 1:
                image = image.squeeze(2)

        else:
            image = latents

        image = (image / 2 + 0.5).clamp(0, 1)
        # we always cast to float32 as this does not cause significant overhead and is compatible with bfloa16
        image = image.cpu().float()
        # if i2v_type == "concat":
        #     image = image[:,:,4:,...]
        # Offload all models
        self.maybe_free_model_hooks()

        if not return_dict:
            return image

        return MatrixGameVideoPipelineOutput(videos=image)
其中文本编码部分如下,这段代码主要完成以下功能:
- LoRA缩放参数处理:从cross_attention_kwargs中获取LoRA的缩放参数scale;
- 计算token数量:根据输入视频的高、宽和帧数计算图像token总数;
- 语义图像处理:若未提供semantic_images,则从初始图像提取并预处理为语义图像;
- 提示编码:调用encode_prompt方法对文本提示进行编码,支持无分类器引导(CFG);
- 嵌入裁剪:限制prompt embeddings的长度为144个tokens;
- 合并正负嵌入:在无分类器引导时,将负向和正向嵌入拼接以减少前向计算次数。
# 3.   文本编码      Encode input prompt
lora_scale = (      # LoRA缩放参数处理
    self.cross_attention_kwargs.get("scale", None)
    if self.cross_attention_kwargs is not None
    else None
)
n_tokens = (height//16 * width // 16 * ((video_length-1)//4+1))     # 计算token数量:根据输入视频的高、宽和帧数计算图像token总数

if semantic_images is None:     # 若未提供semantic_images,则从初始图像提取并预处理为语义图像
    if args.num_pre_frames > 0:
        semantic_images = initial_image[:1,...] #semantic_images torch.Size([1, 3, 352, 640])  #
        # print("semantic_images", semantic_images.shape)
        semantic_images = (semantic_images / 2 + 0.5).clamp(0, 1).cpu().permute(0, 2, 3, 1).float().numpy() # b c h w -> b h w c
        semantic_images = numpy_to_pil(semantic_images)
    else:
        semantic_images = initial_image

(
    prompt_embeds,
    negative_prompt_embeds,
    prompt_mask,
    negative_prompt_mask,
) = self.encode_prompt(         # 调用encode_prompt方法对文本提示进行编码
    prompt,
    device,
    num_videos_per_prompt,
    self.do_classifier_free_guidance,
    negative_prompt,
    prompt_embeds=prompt_embeds,
    attention_mask=attention_mask,
    negative_prompt_embeds=negative_prompt_embeds,
    negative_attention_mask=negative_attention_mask,
    lora_scale=lora_scale,
    clip_skip=self.clip_skip,
    data_type=data_type,
    semantic_images=semantic_images
)
prompt_embeds, prompt_embeds_2 = prompt_embeds
negative_prompt_embeds, negative_prompt_embeds_2 = negative_prompt_embeds
prompt_mask, prompt_mask_2 = prompt_mask
negative_prompt_mask, negative_prompt_mask_2 = negative_prompt_mask
prompt_embeds  = prompt_embeds[:,:144, ...]  # 嵌入裁剪:限制prompt embeddings的长度为144个tokens;  144 is the number of img tokens after MLLM
prompt_mask  = prompt_mask[:,:144, ...]
negative_prompt_embeds = negative_prompt_embeds[:,:144, ...]
negative_prompt_mask = negative_prompt_mask[:,:144, ...]

# For classifier free guidance, we need to do two forward passes.
# Here we concatenate the unconditional and text embeddings into a single batch
# to avoid doing two forward passes
if self.do_classifier_free_guidance:        # 在无分类器引导时,将负向和正向嵌入拼接以减少前向计算次数。
    prompt_embeds = torch.cat([negative_prompt_embeds, prompt_embeds])
    if prompt_mask is not None:
        prompt_mask = torch.cat([negative_prompt_mask, prompt_mask])
    if prompt_embeds_2 is not None:
        prompt_embeds_2 = torch.cat([negative_prompt_embeds_2, prompt_embeds_2])
    if prompt_mask_2 is not None:
        prompt_mask_2 = torch.cat([negative_prompt_mask_2, prompt_mask_2])
其中时间步编码部分如下,该段代码主要完成以下功能:
- 设置推理步数与时间步:通过 prepare_extra_func_kwargs 和 retrieve_timesteps 配置调度器的时间步参数,支持自定义额外参数(如 n_tokens)。
- 视频长度调整:根据使用的 VAE 版本("884" 或 "888"),对输入视频长度进行下采样处理。
- 初始图像处理:若提供初始图像,则将其移动到指定设备和数据类型;根据图像到视频模式(i2v_type)决定潜在空间通道数。
- 默认通道数设置:若无初始图像,则直接使用模型配置中的潜在空间通道数。
# 4. 时间步初始化     Prepare timesteps
extra_set_timesteps_kwargs = self.prepare_extra_func_kwargs(        # 设置推理步数与时间步
    self.scheduler.set_timesteps, {"n_tokens": n_tokens}
)
timesteps, num_inference_steps = retrieve_timesteps(        #  配置调度器的时间步参数
    self.scheduler,
    num_inference_steps,
    device,
    timesteps,
    sigmas,
    **extra_set_timesteps_kwargs,
)

if "884" in vae_ver:        # 视频长度调整:根据使用的 VAE 版本("884" 或 "888"),对输入视频长度进行下采样处理。
    video_length = (video_length - 1) // 4 + 1
elif "888" in vae_ver:
    video_length = (video_length - 1) // 8 + 1
else:
    video_length = video_length


if initial_image is not None:       # 若提供初始图像,则将其移动到指定设备和数据类型
    initial_image = initial_image.to(
        device, dtype=prompt_embeds.dtype
    )
    if i2v_type == 'concat':    # 根据图像到视频模式(i2v_type)决定潜在空间通道数
        num_channels_latents = self.transformer.config.in_channels // 2
    else:
        num_channels_latents = self.transformer.config.in_channels // 2
else:
    num_channels_latents = self.transformer.config.in_channels      # 若无初始图像,则直接使用模型配置中的潜在空间通道数。
该段代码实现了一个基于扩散模型的视频生成过程,主要功能如下:
- 初始化与输入处理:根据时间步timesteps和调度器设置进行推理步数计算,并处理初始隐状态(包括无分类器引导时的输入扩展)。
- 条件输入构建:对图像、鼠标、键盘等多模态条件信息进行拼接或填充处理,支持无分类器引导(CFG)。
- 噪声预测:使用transformer模型预测当前时间步的噪声残差。
- 引导调整:应用分类器自由引导(CFG)和噪声重缩放(rescale)策略优化预测结果。
- 去噪更新:调用scheduler.step更新隐变量latents,逐步去除噪声。
- 回调机制:支持每一步结束后的回调函数处理(如进度条更新、用户自定义操作)
# 7. 去噪循环       Denoising loop
num_warmup_steps = len(timesteps) - num_inference_steps * self.scheduler.order      # 计算预热步数 num_warmup_steps,用于控制推理过程中跳过初始阶段的步数;
self._num_timesteps = len(timesteps)        # 设置当前时间步总数 _num_timesteps
if args.num_pre_frames > 0:         # 如果有前置帧(args.num_pre_frames > 0),则在进行无分类器引导(classifier-free guidance)时,将 concat_latents 与零张量拼接,用于生成视频起始帧。
    concat_latents = (
        torch.cat([torch.zeros_like(concat_latents), concat_latents])
        if self.do_classifier_free_guidance
        else concat_latents
    )
# if is_progress_bar:
with self.progress_bar(total=num_inference_steps) as progress_bar:
    for i, t in enumerate(timesteps):
        if self.interrupt:
            continue

        # expand the latents if we are doing classifier free guidance
        latent_model_input = (      # 条件输入构建
            torch.cat([latents] * 2)
            if self.do_classifier_free_guidance
            else latents
        )
        latent_model_input = self.scheduler.scale_model_input( #do nothing
            latent_model_input, t
        )
        if image_latents is not None:       # 图像潜在表示的拼接方式:根据i2v_type选择是否将图像潜变量与模型输入在通道或时间维度拼接;
            latent_image_input = torch.cat([image_latents] * 2) if self.do_classifier_free_guidance else image_latents  # 无分类器引导(CFG)
            if i2v_type == 'concat':
                latent_model_input = torch.cat([latent_model_input, latent_image_input], dim=1)
            else:
                if args.num_pre_frames > 0:
                    num_pre = latent_image_input.shape[2]
                    #print("latent_image_input", latent_image_input.shape)  #latent_image_input torch.Size([2, 16, 1, 44, 80])
                    #print("latent_model_input", latent_model_input.shape)   #latent_model_input torch.Size([2, 16, 5, 44, 80])
                    #print("concat_latents", concat_latents.shape)  #concat_latents torch.Size([1, 17, 5, 44, 80])
                    latent_model_input = torch.cat([latent_image_input, latent_model_input[:,:,num_pre:,...]], dim=2)

                    latent_model_input = torch.cat([latent_model_input, concat_latents], dim=1)
                else:
                    num_pre = latent_image_input.shape[2]   # 如果多帧past frame需要修改
                    latent_model_input = torch.cat([latent_image_input, latent_model_input[:,:,num_pre:,...]], dim=2)

        t_expand = t.repeat(latent_model_input.shape[0])
        guidance_expand = (
            torch.tensor(
                [embedded_guidance_scale] * latent_model_input.shape[0],
                dtype=torch.float32,
                device=device,
            ).to(target_dtype)
            * 1000.0
            if embedded_guidance_scale is not None
            else None
        )
        if mouse_condition is not None:     #  鼠标、键盘条件输入处理
            mouse_condition_input = (
                torch.cat([torch.full_like(mouse_condition, 1.0), mouse_condition])
                if self.do_classifier_free_guidance
                else mouse_condition
            )
            # torch.zeros_like(mouse_condition)
            # torch.full_like(mouse_condition, 999.0)
            keyboard_condition_input = (
                torch.cat([torch.full_like(keyboard_condition, -1.0), keyboard_condition])
                if self.do_classifier_free_guidance
                else keyboard_condition
            )
            #torch.full_like(keyboard_condition, -1.0)
            #torch.zeros_like(keyboard_condition)
            # mouse_condition = torch.full_like(mouse_condition, 999.0)
            # keyboard 是 6维,改成 -1
            # keyboard_condition = torch.full_like(keyboard_condition, -1.0)
        else:
            mouse_condition_input = None
            keyboard_condition_input = None
        # 噪声预测:使用transformer模型预测当前时间步的噪声残差。     predict the noise residual
        with torch.autocast(
            device_type="cuda", dtype=target_dtype, enabled=autocast_enabled
        ):
            # import ipdb;ipdb.set_trace()
            noise_pred = self.transformer(  # For an input image (129, 192, 336) (1, 256, 256)
                hidden_states = latent_model_input,  # [2, 16, 33, 24, 42]
                timestep = t_expand,  # [2]
                encoder_hidden_states=(prompt_embeds, prompt_embeds_2),  # [2, 256, 4096]
                encoder_attention_mask=(prompt_mask, prompt_mask_2),  # [2, 256]
                guidance=guidance_expand,
                return_dict=True,
                mouse_condition = mouse_condition_input,
                keyboard_condition = keyboard_condition_input,
            )["x"]

        # perform guidance
        if self.do_classifier_free_guidance:
            noise_pred_uncond, noise_pred_text = noise_pred.chunk(2)
            noise_pred = noise_pred_uncond + self.guidance_scale * (
                noise_pred_text - noise_pred_uncond
            )

        if self.do_classifier_free_guidance and self.guidance_rescale > 0.0:        # 无分类器引导(CFG)
            # Based on 3.4. in https://arxiv.org/pdf/2305.08891.pdf
            noise_pred = rescale_noise_cfg(
                noise_pred,
                noise_pred_text,
                guidance_rescale=self.guidance_rescale,
            )

        # 去噪更新:调用scheduler.step更新隐变量latents,逐步去除噪声。     compute the previous noisy sample x_t -> x_t-1
        if i2v_type == "concat":
            latents = self.scheduler.step(
                noise_pred, t, latents, **extra_step_kwargs, return_dict=False
            )[0]
        else:
            latents = self.scheduler.step(
                noise_pred[:,:,1:,...], t, latents[:,:,1:,...], **extra_step_kwargs, return_dict=False
            )[0]
            latents = torch.concat(
                [image_latents, latents], dim=2
            )

        if callback_on_step_end is not None:
            callback_kwargs = {}
            for k in callback_on_step_end_tensor_inputs:
                callback_kwargs[k] = locals()[k]
            callback_outputs = callback_on_step_end(self, i, t, callback_kwargs)

            latents = callback_outputs.pop("latents", latents)
            prompt_embeds = callback_outputs.pop("prompt_embeds", prompt_embeds)
            negative_prompt_embeds = callback_outputs.pop(
                "negative_prompt_embeds", negative_prompt_embeds
            )

        # 回调机制:支持每一步结束后的回调函数处理      call the callback, if provided
        if i == len(timesteps) - 1 or (
            (i + 1) > num_warmup_steps and (i + 1) % self.scheduler.order == 0
        ):
            if progress_bar is not None:
                progress_bar.update()
            if callback is not None and i % callback_steps == 0:
                step_idx = i // getattr(self.scheduler, "order", 1)
                callback(step_idx, t, latents)
这段代码的作用是将潜在变量latent转换为视频帧
# 解码输出:将最终潜变量解码为视频帧;
if not output_type == "latent":
    expand_temporal_dim = False
    if len(latents.shape) == 4:
        if isinstance(self.vae, AutoencoderKLCausal3D):
            latents = latents.unsqueeze(2)
            expand_temporal_dim = True
    elif len(latents.shape) == 5:
        pass
    else:
        raise ValueError(
            f"Only support latents with shape (b, c, h, w) or (b, c, f, h, w), but got {latents.shape}."
        )

    if (
        hasattr(self.vae.config, "shift_factor")
        and self.vae.config.shift_factor
    ):
        latents = (     # 对latents应用VAE配置的缩放和平移变换
            latents / self.vae.config.scaling_factor
            + self.vae.config.shift_factor
        )
    else:
        latents = latents / self.vae.config.scaling_factor

    with torch.autocast(        # 使用VAE解码,支持显存优化的autocast和tiling
        device_type="cuda", dtype=vae_dtype, enabled=vae_autocast_enabled
    ):
        if enable_tiling:
            self.vae.enable_tiling()
            image = self.vae.decode(
                latents, return_dict=False, generator=generator
            )[0]
        else:
            image = self.vae.decode(
                latents, return_dict=False, generator=generator
            )[0]

    if expand_temporal_dim or image.shape[2] == 1:      # 若扩展了时间维度或解码后时间维度为1,则将其压缩回原始维度。
        image = image.squeeze(2)
-
模型架构
3D causal Vae
3D causal VAE的定义如下:主要包括:
- 编码器(EncoderCausal3D)和解码器(DecoderCausal3D),用于学习输入数据的潜在表示并重建输出;
- 量化相关层(quant_conv 和 post_quant_conv)
class AutoencoderKLCausal3D(ModelMixin, ConfigMixin, FromOriginalVAEMixin):
    @register_to_config
    def __init__(   ):
        super().__init__()

        self.time_compression_ratio = time_compression_ratio
        # 1.设置编码器(EncoderCausal3D)和解码器(DecoderCausal3D)
        self.encoder = EncoderCausal3D(
            in_channels=in_channels,
            out_channels=latent_channels,
            down_block_types=down_block_types,
            block_out_channels=block_out_channels,
            layers_per_block=layers_per_block,
            act_fn=act_fn,
            norm_num_groups=norm_num_groups,
            double_z=True,
            time_compression_ratio=time_compression_ratio,
            spatial_compression_ratio=spatial_compression_ratio,
            mid_block_add_attention=mid_block_add_attention,
        )

        self.decoder = DecoderCausal3D(
            in_channels=latent_channels,
            out_channels=out_channels,
            up_block_types=up_block_types,
            block_out_channels=block_out_channels,
            layers_per_block=layers_per_block,
            norm_num_groups=norm_num_groups,
            act_fn=act_fn,
            time_compression_ratio=time_compression_ratio,
            spatial_compression_ratio=spatial_compression_ratio,
            mid_block_add_attention=mid_block_add_attention,
        )

        # 2.定义量化相关层
        self.quant_conv = nn.Conv3d(2 * latent_channels, 2 * latent_channels, kernel_size=1)
        self.post_quant_conv = nn.Conv3d(latent_channels, latent_channels, kernel_size=1)

        self.use_slicing = False
        self.use_spatial_tiling = False
        self.use_temporal_tiling = False

        # 3.配置与VAE分块处理相关的参数   only relevant if vae tiling is enabled
        self.tile_sample_min_tsize = sample_tsize
        self.tile_latent_min_tsize = sample_tsize // time_compression_ratio

        self.tile_sample_min_size = self.config.sample_size
        sample_size = (
            self.config.sample_size[0]
            if isinstance(self.config.sample_size, (list, tuple))
            else self.config.sample_size
        )
        self.tile_latent_min_size = int(sample_size / (2 ** (len(self.config.block_out_channels) - 1)))
        self.tile_overlap_factor = 0.25
下面的函数实现了变分自编码器(VAE)的前向传播过程:
- 输入处理:接收一个样本 sample 和多个控制参数;
- 编码阶段:通过 encode 方法获取潜在变量分布 posterior;
- 采样策略:根据 sample_posterior 决定是采样还是取模式值;
- 解码阶段:将采样结果传入 decode 得到重建输出;
- 返回格式:根据标志决定是否返回字典结构或元组,并可包含后验分布。
class AutoencoderKLCausal3D(ModelMixin, ConfigMixin, FromOriginalVAEMixin):
    def forward(
        self,
        sample: torch.FloatTensor,
        sample_posterior: bool = False,
        return_dict: bool = True,
        return_posterior: bool = False,
        generator: Optional[torch.Generator] = None,
    ) -> Union[DecoderOutput2, torch.FloatTensor]:
        r"""
        Args:
            sample (`torch.FloatTensor`): Input sample.
            sample_posterior (`bool`, *optional*, defaults to `False`):
                Whether to sample from the posterior.
            return_dict (`bool`, *optional*, defaults to `True`):
                Whether or not to return a [`DecoderOutput`] instead of a plain tuple.
        """
        x = sample
        posterior = self.encode(x).latent_dist      # 通过 encode 方法获取潜在变量分布 posterior
        if sample_posterior:        # 根据 sample_posterior 决定是采样还是取模式值
            z = posterior.sample(generator=generator)
        else:
            z = posterior.mode()
        dec = self.decode(z).sample     # 将采样结果传入 decode 得到重建输出

        if not return_dict:
            if return_posterior:
                return (dec, posterior)
            else:
                return (dec,)
        if return_posterior:
            return DecoderOutput2(sample=dec, posterior=posterior)
        else:
            return DecoderOutput2(sample=dec)
我们以encoder为例,其初始化部分为:
class EncoderCausal3D(nn.Module):
    def __init__():
        super().__init__()
        self.layers_per_block = layers_per_block

        # 输入层:使用 CausalConv3d 对输入进行初步特征提取。
        self.conv_in = CausalConv3d(in_channels, block_out_channels[0], kernel_size=3, stride=1)
        self.mid_block = None
        self.down_blocks = nn.ModuleList([])

        # 下采样块down
        output_channel = block_out_channels[0]
        for i, down_block_type in enumerate(down_block_types):
            input_channel = output_channel
            output_channel = block_out_channels[i]
            is_final_block = i == len(block_out_channels) - 1
            num_spatial_downsample_layers = int(np.log2(spatial_compression_ratio))
            num_time_downsample_layers = int(np.log2(time_compression_ratio))

            if time_compression_ratio == 4:     # 根据 time_compression_ratio 和 spatial_compression_ratio 决定时间与空间维度的下采样策略。
                add_spatial_downsample = bool(i < num_spatial_downsample_layers)
                add_time_downsample = bool(
                    i >= (len(block_out_channels) - 1 - num_time_downsample_layers)
                    and not is_final_block
                )
            else:
                raise ValueError(f"Unsupported time_compression_ratio: {time_compression_ratio}.")

            downsample_stride_HW = (2, 2) if add_spatial_downsample else (1, 1)
            downsample_stride_T = (2,) if add_time_downsample else (1,)
            downsample_stride = tuple(downsample_stride_T + downsample_stride_HW)
            down_block = get_down_block3d(      # 构建多个下采样模块,实现对输入数据在时空维度上的逐步压缩。
                down_block_type,
                num_layers=self.layers_per_block,
                in_channels=input_channel,
                out_channels=output_channel,
                add_downsample=bool(add_spatial_downsample or add_time_downsample),
                downsample_stride=downsample_stride,
                resnet_eps=1e-6,
                downsample_padding=0,
                resnet_act_fn=act_fn,
                resnet_groups=norm_num_groups,
                attention_head_dim=output_channel,
                temb_channels=None,
            )
            self.down_blocks.append(down_block)

        # 中间块   mid
        self.mid_block = UNetMidBlockCausal3D(      # 包含注意力机制(可选),用于增强模型对长期依赖的建模能力。
            in_channels=block_out_channels[-1],
            resnet_eps=1e-6,
            resnet_act_fn=act_fn,
            output_scale_factor=1,
            resnet_time_scale_shift="default",
            attention_head_dim=block_out_channels[-1],
            resnet_groups=norm_num_groups,
            temb_channels=None,
            add_attention=mid_block_add_attention,
        )

        # 输出层   out     使用 GroupNorm 和 SiLU 激活函数处理最终特征。
        self.conv_norm_out = nn.GroupNorm(num_channels=block_out_channels[-1], num_groups=norm_num_groups, eps=1e-6)
        self.conv_act = nn.SiLU()

        conv_out_channels = 2 * out_channels if double_z else out_channels
        self.conv_out = CausalConv3d(block_out_channels[-1], conv_out_channels, kernel_size=3)      # 通过 CausalConv3d 输出编码结果,支持双通道输出(如VAE中的均值和方差)。
encoder的前向传播过程为:
class EncoderCausal3D(nn.Module):
    def forward(self, sample: torch.FloatTensor) -> torch.FloatTensor:
        r"""The forward method of the `EncoderCausal3D` class."""
        assert len(sample.shape) == 5, "The input tensor should have 5 dimensions"

        sample = self.conv_in(sample)

        # down
        for down_block in self.down_blocks:
            sample = down_block(sample)

        # middle
        sample = self.mid_block(sample)

        # post-process
        sample = self.conv_norm_out(sample)
        sample = self.conv_act(sample)
        sample = self.conv_out(sample)

        return sample
其中CausalConv3d的定义如下:
- CausalConv3d 实现了一个带有时间因果填充的3D卷积层,
- 其中 padding 为时间因果填充模式:空间维度(W, H)使用对称填充,时间维度(T)仅向前填充,确保当前输出不依赖未来帧。
class CausalConv3d(nn.Module):
    def __init__():
        super().__init__()

        self.pad_mode = pad_mode
        padding = (kernel_size // 2, kernel_size // 2, kernel_size // 2, kernel_size // 2, kernel_size - 1, 0)  # W, H, T   设置 padding 为时间因果填充模式:空间维度(W, H)使用对称填充,时间维度(T)仅向前填充,确保当前输出不依赖未来帧。
        self.time_causal_padding = padding

        self.conv = nn.Conv3d(chan_in, chan_out, kernel_size, stride=stride, dilation=dilation, **kwargs)   # 调用 nn.Conv3d 构建实际的3D卷积层

    def forward(self, x):
        x = F.pad(x, self.time_causal_padding, mode=self.pad_mode)
        return self.conv(x)
Visual Encoder
论文中用于对参考图像进行编码的Visual Encoder的定义如下:
class MatrixGameEncoderWrapperI2V(ModelMixin):
    def __init__(self, model_path, weight_dtype, task='i2v', i2v_type = 'concat'):
        super().__init__()
        text_encoder_type_1 = "llm-i2v"         # 设置文本编码器和分词器类型为 "llm-i2v
        tokenizer_type_1 = "llm-i2v"
        # 定义两个提示模板 prompt_template 和 prompt_template_video,分别用于图像和视频任务,包含嵌入位置、长度等信息。
        prompt_template = {'template': PROMPT_TEMPLATE_ENCODE_I2V, 'crop_start': 36, "image_emb_start": 5,"image_emb_end": 581,"image_emb_len": 576,
        "double_return_token_id": 271}
        prompt_template_video = {"template": PROMPT_TEMPLATE_ENCODE_VIDEO_I2V, "crop_start": 103,"image_emb_start": 5,"image_emb_end": 581,"image_emb_len": 576,
        "double_return_token_id": 271}
        max_length_1 = 256 + (      # 计算最大文本长
            prompt_template_video.get("crop_start", 0)
            if prompt_template_video is not None
            else prompt_template.get("crop_start", 0)
            if prompt_template is not None
            else 0
        )
        # print("text len1:", max_length_1)
        # 设置编码器其他参数,如跳过层、精度、是否应用归一化等。
        hidden_state_skip_layer = 2
        text_encoder_precision = "fp16"
        apply_final_norm = False
        reproduce = False
        logger = None
        device = None

        # 实例化 TextEncoder 并根据 i2v_type 设置 image_embed_interleave 参数(concat 时为 2,否则为 4)
        text_encoder_1 = TextEncoder(
            text_encoder_type=text_encoder_type_1,
            max_length=max_length_1,
            text_encoder_precision=weight_dtype,
            tokenizer_type=tokenizer_type_1,
            i2v_mode = True,
            prompt_template=prompt_template,
            prompt_template_video=prompt_template_video,
            hidden_state_skip_layer=hidden_state_skip_layer,
            apply_final_norm=apply_final_norm,
            reproduce=reproduce,
            logger=logger,
            device=device,
            text_encoder_path = model_path,
            image_embed_interleave = 2 if i2v_type == 'concat' else 4
        )


        self.text_encoder_1 = text_encoder_1
模型处理过程如下,主要流程是将输入的提示(prompt)编码为可用于生成视频或图像的嵌入表示(prompt embeddings),并处理注意力掩码。:
- 确定批量大小:根据输入 prompt 的类型(字符串、列表或已有的嵌入)确定 batch size。
- 文本编码:
- 使用 text_encoder.text2tokens 将文本转换为模型可接受的 token 输入。
- 根据是否设置 clip_skip 决定使用哪一层的输出作为嵌入,若设置则取指定层的隐藏状态,并应用 LayerNorm。
- 处理 attention_mask:如果存在 attention mask,则将其复制扩展以匹配每个 prompt 生成多个视频的需求。
- 调整 prompt_embeds 形状根据维度对 prompt_embeds 进行重复扩展和重塑,使其适配每个 prompt 生成多个视频的情况。
- 返回结果:返回处理后的 prompt_embeds 和 attention_mask,供后续生成过程使用。
class MatrixGameEncoderWrapperI2V(ModelMixin):
    def encode_prompt():
        # 确定批量大小
        if prompt is not None and isinstance(prompt, str):
            batch_size = 1
        elif prompt is not None and isinstance(prompt, list):
            batch_size = len(prompt)
        else:
            batch_size = prompt_embeds.shape[0]


        text_inputs = text_encoder.text2tokens(prompt, data_type=data_type)     # 将文本转换为模型可接受的 token 输入。

        if clip_skip is None:       # 根据是否设置 clip_skip 决定使用哪一层的输出作为嵌入
            prompt_outputs = text_encoder.encode(
                text_inputs, data_type=data_type, device=device, semantic_images=semantic_images,
            )
            prompt_embeds = prompt_outputs.hidden_state
        else:
            prompt_outputs = text_encoder.encode(
                text_inputs,
                output_hidden_states=True,
                data_type=data_type,
                device=device,
                semantic_images=semantic_images
            )
            # Access the `hidden_states` first, that contains a tuple of
            # all the hidden states from the encoder layers. Then index into
            # the tuple to access the hidden states from the desired layer.
            prompt_embeds = prompt_outputs.hidden_states_list[-(clip_skip + 1)]
            # We also need to apply the final LayerNorm here to not mess with the
            # representations. The `last_hidden_states` that we typically use for
            # obtaining the final prompt representations passes through the LayerNorm
            # layer.
            prompt_embeds = text_encoder.model.text_model.final_layer_norm(
                prompt_embeds
            )

        attention_mask = prompt_outputs.attention_mask      # 处理 attention_mask
        if attention_mask is not None:      # 如果存在 attention mask,则将其复制扩展以匹配每个 prompt 生成多个视频的需求。
            attention_mask = attention_mask.to(device)
            bs_embed, seq_len = attention_mask.shape
            attention_mask = attention_mask.repeat(1, num_videos_per_prompt)
            attention_mask = attention_mask.view(
                bs_embed * num_videos_per_prompt, seq_len
            )


        prompt_embeds_dtype = text_encoder.dtype
        prompt_embeds = prompt_embeds.to(dtype=prompt_embeds_dtype, device=device)

        # 调整 prompt_embeds 形状
        if prompt_embeds.ndim == 2:
            bs_embed, _ = prompt_embeds.shape
            # duplicate text embeddings for each generation per prompt, using mps friendly method
            prompt_embeds = prompt_embeds.repeat(1, num_videos_per_prompt)
            prompt_embeds = prompt_embeds.view(bs_embed * num_videos_per_prompt, -1)
        else:
            bs_embed, seq_len, _ = prompt_embeds.shape
            # duplicate text embeddings for each generation per prompt, using mps friendly method
            prompt_embeds = prompt_embeds.repeat(1, num_videos_per_prompt, 1)
            prompt_embeds = prompt_embeds.view(
                bs_embed * num_videos_per_prompt, seq_len, -1
            )
        return prompt_embeds, attention_mask        # 返回处理后的 prompt_embeds 和 attention_mask
DiT
class MGVideoDiffusionTransformerI2V(ModelMixin, ConfigMixin, PeftAdapterMixin):

    @register_to_config
    def __init__():
        ...

        # 1.初始化各类嵌入层:包括图像、文本、时间步和引导信息的嵌入处理
        # image projection
        self.img_in = PatchEmbed(
            self.patch_size, self.in_channels, self.hidden_size, **factory_kwargs
        )

        # text projection
        if self.text_projection == "linear":
            self.txt_in = TextProjection(
                self.text_states_dim,
                self.hidden_size,
                get_activation_layer("silu"),
                **factory_kwargs,
            )
        elif self.text_projection == "single_refiner":
            self.txt_in = SingleTokenRefiner(
                self.text_states_dim, hidden_size, heads_num, depth=2, **factory_kwargs
            )
        else:
            raise NotImplementedError(
                f"Unsupported text_projection: {self.text_projection}"
            )

        # time modulation
        self.time_in = TimestepEmbedder(
            self.hidden_size, get_activation_layer("silu"), **factory_kwargs
        )


        # guidance modulation
        self.guidance_in = (
            TimestepEmbedder(
                self.hidden_size, get_activation_layer("silu"), **factory_kwargs
            )
            if guidance_embed
            else None
        )

        # 2.构建双流与单流Transformer模块
        # double blocks
        self.double_blocks = nn.ModuleList(
            [
                MMDoubleStreamBlock(
                    self.hidden_size,
                    self.heads_num,
                    mlp_width_ratio=mlp_width_ratio,
                    mlp_act_type=mlp_act_type,
                    qk_norm=qk_norm,
                    qk_norm_type=qk_norm_type,
                    qkv_bias=qkv_bias,
                    action_config = action_config,
                    **factory_kwargs,
                )
                for _ in range(mm_double_blocks_depth)
            ]
        )

        # single blocks
        self.single_blocks = nn.ModuleList(
            [
                MMSingleStreamBlock(
                    self.hidden_size,
                    self.heads_num,
                    mlp_width_ratio=mlp_width_ratio,
                    mlp_act_type=mlp_act_type,
                    qk_norm=qk_norm,
                    qk_norm_type=qk_norm_type,
                    action_config = action_config,
                    **factory_kwargs,
                )
                for _ in range(mm_single_blocks_depth)
            ]
        )

        self.final_layer = FinalLayer(
            self.hidden_size,
            self.patch_size,
            self.out_channels,
            get_activation_layer("silu"),
            **factory_kwargs,
        )
        self.gradient_checkpointing = False
        self.gradient_checkpoint_layers = -1
        self.single_stream_block_no_attn_recompute_layers = 0
        self.double_stream_block_no_attn_recompute_layers = 0
该函数是扩散模型中用于视频生成的主干前向传播逻辑,主要功能如下:
- 输入处理:接收图像、时间步、文本编码等条件信息;
- 嵌入与位置编码:对图像和文本进行嵌入,并生成旋转位置编码;
- 时间与引导调制:构建时间步向量并融合引导信息(如CFG);
- 双流Transformer块处理:图像与文本分别通过双流模块交互建模;
- 单流Transformer块处理:合并图像与文本token进行统一建模;
- 输出重建:通过最终层和反patch操作还原为完整视频帧;
- 返回结果:根据参数决定是否以字典形式返回输出。
class MGVideoDiffusionTransformerI2V(ModelMixin, ConfigMixin, PeftAdapterMixin):
    def forward() -> Union[torch.Tensor, Dict[str, torch.Tensor]]:
        x = hidden_states
        t = timestep
        text_states, text_states_2 = encoder_hidden_states
        text_mask, test_mask_2 = encoder_attention_mask
        out = {}
        img = x
        txt = text_states
        _, _, ot, oh, ow = x.shape
        freqs_cos, freqs_sin = self.get_rotary_pos_embed(ot, oh, ow)        # 对图像和文本进行嵌入,并生成位置编码
        tt, th, tw = (
            ot // self.patch_size[0],
            oh // self.patch_size[1],
            ow // self.patch_size[2],
        )

        # 处理时间步t    Prepare modulation vectors.
        vec = self.time_in(t)
        if self.i2v_condition_type == "token_replace":
            token_replace_t = torch.zeros_like(t)
            token_replace_vec = self.time_in(token_replace_t)       # 进行时间编码
            frist_frame_token_num = th * tw     # 计算首帧 token 数量
        else:
            token_replace_vec = None
            frist_frame_token_num = None

        # guidance modulation
        if self.guidance_embed:     # 启用了引导嵌入功能
            if guidance is None:
                raise ValueError(
                    "Didn't get guidance strength for guidance distilled model."
                )

            # our timestep_embedding is merged into guidance_in(TimestepEmbedder)
            vec = vec + self.guidance_in(guidance)      # 引导信息编码,并加到 vec 上(如时间步嵌入中)。

        # 对输入的图像img和文本txt进行不同的特征映射处理        Embed image and text.
        img = self.img_in(img)      # 对输入图像进行嵌入编码
        if self.text_projection == "linear":        # 对文本使用线性投影
            txt = self.txt_in(txt)
        elif self.text_projection == "single_refiner":      # 使用包含时间步t和注意力掩码(可选)的更复杂文本编码
            txt = self.txt_in(txt, t, text_mask if self.use_attention_mask else None)
        else:
            raise NotImplementedError(
                f"Unsupported text_projection: {self.text_projection}"
            )

        txt_seq_len = txt.shape[1]
        img_seq_len = img.shape[1]

        # Compute cu_squlens and max_seqlen for flash attention
        cu_seqlens_q = get_cu_seqlens(text_mask, img_seq_len)       # 获取查询(Q)和键/值(KV)的累积序列长度;
        cu_seqlens_kv = cu_seqlens_q
        max_seqlen_q = img_seq_len + txt_seq_len        # 设置最大序列长度
        max_seqlen_kv = max_seqlen_q

        freqs_cis = (freqs_cos, freqs_sin) if freqs_cos is not None else None   # 将 freqs_cos 和 freqs_sin 合并为 freqs_cis
        self.single_stream_block_no_attn_recompute_layers = 0
        if img_seq_len < 20 * 1024:     # 根据图像序列长度动态设置 single_stream_block_no_attn_recompute_layers 的值,以优化内存与计算效率。
            self.single_stream_block_no_attn_recompute_layers = 10
        elif img_seq_len < 30 * 1024:
            self.single_stream_block_no_attn_recompute_layers = 10
        elif img_seq_len < 40 * 1024:
            self.single_stream_block_no_attn_recompute_layers = 5
        # --------------------- 在模型的双流块中,依次对每个块进行前向传播  Pass through DiT blocks ------------------------
        for i, block in enumerate(self.double_blocks):
            if torch.is_grad_enabled() and self.gradient_checkpointing and i >= self.double_stream_block_no_attn_recompute_layers:
                def create_custom_forward(module):      # 包装模块以支持检查点;
                    def custom_forward(*inputs):
                        return module(*inputs)

                    return custom_forward
                ckpt_kwargs: Dict[str, Any] = {"use_reentrant": False} if is_torch_version(">=", "1.11.0") else {}
                image_kwargs: Dict[str, Any] = {"tt":hidden_states.shape[2] // self.patch_size[0],  # 提供图像块尺寸信息
                    "th":hidden_states.shape[3] // self.patch_size[1],
                    "tw":hidden_states.shape[4] // self.patch_size[2]}
                img, txt = torch.utils.checkpoint.checkpoint(       # 对 block 进行前向计算
                    create_custom_forward(block),
                    img,
                    txt,
                    vec,
                    cu_seqlens_q,
                    cu_seqlens_kv,
                    max_seqlen_q,
                    max_seqlen_kv,
                    freqs_cis,
                    image_kwargs,
                    mouse_condition,
                    keyboard_condition,
                    self.i2v_condition_type,
                    token_replace_vec,
                    frist_frame_token_num,
                    False,
                    **ckpt_kwargs,
                )
            else:
                image_kwargs: Dict[str, Any] = {"tt":hidden_states.shape[2] // self.patch_size[0],
                    "th":hidden_states.shape[3] // self.patch_size[1],
                    "tw":hidden_states.shape[4] // self.patch_size[2]}
                double_block_args = [
                    img,
                    txt,
                    vec,
                    cu_seqlens_q,
                    cu_seqlens_kv,
                    max_seqlen_q,
                    max_seqlen_kv,
                    freqs_cis,
                    image_kwargs,
                    mouse_condition,
                    keyboard_condition,
                    self.i2v_condition_type,
                    token_replace_vec,
                    frist_frame_token_num,
                    True,
                ]

                img, txt = block(*double_block_args)

        # 在模型的单流块中,依次对每个块进行前向传播Merge txt and img to pass through single stream blocks.
        x = torch.cat((img, txt), 1)
        if len(self.single_blocks) > 0:
            for i, block in enumerate(self.single_blocks):
                if torch.is_grad_enabled() and self.gradient_checkpointing  and i >= self.single_stream_block_no_attn_recompute_layers:
                    def create_custom_forward(module):
                        def custom_forward(*inputs):
                            return module(*inputs)

                        return custom_forward
                    ckpt_kwargs: Dict[str, Any] = {"use_reentrant": False} if is_torch_version(">=", "1.11.0") else {}
                    image_kwargs: Dict[str, Any] = {"tt":hidden_states.shape[2] // self.patch_size[0],
                        "th":hidden_states.shape[3] // self.patch_size[1],
                        "tw":hidden_states.shape[4] // self.patch_size[2]}
                    x = torch.utils.checkpoint.checkpoint(      # 前向传播
                        create_custom_forward(block),
                        x,
                        vec,
                        txt_seq_len,
                        cu_seqlens_q,
                        cu_seqlens_kv,
                        max_seqlen_q,
                        max_seqlen_kv,
                        (freqs_cos, freqs_sin),
                        image_kwargs,
                        mouse_condition,
                        keyboard_condition,
                        self.i2v_condition_type,
                        token_replace_vec,
                        frist_frame_token_num,
                        False,
                        **ckpt_kwargs,
                    )
                else:
                    image_kwargs: Dict[str, Any] = {"tt":hidden_states.shape[2] // self.patch_size[0],
                        "th":hidden_states.shape[3] // self.patch_size[1],
                        "tw":hidden_states.shape[4] // self.patch_size[2]}
                    single_block_args = [
                        x,
                        vec,
                        txt_seq_len,
                        cu_seqlens_q,
                        cu_seqlens_kv,
                        max_seqlen_q,
                        max_seqlen_kv,
                        (freqs_cos, freqs_sin),
                        image_kwargs,
                        mouse_condition,
                        keyboard_condition,
                        self.i2v_condition_type,
                        token_replace_vec,
                        frist_frame_token_num,
                        True,
                    ]

                    x = block(*single_block_args)

        img = x[:, :img_seq_len, ...]

        # ---------------------------- Final layer ------------------------------
        img = self.final_layer(img, vec)  # 对输入张量 img 进行最终的图像重建层处理,结合向量 vec(可能用于条件信息),输出重构后的图像块; (N, T, patch_size ** 2 * out_channels)

        img = self.unpatchify(img, tt, th, tw)      # 将图像块恢复为完整图像;
        if return_dict:     # 根据 return_dict 决定返回格式:若为真,则将结果放入字典 out 中并返回
            out["x"] = img
            return out
        return (img,)
-
process_video()
该函数 process_video 的主要功能是处理视频帧,在每一帧上绘制虚拟按键状态并叠加鼠标图标,最终输出处理后的视频。具体逻辑如下:
- 使用 parse_config 解析配置,获取每帧的键盘和鼠标数据。
- 读取鼠标图标,并初始化输出视频列表。
- 遍历输入视频的每一帧:
- 获取当前帧的按键状态和鼠标位置。
- 调用 draw_keys_on_frame 在帧上绘制按键状态。
- 调用 overlay_icon 将鼠标图标叠加到指定位置。
- 将处理后的帧归一化后加入输出列表。
- 使用 export_to_video 将处理后的帧导出为视频文件。
def process_video(input_video, output_video, config, mouse_icon_path, mouse_scale=2.0, mouse_rotation=0,fps=16):
    # 该函数 process_video 的主要功能是处理视频帧,在每一帧上绘制虚拟按键状态并叠加鼠标图标,最终输出处理后的视频。
    key_data, mouse_data = parse_config(config)     # 使用 parse_config 解析配置,获取每帧的键盘和鼠标数据。
    fps = fps
    frame_width = input_video[0].shape[1]
    frame_height = input_video[0].shape[0]
    frame_count = len(input_video)

    mouse_icon = cv2.imread(mouse_icon_path, cv2.IMREAD_UNCHANGED)  # 读取鼠标图标,并初始化输出视频列表。
    out_video = []
    frame_idx = 0
    for frame in input_video:   # 遍历输入视频的每一帧
        keys = key_data.get(frame_idx, {"W": False, "A": False, "S": False, "D": False, "Space": False, "Attack": False})
        raw_mouse_pos = mouse_data.get(frame_idx, (frame_width // 2 // 2, frame_height // 2 // 2))      # fallback 也用小分辨率中心
        mouse_position = (int(raw_mouse_pos[0] * 2), int(raw_mouse_pos[1] * 2))     # 获取鼠标位置。
        draw_keys_on_frame(frame, keys, key_size=(75, 75), spacing=10, bottom_margin=20)        # 调用 draw_keys_on_frame 在帧上绘制按键状态。
        overlay_icon(frame, mouse_icon, mouse_position, scale=mouse_scale, rotation=mouse_rotation)     # 调用 overlay_icon 将鼠标图标叠加到指定位置。
        out_video.append(frame / 255)       # 将处理后的帧归一化后加入输出列表。
        frame_idx += 1
        print(f"Processing frame {frame_idx}/{frame_count}", end="\r")
    export_to_video(out_video, output_video, fps=fps)       # 使用 export_to_video 将处理后的帧导出为视频文件。
    print("\nProcessing complete!")
其中draw_keys_on_frame()如下,该函数在视频帧上绘制虚拟键盘按键,用于可视化按键状态(按下或未按下)。具体功能如下:
- 定义按键位置:根据帧大小计算 W、A、S、D、Space、Attack 按键的坐标位置;
- 绘制按键图形:调用 draw_rounded_rectangle 绘制带圆角矩形的按键;
- 显示按键文字:使用 cv2.putText 在按键上绘制对应文字;
def draw_keys_on_frame(frame, keys, key_size=(80, 50), spacing=20, bottom_margin=30):   # 在视频帧上绘制虚拟键盘按键,用于可视化按键状态(按下或未按下)。
    h, w, _ = frame.shape
    horison_shift = 90
    vertical_shift = -20
    horizon_shift_all = 50
    key_positions = {       # 定义按键位置:根据帧大小计算 W、A、S、D、Space、Attack 按键的坐标位置
        "W": (w // 2 - key_size[0] // 2 - horison_shift - horizon_shift_all + spacing* 2, h - bottom_margin - key_size[1] * 2 + vertical_shift - 20),
        "A": (w // 2 - key_size[0] * 2 + 5 - horison_shift - horizon_shift_all+ spacing* 2, h - bottom_margin - key_size[1] + vertical_shift),
        "S": (w // 2 - key_size[0] // 2 - horison_shift - horizon_shift_all+ spacing* 2, h - bottom_margin - key_size[1] + vertical_shift),
        "D": (w // 2 + key_size[0] - 5 - horison_shift - horizon_shift_all+ spacing* 2, h - bottom_margin - key_size[1] + vertical_shift),
        "Space": (w // 2 + key_size[0] * 2 + spacing * 4 - horison_shift - horizon_shift_all , h - bottom_margin - key_size[1] + vertical_shift),
        "Attack": (w // 2 + key_size[0] * 3 + spacing * 9 - horison_shift - horizon_shift_all, h - bottom_margin - key_size[1] + vertical_shift),
    }

    for key, (x, y) in key_positions.items():       # 遍历每个按键及其位置 (x, y)
        is_pressed = keys.get(key, False)       # 判断按键是否被按下
        top_left = (x, y)
        if key in ["Space", "Attack"]:
            bottom_right = (x + key_size[0]+40, y + key_size[1])
        else:
            bottom_right = (x + key_size[0], y + key_size[1])

        color = (0, 255, 0) if is_pressed else (200, 200, 200)      # 设置颜色 color 和透明度 alph
        alpha = 0.8 if is_pressed else 0.5

        draw_rounded_rectangle(frame, top_left, bottom_right, color, radius=10, alpha=alpha)    # 绘制带圆角的矩形作为按键背景

        text_size = cv2.getTextSize(key, cv2.FONT_HERSHEY_SIMPLEX, 0.8, 2)[0]      # 绘制带圆角的矩形作为按键背景
        if key in ["Space", "Attack"]:
            text_x = x + (key_size[0]+40 - text_size[0]) // 2
        else:
            text_x = x + (key_size[0] - text_size[0]) // 2
        text_y = y + (key_size[1] + text_size[1]) // 2
        cv2.putText(frame, key, (text_x, text_y), cv2.FONT_HERSHEY_SIMPLEX, 0.8, (0, 0, 0), 2)      # 显示按键文字:使用 cv2.putText 在按键上绘制对应文字
其中draw_rounded_rectangle()函数使用 OpenCV 在图像上绘制一个带有圆角的矩形,并支持透明度叠加。
def draw_rounded_rectangle(image, top_left, bottom_right, color, radius=10, alpha=0.5):
    overlay = image.copy()
    x1, y1 = top_left
    x2, y2 = bottom_right

    cv2.rectangle(overlay, (x1 + radius, y1), (x2 - radius, y2), color, -1)     # 绘制圆角矩形
    cv2.rectangle(overlay, (x1, y1 + radius), (x2, y2 - radius), color, -1)

    cv2.ellipse(overlay, (x1 + radius, y1 + radius), (radius, radius), 180, 0, 90, color, -1)   # 使用四个椭圆(cv2.ellipse)绘制四个圆角;
    cv2.ellipse(overlay, (x2 - radius, y1 + radius), (radius, radius), 270, 0, 90, color, -1)
    cv2.ellipse(overlay, (x1 + radius, y2 - radius), (radius, radius), 90, 0, 90, color, -1)
    cv2.ellipse(overlay, (x2 - radius, y2 - radius), (radius, radius), 0, 0, 90, color, -1)

    cv2.addWeighted(overlay, alpha, image, 1 - alpha, 0, image)     # 将绘制好的图形以指定透明度 alpha 叠加到原始图像上。
overlay_icon()的功能是在视频帧的指定位置叠加一个经过缩放和旋转的图标(带透明通道),并保持边界处理和透明混合。
def overlay_icon(frame, icon, position, scale=1.0, rotation=0):
    x, y = position
    h, w, _ = icon.shape

    # 缩放图标,根据 scale 参数调整图标大小。
    scaled_width = int(w * scale)
    scaled_height = int(h * scale)
    icon_resized = cv2.resize(icon, (scaled_width, scaled_height), interpolation=cv2.INTER_AREA)

    # 旋转图标,以图标中心为轴心旋转指定角度 rotation。
    center = (scaled_width // 2, scaled_height // 2)def overlay_icon(frame, icon, position, scale=1.0, rotation=0):
    x, y = position
    h, w, _ = icon.shape

    # 缩放图标
    scaled_width = int(w * scale)
    scaled_height = int(h * scale)
    icon_resized = cv2.resize(icon, (scaled_width, scaled_height), interpolation=cv2.INTER_AREA)

    # 旋转图标
    center = (scaled_width // 2, scaled_height // 2)
    rotation_matrix = cv2.getRotationMatrix2D(center, rotation, 1.0)
    icon_rotated = cv2.warpAffine(icon_resized, rotation_matrix, (scaled_width, scaled_height), flags=cv2.INTER_LINEAR, borderMode=cv2.BORDER_CONSTANT, borderValue=(0, 0, 0, 0))

    h, w, _ = icon_rotated.shape
    frame_h, frame_w, _ = frame.shape

    # 计算绘制区域,确定图标在帧上的放置位置,并限制在帧的边界内。
    top_left_x = max(0, int(x - w // 2))
    top_left_y = max(0, int(y - h // 2))
    bottom_right_x = min(frame_w, int(x + w // 2))
    bottom_right_y = min(frame_h, int(y + h // 2))

    icon_x_start = max(0, int(-x + w // 2))
    icon_y_start = max(0, int(-y + h // 2))
    icon_x_end = icon_x_start + (bottom_right_x - top_left_x)
    icon_y_end = icon_y_start + (bottom_right_y - top_left_y)

    # 提取图标区域
    icon_region = icon_rotated[icon_y_start:icon_y_end, icon_x_start:icon_x_end]
    alpha = icon_region[:, :, 3] / 255.0
    icon_rgb = icon_region[:, :, :3]

    # 提取帧对应区域
    frame_region = frame[top_left_y:bottom_right_y, top_left_x:bottom_right_x]

    # 叠加图标
    print(frame_region.shape, icon_rgb.shape, alpha.shape)
    # import ipdb; ipdb.set_trace()
    for c in range(3):
        frame_region[:, :, c] = (1 - alpha) * frame_region[:, :, c] + alpha * icon_rgb[:, :, c]

    # 替换帧对应区域
    frame[top_left_y:bottom_right_y, top_left_x:bottom_right_x] = frame_region
    rotation_matrix = cv2.getRotationMatrix2D(center, rotation, 1.0)
    icon_rotated = cv2.warpAffine(icon_resized, rotation_matrix, (scaled_width, scaled_height), flags=cv2.INTER_LINEAR, borderMode=cv2.BORDER_CONSTANT, borderValue=(0, 0, 0, 0))

    h, w, _ = icon_rotated.shape
    frame_h, frame_w, _ = frame.shape

    # 计算绘制区域
    top_left_x = max(0, int(x - w // 2))
    top_left_y = max(0, int(y - h // 2))
    bottom_right_x = min(frame_w, int(x + w // 2))
    bottom_right_y = min(frame_h, int(y + h // 2))

    icon_x_start = max(0, int(-x + w // 2))
    icon_y_start = max(0, int(-y + h // 2))
    icon_x_end = icon_x_start + (bottom_right_x - top_left_x)
    icon_y_end = icon_y_start + (bottom_right_y - top_left_y)

    # 提取图标区域
    icon_region = icon_rotated[icon_y_start:icon_y_end, icon_x_start:icon_x_end]
    alpha = icon_region[:, :, 3] / 255.0
    icon_rgb = icon_region[:, :, :3]

    # 提取帧对应区域
    frame_region = frame[top_left_y:bottom_right_y, top_left_x:bottom_right_x]

    # 叠加图标,使用 alpha 通道将图标叠加到帧上。
    print(frame_region.shape, icon_rgb.shape, alpha.shape)
    # import ipdb; ipdb.set_trace()
    for c in range(3):
        frame_region[:, :, c] = (1 - alpha) * frame_region[:, :, c] + alpha * icon_rgb[:, :, c]

    # 替换帧对应区域,将叠加后的图像部分写回原始帧中。
    frame[top_left_y:bottom_right_y, top_left_x:bottom_right_x] = frame_region
-
-
总结
在本工作中,作者提出了Matrix-Game,这是一个专为开放式游戏环境中交互式视频生成设计的新型世界基础模型。与此同时,作者构建了MatrixGame-MC数据集,这是一个大规模且标注丰富的语料库,旨在支持类似《我的世界》风格环境中的动作可控生成。为了促进这一新兴领域的标准化评估,作者还开发了GameWorld Score,这是一个全面的基准测试,能够衡量感知质量、时间连贯性、可控性和物理一致性等关键方面。作者将向社区发布模型权重和基准测试工具包,目标是推动交互式世界生成领域的未来研究。


 被折叠的 条评论
为什么被折叠?
被折叠的 条评论
为什么被折叠?
 到【灌水乐园】发言


