


目录
a.第一步, 新建一个空白文件夹保存repo引导文件,并包含你的路径
c.将git-repo中的repo文件复制到 1 创建的.bin目录中
c.完成后kernel目录中会生成一个goldfish文件夹,进入goldfish目录并使用git命令
八、编译完成之后,可以通过使用模拟器来模拟运行,或者使用真机进行刷机。
效果
一、python安装
a. python2安装
sudo apt-get install python
b. python3安装
sudo apt-get install python3
来自谷歌官网Android的警告
警告:对 Python 2 的支持已于 2020 年 1 月 1 日停止,详情请见 Sunsetting Python 2(废弃 Python 2)一文。所有主要的 Linux 发行版都在停止支持 Python 2 软件包。Google 强烈建议您将所有脚本改用 Python 3。
二、repo管理多个git
repo因为Android源码由多个git组成,故安装repo利于管理git工程.
repo安装步骤
a.第一步, 新建一个空白文件夹保存repo引导文件,并包含你的路径
  mkdir ~/bin
  PATH=~/bin:$PATH    //配置环境变量
b.下载启动器
注意
如果提示 curl: command not found ,那是因为没装 Curl
执行 :sudo apt-get install curl -y
curl https://storage.googleapis.com/git-repo-downloads/repo > ~/bin/repo
或
curl https://mirrors.tuna.tsinghua.edu.cn/git/git-repo -o repo

chmod a+x ~/bin/repo
我采用的是另外一种方法
首先
如果没安装过git先安装执行以下指令
sudo apt update
sudo apt install git

再执行
sudo snap install git-repo
其次
git clone https://gerrit-googlesource.lug.ustc.edu.cn/git-repo


下载repo
    git clone https://gerrit-googlesource.lug.ustc.edu.cn/git-repo
c.将git-repo中的repo文件复制到 1 创建的.bin目录中
cd git-repo/
cp repo ~/bin/
d.修改权限
chmod a+x ~/bin/repoe. 执行版本检查
repo --version


如果报错
 File "/bin/repo", line 51
    def print(self, *args, **kwargs):
            ^
    SyntaxError: invalid syntax
发现是python链接的不对,我的ubuntu装了两个版本的python,分别是python2.7和python3.8,输入python后提示是python2.7,因为python软链接到python2上面了:
/usr/bin/python
-> /usr/bin/python2*
repo需要的是python3,所以需要修改一下上面的软链接:
sudo rm /usr/bin/python
sudo ln -s /usr/bin/python3 /usr/bin/python
三、初始化工程
a.执行创建文件夹命令,创建android12文件夹
mkdir android12b.切换到android12目录下
cd android12/c.初始化android12
repo init -u https://mirrors.tuna.tsinghua.edu.cn/git/AOSP/platform/manifest -b android-security-12.0.0_r47注意如果被拒绝
报错
Downloading Repo source from https://gerrit.googlesource.com/git-repo
fatal: Cannot get https://gerrit.googlesource.com/git-repo/clone.bundle
fatal: error [Errno 111] Connection refused
fatal: double check your --repo-rev setting.
fatal: cloning the git-repo repository failed, will remove '.repo/repo'
repo的运行过程中会尝试访问官方的git源更新自己,如果想使用tuna的镜像源进行更新,可以将如下内容复制到你的~/.bashrc里
执行:
gedit ~/.bashrc
在末尾添加
export PATH=~/bin:$PATH
export REPO_URL='https://mirrors.tuna.tsinghua.edu.cn/git/git-repo/'
保存文件后运行命令,使更改生效:
source ~/.bashrc
初始化git
git config --global user.email "450561200@qq.com"
git config --global user.name "mogutou"
再执行
repo init -u https://mirrors.tuna.tsinghua.edu.cn/git/AOSP/platform/manifest -b android-security-12.0.0_r47d.同步下载android源代码 -j4代表的是指定作业数
作业数是在编译的时候指定主机的CPU个数
repo sync -j4(可选操作 )下载完成可以执行
du -sh -BG //查看目录大小四、准备编译环境
a. 安装 jdk8
sudo apt-get update
sudo apt-get install openjdk-8-jdk
b.安装依赖包
安装所需的软件包 (Ubuntu 14.04)
sudo apt-get install git-core gnupg flex bison gperf build-essential zip curl zlib1g-dev gcc-multilib g++-multilib libc6-dev-i386 lib32ncurses5-dev x11proto-core-dev libx11-dev lib32z-dev ccache libgl1-mesa-dev libxml2-utils xsltproc unzip或
安装所需的软件包(Ubuntu 18.04 及更高版本)
您需要 64 位版本的 Ubuntu。
sudo apt-get install git-core gnupg flex bison build-essential zip curl zlib1g-dev gcc-multilib g++-multilib libc6-dev-i386 libncurses5 lib32ncurses5-dev x11proto-core-dev libx11-dev lib32z1-dev libgl1-mesa-dev libxml2-utils xsltproc unzip fontconfig python五、下载内核源码
AOSP源码中并不包括内核源码,需要单独下载,内核源码有很多版本,比如common是通用的Linux内核,msm是用于使用高通MSM芯片的Android设备,goldfish是用于Android模拟器的内核源码,这里以goldfish为例
a.与下载AOSP源码类似,需要先建立文件夹
mkdir kernel
cd kernel
b.使用清华的镜像
git clone https://aosp.tuna.tsinghua.edu.cn/kernel/goldfish.gitc.完成后kernel目录中会生成一个goldfish文件夹,进入goldfish目录并使用git命令
cd goldfish
git branch -a
这时会列出有哪些内核的版本分支可以下载
这里选择下载goldfish 3.4版本
git checkout remotes/origin/android-goldfish-3.4六、交换空间
由于电脑内存不够,采用了交换空间的方式解决。
方法一
#停用交换文件
swapoff /swapfile
#删除文件
rm /swapfile
#新建swap空间,个人设置的是20G
fallocate -l 20G /swapfile
#设置文件权限
chmod 600 /swapfile
#挂载
mkswap /swapfile
#激活启用
swapon /swapfile
#安装vim(可选)
apt-get install vim
#接下来,需要将交换信息写入系统配置
#打开配置文件
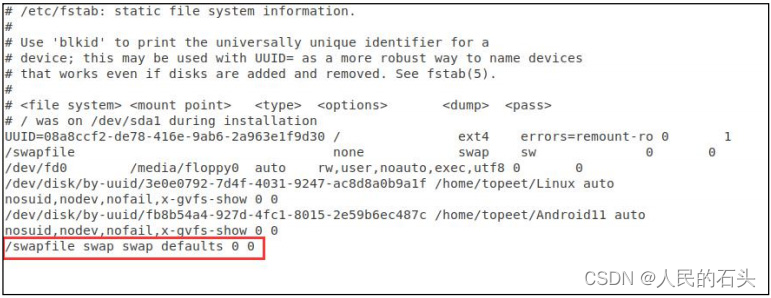
vim /etc/fstab
#在最末尾处插入(输入i进行插入,ctrl + shift + v是粘贴,如果不能实现粘贴,自行搜索处理一下,esc退出编辑,输入wq进行保存)
/swapfile swap swap defaults 0 0
#更改交换空间大小
vim /etc/sysctl.conf
#在最末尾处插入
vm.min_free_kbytes=1500000方法二
迅为提供的编译环境 Ubuntu20.04 默认配置了交换内存是 9G,如果在编译过程中,因内
存不够而编译报错,可以参考本小节进行设置。
这里举例分配 5G 交换内存。
在开始之前,使用命令检查一下您的 ubuntu 的 swap 分区。
sudo swapon --show
通过以下命令创建一个用于 swap 的文件
sudo fallocate -l 5G /swapfile
注意,此时可能会显示
fallocate:fallocate failed:Text file busy
此时,执行以下命令:
sudo swapoff -a
然后再执行以下命令:
sudo fallocate -l 5G /swapfile
执行以下命令为 swapfile 文件设置正确的权限:
sudo chmod 600 /swapfile
使用 mkswap 实用程序在文件上设置 Linux SWAP 区域:
sudo mkswap /swapfile
使用以下命令激活 swap 文件:
sudo swapon /swapfile
要让创建好的 swap 分区永久生效,可以将 swapfile 路径内容写入到 /etc/fstab 文件当中:
sudo vim /etc/fstab
在/etc/fstab 文件最后添加如下内容:
/swapfile swap swap defaults 0 0
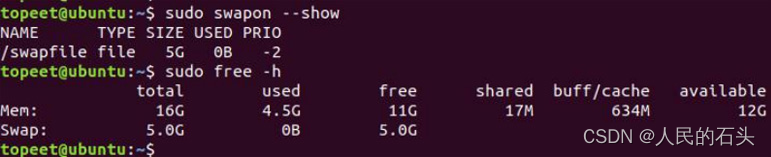
使用 swapon 或 free 命令验证 SWAP 是否处于活动状态,如下所示:
sudo swapon --show
sudo free -h
七、编译
a.初始化环境
cd进入android12的目录,依次输入如下2个命令:
source build/envsetup.sh
// 编译前删除build文件夹A
make clobber
b. 选择编译目标
输入命令:
lunch

然后出现


Lunch menu... pick a combo:
     1. aosp_arm-eng
     2. aosp_arm64-eng
     3. aosp_barbet-userdebug
     4. aosp_blueline-userdebug
     5. aosp_blueline_car-userdebug
     6. aosp_bonito-userdebug
     7. aosp_bonito_car-userdebug
     8. aosp_bramble-userdebug
     9. aosp_bramble_car-userdebug
     10. aosp_car_arm-userdebug
     11. aosp_car_arm64-userdebug
     12. aosp_car_x86-userdebug
     13. aosp_car_x86_64-userdebug
     14. aosp_cf_arm64_auto-userdebug
     15. aosp_cf_arm64_phone-userdebug
     16. aosp_cf_x86_64_foldable-userdebug
     17. aosp_cf_x86_64_pc-userdebug
     18. aosp_cf_x86_64_phone-userdebug
     19. aosp_cf_x86_64_tv-userdebug
     20. aosp_cf_x86_auto-userdebug
     21. aosp_cf_x86_phone-userdebug
     22. aosp_cf_x86_tv-userdebug
     23. aosp_coral-userdebug
     24. aosp_coral_car-userdebug
     25. aosp_crosshatch-userdebug
     26. aosp_crosshatch_car-userdebug
     27. aosp_crosshatch_vf-userdebug
     28. aosp_flame-userdebug
     29. aosp_flame_car-userdebug
     30. aosp_redfin-userdebug
     31. aosp_redfin_car-userdebug
     32. aosp_redfin_vf-userdebug
     33. aosp_sargo-userdebug
     34. aosp_sargo_car-userdebug
     35. aosp_sunfish-userdebug
     36. aosp_sunfish_car-userdebug
     37. aosp_trout_arm64-userdebug
     38. aosp_trout_x86-userdebug
     39. aosp_x86-eng
     40. aosp_x86_64-eng
     41. arm_krait-eng
     42. arm_v7_v8-eng
     43. armv8-eng
     44. armv8_cortex_a55-eng
     45. armv8_kryo385-eng
     46. beagle_x15-userdebug
     47. beagle_x15_auto-userdebug
     48. car_x86_64-userdebug
     49. db845c-userdebug
     50. gsi_car_arm64-userdebug
     51. gsi_car_x86_64-userdebug
     52. hikey-userdebug
     53. hikey64_only-userdebug
     54. hikey960-userdebug
     55. hikey960_tv-userdebug
     56. hikey_tv-userdebug
     57. pixel3_mainline-userdebug
     58. poplar-eng
     59. poplar-user
     60. poplar-userdebug
     61. qemu_trusty_arm64-userdebug
     62. sdk_car_arm-userdebug
     63. sdk_car_arm64-userdebug
     64. sdk_car_x86-userdebug
     65. sdk_car_x86_64-userdebug
     66. silvermont-eng
     67. uml-userdebug
     68. yukawa-userdebug
     69. yukawa_sei510-userdebug

Which would you like? [aosp_arm-eng]
c.Which would you like?
Which would you like? [aosp_arm-eng]后面直接输入对应序号39就可以。
lunch命令用来让用户选择编译目标,只有在source build/envsetup.sh之后才会有效,不然会报命令not found
这里我又踩了一个坑,参照其他人的比较老的教程选择了aosp_x86-eng,这是可以运行在模拟器上。
编译:lunch arm_v7_v8-eng
执行make -j4编译或者执行m(表示选择合适的线程)编译
make -j4
或者
m
常见报错
failed to build some targets(看看虚拟机是不是分配低于400G硬盘)
提示:
编译时候有时候terminal显示区域有限,有时候编译出错想要找一个编译错误原因可能在terminal上就比较麻烦,或者很可能缓存有限导致找不到根本错误,这个时候就需要我们把编的整个日志需要输出到一个文件中,具体命令:
make   2>&1 | tee build.log


这里首先make不用介绍了,重点介绍2>&1和tee
2>&1:
在 bash 命令执行的过程中,主要有三种输出入的状况,分别是:

标准输入;代码为 0 ;或称为 stdin ;使用的方式为 <
标准输出:代码为 1 ;或称为 stdout;使用的方式为 1>
错误输出:代码为 2 ;或称为 stderr;使用的方式为 2>
2是标准错误,&1是标准输出,2>&1意思就是将标准错误输出到标准输出中。
如果没有2>&1,只会有标准输出,没有错误;

tee build.log
这里tee指令会从标准输入设备读取数据,将其内容输出到标准输出设备,同时保存成文件。
所以命令就是tee从make 2>&1 获取输入,输出到build.log
八、编译完成之后,可以通过使用模拟器来模拟运行,或者使用真机进行刷机。
8.1 模拟器测试
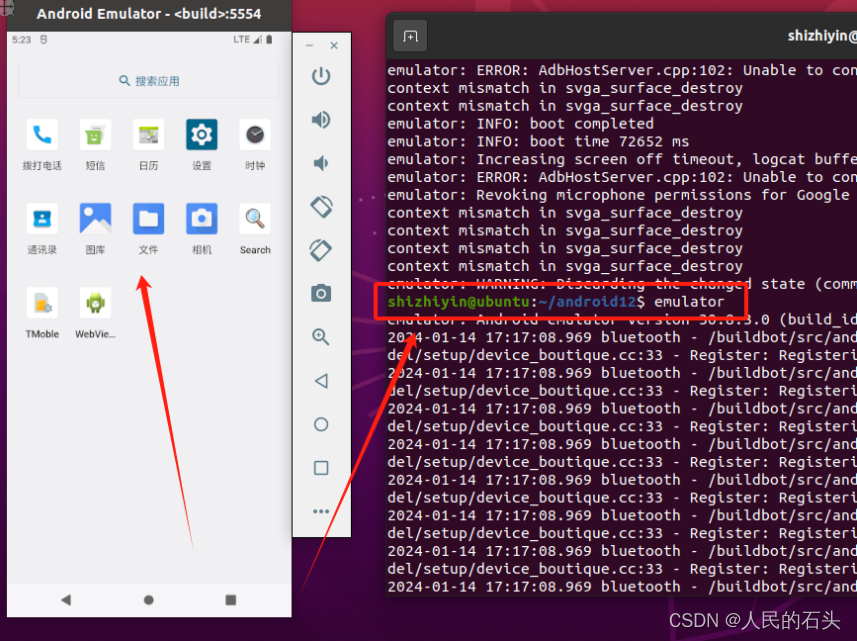
a.模拟器运行直接运行这条指令:
emulator错误, 你肯定是在没有导入环境的窗口执行 emulator 了
-bash: emulator: command not found这里要先导入环境, 如下
source build/envsetup.sh选择运行的项目 (这个和你编译的一样)
lunch 选择对应版本

然后  emulator
即可启动模拟器提示:在windows系统下,用VMware搭建Ubuntu系统,在Ubuntu中搭建安卓emulator,启动emulator时报错:
ERROR: x86 emulation currently requires hardware acceleration!解决方法:.
1. 关闭Ubuntu虚拟机。
2. VMware右击Ubuntu虚拟机的名字,选择设置。
3. 虚拟机设置界面选择【硬件】下的【处理器】,勾选虚拟化引擎下的【虚拟化Intel VT-x/EPT或AMD-V/RVI(V)】,点击确定。
4. 重启Ubuntu。
注意1:
a.尝鲜了下android12的模拟器,基于android-12.0.0_r3,发现按照以往的方法,lunch aosp_x86_64-eng编译后模拟器无法启动,无法启动的原因是没有生成相关*-qemu.img, 提示:Could not open '****/userdata-qemo.img':No such file or directory
修改成重新编译即可。主要原因是```aosp_x86_64-eng```不会生成qemu相关镜像, 换成lunch sdk_x86_64 即可
完整步骤
source build/envsetup.sh
lunch sdk_x86_64
make
emulator
或
b. 修改AndroidProduct.mk使支持x86_x64镜像编译
由于android12 默认lunch默认选不到模拟器镜像,所以首先需要修改mk。
修改build/make/target/product/AndroidProducts.mk文件,添加sdk_phone_x86_64-eng支持
diff --git a/target/product/AndroidProducts.mk b/target/product/AndroidProducts.mk
index 7d9d90e92a..419cccb80a 100644
--- a/target/product/AndroidProducts.mk
+++ b/target/product/AndroidProducts.mk
@@ -84,3 +84,4 @@ COMMON_LUNCH_CHOICES := \
     aosp_arm-eng \
     aosp_x86_64-eng \
     aosp_x86-eng \
+    sdk_phone_x86_64-eng \
注意2:
此处的emulator命令是代码编译时,source build/envsetup.sh和lunch设置的命令,emulator的实际位置在android源码的prebuilts/android-emulator下面:
~/code/android12_12.1.0.r3/out/target/product/emulator_x86_64$ which emulator
/home/zdm/code/android12_12.1.0.r3/prebuilts/android-emulator/linux-x86_64/emulator
如果执行模拟器时出现下面的错误
mulator: ERROR: Running multiple emulators with the same AVD is an experimental feature.
Please use -read-only flag to enable this feature.
表示已经有模拟器在运行了,或者是由于模拟器异常退出导致,删除下面两个lock文件即可正常:
$ croot
$ cd out/target/product/emulator_x86_64
$ ls *.lock
hardware-qemu.ini.lock  multiinstance.lock
8.2 手机测试
通过 adb 连接手机,也可以把系统镜像刷入真机。
先通过 adb 让手机重启到fastboot模式:
adb reboot bootloader在fastboot模式下,使用该命令刷入:
fastboot flashall -w其中 -w 表示擦除掉 /data 分区。
常见报错
 有时候执行  lunch sdk_x86_64
会有如下提示
In file included from build/make/core/config.mk:313:
In file included from build/make/core/envsetup.mk:323:
build/make/core/board_config.mk:181: error: Multiple board config files for TARGET_DEVICE emulator_x86_64: build/make/target/board/emulator_x86_64/BoardConfig.mk device/manufacturer/emulator_x86_64/BoardConfig.mk.
解决方法就是把以下文件夹
manufacturer/emulator_x86_64/BoardConfig.mk.删掉
附录:AOSP常用编译和查找命令
m:等同于make,进行一次完整编译。mm:在当前目录下编译所有模块,但不包括依赖项。mmm [目录]:编译指定目录下的所有模块,但不包括依赖项。只编译指定模块:mmm [dir/:target1,target2]mma:在当前目录下编译所有模块,包括依赖项。mmma [目录]:编译指定目录下的所有模块,包括依赖项。make clean:删除整个out/目录。make clobber:用于清除编译缓存。make snod:当重新编译部分模块完成后,快速生成img文件。cgrep:对C/C++文件执行grep(只搜寻C/C++文件类型,也包括.h类型)。jgrep:只对Java文件执行grep(只搜寻Java文件类型)。resgrep:只匹配/res目录下的 xml 文件。sepgrep:只查找sepolicy文件。


 3147
3147


 被折叠的 条评论
为什么被折叠?
被折叠的 条评论
为什么被折叠?
 到【灌水乐园】发言


