


 本文介绍了uiautomator2,一个用于Android自动化测试的Python库,它是uiautomator的升级版,允许通过WiFi远程控制设备。内容包括uiautomator2的安装、基本命令、元素选择和操作、手势操作、屏幕操作、消息提示框管理和更多高级功能。该框架基于Accessibility服务,支持无线连接、实时屏幕投频、精确设备控制等特性。
uiautomator简介
UiAutomator是Google提供的用来做安卓自动化测试的一个Java库,基于Accessibility服务。功能很强,可以对第三方App进行测试,获取屏幕上任意一个APP的任意一个控件属性,并对其进行任意操作,但有两个缺点:1. 测试脚本只能使用Java语言 2. 测试脚本要打包成jar或者apk包上传到设备上才能运行
uiautomator2是对uiautomator的改进,使其能够用Python编写,能够在电脑上运行的时候就控制手机,原理是在手机上运行了一个http rpc服务,将uiautomator中的功能开放出来,然后再将这些http接口封装成Python库
github地址:https://github.com/openatx/uiautomator2
uiautomator2 除了对原有的库的bug进行了修复,还增加了很多新的Feature。主要有以下部分:
- 设备和开发机可以脱离数据线,通过WiFi互联(基于atx-agent)
- 集成了openstf/minicap达到实时屏幕投频,以及实时截图
- 集成了openstf/minitouch达到精确实时控制设备
- 修复了xiaocong/uiautomator经常性退出的问题
- 代码进行了重构和精简,方便维护
- 实现了一个设备管理平台(也支持iOS) atxserver2
- 扩充了toast获取和展示的功能
安装
安装 uiautomator2
pip install --upgrade --pre uiautomator2 # 因为uiautomator2仍在开发中,你必须添加——pre来安装开发版本测试是否安装成功 uiautomator2 --help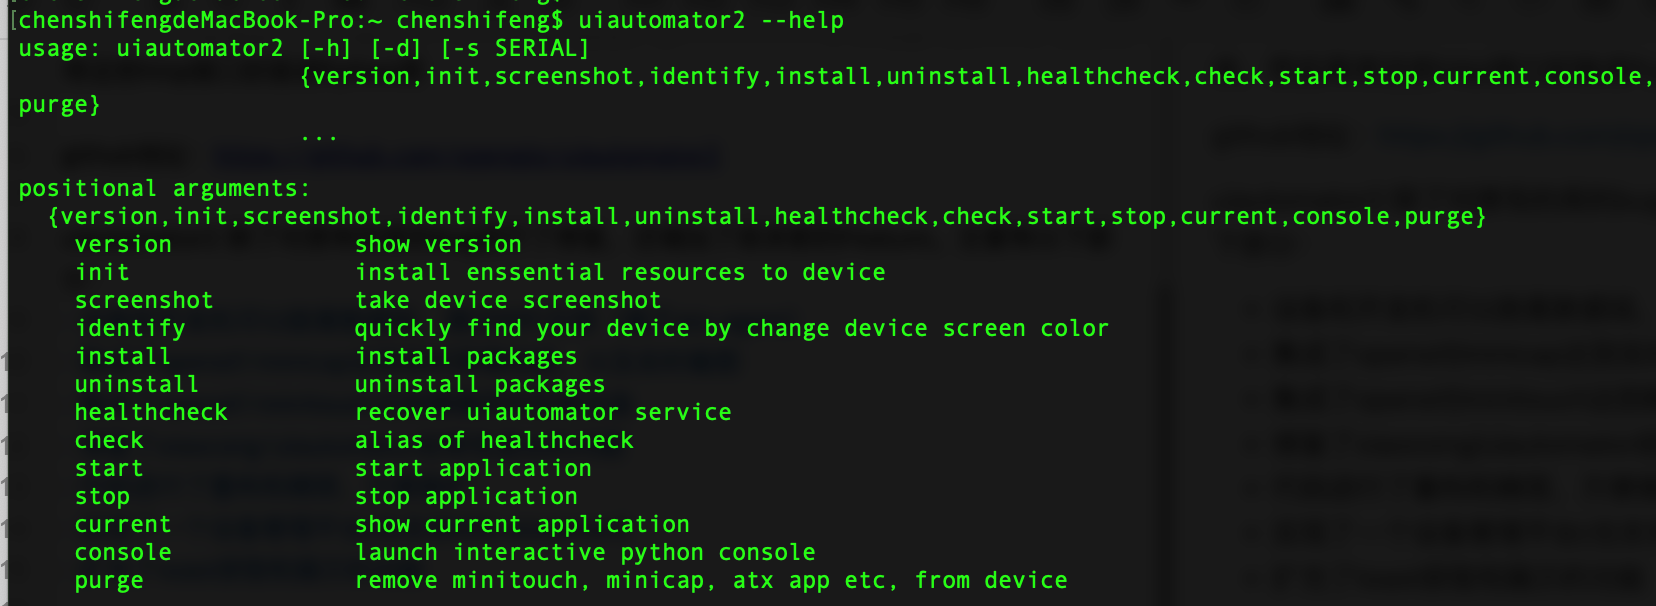
安装 weditor (UI Inspector)
因为uiautomator是独占资源,所以当atx运行的时候uiautomatorviewer是不能用的,为了减少atx频繁的启停,可以使用基于浏览器技术的weditor UI查看器。https://github.com/openatx/weditor
安装方法(备注: 目前最新的稳定版为 0.1.0)
pip install -U weditor安装 daemons to a device (Optional)
电脑连接上一个手机或多个手机, 确保adb已经添加到环境变量中,执行下面的命令会自动安装本库所需要的设备端程序:uiautomator-server 、atx-agent、openstf/minicap、openstf/minitouch
# 初始化 所有的已经连接到电脑的设备
python -m uiautomator2 init安装提示success即可
UiAutomator 常用命令
命令行常用命令
-
screenshot: 截图
uiautomator2 screenshot screenshot.jpg #图片存放在当前路径 -
current: 获取当前包名和activity
$ uiautomator2 current { "package": "com.xueqiu.android", "activity": "com.xueqiu.android.stockmodule.stockdetail.StockDetailActivity" } -
install: 安装apk
$ uiautomator2 install  com.android.chrome_81.0.4044.117_404411700.apk
[D 221119 15:09:15 __init__:1295] pm install -rt /data/local/tmp/_tmp.apk
Installed None
官方说不能使用,但我实测可以安装成功
-
uninstall: 卸载
$ uiautomator2 uninstall <package-name> # 卸载一个包
$ uiautomator2 uninstall <package-name-1> <package-name-2> # 卸载多个包
$ uiautomator2 uninstall --all # 全部卸载
$ uiautomator2 uninstall com.android.chrome Uninstall "com.android.chrome" OK -
stop: 停止应用
$ uiautomator2 stop com.example.app # 停止一个app
$ uiautomator2 stop --all # 停止所有的app
$ uiautomator2 stop com.xueqiu.android am force-stop "com.xueqiu.android"
设置超时时间
在假设客户端退出并结束uiautomator服务之前,等待来自客户端的新命令的时间(秒)(默认为3分钟)
d.set_new_command_timeout(300) # 改为5分钟,单位为s开启debug模式
d.debug = True
print(d.info)
15:37:11.340 $ curl -X POST -d '{"jsonrpc": "2.0", "id": "c78bf70891f2fb0b99b082a40faa6e76", "method": "deviceInfo", "params": {}}' 'http://127.0.0.1:56258/jsonrpc/0'
15:37:11.483 Response (142 ms) >>>
{"jsonrpc":"2.0","id":"c78bf70891f2fb0b99b082a40faa6e76","result":{"currentPackageName":"com.xueqiu.android","displayHeight":1872,"displayRotation":0,"displaySizeDpX":450,"displaySizeDpY":720,"displayWidth":1170,"productName":"cancro_x64","screenOn":true,"sdkInt":23,"naturalOrientation":true}}
<<< END
{'currentPackageName': 'com.xueqiu.android', 'displayHeight': 1872, 'displayRotation': 0, 'displaySizeDpX': 450, 'displaySizeDpY': 720, 'displayWidth': 1170, 'productName': 'cancro_x64', 'screenOn': True, 'sdkInt': 23, 'naturalOrientation': True}设置Implicit wait
设置元素查找等待时间(默认20s)
d.implicitly_wait(10.0)   # 也可以通过d.settings['wait_timeout'] = 10.0 修改
d(text="Settings").click() # 如果元素在10秒内没有找到,报UiObjectNotFoundError

print("wait timeout", d.implicitly_wait())   # 获取隐身等待时间
app 管理
安装APP
d.app_install('https://down11.zol.com.cn/liaotian/huoshan15.2.0w.apk')  # 支持从URL或本文文件安装APK
# [D 221119 15:58:54 __init__:1295] pm install -rt /data/local/tmp/_tmp.apk
启动APP
# 默认的这种方法是先通过atx-agent解析apk包的mainActivity,然后调用am start -n $package/$activity启动
d.app_start("com.xueqiu.android")
d.app_start("com.xueqiu.android" ,stop=True) # 启动应用前停止应用

# 使用 monkey -p com.example.hello_world -c android.intent.category.LAUNCHER 1 启动
# 这种方法有个副作用,它自动会将手机的旋转锁定给关掉
d.app_start("com.example.hello_world", use_monkey=True) # start with package name

# 通过指定main activity的方式启动应用,等价于调用am start -n com.example.hello_world/.MainActivity
d.app_start("com.example.hello_world", ".MainActivity")
关闭APP
d.app_stop("com.xueqiu.android")
# 相当于`am force-stop`,因此你可能会丢失数据

d.app_clear("com.xueqiu.android")
# 相当于 `pm clear`
关闭所有正则运行的APP
d.app_stop_all()  # 停止所有APP

d.app_stop_all(excludes=['com.xueqiu.android']) # 停止除了com.xueqiu.android之外的所有APP
获取APP信息
print(d.app_info('com.xueqiu.android'))
# {'packageName': 'com.xueqiu.android', 'mainActivity': 'com.xueqiu.android.common.splash.SplashActivity', 'label': '雪球股票', 'versionName': '12.18.1', 'versionCode': 280, 'size': 88270498}


img = d.app_icon("com.xueqiu.android")  # 获取APP图标
img.save('xueqiu.jpg')
获取正在运行的APP
print(d.app_list_running())
# ['com.github.uiautomator', 'com.android.systemui', 'com.xueqiu.android']
等待应用程序运行
pid = d.app_wait('com.xueqiu.android')   #等待APP运行,返回PID(不会自动运行APP)
if pid:
    print(f"com.xueqiu.android 运行成功")
else:
    print("运行失败")
d.app_wait("com.example.android", front=True) # 等待应用前台运行
d.app_wait("com.example.android", timeout=20.0) # 最长等待时间20s(默认)上传下载文件
上传文件
d.push('xueqiu.jpg','/sdcard/')   # 上传文件

d.push('xueqiu.jpg','/sdcard/xue.jpg')  # 上传文件并改名

with open("xueqiu.jpg", 'rb') as f:
    d.push(f, "/sdcard/")      # 以文件对象方式上传


d.push("xueqiu.jpg", "/data/local/tmp/", mode=0o755)   # 上传并更改文件访问模式
下载文件
d.pull('/data/local/tmp/xueqiu.mp4','xueqiu.mp4')指定APP打开链接
d.open_url("https://www.baidu.com")
d.open_url("taobao://taobao.com") # open Taobao app
d.open_url("appname://appnamehost")
执行shell命令
d.shell("pwd", timeout=60)  # 设置超时时间,默认60s

print(d.shell("pwd")) # ShellResponse(output='/\n', exit_code=0)


output = d.shell("pwd").output  # 命令执行结果
exit_code = d.shell("pwd").exit_code   # 命令是否正确执行

d.shell(["ls", "-l"]) # 长命令以列表方式输入当执行需要长期输出的命令时,需加stream=True,否则代码讲一直在执行,直到超时失败
import time
r = d.shell("logcat",stream=True)

deadline = time.time() + 10 # run maxium 10s
try:
    for line in r.iter_lines(): # r.iter_lines(chunk_size=512, decode_unicode=None, delimiter=None)
        if time.time() > deadline:
            break
        print(line.decode("utf-8"))
finally:
    r.close() # 执行此命令后终止任务
Session
Session 代表一个应用程序生命周期。可以用来启动应用程序,检测应用程序崩溃
目前session方法以停用,预计在3.0版本中再启用

启动和关闭APP
sess = d.session('com.xueqiu.android') # 启动雪球APP
sess.app_stop('com.xueqiu.android') # 停止
基本操作
基本命令
print(d.info)  # 设备基本信息
# {'currentPackageName': 'com.mumu.launcher', 'displayHeight': 1872, 'displayRotation': 0, 'displaySizeDpX': 450, 'displaySizeDpY': 720, 'displayWidth': 1170, 'productName': 'cancro_x64', 'screenOn': True, 'sdkInt': 23, 'naturalOrientation': True}
print(d.window_size()) # 屏幕大小
print(d.app_current())  # 当前APP基本信息   {'package': 'com.xueqiu.android', 'activity': 'com.xueqiu.android.main.view.MainActivity'}
print(d.wait_activity("com.xueqiu.android.main.view.MainActivity", timeout=10))  # 等待当前页面活动   Output: true of false
print(d.serial)  # 当前设置名称  与adb devices 中设置名称一致
print(d.wlan_ip)  # 获取设置IP地址
print(d.device_info)  # 获取设备详细信息

d.set_clipboard('text', 'label') # 设置粘贴板内容
print(d.clipboard) # 获取粘贴板内容
屏幕操作
d.screen_on() # 打开屏幕
d.screen_off() # 关闭屏幕
print(d.info.get('screenOn')) # 获取当前屏幕状态

d.press("home") # 按home键
d.press("back") # 按返回键
d.press(0x07, 0x02) # press keycode 0x07('0') with META ALT(0x02)
d.unlock() # 解锁屏幕
d.click(100, 200) # 点击坐标点
d.double_click(100,200,0.1)  # 双击默认情况下,两次点击的间隔时间为0.1s
d.long_click(100, 200, 0.5) # 长按,默认按0.5s
d.long_click(0.5, 0.5) # 长时间点击屏幕中央  注:点击、滑动、拖动操作支持百分比
d.swipe(580, 1400, 580, 400, 0.5) # 滑动, 默认滑动速度0.5s
SwipeExt 扩展功能
d.swipe_ext("right") # 手指右滑,4选1 "left", "right", "up", "down"
d.swipe_ext("right", scale=0.9) # 默认0.9, 滑动距离为屏幕宽度的90%
d.swipe_ext("right", box=(0, 0, 100, 100)) # 在 (0,0) -> (100, 100) 这个区域做滑动
# # 实践发现上滑或下滑的时候,从中点开始滑动成功率会高一些
d.swipe_ext("up", scale=0.8)

# 还可以使用Direction作为参数
from uiautomator2 import Direction

d.swipe_ext(Direction.FORWARD) # 页面下翻, 等价于 d.swipe_ext("up"), 只是更好理解
d.swipe_ext(Direction.BACKWARD) # 页面上翻
d.swipe_ext(Direction.HORIZ_FORWARD) # 页面水平右翻
d.swipe_ext(Direction.HORIZ_BACKWARD) # 页面水平左翻


d.drag(288, 880, 800, 880) # 拖动
d.drag(288, 880, 800, 880, 0.5) # 设置拖动时间0.5s ,默认0.5s

# 点击和移动
# d.swipe_points([(x0, y0), (x1, y1), (x2, y2)], 0.2) # 从点(x0, y0)到点(x1, y1)再到点(x2, y2),两点之间的时间速度是0.2秒
d.swipe_points([(300, 700), (700, 700), (700, 1400)], 0.2)

# 点击和移动
# 这个接口属于比较底层的原始接口,感觉并不完善,不过凑合能用。注:这个地方并不支持百分比
d.touch.down(10, 10) # 模拟按下
time.sleep(.01) # down 和 move 之间的延迟,自己控制
d.touch.move(15, 15) # 模拟移动
d.touch.up() # 模拟抬起
屏幕设置
# 旋转屏幕  注,我用模拟器没有测试通过
d.set_orientation('l') # or "left"
d.set_orientation("u") # or "upsidedown"
d.set_orientation("r") # or "right"
d.set_orientation("n") # or "natural"

d.freeze_rotation()  # 冻结旋转
d.freeze_rotation(False) # 解除冻结


# 屏幕截图
d.screenshot("home.jpg")  # 屏幕截图

# image方法保存截图
image = d.screenshot()
image.save("home.jpg")

# opencv 方法保存解脱
import cv2
image = d.screenshot(format='opencv')
cv2.imwrite('home.jpg', image)

# open 方法保存截图
imagebin = d.screenshot(format='raw')
open("some.jpg", "wb").write(imagebin)

# 获取DOM树
xml = d.dump_hierarchy()
print(xml)


d.open_notification()  # 打开通知消息
d.open_quick_settings()  # 打开快捷设置
选择器
选择器是一种方便的机制,可以在当前窗口中标识特定的UI对象。
演示用例:
<?xml version='1.0' encoding='UTF-8' standalone='yes' ?>
<hierarchy rotation="0">
  <node index="0" text="" resource-id="" class="android.widget.FrameLayout" package="com.android.systemui" content-desc="" checkable="false" checked="false" clickable="false" enabled="true" focusable="false" focused="false" scrollable="false" long-clickable="false" password="false" selected="false" visible-to-user="true" bounds="[0,0][1170,62]">
    <node index="1" text="" resource-id="com.android.systemui:id/status_bar" class="android.widget.FrameLayout" package="com.android.systemui" content-desc="" checkable="false" checked="false" clickable="false" enabled="true" focusable="false" focused="false" scrollable="false" long-clickable="false" password="false" selected="false" visible-to-user="true" bounds="[0,0][1170,62]">
      <node index="0" text="" resource-id="com.android.systemui:id/status_bar_contents" class="android.widget.LinearLayout" package="com.android.systemui" content-desc="" checkable="false" checked="false" clickable="false" enabled="true" focusable="false" focused="false" scrollable="false" long-clickable="false" password="false" selected="false" visible-to-user="true" bounds="[0,0][1170,62]">
        <node index="0" text="" resource-id="com.android.systemui:id/notification_icon_area" class="android.widget.FrameLayout" package="com.android.systemui" content-desc="" checkable="false" checked="false" clickable="false" enabled="true" focusable="false" focused="false" scrollable="false" long-clickable="false" password="false" selected="false" visible-to-user="true" bounds="[16,0][1007,62]">
          <node index="0" text="" resource-id="com.android.systemui:id/notification_icon_area_inner" class="android.widget.LinearLayout" package="com.android.systemui" content-desc="" checkable="false" checked="false" clickable="false" enabled="true" focusable="false" focused="false" scrollable="false" long-clickable="false" password="false" selected="false" visible-to-user="true" bounds="[16,0][1007,62]">
            <node index="0" text="" resource-id="com.android.systemui:id/notificationIcons" class="android.widget.LinearLayout" package="com.android.systemui" content-desc="" checkable="false" checked="false" clickable="false" enabled="true" focusable="false" focused="false" scrollable="false" long-clickable="false" password="false" selected="false" visible-to-user="true" bounds="[16,0][946,62]
最低0.47元/天 解锁文章


 1496
1496

 被折叠的 条评论
为什么被折叠?
被折叠的 条评论
为什么被折叠?
 到【灌水乐园】发言


