


今天学习配置SVN服务器,总结一下。
架SVN服务器需要的安装包:
- 服务端安装包(http://sourceforge.net/projects/win32svn/?source=dlp)
- 客户端安装包及语言包(http://tortoisesvn.net/downloads.html)
想了解更多的可以去官网:http://subversion.apache.org/,Subversion中文网站:http://www.subversion.org.cn/?action-channel-name-product#download(打开速度有点慢)。
安装服务端:
- 直接打开Setup-Subversion-1.7.9.msi,可以选择安装路径,最后finish即可。安装成功后,Subversion文件夹下有四个文件夹:bin、iconv、licenses、share。
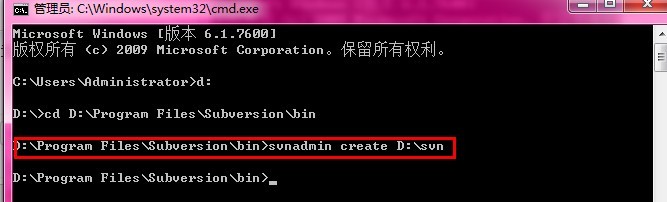
- 设置类库路径:在doc窗口进入到Subversion/bin路径下,运行svnadmin create D:\svn(文件夹路径名)命令,如图:
- 修改文件:即添加或删除用户名,在你设置的类库文件夹里有conf文件夹里有三个文件:authz、passwd、svnserve.conf。我们需要修改后两个文件。先修改svnserve.conf文件,找到
[general]
### The anon-access and auth-access options control access to the
### repository for unauthenticated (a.k.a. anonymous) users and
### authenticated users, respectively.
### Valid values are "write", "read", and "none".
### Setting the value to "none" prohibits both reading and writing;
### "read" allows read-only access, and "write" allows complete
### read/write access to the repository.
### The sample settings below are the defaults and specify that anonymous
### users have read-only access to the repository, while authenticated
### users have read and write access to the repository.
# anon-access = read
# auth-access = write
### The password-db option controls the location of the password
### database file.  Unless you specify a path starting with a /,
### the file's location is relative to the directory containing
### this configuration file.
### If SASL is enabled (see below), this file will NOT be used.
### Uncomment the line below to use the default password file.
# password-db = passwd
将# anon-access = read # auth-access = write
和# password-db = passwd
的注释去掉,即:anon-access = read auth-access = write
这样就可以加载passwd文件了,然后修改passwd文件,即在passwd文件里添加一些用户名和密码,我添加的用户名和密码都为admin,例:password-db = passwd### This file is an example password file for svnserve. ### Its format is similar to that of svnserve.conf. As shown in the ### example below it contains one section labelled [users]. ### The name and password for each user follow, one account per line. [users] # harry = harryssecret # sally = sallyssecret admin=admin
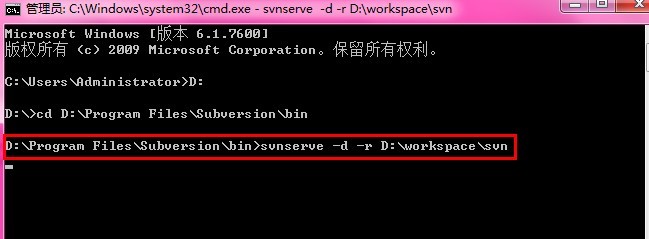
“=”前面是用户名,后面为密码,连接SVN服务端时需要用户名和密码。 - 启动SVN服务:同样去doc命令窗口,进入到Subversion\bin路径下,运行svnserve -d -r 类库路径,我的是D:\svn,如图:
注意:不要关闭该窗口,否则SVN服务会被关掉。
安装客户端TortoiseSVN:
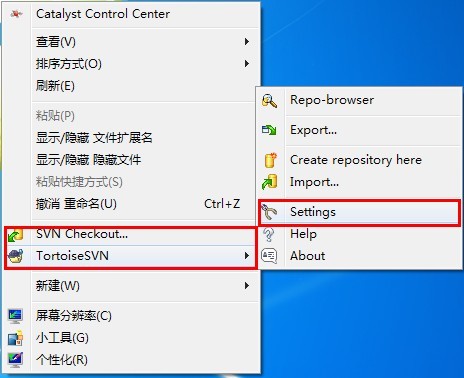
直接打开TortoiseSVN-1.7.13.24257-win32-svn-1.7.10.msi安装即可,同时也可以选择安装路径。安装成功后,在桌面上右键就会多出两个选项:SVN Checkout...和TortoiseSVN,然后安装LanguagePack_1.7.13.24257-win32-zh_CN.msi,安装成功后,在桌面上右键,出现如图:
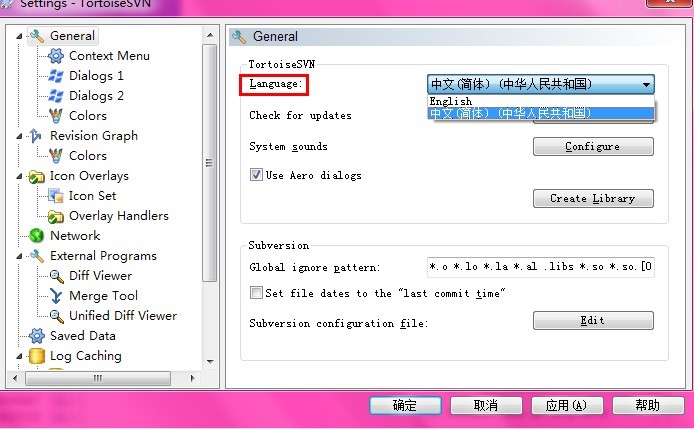
然后在右键看一下就会是中文的了。
使用TortoiseSVN导入、导出项目
导入:在要被导入的项目文件夹上右键->TortoiseSVN->Import,弹出一个对话框,在URL of repository输入连接SVN服务的地址,如果是本地,则是svn://localhost;如果是远程,则是svn://IP地址。最后确定就导入项目了。
导出:和导入操作相似。


 1701
1701

 被折叠的 条评论
为什么被折叠?
被折叠的 条评论
为什么被折叠?
 到【灌水乐园】发言


