


创建JSF自定义组件
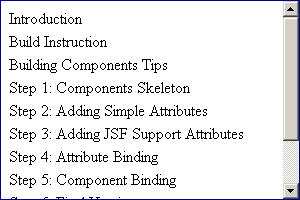
在我们开始之前,首先下载Step0.zip,它是一个初始的工程,包含了JSF运行所需要的包。当程序运行时将显示bannerpage.jsp页面,我们将通过这个页面逐步展示自定义组件的创建过程,并达到最终的运行效果。效果图如下:
第一节、 自定义组件组成
首先我们将创建在页面上显示“Hello JSF Component”文字的简单组件,通过这个实例我们需要认识到自定义组件由那几部分组成。
一、页面显示代码
l 在HTML页面表述:
<div>Hello JSF Component</div>
l 在JSF页面表述:
<d:ticker>
<f:verbatim>Hello JSF Component</f:verbatim>
</d:ticker>
二、开始创建自定义组件
1、 第一步:实现标签库描述库
在WEB-INF下创建ticker.tld文件,内容如下:
<?xml version="1.0" encoding="UTF-8"?>
<!DOCTYPE taglib PUBLIC "-//Sun Microsystems, Inc.//DTD JSP Tag Library 1.2//EN"
"http://java.sun.com/dtd/web-jsptaglibrary_1_2.dtd">
<taglib>
<tlib-version>1.0</tlib-version>
<jsp-version>1.2</jsp-version>
<short-name>d</short-name>
<uri>http://jsftutorials.com/</uri>
<tag>
<name>ticker</name>
<tag-class>ticker.TickerTag</tag-class>
<body-content>JSP</body-content>
</tag>
</taglib>
2、 第二步:创建标签属性处理类
新建ticker包并在其下创建TickerTag.java
package ticker;
import javax.faces.component.UIComponent;
import javax.faces.webapp.UIComponentTag;
public class TickerTag extends UIComponentTag{
public void release() {
// the super class method should be called
super.release();
}
protected void setProperties(UIComponent component) {
// the super class method should be called
super.setProperties(component);
}
public String getComponentType() {
return "ticker";
}
public String getRendererType() {
// null means the component renders itself
return null;
}
}
注意:
l 通常我们的属性处理类命名为:标签名+Tag。
l TickerTag需要继承UIConponentTag。
l getComponentType()方法返回组件类型名称,类型在faces-configz.xml中配置,稍后我们将看到。
l getRendererType()方法返回组件所需的呈现器类型。如果返回为空,那么组件将自我呈现。
l release()方法将在标签销毁时释放它所占用的资源。
l setProperties()方法是必须的,它将标签属性值绑定到组件中。
第三步:创建组件类
打开WEB-INF/faces-config.xml并且在其中写入配置信息
<?xml version="1.0" encoding="UTF-8"?>
<!DOCTYPE faces-config PUBLIC "-//Sun Microsystems, Inc.//DTD JavaServer Faces Config 1.0//EN"
"http://java.sun.com/dtd/web-facesconfig_1_0.dtd">
<faces-config>
<component>
<component-type>ticker</component-type>
<component-class>ticker.UITicker</component-class>
</component>
<lifecycle/>
<application>
<locale-config/>
</application>
<factory/>
</faces-config>
创建ticker.UITicker类,组件类主要用来维护状态、呈现用户接口和处理输入。
package ticker;
import java.io.IOException;
import javax.faces.component.UIOutput;
import javax.faces.context.FacesContext;
import javax.faces.context.ResponseWriter;
public class UITicker extends UIOutput {
public void encodeBegin(FacesContext context) throws IOException {
ResponseWriter writer = context.getResponseWriter();
writer.startElement("div", this);
}
public void encodeEnd(FacesContext context) throws IOException {
ResponseWriter writer = context.getResponseWriter();
writer.endElement("div");
}
}
注意:
组件类必须以UI+组件类型名命名
l 因为自定义组件没有输入,所以我们继承UIOutput类
l encodeBegin(FacesContext context)方法开始标签
l encodeEnd(FacesContext context)方法结束标签
第四步:使用自定义组件
打开bannerpage.jsp页面,并且将标签添加到JSP页面中
<%@ taglib uri="http://java.sun.com/jsf/html" prefix="h" %>
<%@ taglib uri="http://java.sun.com/jsf/core" prefix="f" %>
<%@ taglib uri="http://jsftutorials.com/" prefix="d" %>
<html>
<head>
<title>Show Custom Component</title>
</head>
<body>
<f:view>
<d:ticker>
<f:verbatim>Hello JSF Component</f:verbatim>
</d:ticker>
</f:view>
</body>
</html>
注意:
l URI属性是必须的,通常都认为它是一个URL,但它其实是一个标签的唯一标识。
l <f:verbatim>标签使用在自定义标签内是允许的,它的作用是将<div>作为HTML代码输出。
第五步:最后将工程添加到TOMCAT中,运行后可以看到在bannerpage.jsp页面的显示效果。我是在eclipse + myeclipse + tomcate环境测试。
三、组件调用关系图
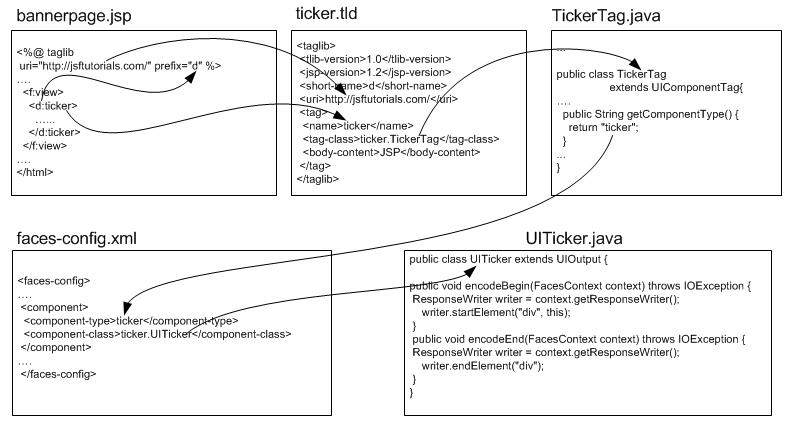
1、 根据JSP页面上的URI值查找标签库
2、 根据使用的标签在标签库中查找到相应标签
3、 根据标签库中标签的信息查找到标签类
4、 通过标签类在faces-config.xml中查找到对应处理类
5、 通过处理类的encodeBegin方法和encodeEnd方法实现标签内容。
第二节、 添加简单的属性
上一节中<div>标签没有任何样式,这一节我们将在自定义控件中加入简单的属性,通过加入css样式将<div>标签显示出来。
第一步、在JSP中添加标签的样式
打开jsp页面,在<d:ticker>自定义标签中添加style样式:
<%@ taglib uri="http://java.sun.com/jsf/html" prefix="h" %>
<%@ taglib uri="http://java.sun.com/jsf/core" prefix="f" %>
<%@ taglib uri="http://jsftutorials.com/" prefix="d" %>
<html>
<head>
<title>Show Custom Component</title>
</head>
<body>
<f:view>
<d:ticker style="border:1px solid darkblue;width:100px">
<f:verbatim>Hello JSF Component</f:verbatim>
</d:ticker>
</f:view>
</body>
</html>
第二步、在标签库ticker.tld中添加属性
<?xml version="1.0" encoding="UTF-8"?>
<!DOCTYPE taglib PUBLIC "-//Sun Microsystems, Inc.//DTD JSP Tag Library 1.2//EN"
"http://java.sun.com/dtd/web-jsptaglibrary_1_2.dtd">
<taglib>
<tlib-version>1.0</tlib-version>
<jsp-version>1.2</jsp-version>
<short-name>d</short-name>
<uri>http://jsftutorials.com/</uri>
<tag>
<name>ticker</name>
<tag-class>ticker.TickerTag</tag-class>
<body-content>JSP</body-content>
<attribute>
<name>style</name>
</attribute>
</tag>
</taglib>
第三步、将属性添加到样式类
package ticker;
import javax.faces.component.UIComponent;
import javax.faces.webapp.UIComponentTag;
public class TickerTag extends UIComponentTag{
String style;
public String getStyle() {
return style;
}
public void setStyle(String style) {
this.style = style;
}
public void release() {
// the super class method should be called
super.release();
style = null ;
}
protected void setProperties(UIComponent component) {
// the super class method should be called
super.setProperties(component);
if(style != null)
component.getAttributes().put("style", style);
}
public String getComponentType() {
return "ticker";
}
public String getRendererType() {
// null means the component renders itself
return null;
}
}
注意:
1、 通过setStyle(String style)方法获取style的值。
2、 通过getStyle()返回style的值。
3、 在setProperties(UIComponent component)中将获得的style值绑定到组件属性中。
4、 Release()中释放资源。
第四步、在标签处理类中将属性加入到标签
package ticker;
import java.io.IOException;
import javax.faces.component.UIOutput;
import javax.faces.context.FacesContext;
import javax.faces.context.ResponseWriter;
public class UITicker extends UIOutput {
public void encodeBegin(FacesContext context) throws IOException {
ResponseWriter writer = context.getResponseWriter();
writer.startElement("div", this);
String style = (String)getAttributes().get("style");
if (style!=null)
writer.writeAttribute("style", style, null);
}
public void encodeEnd(FacesContext context) throws IOException {
ResponseWriter writer = context.getResponseWriter();
writer.endElement("div");
}
}
注意:
If(style!=null)是必要的,当你没有用到style属性时,如果没有使用该判断,将出现异常。
第五步、运行工程,我们可以看到div出现了深蓝色的边框。
第六步、改良css并继续添加属性
通常我们通过定义CSS来控制显示效果,我们将页面代码变更了,以便更加灵活。并且我们通过类似的方法增加了一个styleclass属性
<%@ taglib uri="http://java.sun.com/jsf/html" prefix="h" %>
<%@ taglib uri="http://java.sun.com/jsf/core" prefix="f" %>
<%@ taglib uri="http://jsftutorials.com/" prefix="d" %>
<html>
<head>
<title>Show Custom Component</title>
<style>
.banner {
border: 1px solid darkblue;
padding: 5px 5px 5px 5px;
}
</style>
</head>
<body>
<f:view>
<d:ticker styleClass="banner" style="width:100px">
<f:verbatim>Hello JSF Component</f:verbatim>
</d:ticker>
</f:view>
</body>
</html>
Ticker.tld
<?xml version="1.0" encoding="UTF-8"?>
<!DOCTYPE taglib PUBLIC "-//Sun Microsystems, Inc.//DTD JSP Tag Library 1.2//EN"
"http://java.sun.com/dtd/web-jsptaglibrary_1_2.dtd">
<taglib>
<tlib-version>1.0</tlib-version>
<jsp-version>1.2</jsp-version>
<short-name>d</short-name>
<uri>http://jsftutorials.com/</uri>
<tag>
<name>ticker</name>
<tag-class>ticker.TickerTag</tag-class>
<body-content>JSP</body-content>
<attribute>
<name>style</name>
</attribute>
<attribute>
<name>styleClass</name>
</attribute>
</tag>
</taglib>
TickerTag.java
package ticker;
import javax.faces.component.UIComponent;
import javax.faces.webapp.UIComponentTag;
public class TickerTag extends UIComponentTag{
String style;
String styleClass;
public String getStyle() {
return style;
}
public void setStyle(String style) {
this.style = style;
}
public String getStyleClass() {
return styleClass;
}
public void setStyleClass(String styleClass) {
this.styleClass = styleClass;
}
public void release() {
// the super class method should be called
super.release();
style = null ;
styleClass = null ;
}
protected void setProperties(UIComponent component) {
// the super class method should be called
super.setProperties(component);
if(style != null)
component.getAttributes().put("style", style);
if(styleClass != null)
component.getAttributes().put("styleClass", styleClass);
}
public String getComponentType() {
return "ticker";
}
public String getRendererType() {
// null means the component renders itself
return null;
}
}
UITicker.java
package ticker;
import java.io.IOException;
import javax.faces.component.UIOutput;
import javax.faces.context.FacesContext;
import javax.faces.context.ResponseWriter;
public class UITicker extends UIOutput {
public void encodeBegin(FacesContext context) throws IOException {
ResponseWriter writer = context.getResponseWriter();
writer.startElement("div", this);
String style = (String)getAttributes().get("style");
if (style!=null)
writer.writeAttribute("style", style, null);
String styleClass = (String)getAttributes().get("styleClass");
if (styleClass!=null)
writer.writeAttribute("class", styleClass, null);
}
public void encodeEnd(FacesContext context) throws IOException {
ResponseWriter writer = context.getResponseWriter();
writer.endElement("div");
}
}
第三节、 添加JSF支持的属性
某些属性在Ticker类中是不需要TickerTag.java中获取,因为这些属性的方法已经在UIComponentTab类中实现了,如:binding、id和rendered。下面我们将添加ID和rendered属性到我们的控件当中。
第一步、打开ticker.tld加入Id属性
<attribute>
<name>id</name>
</attribute>
第二步、在UITicker.java中输出属性
public void encodeBegin(FacesContext context) throws IOException {
ResponseWriter writer = context.getResponseWriter();
writer.startElement("div", this);
writer.writeAttribute("id", getClientId(context), null);
String style = (String)getAttributes().get("style");
if (style!=null)
writer.writeAttribute("style", style, null);
String styleClass = (String)getAttributes().get("styleClass");
if (styleClass!=null)
writer.writeAttribute("class", styleClass, null);
}
运行后,查看html源代码,你可以发现自定义标签生成了一个ID属性,并且属性已经被自动赋值。
第三步、添加rendered属性。
该属性主要控制控件的是否显示,我们只要在ticker.tld中加入
<attribute>
<name>rendered</name>
</attribute>
将rendered设为false后运行,我们可以看到控件消失在页面上,设为true控件又显示在页面上 。
当我们将JSP中的<f:verbatim>标签去掉,让重复上述操作,我们可以看到div可以在我们的控制之下显示,但文字始终显示在页面上。我们可以看出,<f:verbatim>控件包含的Hello JSF Component文字才能正常显示。
第四节、 属性绑定
属性绑定是JSF中的重要特性,你可以不必在JSP文件中硬编码,直接使用资源文档,对属性进行维护。本节我们将学会怎样绑定一个名为title的属性。
第一步、为了使程序包结构清晰,我们在根目录下创建demo包,并在里面创建resources.properties属性。打开resources.properties,写入
banner_title=Creating JSF Components. Step-By-Step Tutorial.
第二步、在ticker.tld中加入title属性
<attribute>
<name>title</name>
</attribute>
第三步、绑定title属性
在ticker.TickerTag.java文件中插入如下代码:
package ticker;
import javax.faces.component.UIComponent;
import javax.faces.el.ValueBinding;
import javax.faces.webapp.UIComponentTag;
public class TickerTag extends UIComponentTag{
String style;
String styleClass;
String title;
public String getStyle() {
return style;
}
public void setStyle(String style) {
this.style = style;
}
public String getStyleClass() {
return styleClass;
}
public void setStyleClass(String styleClass) {
this.styleClass = styleClass;
}
public String getTitle() {
return title;
}
public void setTitle(String title) {
this.title = title;
}
public void release() {
// the super class method should be called
super.release();
style = null ;
styleClass = null ;
title = null;
}
protected void setProperties(UIComponent component) {
// the super class method should be called
super.setProperties(component);
if(style != null)
component.getAttributes().put("style", style);
if(styleClass != null)
component.getAttributes().put("styleClass", styleClass);
if (title != null) {
if (isValueReference(title)) {
ValueBinding vb =
getFacesContext().getApplication().
createValueBinding(title);
component.setValueBinding("title", vb);
} else {
component.getAttributes().put("title", title);
}
}
}
public String getComponentType() {
return "ticker";
}
public String getRendererType() {
// null means the component renders itself
return null;
}
}
通过这重要的一步,我们将属性值绑定了。
第四步、将属性加入组件控制类
public void encodeBegin(FacesContext context) throws IOException {
ResponseWriter writer = context.getResponseWriter();
writer.startElement("div", this);
writer.writeAttribute("id", getClientId(context), null);
String style = (String)getAttributes().get("style");
if (style!=null)
writer.writeAttribute("style", style, null);
String styleClass = (String)getAttributes().get("styleClass");
if (styleClass!=null)
writer.writeAttribute("class", styleClass, null);
String title = (String)getAttributes().get("title");
if (title!=null)
writer.writeAttribute("title", title, null);
}
第五步、修改JSP页面,引用资源文档。
<%@ taglib uri="http://java.sun.com/jsf/html" prefix="h" %>
<%@ taglib uri="http://java.sun.com/jsf/core" prefix="f" %>
<%@ taglib uri="http://jsftutorials.com/" prefix="d" %>
<f:loadBundle basename="demo.resources" var="bundle" />
<html>
<head>
<title>Show Custom Component</title>
<style>
.banner {
border: 1px solid darkblue;
padding: 5px 5px 5px 5px;
}
</style>
</head>
<body>
<f:view>
<d:ticker id="banner"
styleClass="banner"
style="width:100px"
rendered="true"
title="#{bundle.banner_title}">
<f:verbatim>Hello JSF Component</f:verbatim>
</d:ticker>
</f:view>
</body>
</html>
第五节、 组件绑定
组件绑定是JSF的重要特性。不同于值绑定,控件绑定能够控制控件和它子控件的外观。本节中,我们将说明这个组件绑定的运行机制。
现在我们将在bannerpage.jsp页面上添加一个有两个按钮的表单,一个按钮具有隐藏功能,另一个将具有显示控件功能。我们还将创建一个能购控制表单和表单中控件的“支持BEAN”。
实际上,这个绑定机制是由组件父类实现的。
第一步、在ticker.tld中添加新属性
<?xml version="1.0" encoding="UTF-8"?>
<!DOCTYPE taglib PUBLIC "-//Sun Microsystems, Inc.//DTD JSP Tag Library 1.2//EN"
"http://java.sun.com/dtd/web-jsptaglibrary_1_2.dtd">
<taglib>
<tlib-version>1.0</tlib-version>
<jsp-version>1.2</jsp-version>
<short-name>d</short-name>
<uri>http://jsftutorials.com/</uri>
<tag>
<name>ticker</name>
<tag-class>ticker.TickerTag</tag-class>
<body-content>JSP</body-content>
<attribute>
<name>style</name>
</attribute>
<attribute>
<name>styleClass</name>
</attribute>
<attribute>
<name>id</name>
</attribute>
<attribute>
<name>rendered</name>
</attribute>
<attribute>
<name>title</name>
</attribute>
<attribute>
<name>binding</name>
</attribute>
</tag>
</taglib>
第二步、在faces-config.xml文件中添加绑定信息
<?xml version="1.0" encoding="UTF-8"?>
<!DOCTYPE faces-config
PUBLIC "-//Sun Microsystems, Inc.//DTD JavaServer Faces Config 1.0//EN"
"http://java.sun.com/dtd/web-facesconfig_1_0.dtd">
<faces-config>
<component>
<component-type>ticker</component-type>
<component-class>ticker.UITicker</component-class>
</component>
<managed-bean>
<managed-bean-name>BannerPageBean</managed-bean-name>
<managed-bean-class>demo.BannerPageBean</managed-bean-class>
<managed-bean-scope>request</managed-bean-scope>
<managed-property>
<property-name>rendered</property-name>
<property-class>java.lang.Boolean</property-class>
<value>true</value>
</managed-property>
</managed-bean>
<lifecycle/>
<application>
<locale-config/>
</application>
<factory/>
</faces-config>
我们加入了一个BannerPageBean的管理bean,它将控制控件。初始状态我们将rendered属性设置围true。
第三步、在demo包中创建BannerPageBean.java
package demo;
import ticker.UITicker;
public class BannerPageBean {
Boolean rendered;
UITicker ticker;
public Boolean getRendered() {
return rendered;
}
public void setRendered(Boolean rendered) {
this.rendered = rendered;
}
public UITicker getTicker() {
return ticker;
}
public void setTicker(UITicker ticker) {
this.ticker = ticker;
}
public String TurnOn() {
ticker.setRendered(true);
return null;
}
public String TurnOff() {
ticker.setRendered(false);
return null;
}
}
这个BEAN由两个属性Boolean类型的rendered和UITicker类型的ticker,最后两个方法将在页面调用,来控制控件的显示。那些方法能够设置rendered属性,甚至你可以控制控件的任何属性。
第四步、修改bannerpage.jsp页面
<%@ taglib uri="http://java.sun.com/jsf/html" prefix="h" %>
<%@ taglib uri="http://java.sun.com/jsf/core" prefix="f" %>
<%@ taglib uri="http://jsftutorials.com/" prefix="d" %>
<f:loadBundle basename="demo.resources" var="bundle" />
<html>
<head>
<title>Show Custom Component</title>
<style>
.banner {
border: 1px solid darkblue;
padding: 5px 5px 5px 5px;
}
</style>
</head>
<body>
<f:view>
<h:form>
<h:commandButton value="Turn Off" action="#{BannerPageBean.TurnOff}"/>
<h:commandButton value="Turn On" action="#{BannerPageBean.TurnOn}"/>
<d:ticker id="banner"
styleClass="banner"
style="width:100px"
title="#{bundle.banner_title}"
binding="#{BannerPageBean.ticker}">
<f:verbatim>Hello JSF Component</f:verbatim>
</d:ticker>
</h:form>
</f:view>
</body>
</html>
这个组件绑定了BannerPageBean类中的ticker对象,通过按钮我们可以决定控件的显示或隐藏。
第六节、最后版本
本节我们将生成我们在第一节看到的最后版本。在这里我们将新建两个width和height属性,它们通过style属性改变控件的外观。当你同时在style中已经定义了width、height那么控件的width和height的值将覆盖style 中以存在的值。
第一步、在ticker.tld 中加入width和height属性。
<?xml version="1.0" encoding="UTF-8"?>
<!DOCTYPE taglib PUBLIC "-//Sun Microsystems, Inc.//DTD JSP Tag Library 1.2//EN"
"http://java.sun.com/dtd/web-jsptaglibrary_1_2.dtd">
<taglib>
<tlib-version>1.0</tlib-version>
<jsp-version>1.2</jsp-version>
<short-name>d</short-name>
<uri>http://jsftutorials.com/</uri>
<tag>
<name>ticker</name>
<tag-class>ticker.TickerTag</tag-class>
<body-content>JSP</body-content>
<attribute>
<name>style</name>
</attribute>
<attribute>
<name>styleClass</name>
</attribute>
<attribute>
<name>id</name>
</attribute>
<attribute>
<name>rendered</name>
</attribute>
<attribute>
<name>title</name>
</attribute>
<attribute>
<name>binding</name>
</attribute>
<attribute>
<name>width</name>
</attribute>
<attribute>
<name>height</name>
</attribute>
</tag>
</taglib>
第二步、在TickerTag.java中加入
package ticker;
import javax.faces.component.UIComponent;
import javax.faces.el.ValueBinding;
import javax.faces.webapp.UIComponentTag;
public class TickerTag extends UIComponentTag{
String style;
String styleClass;
String title;
String width;
String height;
public String getHeight() {
return height;
}
public void setHeight(String height) {
this.height = height;
}
public String getWidth() {
return width;
}
public void setWidth(String width) {
this.width = width;
}
public String getStyle() {
return style;
}
public void setStyle(String style) {
this.style = style;
}
public String getStyleClass() {
return styleClass;
}
public void setStyleClass(String styleClass) {
this.styleClass = styleClass;
}
public String getTitle() {
return title;
}
public void setTitle(String title) {
this.title = title;
}
public void release() {
// the super class method should be called
super.release();
style = null ;
styleClass = null ;
title = null;
height = null;
width = null;
}
protected void setProperties(UIComponent component) {
// the super class method should be called
super.setProperties(component);
if(style != null)
component.getAttributes().put("style", style);
if(styleClass != null)
component.getAttributes().put("styleClass", styleClass);
if(width != null)
component.getAttributes().put("width", width);
if(height != null)
component.getAttributes().put("height", height);
if (title != null) {
if (isValueReference(title)) {
ValueBinding vb =
getFacesContext().getApplication().
createValueBinding(title);
component.setValueBinding("title", vb);
} else {
component.getAttributes().put("title", title);
}
}
}
public String getComponentType() {
return "ticker";
}
public String getRendererType() {
// null means the component renders itself
return null;
}
}
第三步、在UITicker.java中加入
package ticker;
import java.io.IOException;
import javax.faces.component.UIOutput;
import javax.faces.context.FacesContext;
import javax.faces.context.ResponseWriter;
public class UITicker extends UIOutput {
public void encodeBegin(FacesContext context) throws IOException {
ResponseWriter writer = context.getResponseWriter();
writer.startElement("div", this);
writer.writeAttribute("id", getClientId(context), null);
String width = (String)getAttributes().get("width");
String height = (String)getAttributes().get("height");
String style = (String)getAttributes().get("style");
style= (style!=null) ? style + ";" : "";
if (width != null) style += "width:" + width + ";";
if (height != null) style += "height:" + height+ ";";
writer.writeAttribute("style", style, null);
String styleClass = (String)getAttributes().get("styleClass");
if (styleClass!=null)
writer.writeAttribute("class", styleClass, null);
String title = (String)getAttributes().get("title");
if (title!=null)
writer.writeAttribute("title", title, null);
}
public void encodeEnd(FacesContext context) throws IOException {
ResponseWriter writer = context.getResponseWriter();
writer.endElement("div");
}
}
第四步、在jsp中加入代码
<%@ taglib uri="http://java.sun.com/jsf/html" prefix="h" %>
<%@ taglib uri="http://java.sun.com/jsf/core" prefix="f" %>
<%@ taglib uri="http://jsftutorials.com/" prefix="d" %>
<f:loadBundle basename="demo.resources" var="bundle" />
<html>
<head>
<title>Show Custom Component</title>
<style>
.banner {
border: 1px solid darkblue;
padding: 5px 5px 5px 5px;
overflow: auto;
}
</style>
</head>
<body>
<f:view>
<h:form>
<h:commandButton value="Turn Off" action="#{BannerPageBean.TurnOff}"/>
<h:commandButton value="Turn On" action="#{BannerPageBean.TurnOn}"/>
<d:ticker id="banner"
width="300px"
height="200px"
styleClass="banner"
title="#{bundle.banner_title}"
binding="#{BannerPageBean.ticker}">
<h:panelGrid columns="1">
<h:outputText value="Introduction"/>
<h:outputText value="Build Instruction"/>
<h:outputText value="Building Components Tips"/>
<h:outputText value="Step 1: Components Skeleton"/>
<h:outputText value="Step 2: Adding Simple Attributes"/>
<h:outputText value="Step 3: Adding JSF Support Attributes"/>
<h:outputText value="Step 4: Attribute Binding"/>
<h:outputText value="Step 5: Component Binding"/>
<h:outputText value="Step 6: Final Version"/>
<h:outputText value="Step 7: Creating Deployable jar File"/>
<h:outputText value="What next?"/>
</h:panelGrid>
</d:ticker>
</h:form>
</f:view>
</body>
</html>
注意:1、我们在页面中加入了"overflow: auto",使得Textarea出现滚动条


 1726
1726

 被折叠的 条评论
为什么被折叠?
被折叠的 条评论
为什么被折叠?
 到【灌水乐园】发言


