


看到高佣联盟的金额竟然可以跳动。感觉挺新鲜的。就自己实现一下。比较简单。看看就OK了。高手勿喷。
先看看效果
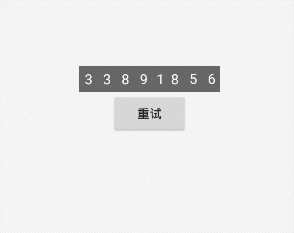
看着挺好玩的。由于是gif。看着有点诡异。中间少了一些帧。看效果还是自己跑一下吧
思路:
单个textveiw是没法实现了。这么多数字在一排。那就是个LinearLayout。 然后是数字部分。这么多。怎么办。只好拆成一个个的数字了。 那就出来了。先自定义一个view实现单个跳动的数字view 。排成一排。就完成了。
实现:
先实现单个的view。 由于比较简单。就直接看代码吧。
package com.shoneworn.supermvp.common.widget;

import android.content.Context;
import android.graphics.Canvas;
import android.graphics.Color;
import android.graphics.Paint;
import android.graphics.Rect;
import android.support.annotation.Nullable;
import android.text.TextUtils;
import android.util.AttributeSet;
import android.view.View;

import com.shoneworn.supermvp.uitls.NumberUtils;

/**
 * Created by chenxiangxiang on 2019/5/16.
 *
 * @author shoneworn
 * @只支持单个文字的跳动,只想支持数字。
 */

public class SingleScrollNumberView extends View {

    private String mText = "";
    private int mTextColor = Color.BLACK;
    private int mTextSize = 48;
    private int textPadding = 6;

    private Paint mPaint;
    private Context mContext;
    private static String BASE_NUMBER = "0123456789";

    /**
     * 由于只想用一个view完事,但是文字绘制的时候,不带边距,只好在measure的时候,用大字体占个大位置。在onDraw的时候,用小字体。这样文字就自带了边距
     */
    private int textOutHeight;
    private int textOutWidth;
    private int textInnerWidth;
    private int scrollY = 0;
    private int scale = 2;

    public SingleScrollNumberView(Context context) {
        this(context, null);
    }

    public SingleScrollNumberView(Context context, @Nullable AttributeSet attrs) {
        this(context, attrs, 0);
    }

    public SingleScrollNumberView(Context context, @Nullable AttributeSet attrs, int defStyleAttr) {
        super(context, attrs, defStyleAttr);
        this.mContext = context;
        initPaint();
    }

    private void initPaint() {
        mPaint = new Paint();
        //设置抗锯齿
        mPaint.setAntiAlias(true);
        //设置字体和颜色
        mPaint.setTextSize(mTextSize * scale);
        mPaint.setColor(mTextColor);
        setPadding(textPadding, textPadding, textPadding, textPadding);
    }

    public SingleScrollNumberView setText(String text) {
        this.mText = text;
        return this;
    }

    public SingleScrollNumberView setTextColor(int textColor) {
        this.mTextColor = textColor;
        mPaint.setColor(mTextColor);
        return this;
    }

    public SingleScrollNumberView setTextSize(int textSize) {
        this.mTextSize = textSize;
        mPaint.setTextSize(mTextSize * scale);
        return this;
    }

    public SingleScrollNumberView setTextPadding(int padding) {
        this.textPadding = padding;
        setPadding(textPadding, textPadding, textPadding, textPadding);
        return this;
    }

    @Override
    protected void onMeasure(int widthMeasureSpec, int heightMeasureSpec) {

        int widthMode = MeasureSpec.getMode(widthMeasureSpec);
        int heightMode = MeasureSpec.getMode(heightMeasureSpec);

        int width = MeasureSpec.getSize(widthMeasureSpec);
        int height = MeasureSpec.getSize(heightMeasureSpec);

        if (widthMode == MeasureSpec.AT_MOST) {
            Rect bounds = new Rect();
            mPaint.getTextBounds(mText, 0, mText.length(), bounds);
            textOutWidth = bounds.width();
            width = bounds.width() + getPaddingLeft() + getPaddingRight();

        }
        if (heightMode == MeasureSpec.AT_MOST) {
            Rect bounds = new Rect();
            mPaint.getTextBounds(mText, 0, mText.length(), bounds);
            textOutHeight = bounds.height();
            height = textOutHeight + getPaddingTop() + getPaddingBottom();
        }
        //设置宽高
        setMeasuredDimension(width, height);
    }

    @Override
    protected void onDraw(Canvas canvas) {
        super.onDraw(canvas);
        if (TextUtils.isEmpty(mText)) return;
        if (mText.length() > 1) return;
        if (!BASE_NUMBER.contains(mText)) return;

        //保持垂直方向居中
        //getPaddingLeft() + (textOutWidth - textInnerWidth) / 2 保持水平方向居中
        mPaint.setTextSize(mTextSize);
        Paint.FontMetricsInt fontMetrics = mPaint.getFontMetricsInt();
        int dy = (fontMetrics.bottom - fontMetrics.top) / 2 - fontMetrics.bottom;
        int baseLine = getHeight() / 2 + dy;

        for (int i = 0; i <= NumberUtils.toInt(mText); i++) {
            mPaint.setTextSize(mTextSize);
            Rect innerBounds = new Rect();
            mPaint.getTextBounds(mText, 0, mText.length(), innerBounds);
            textInnerWidth = innerBounds.width();
            canvas.drawText(String.valueOf(i), getPaddingLeft() + (textOutWidth - textInnerWidth) / 2, baseLine + i * textOutHeight - scrollY, mPaint);
        }
    }


    private void animateView() {
        this.postDelayed(new Runnable() {
            @Override
            public void run() {
                //最大数字出现后,就要停下来。还要停稳,不然多几个数字,就会出现高低不平了。
                if (scrollY >= textOutHeight * NumberUtils.toInt(mText)) {
                    scrollY = textOutHeight * NumberUtils.toInt(mText);
                    SingleScrollNumberView.this.postInvalidate();
                    return;
                }
                scrollY += textOutHeight / 4;
                SingleScrollNumberView.this.postInvalidate();
                animateView();

            }
        }, 8);
    }

    public void start() {
        scrollY = 0;
        animateView();
    }


}
单个的view可以跑一下,看看实现没。接下来串起来。
/**
 * Created by chenxiangxiang on 2019/5/17.
 *
 * @author shoneworn
 * @只想支持数字。
 */

public class DanceNumberView extends LinearLayout {

    private String text;
    private int textColor;
    private int textSize;
    private float textPadding;  //文字间距

    private List<SingleScrollNumberView> list = new ArrayList<>();


    public DanceNumberView(Context context) {
        this(context, null);
    }

    public DanceNumberView(Context context, @Nullable AttributeSet attrs) {
        this(context, attrs, 0);
    }

    public DanceNumberView(Context context, @Nullable AttributeSet attrs, int defStyleAttr) {
        super(context, attrs, defStyleAttr);
        TypedArray typedArray = context.obtainStyledAttributes(attrs, R.styleable.scrollNumber);
        initAttributesData(typedArray);
        this.setOrientation(HORIZONTAL);
        this.setGravity(Gravity.CENTER);
    }

    public void createView() {
        if (TextUtils.isEmpty(text)) return;
        char[] chars = String.valueOf(NumberUtils.toInt(text)).toCharArray();
        for (int i = 0; i < chars.length; i++) {
            SingleScrollNumberView scrollNumber = new SingleScrollNumberView(getContext());
            scrollNumber.setTextColor(textColor);
            scrollNumber.setTextSize(textSize);
            scrollNumber.setText(String.valueOf(chars[i]));
            addView(scrollNumber);
            list.add(scrollNumber);
        }
    }

    public void start() {
        if (Utils.isEmpty(list)) return;
        for (SingleScrollNumberView view : list) {
            view.start();
        }
    }

    private void initAttributesData(TypedArray typedArray) {
        textColor = typedArray.getColor(R.styleable.scrollNumber_textColor, Color.BLACK);
        textSize = (int) typedArray.getDimension(R.styleable.scrollNumber_textSize, 16);
        text = typedArray.getString(R.styleable.scrollNumber_text);
        textPadding = typedArray.getDimension(R.styleable.scrollNumber_textPadding, 5);

    }


}
这就成了。so easy!
接下来就是使用了
自定义属性别忘记了 scroll_number_attrs.xml
<?xml version="1.0" encoding="utf-8"?>
<resources>
    <declare-styleable name="scrollNumber">
        <attr name="text" format="string" />
        <attr name="textSize" format="dimension" />
        <attr name="textColor" format="color" />
        <attr name="textPadding" format="dimension" />
    </declare-styleable>
</resources>
使用,使用,使用
 <com.shoneworn.supermvp.common.widget.DanceNumberView
        android:id="@+id/dnView"
        android:layout_width="wrap_content"
        android:layout_height="wrap_content"
        android:background="#666666"
        app:text="33891856"
        app:textColor="#ffffff"
        app:textPadding="2dp"
        app:textSize="16sp" />
在activity里或者fragment里使用
  dnView.createView();
  dnView.start();
结束了。最近越来越懒了


 559
559


 被折叠的 条评论
为什么被折叠?
被折叠的 条评论
为什么被折叠?
 到【灌水乐园】发言


