


前言
前一篇文章讲解了在自定义对话框中加入属性动画。
但是有个小小缺憾,小飞机没有从屏幕边缘飞出,仅仅是在对话框的边缘消失。
那如何解决这个小问题呢?这是本篇要说明的重点。
其实,不复杂,只要在上篇对话框布局的基础上做一点改动。可见的区域还是那么大,其他部分只不过是半透明。飞机就可以飞出屏幕了。
目标
这篇blog解决上篇遇到的问题: “假如让这个曲线动画沿着自定义对话框的最上侧往上飞出屏幕或是往下飞出屏幕,该如何实现?”
图形分析
上篇的坐标系参考下图
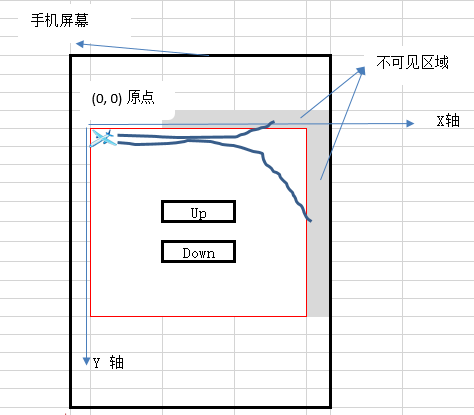
说明:
图中的原点(0,0)取的是相对坐标,而不是手机最左上角开始。
而是从对话框的最左上角开始的,然后沿着x轴飞上或飞下。
那回到这篇,我们的坐标系需要变化下, 如下图:
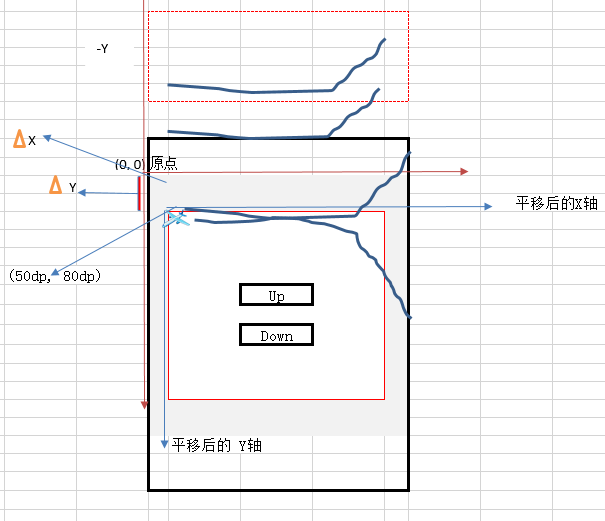
说明:
这个是在上图的基础上,将X轴,Y轴分别往上,往左移动。两图相比,确实是可以这么理解。
但是为了分析这个问题, 还是需要依照图中的标记来说明。
因为对话框的布局撑满了屏幕宽度,背景使用白色,然后在可见区域还是之前的白色图片。
原点(0,0)是在外框的左上角,小飞机的坐标是(50dp, 80dp) 也就是图中的deltaX, deltaY值。
其中需要注意的是从原点(0,0)平移到原点(50dp, 80dp)后,要达到小飞机还是沿着y=80dp这条x轴线跑动往上飞,
需要将 -y值 + 2 * deltaY。
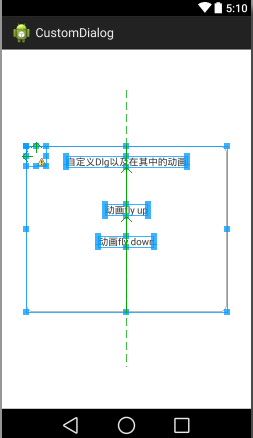
关键点
布局示意图
布局文件 layout.dlg_custom_dialog_fullscreen_anim
<RelativeLayout xmlns:android="http://schemas.android.com/apk/res/android"
    android:id="@+id/rl_dlg_container1"
    android:layout_width="fill_parent"
    android:layout_height="400dp"
    android:layout_centerInParent="true"
    android:layout_gravity="center" >

    <RelativeLayout
        android:id="@+id/rl_dlg_container"
        android:layout_width="wrap_content"
        android:layout_height="240dp"
        android:layout_centerInParent="true"
        android:layout_gravity="center"
        android:background="@drawable/bg_dialog" >

        <TextView
            android:id="@+id/tv_dlg_title"
            android:layout_width="wrap_content"
            android:layout_height="wrap_content"
            android:layout_centerHorizontal="true"
            android:layout_marginTop="15dp"
            android:clickable="true"
            android:text="@string/tv_dlg_title" />

        <TextView
            android:id="@+id/tv_dlg_flyup"
            android:layout_width="wrap_content"
            android:layout_height="wrap_content"
            android:layout_below="@+id/tv_dlg_title"
            android:layout_centerHorizontal="true"
            android:layout_marginTop="53dp"
            android:clickable="true"
            android:text="@string/tv_fly_up" />

        <TextView
            android:id="@+id/tv_dlg_flydown"
            android:layout_width="wrap_content"
            android:layout_height="wrap_content"
            android:layout_below="@+id/tv_dlg_flyup"
            android:layout_centerHorizontal="true"
            android:layout_marginTop="29dp"
            android:clickable="true"
            android:text="@string/tv_fly_down" />
    </RelativeLayout>

    <ImageView
        android:id="@+id/iv_small_plane"
        android:layout_width="30dp"
        android:layout_height="30dp"
        android:layout_alignLeft="@id/rl_dlg_container"
        android:layout_alignTop="@id/rl_dlg_container"
        android:background="@drawable/plane"
        android:visibility="invisible"/>

</RelativeLayout>
对话框宽度充满屏幕
DisplayMetrics metrics = mContext.getResources().getDisplayMetrics();

customDialog.getWindow().getAttributes().width = metrics.widthPixels;
坐标转换
// 坐标系x,y 转换
plane_start_x = Utils.dip2px(mContext,PLANE_START_POINTF_X);
plane_start_y = Utils.dip2px(mContext,PLANE_START_POINTF_Y);
全屏动画时初始化贝塞尔的起点p0, p2
        // full screen anim
        valueAnimator = ValueAnimator.ofObject(new PlaneEvaluator(type),
                new PointF(plane_start_x, plane_start_y), new PointF(width
                        + plane_start_x, height + plane_start_y));
        // full screen anim end
PointF evaluate 中的变化
// full screen anim
/*
 * if (this.type == 0) {// up point1.set(width_up, 0); } else {//
 * down point1.set(width_down, 0); }
 */

if (this.type == 0) {// up
    point1.set(width_up + plane_start_x, plane_start_y);
} else {// down
    point1.set(width_down + plane_start_x, plane_start_y);
}

point.x = oneMinusT * oneMinusT * (point0.x) + 2 * oneMinusT * t
        * (point1.x) + t * t * (point2.x);
point.y = oneMinusT * oneMinusT * (point0.y) + 2 * oneMinusT * t
        * (point1.y) + t * t * (point2.y);

/*
 * if (this.type == 0) { point.y = -point.y; }
 */
if (this.type == 0) {// y值反向, 坐标系移位后,y值 * 2
    point.y = -point.y + plane_start_y * 2;
}
// full screen anim end
小结
结合2篇blog,要实现能在各种屏幕下使用的曲线的属性动画,需要如下几个步骤:
1)对应的布局文件以及view
2)屏幕适应的长宽,需要调整最优的数字dp单位
3)实现属性动画的 TypeEvaluator
4)定义ValueAnimator valueAnimator; 然后使用类是的方式初始化:
ValueAnimator.ofObject(new PlaneEvaluator(type),
new PointF(plane_start_x, plane_start_y), new PointF(width+ plane_start_x, height + plane_start_y));
5)设置特定的动画时间valueAnimator.setDuration(2000);
动画的addUpdateListener,
valueAnimator.addListener(new AnimatorListenerAdapter()
6) 以及动画的目标,重复次数,模式
valueAnimator.setTarget(mIvPlane);
valueAnimator.setRepeatCount(1);
valueAnimator.setRepeatMode(ValueAnimator.REVERSE);
7)valueAnimator.start();


 3875
3875


 被折叠的 条评论
为什么被折叠?
被折叠的 条评论
为什么被折叠?
 到【灌水乐园】发言


