


作者:马顺华
从事运维管理工作多年,目前就职于某科技有限公司,熟悉运维自动化、OceanBase部署运维、MySQL 运维以及各种云平台技术和产品。并已获得OceanBase认证OBCA、OBCP 证书、OpenGauss社区认证结业证书、崖山DBCA证书、亚信AntDBCA证书、翰高HDCA认证、GBase 8a|GBase 8c 证书。OceanBase & 墨天轮第二、三、四届技术征文大赛,多次获得 一、二、三 等奖,在openGauss 第五届、第六届技术征文大赛中多次获奖。时常在墨天轮发布原创技术文章,并多次被首页推荐。
随着TiDB社区的蓬勃发展,TiDB社区迎来了第三届专栏征文大赛。本次大赛旨在分享TiDB的最新应用、技术实践及创新思路。本次实验将围绕“TiDB在单机上模拟部署生产环境集群”这一主题,分享我在此过程中的探索与实践。

一、引言
TiDB是一个开源的分布式关系型数据库,具备高性能、可扩展、兼容MySQL协议等特性,广泛应用于各种业务场景。然而,在实际的生产环境中,TiDB的部署和运维往往面临着诸多挑战。为了更好地模拟和验证TiDB在生产环境的表现,本文将在单机上模拟部署TiDB 8.0生产环境集群,在单机上模拟部署生产环境集群,有助于我们更好地了解TiDB集群的搭建过程、组件间的交互以及性能调优等方面。此外,通过模拟生产环境,我们可以提前发现并解决可能存在的问题,为真正的生产环境部署做好准备。
以下是参考官网 TiDB 8.0 新特性清晰归纳如下:
1、可扩展性与性能
PD(Placement Driver)微服务化:支持拆分PD为微服务,提升集群的可扩展性。(实验特性)
批量DML执行方式:引入新的DML类型,用于高效处理大批量DML任务。(实验特性)
BR快照恢复速度提升:通过充分利用集群规模优势,显著提升大规模集群中大数据集的恢复速度。
schema信息缓存稳定性增强:引入新的schema缓存系统和优先队列配置,提高多租户应用的稳定性。
2、数据库管理与可观测性
索引使用观测:支持通过新引入的系统表和视图记录索引的使用情况,帮助用户优化索引设计。
表默认值表达式支持:支持在TiDB建表时使用更多的表达式设置列的默认值。(实验特性)
自动统计信息收集优化:引入优先级队列的概念,优先收集健康度较低的表。
3、数据迁移
TiCDC协议支持:支持Simple协议和Debezium协议,实现对schema信息的动态追踪。
4、高可用
TiProxy代理组件:TiProxy代理组件GA,并已集成到TiUP中。
5、SQL功能
除法运算结果精度控制:支持系统变量div_precision_increment,用于指定除法运算结果增加的小数位数。
PITR与S3对象锁定:PITR支持Amazon S3对象锁定,提升数据安全性和完整性。
不可见索引:支持会话级别使用不可见索引,而不影响其他会话。
日志管理:支持general日志写入独立文件,并支持将历史日志以gzip格式压缩。
6、安全性
TiKV静态加密:TiKV支持静态加密,提升数据安全。
7、版本更新与支持
常规版本更新:针对LTS版本,PingCAP提供最多至3年的常规版本更新服务。
额外支持服务:在常规版本维护周期结束后,PingCAP提供1年的额外支持服务,专注于严重级别的安全漏洞修复。
这些新特性不仅增强了TiDB 8.0的性能、可扩展性和安全性,同时也提高了数据库管理和可观测性的能力,为用户提供了更加灵活、可靠和高效的数据库解决方案。
二、部署过程概述
1、环境准备:
首先,我确保了我的服务器满足TiDB的硬件要求,并安装了必要的软件和工具。同时,我关闭了防火墙或开放了TiDB集群所需的端口。
2、安装TiUP工具:
TiUP是TiDB官方提供的一键式部署工具,我按照官方文档的指引成功安装了TiUP。
3、初始化集群配置:
我使用TiUP工具初始化了集群配置,包括设置集群名称、版本、拓扑结构等信息。在单机上模拟生产环境集群时,我配置了多个TiDB实例以形成一个伪分布式集群。
4、部署TiDB集群:
通过TiUP工具,我执行了部署命令并成功搭建了TiDB集群。在部署过程中,我遵循了官方文档的指引,并根据提示进行了相应的操作。
5、验证集群状态:
部署完成后,我使用TiDB客户端工具登录到TiDB实例,并执行了简单的SQL语句来验证集群的读写功能是否正常。同时,我也通过TiUP工具查看了集群的状态信息,确保所有组件均正常运行。
三、初始化集群配置
1、准备环境
在单机上模拟部署生产环境集群
适用场景:希望用单台 Linux 服务器,体验 TiDB 最小的完整拓扑的集群,并模拟生产环境下的部署步骤。
本节介绍如何参照 TiUP 最小拓扑的一个 YAML 文件部署 TiDB 集群。
在开始部署之前,我们需要准备一台满足要求的服务器。考虑到TiDB的硬件需求,建议选择一台配置较高的服务器,如8核16G内存以上的服务器。同时,确保服务器操作系统为CentOS 7.6及以上版本,并关闭防火墙或开放TiDB集群所需的端口。
1.1 下载并安装 TiUP
注意: 下表中拓扑实例的 IP 为示例 IP。在实际部署时,请替换为实际的 IP。
| 实例 | 个数 | 实验IP | 配置 |
|---|---|---|---|
| TIDB version | 1 | 172.22.2.122 | TiDB v8.0 (DMR) |
| TiKV | 3 | 172.22.2.122、172.22.2.122、172.22.2.122 | 避免端口和目录冲突 |
| TiDB | 1 | 172.22.2.122 | 默认端口 全局目录配置 |
| PD | 1 | 172.22.2.122 | 默认端口 全局目录配置 |
| TiFlash | 1 | 172.22.2.122 | 默认端口 全局目录配置 |
| Monitor | 1 | 172.22.2.122 | 默认端口 全局目录配置 |
| deploy_dir | 1 | 172.22.2.122 | /data/tidb-deploy |
| data_dir | 1 | 172.22.2.122 | /data/tidb-data |
| OS | 1 | 172.22.2.122 | CentOS 7.4 |
| CPU | 1 | 172.22.2.122 | 8 Intel® Xeon® |
| Mem | 1 | 172.22.2.122 | 32G |
1.2 部署主机软件和环境要求如下:
开始部署 TiDB 集群前,准备一台部署主机,确保其软件满足需求:
[root@worker2 ~]#
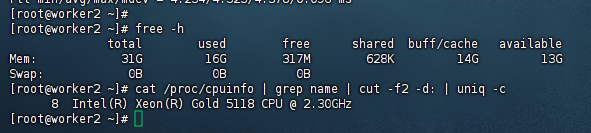
[root@worker2 ~]# free -h
total used free shared buff/cache available
Mem: 31G 16G 317M 628K 14G 13G
Swap: 0B 0B 0B
[root@worker2 ~]# cat /proc/cpuinfo | grep name | cut -f2 -d: | uniq -c
8 Intel(R) Xeon(R) Gold 5118 CPU @ 2.30GHz
[root@worker2 ~]#
1.3 部署系统
部署需要使用部署主机的 root 用户及密码
推荐安装 CentOS 7.3 及以上版本
运行环境可以支持互联网访问,用于下载 TiDB 及相关软件安装包
最小规模的 TiDB 集群拓扑包含以下实例:
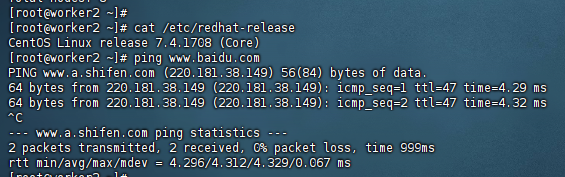
[root@worker2 ~]# cat /etc/redhat-release
CentOS Linux release 7.4.1708 (Core)
[root@worker2 ~]# ping www.baidu.com
PING www.a.shifen.com (220.181.38.149) 56(84) bytes of data.
64 bytes from 220.181.38.149 (220.181.38.149): icmp_seq=1 ttl=47 time=4.29 ms
64 bytes from 220.181.38.149 (220.181.38.149): icmp_seq=2 ttl=47 time=4.32 ms
^C
--- www.a.shifen.com ping statistics ---
2 packets transmitted, 2 received, 0% packet loss, time 999ms
rtt min/avg/max/mdev = 4.296/4.312/4.329/0.067 ms
[root@worker2 ~]#
1.4 部署主机关闭防火墙
部署主机关闭防火墙或者开放 TiDB 集群的节点间所需端口
[root@worker2 ~]#
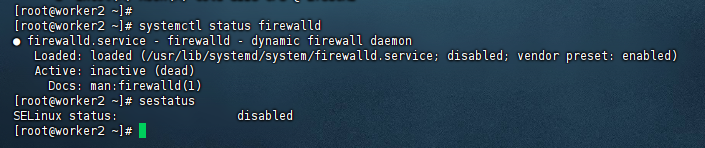
[root@worker2 ~]# systemctl status firewalld
● firewalld.service - firewalld - dynamic firewall daemon
Loaded: loaded (/usr/lib/systemd/system/firewalld.service; disabled; vendor preset: enabled)
Active: inactive (dead)
Docs: man:firewalld(1)
[root@worker2 ~]# sestatus
SELinux status: disabled
[root@worker2 ~]#
2、下载并安装 TiUP
支持互联网访问下载并安装 TiUP:
curl --proto ‘=https’ --tlsv1.2 -sSf https://tiup-mirrors.pingcap.com/install.sh | sh
[root@worker2 tidb]# curl --proto '=https' --tlsv1.2 -sSf https://tiup-mirrors.pingcap.com/install.sh | sh
  % Total    % Received % Xferd  Average Speed   Time    Time     Time  Current
                                 Dload  Upload   Total   Spent    Left  Speed
100 5152k  100 5152k    0     0  13.4M      0 --:--:-- --:--:-- --:--:-- 13.4M
Successfully set mirror to https://tiup-mirrors.pingcap.com
Detected shell: bash
Shell profile:  /root/.bash_profile
Installed path: /root/.tiup/bin/tiup
===============================================
Have a try:     tiup playground
===============================================
[root@worker2 tidb]#

3、声明全局环境变量:
注意
TiUP 安装完成后会提示对应 Shell profile 文件的绝对路径。在执行以下 source 命令前,需要将 ${your_shell_profile} 修改为 Shell profile 文件的实际位置。
source ${your_shell_profile}
[root@worker2 ~]#
[root@worker2 ~]# source /root/.bash_profile
[root@worker2 ~]#

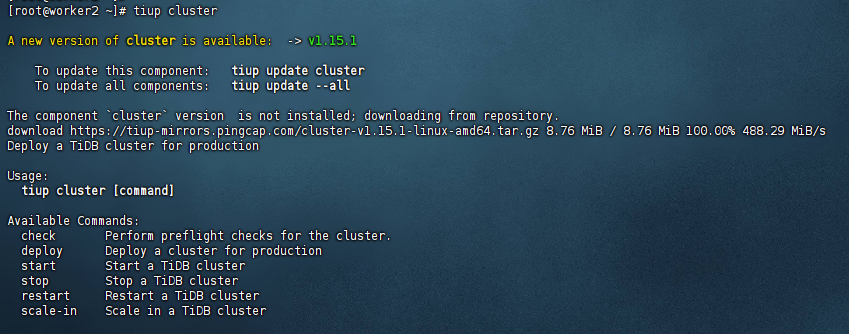
4、安装 TiUP 的 cluster 组件:
tiup cluster
[root@worker2 ~]# tiup cluster

A new version of cluster is available:  -> v1.15.1

    To update this component:   tiup update cluster
    To update all components:   tiup update --all

The component `cluster` version  is not installed; downloading from repository.
download https://tiup-mirrors.pingcap.com/cluster-v1.15.1-linux-amd64.tar.gz 8.76 MiB / 8.76 MiB 100.00% 488.29 MiB/s
Deploy a TiDB cluster for production

Usage:
  tiup cluster [command]

Available Commands:
  check       Perform preflight checks for the cluster.
  deploy      Deploy a cluster for production
  start       Start a TiDB cluster
  stop        Stop a TiDB cluster
  restart     Restart a TiDB cluster
  scale-in    Scale in a TiDB cluster
  scale-out   Scale out a TiDB cluster
  destroy     Destroy a specified cluster
  clean       (EXPERIMENTAL) Cleanup a specified cluster
  upgrade     Upgrade a specified TiDB cluster
  display     Display information of a TiDB cluster
  prune       Destroy and remove instances that is in tombstone state
  list        List all clusters
  audit       Show audit log of cluster operation
  import      Import an exist TiDB cluster from TiDB-Ansible
  edit-config Edit TiDB cluster config
  show-config Show TiDB cluster config
  reload      Reload a TiDB cluster's config and restart if needed
  patch       Replace the remote package with a specified package and restart the service
  rename      Rename the cluster
  enable      Enable a TiDB cluster automatically at boot
  disable     Disable automatic enabling of TiDB clusters at boot
  replay      Replay previous operation and skip successed steps
  template    Print topology template
  tls         Enable/Disable TLS between TiDB components
  meta        backup/restore meta information
  rotatessh   rotate ssh keys on all nodes
  help        Help about any command
  completion  Generate the autocompletion script for the specified shell

Flags:
  -c, --concurrency int     max number of parallel tasks allowed (default 5)
      --format string       (EXPERIMENTAL) The format of output, available values are [default, json] (default "default")
  -h, --help                help for tiup
      --ssh string          (EXPERIMENTAL) The executor type: 'builtin', 'system', 'none'.
      --ssh-timeout uint    Timeout in seconds to connect host via SSH, ignored for operations that don't need an SSH connection. (default 5)
  -v, --version             version for tiup
      --wait-timeout uint   Timeout in seconds to wait for an operation to complete, ignored for operations that don't fit. (default 120)
  -y, --yes                 Skip all confirmations and assumes 'yes'

Use "tiup cluster help [command]" for more information about a command.
如果机器已经安装 TiUP cluster,需要更新软件版本:
tiup update --self && tiup update cluster
5、设置服务连接数限制
由于模拟多机部署,需要通过 root 用户调大 sshd 服务的连接数限制:
修改 /etc/ssh/sshd_config 将 MaxSessions 调至 20。
[root@worker2 ~]# vim /etc/ssh/sshd_config
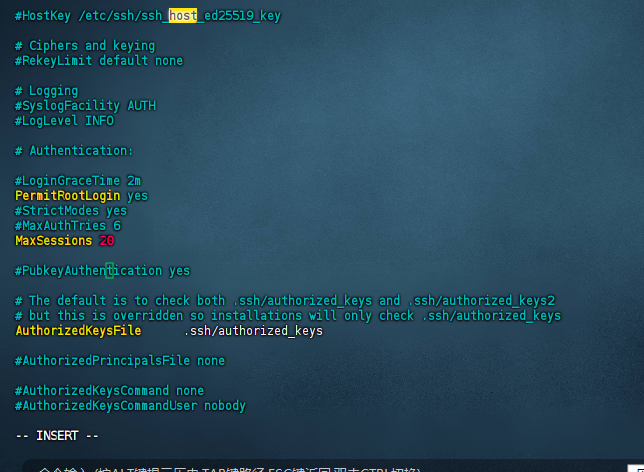
重启 sshd 服务:
service sshd restart
[root@worker2 ~]# vim /etc/ssh/sshd_config
[root@worker2 ~]# service sshd restart
Restarting sshd (via systemctl):                           [  OK  ]
[root@worker2 ~]#

四、部署TiDB集群
通过TiUP工具执行部署命令,开始搭建TiDB集群。在部署过程中,TiUP会自动下载所需的软件安装包并进行配置。我们只需按照提示进行操作即可。
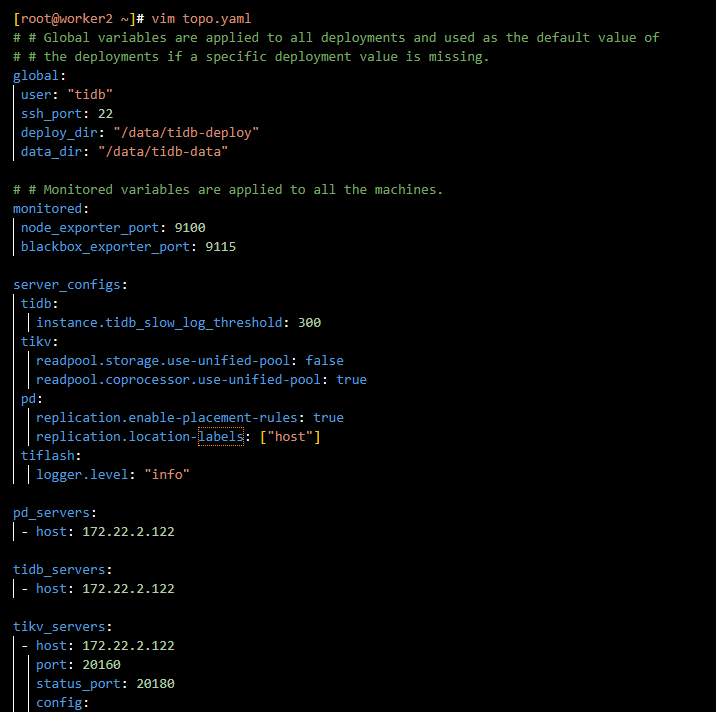
1、创建并启动集群
按下面的配置模板,编辑配置文件,命名为 topo.yaml
其中:
user: “tidb”:表示通过 tidb 系统用户(部署会自动创建)来做集群的内部管理,默认使用 22 端口通过 ssh 登录目标机器
replication.enable-placement-rules:设置这个 PD 参数来确保 TiFlash 正常运行
host:设置为本部署主机的 IP
配置模板如下:
[root@worker2 ~]# vim topo.yaml
# # Global variables are applied to all deployments and used as the default value of
# # the deployments if a specific deployment value is missing.
global:
 user: "tidb"
 ssh_port: 22
 deploy_dir: "/data/tidb-deploy"
 data_dir: "/data/tidb-data"

# # Monitored variables are applied to all the machines.
monitored:
 node_exporter_port: 9100
 blackbox_exporter_port: 9115

server_configs:
 tidb:
   instance.tidb_slow_log_threshold: 300
 tikv:
   readpool.storage.use-unified-pool: false
   readpool.coprocessor.use-unified-pool: true
 pd:
   replication.enable-placement-rules: true
   replication.location-labels: ["host"]
 tiflash:
   logger.level: "info"

pd_servers:
 - host: 172.22.2.122

tidb_servers:
 - host: 172.22.2.122

tikv_servers:
 - host: 172.22.2.122
   port: 20160
   status_port: 20180
   config:
     server.labels: { host: "logic-host-1" }

 - host: 172.22.2.122
   port: 20161
   status_port: 20181
   config:
     server.labels: { host: "logic-host-2" }

 - host: 172.22.2.122
   port: 20162
   status_port: 20182
   config:
     server.labels: { host: "logic-host-3" }

tiflash_servers:
 - host: 172.22.2.122

monitoring_servers:
 - host: 172.22.2.122

grafana_servers:
 - host: 172.22.2.122
2、执行集群部署命令:
tiup cluster deploy tidb666 v8.0.0 ./topo.yaml --user root -p
[root@worker2 ~]# tiup cluster deploy tidb666 v8.0.0 ./topo.yaml --user root -p
Checking updates for component cluster... Timedout (after 2s)
Input SSH password:

+ Detect CPU Arch Name
  - Detecting node 172.22.2.122 Arch info ... Done

+ Detect CPU OS Name
  - Detecting node 172.22.2.122 OS info ... Done
Please confirm your topology:
Cluster type:    tidb
Cluster name:    tidb666
Cluster version: v8.0.0
Role        Host          Ports                            OS/Arch       Directories
----        ----          -----                            -------       -----------
pd          172.22.2.122  2379/2380                        linux/x86_64  /tidb-deploy/pd-2379,/tidb-data/pd-2379
tikv        172.22.2.122  20160/20180                      linux/x86_64  /tidb-deploy/tikv-20160,/tidb-data/tikv-20160
tikv        172.22.2.122  20161/20181                      linux/x86_64  /tidb-deploy/tikv-20161,/tidb-data/tikv-20161
tikv        172.22.2.122  20162/20182                      linux/x86_64  /tidb-deploy/tikv-20162,/tidb-data/tikv-20162
tidb        172.22.2.122  4000/10080                       linux/x86_64  /tidb-deploy/tidb-4000
tiflash     172.22.2.122  9000/8123/3930/20170/20292/8234  linux/x86_64  /tidb-deploy/tiflash-9000,/tidb-data/tiflash-9000
prometheus  172.22.2.122  9090/12020                       linux/x86_64  /tidb-deploy/prometheus-9090,/tidb-data/prometheus-9090
grafana     172.22.2.122  3000                             linux/x86_64  /tidb-deploy/grafana-3000
Attention:
    1. If the topology is not what you expected, check your yaml file.
    2. Please confirm there is no port/directory conflicts in same host.
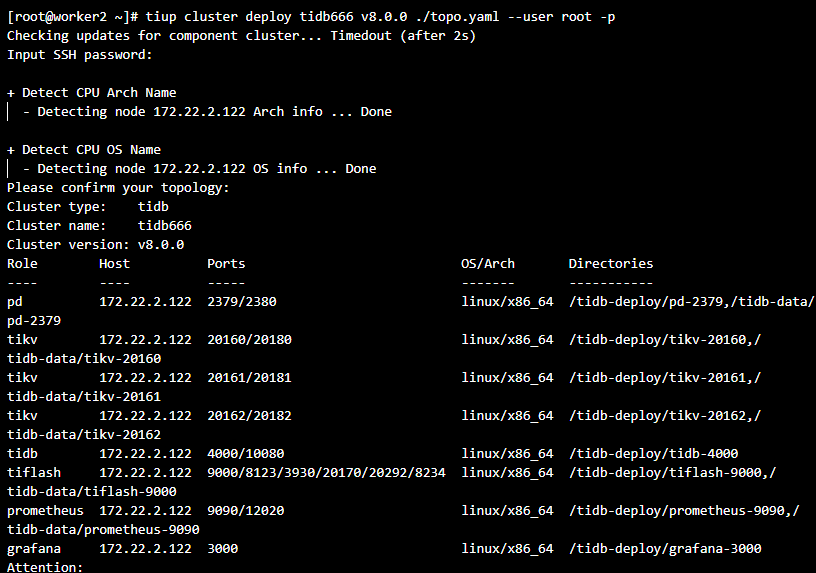
参数 tidb666 表示设置集群名称
参数 v8.0.0 表示设置集群版本。可以通过 tiup list tidb 命令来查看当前支持部署的 TiDB 版本
参数 -p 表示在连接目标机器时使用密码登录
注意
如果主机通过密钥进行 SSH 认证,请使用 -i 参数指定密钥文件路径,-i 与 -p 不可同时使用。
按照引导,输入”y”及 root 密码,来完成部署:
Do you want to continue? [y/N]:  y
Input SSH password:
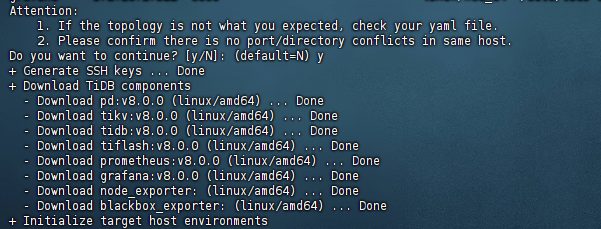
此处执行安装报错
+ Deploy TiDB instance
  - Copy pd -> 172.22.2.122 ... Error
  - Copy tikv -> 172.22.2.122 ... Error
  - Copy tikv -> 172.22.2.122 ... Error
  - Copy tikv -> 172.22.2.122 ... Error
  - Copy tidb -> 172.22.2.122 ... Error
  - Copy tiflash -> 172.22.2.122 ... Error
  - Copy prometheus -> 172.22.2.122 ... Error
  - Copy grafana -> 172.22.2.122 ... Error
  - Deploy node_exporter -> 172.22.2.122 ... Error
  - Deploy blackbox_exporter -> 172.22.2.122 ... Error

Error: executor.ssh.execute_failed: Failed to execute command over SSH for 'tidb@172.22.2.122:22' {ssh_stderr: , ssh_stdout: , ssh_command: export LANG=C; PATH=$PATH:/bin:/sbin:/usr/bin:/usr/sbin; /usr/bin/sudo -H bash -c "test -d /data || (mkdir -p /data && chown tidb:$(id -g -n tidb) /data)"}, cause: ssh: handshake failed: ssh: unable to authenticate, attempted methods [none publickey], no supported methods remain

Verbose debug logs has been written to /root/.tiup/logs/tiup-cluster-debug-2024-05-24-18-28-07.log.

解决办法手动配置 SSH 互信及 sudo 免密码
对于有需求,通过手动配置中控机至目标节点互信的场景,可参考本段。通常推荐使用 TiUP 部署工具会自动配置 SSH 互信及免密登录,可忽略本段内容。
01. 以 root 用户依次登录到部署目标机器创建 tidb 用户并设置登录密码。
useradd tidb && passwd tidb
[root@worker2 tidb]# useradd tidb && passwd tidb
Changing password for user tidb.
New password:
Retype new password:
passwd: all authentication tokens updated successfully.
[root@worker2 tidb]#

02. 执行以下命令,将 tidb ALL=(ALL) NOPASSWD: ALL 添加到文件末尾,即配置好 sudo 免密码。
[root@worker2 tidb]# vim /etc/sudoers
visudo
tidb ALL=(ALL) NOPASSWD: ALL

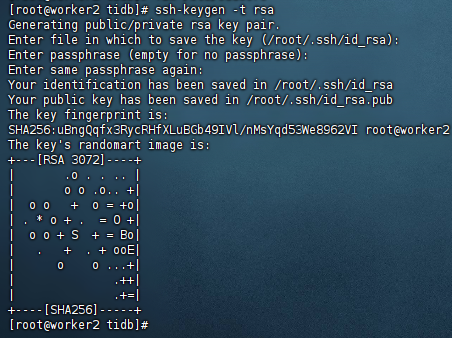
03. 以 tidb 用户登录到中控机,执行以下命令。
将 172.22.2.122 替换成你的部署目标机器 IP,按提示输入部署目标机器 tidb 用户密码,执行成功后即创建好 SSH 互信,其他机器同理。新建的 tidb 用户下没有 .ssh 目录,需要执行生成 rsa 密钥的命令来生成 .ssh 目录。如果要在中控机上部署 TiDB 组件,需要为中控机和中控机自身配置互信。
ssh-keygen -t rsa
ssh-copy-id -i ~/.ssh/id_rsa.pub 172.22.2.122
[root@worker2 tidb]# ssh-keygen -t rsa
Generating public/private rsa key pair.
Enter file in which to save the key (/root/.ssh/id_rsa):
Enter passphrase (empty for no passphrase):
Enter same passphrase again:
Your identification has been saved in /root/.ssh/id_rsa
Your public key has been saved in /root/.ssh/id_rsa.pub
The key fingerprint is:
SHA256:uBngQqfx3RycRHfXLuBGb49IVl/nMsYqd53We8962VI root@worker2
The key's randomart image is:
+---[RSA 3072]----+
|       .o . . .. |
|       o o .o.. +|
|  o o   +  o = +o|
| . * o + .  = O +|
|  o o + S  + = Bo|
|   .   +  . + ooE|
|      o    o ...+|
|              .++|
|              .+=|
+----[SHA256]-----+
[root@worker2 tidb]#
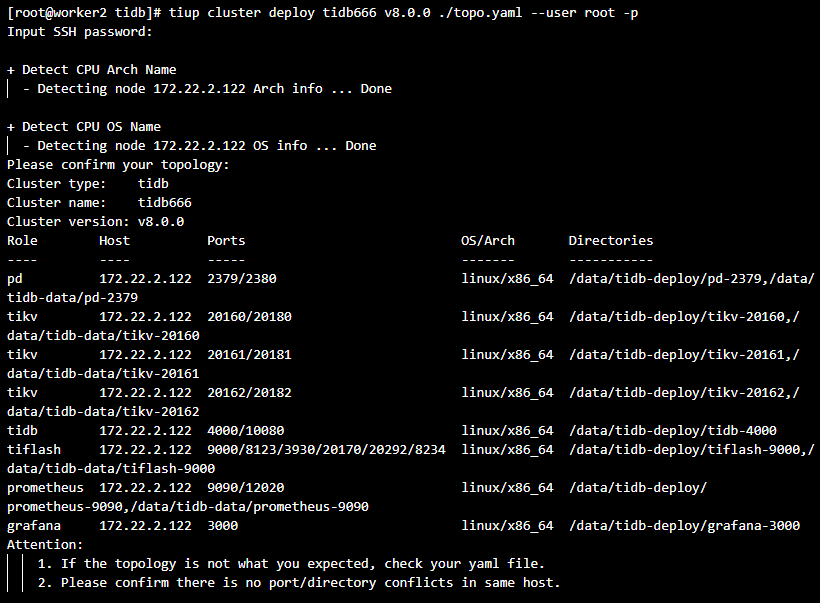
3、再次 执行集群部署命令:
tiup cluster deploy tidb666 v8.0.0 ./topo.yaml --user root -p
[root@worker2 tidb]# tiup cluster deploy tidb666 v8.0.0 ./topo.yaml --user root -p
Input SSH password:

+ Detect CPU Arch Name
  - Detecting node 172.22.2.122 Arch info ... Done

+ Detect CPU OS Name
  - Detecting node 172.22.2.122 OS info ... Done
Please confirm your topology:
Cluster type:    tidb
Cluster name:    tidb666
Cluster version: v8.0.0
Role        Host          Ports                            OS/Arch       Directories
----        ----          -----                            -------       -----------
pd          172.22.2.122  2379/2380                        linux/x86_64  /data/tidb-deploy/pd-2379,/data/tidb-data/pd-2379
tikv        172.22.2.122  20160/20180                      linux/x86_64  /data/tidb-deploy/tikv-20160,/data/tidb-data/tikv-20160
tikv        172.22.2.122  20161/20181                      linux/x86_64  /data/tidb-deploy/tikv-20161,/data/tidb-data/tikv-20161
tikv        172.22.2.122  20162/20182                      linux/x86_64  /data/tidb-deploy/tikv-20162,/data/tidb-data/tikv-20162
tidb        172.22.2.122  4000/10080                       linux/x86_64  /data/tidb-deploy/tidb-4000
tiflash     172.22.2.122  9000/8123/3930/20170/20292/8234  linux/x86_64  /data/tidb-deploy/tiflash-9000,/data/tidb-data/tiflash-9000
prometheus  172.22.2.122  9090/12020                       linux/x86_64  /data/tidb-deploy/prometheus-9090,/data/tidb-data/prometheus-9090
grafana     172.22.2.122  3000                             linux/x86_64  /data/tidb-deploy/grafana-3000
Attention:
    1. If the topology is not what you expected, check your yaml file.
    2. Please confirm there is no port/directory conflicts in same host.
Cluster `tidb666` deployed successfully, you can start it with command: `tiup cluster start tidb666 --init`
部署完成了
五、验证集群状态
部署完成后,我们需要验证TiDB集群的状态是否正常。可以使用TiDB客户端工具登录到TiDB实例,并执行一些简单的SQL语句来验证集群的读写功能是否正常。同时,我们还可以通过TiUP工具查看集群的状态信息,确保所有组件均正常运行。
1、启动集群:
tiup cluster start tidb666
[root@worker2 tidb]# tiup cluster start tidb666
Checking updates for component cluster... Timedout (after 2s)
Starting cluster tidb666...
+ [ Serial ] - SSHKeySet: privateKey=/root/.tiup/storage/cluster/clusters/tidb666/ssh/id_rsa, publicKey=/root/.tiup/storage/cluster/clusters/tidb666/ssh/id_rsa.pub
+ [Parallel] - UserSSH: user=tidb, host=172.22.2.122
+ [Parallel] - UserSSH: user=tidb, host=172.22.2.122
+ [Parallel] - UserSSH: user=tidb, host=172.22.2.122
+ [Parallel] - UserSSH: user=tidb, host=172.22.2.122
+ [Parallel] - UserSSH: user=tidb, host=172.22.2.122
+ [Parallel] - UserSSH: user=tidb, host=172.22.2.122
+ [Parallel] - UserSSH: user=tidb, host=172.22.2.122
+ [Parallel] - UserSSH: user=tidb, host=172.22.2.122
+ [ Serial ] - StartCluster
Starting component pd
        Starting instance 172.22.2.122:2379
        Start instance 172.22.2.122:2379 success
Starting component tikv
        Starting instance 172.22.2.122:20162
        Starting instance 172.22.2.122:20160
        Starting instance 172.22.2.122:20161
        Start instance 172.22.2.122:20161 success
        Start instance 172.22.2.122:20162 success
        Start instance 172.22.2.122:20160 success
Starting component tidb
        Starting instance 172.22.2.122:4000
        Start instance 172.22.2.122:4000 success
Starting component tiflash
        Starting instance 172.22.2.122:9000
        Start instance 172.22.2.122:9000 success
Starting component prometheus
        Starting instance 172.22.2.122:9090
        Start instance 172.22.2.122:9090 success
Starting component grafana
        Starting instance 172.22.2.122:3000
        Start instance 172.22.2.122:3000 success
Starting component node_exporter
        Starting instance 172.22.2.122
        Start 172.22.2.122 success
Starting component blackbox_exporter
        Starting instance 172.22.2.122
        Start 172.22.2.122 success
+ [ Serial ] - UpdateTopology: cluster=tidb666
Started cluster `tidb666` successfully
[root@worker2 tidb]#

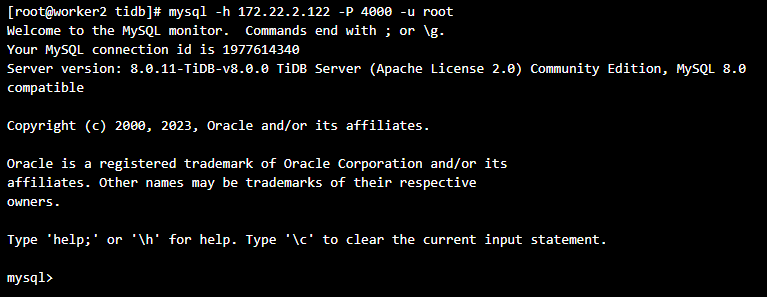
2、访问集群:
使用 MySQL 客户端访问 TiDB 数据库,密码为空:
mysql -h 172.22.2.122 -P 4000 -u root
[root@worker2 tidb]# mysql -h 172.22.2.122 -P 4000 -u root
Welcome to the MySQL monitor.  Commands end with ; or \g.
Your MySQL connection id is 1977614340
Server version: 8.0.11-TiDB-v8.0.0 TiDB Server (Apache License 2.0) Community Edition, MySQL 8.0 compatible

Copyright (c) 2000, 2023, Oracle and/or its affiliates.

Oracle is a registered trademark of Oracle Corporation and/or its
affiliates. Other names may be trademarks of their respective
owners.

Type 'help;' or '\h' for help. Type '\c' to clear the current input statement.

mysql>
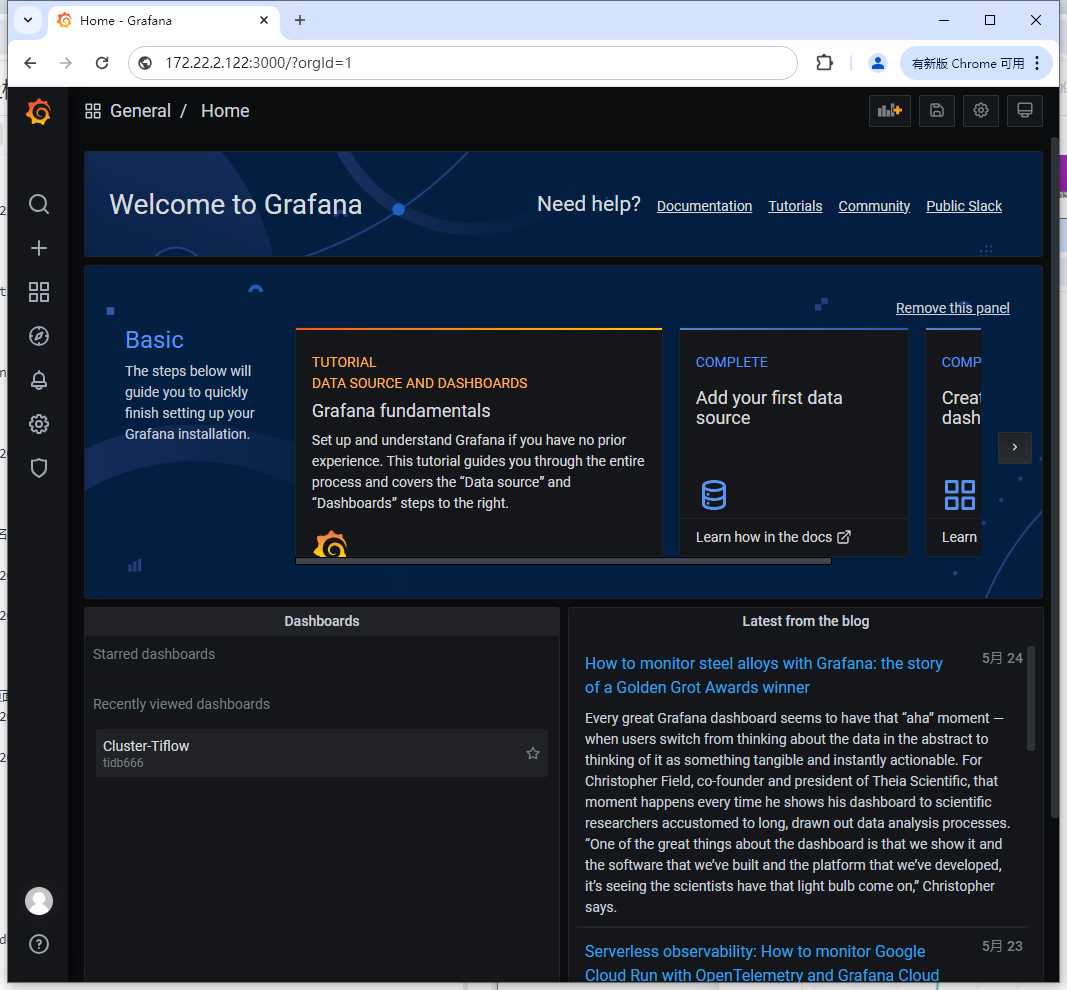
3、访问 TiDB 的 Grafana 监控:
通过 http://{grafana-ip}:3000 访问集群 Grafana 监控页面,默认用户名和密码均为 admin。
http://172.22.2.122:3000/?orgId=1
4、访问 TiDB 的 Dashboard:
通过 http://{pd-ip}:2379/dashboard 访问集群 TiDB Dashboard 监控页面,默认用户名为 root,密码为空。
http://172.22.2.122:2379/dashboard/#/overview

5、执行以下命令确认当前已经部署的集群列表:
tiup cluster list
[root@worker2 ~]# tiup cluster list
Name     User  Version  Path                                          PrivateKey
----     ----  -------  ----                                          ----------
tidb666  tidb  v8.0.0   /root/.tiup/storage/cluster/clusters/tidb666  /root/.tiup/storage/cluster/clusters/tidb666/ssh/id_rsa
[root@worker2 ~]#

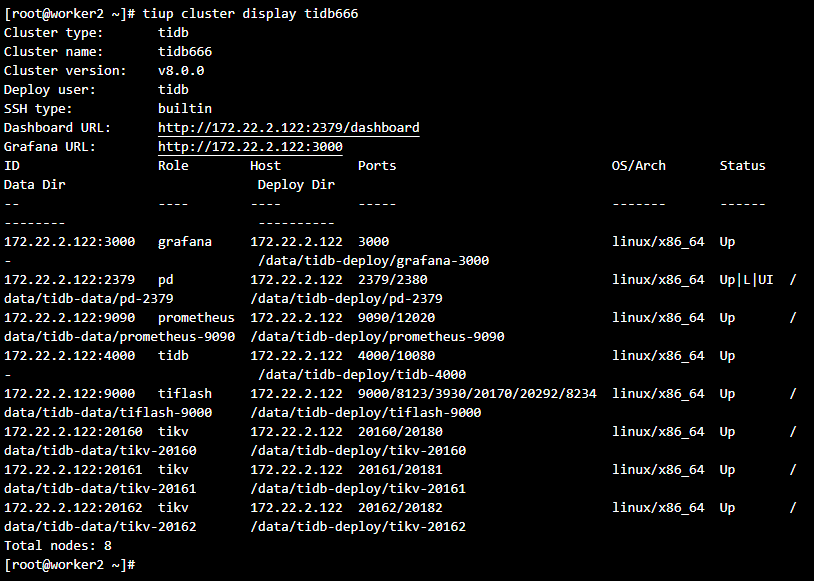
6、执行以下命令查看集群的拓扑结构和状态:
tiup cluster display tidb666
[root@worker2 ~]# tiup cluster display tidb666
Cluster type:       tidb
Cluster name:       tidb666
Cluster version:    v8.0.0
Deploy user:        tidb
SSH type:           builtin
Dashboard URL:      http://172.22.2.122:2379/dashboard
Grafana URL:        http://172.22.2.122:3000
ID                  Role        Host          Ports                            OS/Arch       Status   Data Dir                         Deploy Dir
--                  ----        ----          -----                            -------       ------   --------                         ----------
172.22.2.122:3000   grafana     172.22.2.122  3000                             linux/x86_64  Up       -                                /data/tidb-deploy/grafana-3000
172.22.2.122:2379   pd          172.22.2.122  2379/2380                        linux/x86_64  Up|L|UI  /data/tidb-data/pd-2379          /data/tidb-deploy/pd-2379
172.22.2.122:9090   prometheus  172.22.2.122  9090/12020                       linux/x86_64  Up       /data/tidb-data/prometheus-9090  /data/tidb-deploy/prometheus-9090
172.22.2.122:4000   tidb        172.22.2.122  4000/10080                       linux/x86_64  Up       -                                /data/tidb-deploy/tidb-4000
172.22.2.122:9000   tiflash     172.22.2.122  9000/8123/3930/20170/20292/8234  linux/x86_64  Up       /data/tidb-data/tiflash-9000     /data/tidb-deploy/tiflash-9000
172.22.2.122:20160  tikv        172.22.2.122  20160/20180                      linux/x86_64  Up       /data/tidb-data/tikv-20160       /data/tidb-deploy/tikv-20160
172.22.2.122:20161  tikv        172.22.2.122  20161/20181                      linux/x86_64  Up       /data/tidb-data/tikv-20161       /data/tidb-deploy/tikv-20161
172.22.2.122:20162  tikv        172.22.2.122  20162/20182                      linux/x86_64  Up       /data/tidb-data/tikv-20162       /data/tidb-deploy/tikv-20162
Total nodes: 8
[root@worker2 ~]#
总结
通过本次在单机上模拟部署生产环境集群的探索与实践,我们深入了解了TiDB的部署和运维过程,并对TiDB的性能和稳定性有了更深刻的认识。未来,我将继续探索TiDB的学习应用和创新实践,为TiDB社区的发展贡献自己的力量。同时,我也期待更多的开发者能够加入TiDB社区,共同推动TiDB的发展和创新。


 792
792


 被折叠的 条评论
为什么被折叠?
被折叠的 条评论
为什么被折叠?
 到【灌水乐园】发言


