


1 自定义view的简介
1.1为什么要自定义view
在Android开发中有很多业务场景,原生的控件是无法满足应用,并且经常也会遇到一个UI在多处 重复使用情况,那么就需要通过自定义View的方式来实现这些UI效果。
作为一个Android开发工程师自定义View属于一个必备技能。
1.2android自定义view几种方式
自定义View的实现方式有以下几种: 组合控件,继承控件,自绘控件
详细可分为:自定义组合控件,继承系统View控件,继承系统ViewGroup,自绘View控件,自绘
ViewGroup控件
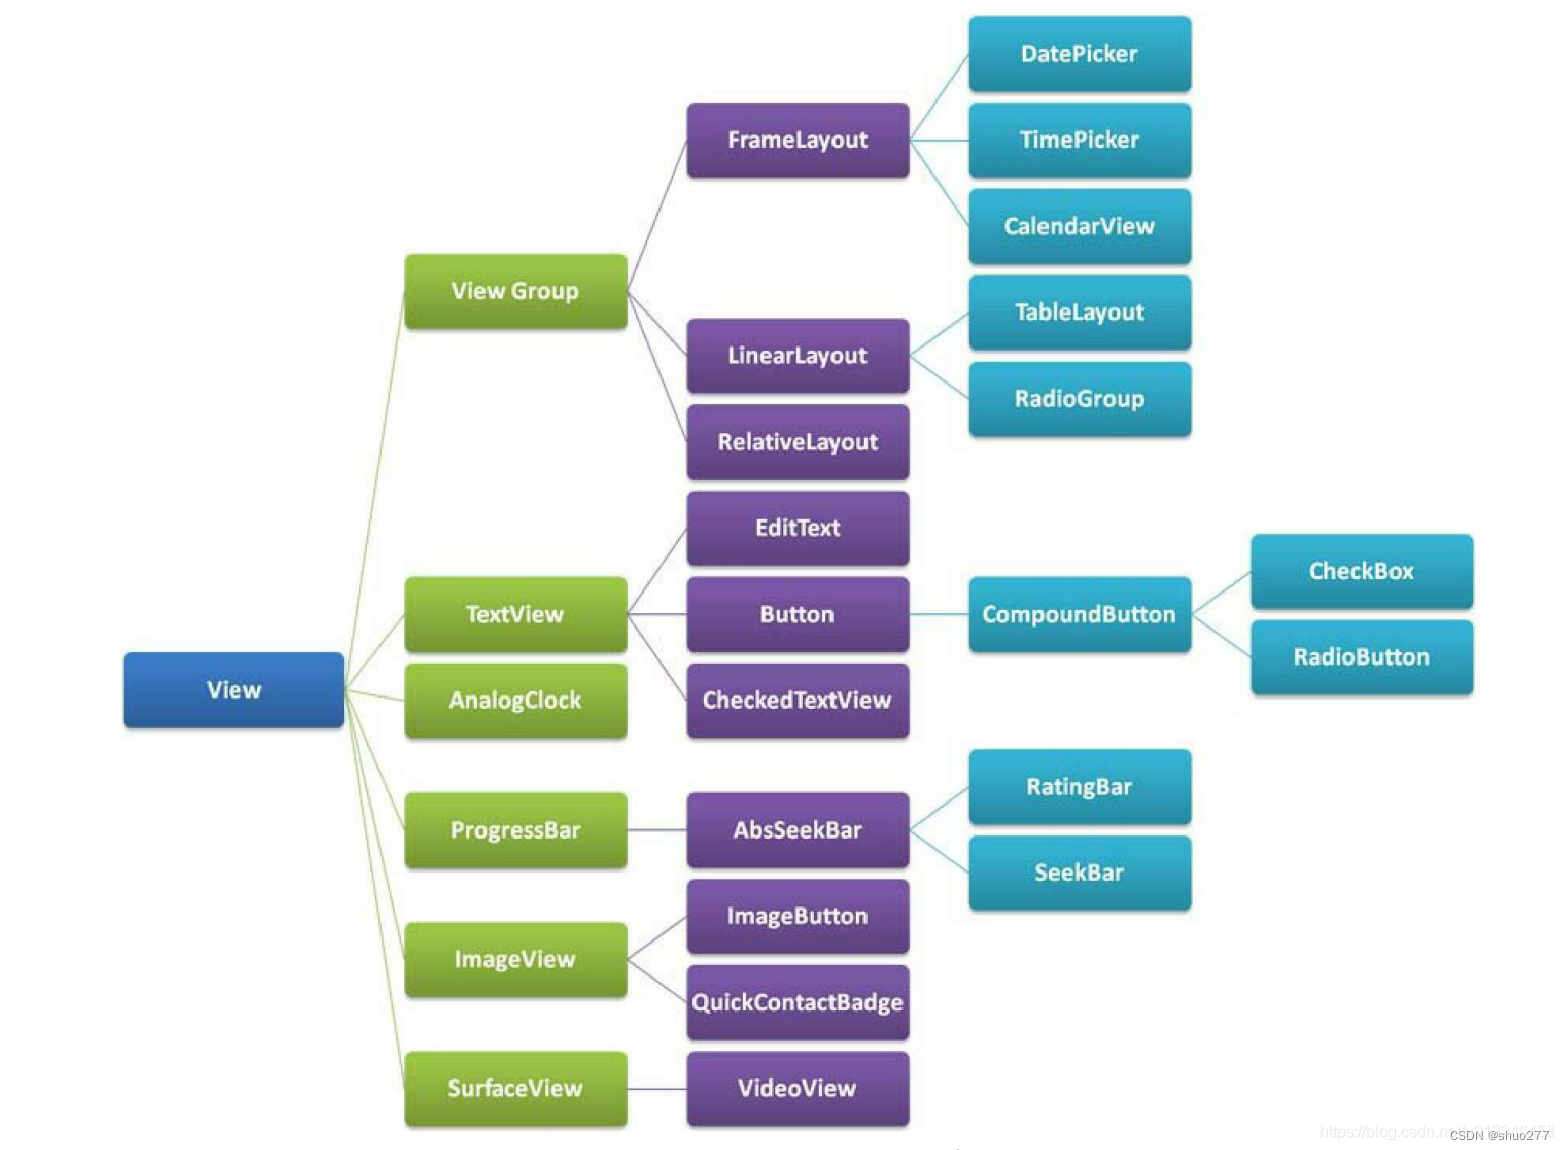
1.3View和ViewGroup
2自定义组合控件
组合控件就是将多个控件组合成一个新的控件,可以重复使用。
应用场景:在项目中经常会遇到一些比较复杂的UI块需要用在多处使用,那么我们就可以通过五大布局 和基本控件组合成一个新的布局View,这样就可以方便的将该UI用在项目的不同页面中,比如一个标题 栏。这种方式比较简单,只要通过布局文件实现相应的UI,然后将该UI加到适合的五大布局中即可。
2.1自定义组合控件的使用步骤
1. 编写布局文件
2. 实现构造方法
3. 初始化UI 4. 提供对外的方法
5. 在布局当中引用该控件
6. activity中使用
2.2示例
中间是title的文字,左边是返回按钮
1 . 编写布局文件 view_header.xml
<?xml version="1.0" encoding="utf-8"?>
<RelativeLayout xmlns:android="http://schemas.android.com/apk/res/android"
    android:layout_width="match_parent"
    xmlns:app="http://schemas.android.com/apk/res-auto"
    android:background="#89CEED"
    android:id="@+id/rl"
    android:layout_height="60dp">

    <ImageView
        android:id="@+id/iv_img"
        android:layout_width="wrap_content"
        android:layout_height="wrap_content"
        android:layout_centerVertical="true"
        android:layout_marginLeft="10dp"
        app:srcCompat="@drawable/ic_baseline_arrow_back_24"/>

    <TextView
        android:id="@+id/textView"
        android:layout_width="wrap_content"
        android:layout_height="wrap_content"
        android:textSize="22sp"
        android:layout_centerInParent="true"
        android:textColor="@color/white"
        android:text="微信" />


</RelativeLayout>
2. 实现构造方法
3. 初始化UI
4. 提供对外的方法
//因为我们的布局采用RelativeLayout,所以这里继承RelativeLayout。
public class HeaderView extends RelativeLayout {
    private Button left_btn;
    private TextView title_tv;
    private RelativeLayout layout_root;
    public HeaderView(Context context) {
        super(context);
    }

    public HeaderView(Context context, AttributeSet attrs) {
        super(context, attrs);
        initView(context);
    }
    public HeaderView(Context context, AttributeSet attrs, int defStyleAttr)
    {
        super(context, attrs, defStyleAttr);
    }
    //初始化UI,可根据业务需求设置默认值。
    private void initView(Context context) {
        LayoutInflater.from(context).inflate(R.layout.view_header, this,
                true);
        left_btn = findViewById(R.id.left_btn);
        title_tv = findViewById(R.id.title_tv);
        layout_root = findViewById(R.id.header_root_layout);
        layout_root.setBackgroundColor(Color.BLACK);
        title_tv.setTextColor(Color.WHITE);
    }
    //设置标题文字的方法
    private void setTitle(String title) {
        if (!TextUtils.isEmpty(title)) {
            title_tv.setText(title);
        }
    }
    //对左边按钮设置事件的方法
    private void setLeftListener(OnClickListener onClickListener) {
        left_btn.setOnClickListener(onClickListener);
    }
}
5. 在布局当中引用该控件
<?xml version="1.0" encoding="utf-8"?>
<LinearLayout xmlns:android="http://schemas.android.com/apk/res/android"
xmlns:app="http://schemas.android.com/apk/res-auto"
xmlns:tools="http://schemas.android.com/tools"
android:layout_width="match_parent"
android:layout_height="match_parent"
android:orientation="vertical"
tools:context=".MainActivity2">
<com.hopu.customviewdemo.view.HeaderView
    android:id="@+id/title_bar"
    android:layout_width="match_parent"
    android:layout_height="wrap_content" />
</LinearLayout>
6. activity中使用
public class MainActivity2 extends AppCompatActivity {
    private HeaderView title_bar;
    @Override
    protected void onCreate(Bundle savedInstanceState) {
        super.onCreate(savedInstanceState);
        setContentView(R.layout.activity_main2);
        title_bar = findViewById(R.id.title_bar);
        title_bar.setLeftListener(new View.OnClickListener() {
            @Override
            public void onClick(View v) {
                Toast.makeText(MainActivity2.this, "左侧按钮被点击",
                        Toast.LENGTH_SHORT).show();
            }
        });
    }
}
3.继承系统控件
通过继承系统控件(View子类控件或ViewGroup子类控件)来完成自定义View,一般是希望在原 有系统控件基础上做一些修饰性的修改,而不会做大幅度的改动,如在TextView的文字下方添加下 划线,在LinearLayout布局中加一个蒙板等。这种方式往往都会复用系统控件的onMeasure和onLayout方法,而只需要重写onDraw方法,在其中绘制一些需要的内容。
下面会分别继承View类控件和ViewGroup类控件来举例说明
3.1继承View类系统控件
1 . 继承View控件,并重写onDraw方法
2. 在布局文件中调用
3.2示例
为在TextView文字下方显示红色下划线,其基本步骤如下:
1 . 继承View控件,并重写onDraw方法
public class UnderlineTextView extends
        androidx.appcompat.widget.AppCompatTextView {
    public UnderlineTextView(Context context, @Nullable AttributeSet attrs) {
        super(context, attrs);
    }

    @Override
    protected void onDraw(Canvas canvas) {
        super.onDraw(canvas);
        Paint paint = new Paint();
        paint.setColor(Color.RED);
        paint.setStrokeWidth(5);
        int width = getWidth();
        int height = getBaseline();
        canvas.drawLine(0, height, width, height, paint);
    }
}
2. 在布局文件中调用
就像使用一个普通TextView一样使用UnderlineTextView。
<com.hopu.customviewdemo.view.UnderlineTextView
android:layout_width="match_parent"
android:layout_height="wrap_content"
android:text="张三"/>
3.3 继承ViewGroup类系统控件
1 . 继承ViewGroup类系统控件
2. 在布局文件中调用
3.4示例
在layout布局上添加一个浅红色的半透明蒙板,这种需求在工作中也是非常常见的。
1 . 继承ViewGroup类系统控件
public class ForegroundLinearLayout extends LinearLayout{
    public ForegroundLinearLayout(Context context, @Nullable AttributeSet
            attrs) {
        super(context, attrs);
    }
    @Override
    protected void dispatchDraw(Canvas canvas) {
        super.dispatchDraw(canvas);
        canvas.drawColor(Color.parseColor("#50FF0000"));
    }
}
2. 在布局文件中调用
对ForegroundLinearLayout的使用,就和使用其父类LinearLayout一样。
<?xml version="1.0" encoding="utf-8"?>
<RelativeLayout xmlns:android="http://schemas.android.com/apk/res/android"
android:layout_width="match_parent"
android:layout_height="match_parent">
<com.hopu.customviewdemo.view.ForegroundLinearLayout
    android:layout_width="match_parent"
    android:layout_height="200dp"
    android:layout_centerInParent="true"
    android:gravity="center">
    <TextView
        android:layout_width="wrap_content"
        android:layout_height="wrap_content"
        android:layout_centerInParent="true"
        android:text="Hello World!"
        android:textColor="@android:color/black"
        android:textSize="50dp" />
</com.hopu.customviewdemo.view.ForegroundLinearLayout>
</RelativeLayout>
3.5 继承系统控件小结
从上面两个例子可见,继承系统原有的控件来实现自定义View,步骤非常简单,比组合控件简单多了。 但是这一节需要对Canvas, paint, Path等绘制方面的知识有一定的了解,且还需要对ViewGroup的中 内容的绘制顺序有一定的了解,才能在原生控件的基础上做出想要的效果来。


 2800
2800


 被折叠的 条评论
为什么被折叠?
被折叠的 条评论
为什么被折叠?
 到【灌水乐园】发言


