


shiro教程系列
1shiro介绍
1.1什么是shiro
Shiro是apache旗下一个开源框架,它将软件系统的安全认证相关的功能抽取出来,实现用户身份认证,权限授权、加密、会话管理等功能,组成了一个通用的安全认证框架。
1.2为什么要学shiro
既然shiro将安全认证相关的功能抽取出来组成一个框架,使用shiro就可以非常快速的完成认证、授权等功能的开发,降低系统成本。
shiro使用广泛,shiro可以运行在web应用,非web应用,集群分布式应用中越来越多的用户开始使用shiro。
java领域中spring security(原名Acegi)也是一个开源的权限管理框架,但是spring security依赖spring运行,而shiro就相对独立,最主要是因为shiro使用简单、灵活,所以现在越来越多的用户选择shiro。
1.3Shiro架构
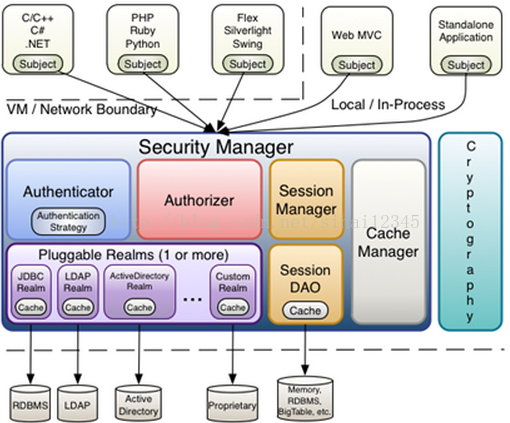
1.3.1Subject
Subject即主体,外部应用与subject进行交互,subject记录了当前操作用户,将用户的概念理解为当前操作的主体,可能是一个通过浏览器请求的用户,也可能是一个运行的程序。 Subject在shiro中是一个接口,接口中定义了很多认证授相关的方法,外部程序通过subject进行认证授,而subject是通过SecurityManager安全管理器进行认证授权
1.3.2SecurityManager
SecurityManager即安全管理器,对全部的subject进行安全管理,它是shiro的核心,负责对所有的subject进行安全管理。通过SecurityManager可以完成subject的认证、授权等,实质上SecurityManager是通过Authenticator进行认证,通过Authorizer进行授权,通过SessionManager进行会话管理等。
SecurityManager是一个接口,继承了Authenticator, Authorizer, SessionManager这三个接口。
1.3.3Authenticator
Authenticator即认证器,对用户身份进行认证,Authenticator是一个接口,shiro提供ModularRealmAuthenticator实现类,通过ModularRealmAuthenticator基本上可以满足大多数需求,也可以自定义认证器。
1.3.4Authorizer
Authorizer即授权器,用户通过认证器认证通过,在访问功能时需要通过授权器判断用户是否有此功能的操作权限。
1.3.5realm
Realm即领域,相当于datasource数据源,securityManager进行安全认证需要通过Realm获取用户权限数据,比如:如果用户身份数据在数据库那么realm就需要从数据库获取用户身份信息。
注意:不要把realm理解成只是从数据源取数据,在realm中还有认证授权校验的相关的代码。
1.3.6sessionManager
sessionManager即会话管理,shiro框架定义了一套会话管理,它不依赖web容器的session,所以shiro可以使用在非web应用上,也可以将分布式应用的会话集中在一点管理,此特性可使它实现单点登录。
1.3.7SessionDAO
SessionDAO即会话dao,是对session会话操作的一套接口,比如要将session存储到数据库,可以通过jdbc将会话存储到数据库。
1.3.8CacheManager
CacheManager即缓存管理,将用户权限数据存储在缓存,这样可以提高性能。
1.3.9Cryptography
Cryptography即密码管理,shiro提供了一套加密/解密的组件,方便开发。比如提供常用的散列、加/解密等功能。
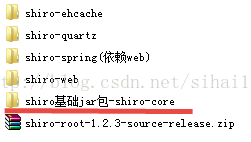
1.4shiro的jar包
与其它java开源框架类似,将shiro的jar包加入项目就可以使用shiro提供的功能了。shiro-core是核心包必须选用,还提供了与web整合的shiro-web、与spring整合的shiro-spring、与任务调度quartz整合的shiro-quartz等,下边是shiro各jar包的maven坐标。
<dependency>

<groupId>org.apache.shiro</groupId>

<artifactId>shiro-core</artifactId>

<version>1.2.3</version>

</dependency>

<dependency>

<groupId>org.apache.shiro</groupId>

<artifactId>shiro-web</artifactId>

<version>1.2.3</version>

</dependency>

<dependency>

<groupId>org.apache.shiro</groupId>

<artifactId>shiro-spring</artifactId>

<version>1.2.3</version>

</dependency>

<dependency>

<groupId>org.apache.shiro</groupId>

<artifactId>shiro-ehcache</artifactId>

<version>1.2.3</version>

</dependency>

<dependency>

<groupId>org.apache.shiro</groupId>

<artifactId>shiro-quartz</artifactId>

<version>1.2.3</version>

</dependency>


也可以通过引入shiro-all包括shiro所有的包:

<dependency>

<groupId>org.apache.shiro</groupId>

<artifactId>shiro-all</artifactId>

<version>1.2.3</version>

</dependency>参考lib目录 :
2shiro认证
2.1 认证流程

2.2入门程序(用户登陆和退出)
2.2.1创建java工程
jdk版本:1.7.0_72
eclipse:elipse-indigo
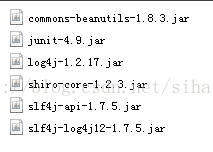
2.2.2加入shiro-core的Jar包及依赖包
2.2.3log4j.properties日志配置文件
log4j.rootLogger=debug, stdout
log4j.appender.stdout=org.apache.log4j.ConsoleAppender
log4j.appender.stdout.layout=org.apache.log4j.PatternLayout
log4j.appender.stdout.layout.ConversionPattern=%d %p [%c] - %m %n
2.2.4shiro.ini
通过Shiro.ini配置文件初始化SecurityManager环境。
配置 eclipse支持ini文件编辑:

在eclipse配置后,在classpath创建shiro.ini配置文件,为了方便测试将用户名和密码配置的shiro.ini配置文件中:
[users]
zhang=123
lisi=123
2.2.5认证代码
// 用户登陆、用户退出

@Test

public void testLoginLogout() {


// 构建SecurityManager工厂,IniSecurityManagerFactory可以从ini文件中初始化SecurityManager环境

Factory<SecurityManager> factory = new IniSecurityManagerFactory(

"classpath:shiro.ini");


// 通过工厂创建SecurityManager

SecurityManager securityManager = factory.getInstance();

// 将securityManager设置到运行环境中

SecurityUtils.setSecurityManager(securityManager);


// 创建一个Subject实例,该实例认证要使用上边创建的securityManager进行

Subject subject = SecurityUtils.getSubject();


// 创建token令牌,记录用户认证的身份和凭证即账号和密码

UsernamePasswordToken token = new UsernamePasswordToken("zhang", "123");


try {

// 用户登陆

subject.login(token);

} catch (AuthenticationException e) {

// TODO Auto-generated catch block

e.printStackTrace();

}


// 用户认证状态


Boolean isAuthenticated = subject.isAuthenticated();


System.out.println("用户认证状态:" + isAuthenticated);


// 用户退出


subject.logout();


isAuthenticated = subject.isAuthenticated();


System.out.println("用户认证状态:" + isAuthenticated);


}
2.2.6认证执行流程
1、创建token令牌,token中有用户提交的认证信息即账号和密码
2、执行subject.login(token),最终由securityManager通过Authenticator进行认证
3、 Authenticator的实现ModularRealmAuthenticator调用realm从ini配置文件取用户真实的账号和密码,这里使用的是IniRealm(shiro自带)
4、IniRealm先根据token中的账号去ini中找该账号,如果找不到则给ModularRealmAuthenticator返回null,如果找到则匹配密码,匹配密码成功则认证通过。
2.2.7常见的异常
UnknownAccountException
账号不存在异常如下:
org.apache.shiro.authc.UnknownAccountException: No account found for user。。。。
IncorrectCredentialsException
当输入密码错误会抛此异常,如下:
org.apache.shiro.authc.IncorrectCredentialsException: Submitted credentials for token [org.apache.shiro.authc.UsernamePasswordToken - zhangsan, rememberMe=false] did not match the expected credentials.
更多如下:
DisabledAccountException(帐号被禁用)
LockedAccountException(帐号被锁定)
ExcessiveAttemptsException(登录失败次数过多)
ExpiredCredentialsException(凭证过期)等
2.3自定义Realm
上边的程序使用的是Shiro自带的IniRealm,IniRealm从ini配置文件中读取用户的信息,大部分情况下需要从系统的数据库中读取用户信息,所以需要自定义realm。
2.3.1shiro提供的realm
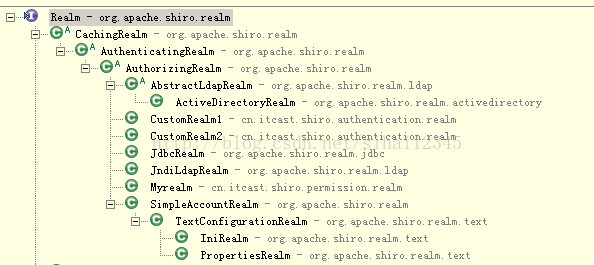
最基础的是Realm接口,CachingRealm负责缓存处理,AuthenticationRealm负责认证,AuthorizingRealm负责授权,通常自定义的realm继承AuthorizingRealm。
2.3.2自定义Realm
public class CustomRealm1 extends AuthorizingRealm {


@Override

public String getName() {

return "customRealm1";

}


//支持UsernamePasswordToken

@Override

public boolean supports(AuthenticationToken token) {

return token instanceof UsernamePasswordToken;

}


//认证

@Override

protected AuthenticationInfo doGetAuthenticationInfo(

AuthenticationToken token) throws AuthenticationException {

//从token中 获取用户身份信息

String username = (String) token.getPrincipal();

//拿username从数据库中查询

//....

//如果查询不到则返回null

if(!username.equals("zhang")){//这里模拟查询不到

return null;

}

//获取从数据库查询出来的用户密码

String password = "123";//这里使用静态数据模拟。。

//返回认证信息由父类AuthenticatingRealm进行认证

SimpleAuthenticationInfo simpleAuthenticationInfo = new SimpleAuthenticationInfo(

username, password, getName());


return simpleAuthenticationInfo;

}


//授权

@Override

protected AuthorizationInfo doGetAuthorizationInfo(

PrincipalCollection principals) {

// TODO Auto-generated method stub

return null;

}


}
2.3.3shiro-realm.ini
[main]

#自定义 realm

customRealm=com.sihai.shiro.authentication.realm.CustomRealm1

#将realm设置到securityManager

securityManager.realms=$customRealm
2.3.4测试代码
测试代码同入门程序,将ini的地址修改为shiro-realm.ini。
分别模拟账号不存在、密码错误、账号和密码正确进行测试。
2.4散列算法
散列算法一般用于生成一段文本的摘要信息,散列算法不可逆,将内容可以生成摘要,无法将摘要转成原始内容。散列算法常用于对密码进行散列,常用的散列算法有MD5、SHA。
一般散列算法需要提供一个salt(盐)与原始内容生成摘要信息,这样做的目的是为了安全性,比如:111111的md5值是:96e79218965eb72c92a549dd5a330112,拿着“96e79218965eb72c92a549dd5a330112”去md5破解网站很容易进行破解,如果要是对111111和salt(盐,一个随机数)进行散列,这样虽然密码都是111111加不同的盐会生成不同的散列值。
2.4.1例子
//md5加密,不加盐

String password_md5 = new Md5Hash("111111").toString();

System.out.println("md5加密,不加盐="+password_md5);

//md5加密,加盐,一次散列

String password_md5_sale_1 = new Md5Hash("111111", "eteokues", 1).toString();

System.out.println("password_md5_sale_1="+password_md5_sale_1);

String password_md5_sale_2 = new Md5Hash("111111", "uiwueylm", 1).toString();

System.out.println("password_md5_sale_2="+password_md5_sale_2);

//两次散列相当于md5(md5())


//使用SimpleHash

String simpleHash = new SimpleHash("MD5", "111111", "eteokues",1).toString();

System.out.println(simpleHash);
2.4.2在realm中使用
实际应用是将盐和散列后的值存在数据库中,自动realm从数据库取出盐和加密后的值由shiro完成密码校验。
2.4.2.1自定义realm
@Override

protected AuthenticationInfo doGetAuthenticationInfo(

AuthenticationToken token) throws AuthenticationException {

//用户账号

String username = (String) token.getPrincipal();

//根据用户账号从数据库取出盐和加密后的值

//..这里使用静态数据

//如果根据账号没有找到用户信息则返回null,shiro抛出异常“账号不存在”

//按照固定规则加密码结果 ,此密码 要在数据库存储,原始密码 是111111,盐是eteokues

String password = "cb571f7bd7a6f73ab004a70322b963d5";

//盐,随机数,此随机数也在数据库存储

String salt = "eteokues";

//返回认证信息

SimpleAuthenticationInfo simpleAuthenticationInfo = new SimpleAuthenticationInfo(

username, password, ByteSource.Util.bytes(salt),getName());


return simpleAuthenticationInfo;

}2.4.2.2realm配置
配置shiro-cryptography.ini
[main]

#定义凭证匹配器

credentialsMatcher=org.apache.shiro.authc.credential.HashedCredentialsMatcher

#散列算法

credentialsMatcher.hashAlgorithmName=md5

#散列次数

credentialsMatcher.hashIterations=1


#将凭证匹配器设置到realm

customRealm=com.sihai.shiro.authentication.realm.CustomRealm2

customRealm.credentialsMatcher=$credentialsMatcher

securityManager.realms=$customRealm2.4.2.3测试代码
测试代码同上个章节,注意修改ini路径。


 905
905

 被折叠的 条评论
为什么被折叠?
被折叠的 条评论
为什么被折叠?
 到【灌水乐园】发言


