


这段时间想建立一个资料库,对比了一下最终选择了Confluence,趁着放假时间整理了一下笔记,方便以后查询,顺便分享一下。
一、小插曲
第一次尝试安装不成功(不想看的朋友可以直接跳到第二点),过程如下
本来想着用自带的MariaDB,但是查看了一下官网的说明文档提示,所以决定还是用回MySql吧

然后在mysql官网下载了默认的最新版 mysql8,但是到最后连接数据库的时候提示下图所示
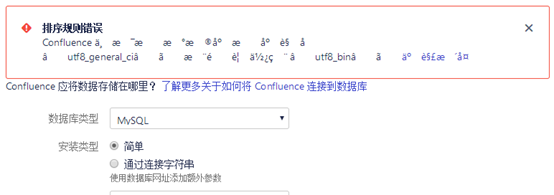
查了一下,是配置数据库的时候没弄好,于是进入数据库,执行下面命令,然后再重新连接
ALTER DATABASE confluence CHARACTER SET utf8 COLLATE utf8_bin;
于是弹出下出提示

搜索很久都没结果,最后看到有人说是confluence还不支持Mysql8,算了,还是装回5算了。
二安装用到的软件
用到的软件百度云打包链接
链接:https://pan.baidu.com/s/1tOSlgcMKZ5LxSFCETGeICg
提取码:fa1x
因为需要上传和下载文件,先安装lrzsz
[root@silence ~]# yum install lrzsz –y
安装java
[root@silence ~]# yum install -y java
验证一下
[root@silence ~]# java -version
openjdk version "1.8.0_212"
OpenJDK Runtime Environment (build 1.8.0_212-b04)
OpenJDK 64-Bit Server VM (build 25.212-b04, mixed mode)
三 安装数据库
3.1卸载MariaDB
因为Centos自带的是MariaDB,所以要先卸载,查找一下系统安装了那几个包,
[root@silence ~]# rpm -qa |grep mariadb
mariadb-libs-5.5.60-1.el7_5.x86_64
卸载
[root@silence ~]# rpm -e mariadb-libs-5.5.60-1.el7_5.x86_64
错误:依赖检测失败:
	libmysqlclient.so.18()(64bit) 被 (已安裝) postfix-2:2.10.1-7.el7.x86_64 需要
	libmysqlclient.so.18(libmysqlclient_18)(64bit) 被 (已安裝) postfix-2:2.10.1-7.el7.x86_64 需要
由于依赖关系提示出错,我们强制删除
[root@silence ~]# rpm -e mariadb-libs-5.5.60-1.el7_5.x86_64 --nodeps
检测是否卸载成功
[root@silence ~]# rpm -qa |grep mariadb
[root@silence ~]#
3.2安装MySQL
然后直接去官网下载MySQL,


下载捆绑包

上传安装和解压包到服务器
[root@silence ~]# mkdir /mnt/mysql
[root@silence ~]# cd /mnt/mysql
[root@silence mysql]# rz
选取mysql包后等待上传完成,然后解压包
[root@silence mysql]# tar -xvf mysql-5.7.26-1.el7.x86_64.rpm-bundle.tar
mysql-community-embedded-devel-5.7.26-1.el7.x86_64.rpm
mysql-community-libs-5.7.26-1.el7.x86_64.rpm
mysql-community-embedded-5.7.26-1.el7.x86_64.rpm
mysql-community-test-5.7.26-1.el7.x86_64.rpm
mysql-community-embedded-compat-5.7.26-1.el7.x86_64.rpm
mysql-community-common-5.7.26-1.el7.x86_64.rpm
mysql-community-devel-5.7.26-1.el7.x86_64.rpm
mysql-community-client-5.7.26-1.el7.x86_64.rpm
mysql-community-server-5.7.26-1.el7.x86_64.rpm
mysql-community-libs-compat-5.7.26-1.el7.x86_64.rpm
现在就可以安装mysql了,因为包存在依赖关系,所以一起安装
[root@silence mysql]# rpm -ivh mysql-community-common-5.7.26-1.el7.x86_64.rpm mysql-community-libs-5.7.26-1.el7.x86_64.rpm mysql-community-client-5.7.26-1.el7.x86_64.rpm mysql-community-server-5.7.26-1.el7.x86_64.rpm
也可以一个一个按照以下顺序安装
rpm -ivh mysql-community-common-5.7.26-1.el7.x86_64.rpm

rpm -ivh mysql-community-libs-5.7.26-1.el7.x86_64.rpm

rpm -ivh mysql-community-client-5.7.26-1.el7.x86_64.rpm

rpm -ivh mysql-community-server-5.7.26-1.el7.x86_64.rpm
启动MySql
systemctl start mysqld
查看mysql运行情况
[root@silence mysql]# systemctl status mysqld
● mysqld.service - MySQL Server
   Loaded: loaded (/usr/lib/systemd/system/mysqld.service; enabled; vendor preset: disabled)
   Active: **active (running)** since 日 2019-06-09 09:36:51 CST; 44s ago
     Docs: man:mysqld(8)
           http://dev.mysql.com/doc/refman/en/using-systemd.html
  Process: 5984 ExecStart=/usr/sbin/mysqld --daemonize --pid-file=/var/run/mysqld/mysqld.pid $MYSQLD_OPTS (code=exited, status=0/SUCCESS)
  Process: 5910 ExecStartPre=/usr/bin/mysqld_pre_systemd (code=exited, status=0/SUCCESS)
 Main PID: 5987 (mysqld)
   CGroup: /system.slice/mysqld.service
           └─5987 /usr/sbin/mysqld --daemonize --pid-file=/var/run/mysqld/mysqld.pid

6月 09 09:36:46 silence systemd[1]: Starting MySQL Server...
6月 09 09:36:51 silence systemd[1]: Started MySQL Server.
可以看到MySql已经在运行。
然后需要先修改mysql默认密码,要不然没法操作数据库,先找到临时密码
[root@silence mysql]# cat /var/log/mysqld.log | grep temporary
2019-06-09T01:36:47.787427Z 1 [Note] A temporary password is generated for root@localhost: wY/gyj#?w6ko
2019-06-09T01:36:51.813774Z 0 [Note] InnoDB: Creating shared tablespace for temporary tables
A temporary password is generated for root@localhost:后的wY/gyj#?w6ko就是临时密码,先记下来
登入数据库
[root@silence mysql]# mysql -uroot –p

按提示输入密码
Enter password:

登入成功有如下提示
Welcome to the MySQL monitor.  Commands end with ; or \g.
Your MySQL connection id is 3
Server version: 5.7.26

Copyright (c) 2000, 2019, Oracle and/or its affiliates. All rights reserved.

Oracle is a registered trademark of Oracle Corporation and/or its
affiliates. Other names may be trademarks of their respective
owners.

Type 'help;' or '\h' for help. Type '\c' to clear the current input statement.

mysql>
如果直接键入命令将会提示先重置密码
mysql> show databases;
ERROR 1820 (HY000): You must reset your password using ALTER USER statement before executing this statement.
我先们修改密码(强密码,否则提示出错),mysql命令以分号;结束
ALTER USER 'root'@'localhost' IDENTIFIED BY '您的密码';
Query OK, 0 rows affected (0.00 sec)
然后就可以开始创建confluence数据库和用户名密码了,
create database confluence default character set utf8;
Query OK, 1 row affected (0.00 sec)

grant all on confluence.* to 'confluenceuser'@'%' identified by 'confluencepasswd' with grant option;
Query OK, 0 rows affected, 1 warning (0.00 sec)

grant all on confluence.* to 'confluenceuser'@localhost identified by 'confluencepasswd' with grant option;
Query OK, 0 rows affected, 1 warning (0.00 sec)

flush privileges;
Query OK, 0 rows affected (0.01 sec)

退出数据库
quit
重启一下数据库
[root@silence mysql]# systemctl restart mysqld
在这里先把数据库3306端口打开
[root@silence mysql]# firewall-cmd --permanent --add-port=3306/tcp
Success
更新一下
[root@silence mysql]# firewall-cmd --reload
Success
四,安装Confluence
在官网https://www.atlassian.com/下载Confluence


下载完成后,把bin文件上传到服务器
[root@silence ~]# mkdir /mnt/confluence
[root@silence ~]# cd /mnt/confluence/
[root@silence confluence]# rz
rz waiting to receive.
Starting zmodem transfer.  Press Ctrl+C to cancel.
Transferring atlassian-confluence-6.7.1-x64.bin...
  100%  580634 KB    10186 KB/sec    00:00:57       0 Errors

[root@silence confluence]#
更改安装权限
[root@silence confluence]# chmod -c 744 atlassian-confluence-6.7.1-x64.bin
mode of "atlassian-confluence-6.7.1-x64.bin" changed from 0644 (rw-r--r--) to 0744 (rwxr--r--)
安装confluence,期间需要输入o 1 i y 如果下所示
[root@silence confluence]# ./atlassian-confluence-6.7.1-x64.bin
Unpacking JRE ...
Starting Installer ...
六月 09, 2019 10:23:09 上午 java.util.prefs.FileSystemPreferences$1 run
信息: Created user preferences directory.
六月 09, 2019 10:23:09 上午 java.util.prefs.FileSystemPreferences$2 run
信息: Created system preferences directory in java.home.

This will install Confluence 6.7.1 on your computer.
OK [o, Enter], Cancel [c]
o
Choose the appropriate installation or upgrade option.
Please choose one of the following:
Express Install (uses default settings) [1],
Custom Install (recommended for advanced users) [2, Enter],
Upgrade an existing Confluence installation [3]
1
See where Confluence will be installed and the settings that will be used.
Installation Directory: /opt/atlassian/confluence
Home Directory: /var/atlassian/application-data/confluence
HTTP Port: 8090
RMI Port: 8000
Install as service: Yes
Install [i, Enter], Exit [e]
i

Extracting files ...


Please wait a few moments while we configure Confluence.
Installation of Confluence 6.7.1 is complete
Start Confluence now?
Yes [y, Enter], No [n]
y

Please wait a few moments while Confluence starts up.
Launching Confluence ...
Installation of Confluence 6.7.1 is complete
Your installation of Confluence 6.7.1 is now ready and can be accessed via
your browser.
Confluence 6.7.1 can be accessed at http://localhost:8090
Finishing installation ...
[root@silence confluence]#
由于confluence默认是8090端口,防火墙再放通对应端口,然后重载防火墙
[root@silence confluence]# firewall-cmd --permanent --add-port=8090/tcp
success
[root@silence confluence]# firewall-cmd --reload
success
五 破解
浏览器打开服务器IP:8090

单击下一步,记下服务器序列号

先停掉confluence
[root@silence confluence]# /etc/init.d/confluence stop
先下载破解文件:confluence破解工具.zip,并解压。
要运行破解文件,要先在本地windows端安装JDK
先去网站下载JDK
https://www.oracle.com/technetwork/java/javase/downloads/jdk8-downloads-2133151.html


下载安装好后,先从centos中导出confluence文件atlassian-extras-decoder-v2-3.3.0.jar,然后重命名为atlassian-extras-2.4.jar
[root@silence confluence]# sz /opt/atlassian/confluence/confluence/WEB-INF/lib/atlassian-extras-decoder-v2-3.3.0.jar
然后windows打开cmd 进入jave目录(我是懒的配置变量环境),运行破解文件

在弹出框里填好服务器ID和其它信息,然后把key复制到文档先保存,再点低下的patch按钮,选择重命名文件atlassian-extras-2.4.jar进行破解,破解后,先在centos中把atlassian-extras-decoder-v2-3.3.0.jar改名备份
再把破解文件重命名回atlassian-extras-decoder-v2-3.3.0.jar,然后上传回/opt/atlassian/confluence/confluence/WEB-INF/lib/

改名备份atlassian-extras-decoder-v2-3.3.0.jar
[root@silence confluence]# cd /opt/atlassian/confluence/confluence/WEB-INF/lib/
[root@silence lib]# mv atlassian-extras-decoder-v2-3.3.0.jar atlassian-extras-decoder-v2-3.3.0.jar.bak

上传破解后的文件
[root@silence lib]# rz

查看是否上传成功

[root@silence lib]# ll atlassian-extras-decoder-v2-3.3.0.jar
-rw-r--r--. 1 root root 6647 2月  12 2018 atlassian-extras-decoder-v2-3.3.0.jar
[root@silence lib]#
然后再回mysql下载java驱动文件

点击 Looking for the latest GA version选择之前的版本,

下载解压后,把解压根目录的mysql-connector-java-5.1.47-bin.jar一起上传到/opt/atlassian/confluence/confluence/WEB-INF/lib/
完成后,重启confluence,
[root@silence lib]# /etc/init.d/confluence start
打开浏览器,继续输入序列号

连接数据库


填写相关信息后点击测试连接,报错

重新登入mysql后输入以下命令
mysql> ALTER DATABASE confluence  CHARACTER SET utf8 COLLATE utf8_bin;
Query OK, 1 row affected (0.00 sec)
退出数据,再点击测试连接,再次报错:

文档说明
Resolution
There are several options for fixing this:
• Set the global transaction isolation level to READ-COMMITTED. You can do this by configuring your MySQL server’s settings by editing MySQL’s my.cnf file (often named my.ini on Windows operating systems). Locate the [mysqld] section in the file and add/modify the following parameter:
Vim /etc/my.cnf
[mysqld]
…
transaction-isolation=READ-COMMITTED
…
于是编辑my.cnf文件,加入transaction-isolation=READ-COMMITTED 语句
[root@silence lib]# vim /etc/my.cnf
在以下语句下加入
datadir=/var/lib/mysql
socket=/var/lib/mysql/mysql.sock

transaction-isolation=READ-COMMITTED
保存退出后重启数据库
[root@silence lib]# systemctl restart mysqld
再次测试成功,点击下一步继续其它设置

到此,confluence安装破解完毕~
参考文章(谢谢作者的分享):
https://segmentfault.com/a/1190000008753391?utm_medium=referral&utm_source=tuicool
https://www.cnblogs.com/vcdx/archive/2018/08/18/9499039.html


 878
878


 被折叠的 条评论
为什么被折叠?
被折叠的 条评论
为什么被折叠?
 到【灌水乐园】发言


