


So, you looked at the ngMomentum project and decided, “Well if they can make a custom Angular Schematic, so can I”. That is great! I started developing code generators a while back because I am a lazy developer that likes to have pretty code shot out of a generator without me having to repeat myself. It started with IntelliJ live templates and moved into Yeoman Generators. I was able to use a lot of the templates I created with Yeoman to build the Ng Momentum project. Hopefully, you have some idea of code that you want to replicate over and over again.

start the replication process!
As someone that built many Yeoman Generators, Angular Schematics is a much better way to create template based generators with complex logic. I just miss the mini GUI provided by Yeoman.
You can find all the code created with this post at my GitHub repo:
jonbcampos/schematics
GitHub is where people build software. More than 28 million people use GitHub to discover, fork, and contribute to over…
The Parts of an Angular Schematic
After you spend some time building your own Angular Schematic you’ll realize that a Schematic really has 5 parts/files.
collection.json— The Schematic’s definitionindex.ts— The actual Schematic codeschema.json— The Schematic variable definitionschema.d.ts— The Schematic variablesfiles/— The template files to replicate
There is going to be more files that we need to touch to get a basic Angular Schematic to work, but these are the main parts. After the basics are working and as you build out more functionality, you will simply end up replicating and customizing these same files over and over again.
Let’s just go ahead and start by building our own simple Angular Schematic.
Setup
To follow along there is some system setup that is expected. You will need to install NodeJs on your computer (I recommend using a Package Manager).
Then, with the NodeJs install complete you need to install the Schematics CLI.
$ npm install -g @angular-devkit/schematics-cliNot too bad. You now have all the basics you’ll need to start building your own Angular Schematic.
Starting With A Simple Angular Schematic
With your system set up, it is time to create your first schematic. We will do that by running the following command.
$ cd to/wherever/you/want
$ schematics blank --name=simple-schematic
With this process complete you have your simple-schematic project prepared and ready for customization. Your current folder structure should look like the following image.

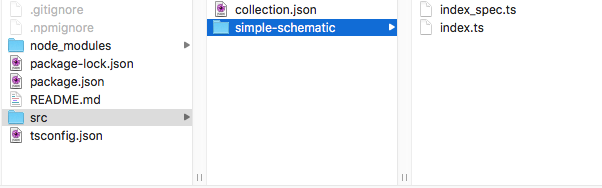
Your Current Folder Structure
Already you can start looking into the files and seeing how to wire up an Angular Schematic. I always find it helpful to quickly see how the wiring is put together so I can’t accidentally bust something.

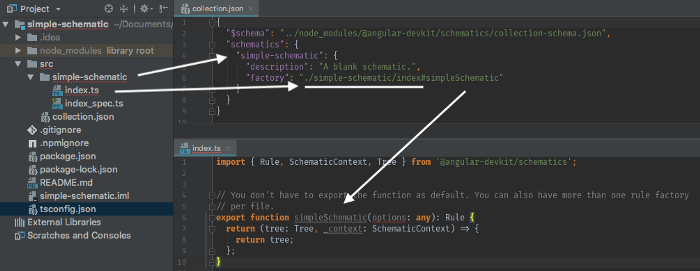
Basic Anatomy Of A Schematic
This image shows how a Schematic Collection (src/collection.json) maps to the actual Schematic code (src/simple-schematic/index.ts). Since the basic setup is already set for us we just need to start focusing on the actual Schematic and not the project. We are moving right along! However, there are some niceties that will speed up your development. I personally like to include the base Angular Schematic as there are many files that we can utilize to make our lives easier. As such here are the commands to include those necessary files.
$ cd ~/to/wherever/you/want/simple-schematic
$ npm install @angular/cli
This will add in all the base Angular CLI components and Schematic files into your project.
Angular Schematic Template Files
Yes, you could totally code an Angular Schematic just in the index.ts file. However, it is more fun/difficult/helpful to have complicated template files that we can just inject variables and spit out code. So the first thing we need to do is add a files/ folder to src/simple-schematic/ and put a template file in there.
My new file is /src/simple-schematic/files/hello.ts.
export class Hello {

}
Well… great… that doesn’t do much. So far our template isn’t really using any parameters to customize it and make it useful. Before we do that though let’s return to the index.ts file and have this Angular Schematic setup to spit out our simple template file.
Setup The index.ts File For Templating
Okay, until now the content you’ve seen could have been pulled from any Angular Schematics’ 101 blog post. Now I’m going to go further and properly setup a file. Here are some of the considerations that are going into the following code:
- Depending on the project that you are adding your Schematic into you may be working with a multi-project workspace. So we need to make sure we map to the correct project/folder.
- Do we need to create a folder or is this file just going to be added into some other folder? Because it is more difficult I will assume I’m creating a new folder.
- Do we need to inject/change variable strings? Then we will need some functions to do that.
- How are we merging this content with code that might already exist? I’m going to assume we will use the default merge strategy and NOT write over existing files/code.
- Do we want to also produce a
.spec.tsfile for our code or remove those files?
Let’s look at what the code looks like to answer each of these bullets.
Automatic Folder Handling For Single and Multi-Project Workspaces
This code is small but very important. We need to get our workspace information, understand what project we are adding this file into, and then build the paths for this project. Here is the code.
I didn’t worry about providing too much annotation as the code is fairly straightforward.
Create A Folder Vs Nested Under Another Folder
For this, we need to determine if we need to move the path of our template generation from the default path to another nested path. In our case, the options.flat variable will make the determination for us. We will also use the @angular-devkit/core’s strings package to help us clean up any naming for our folders.
Again, easy and straightforward to read.
Inject Strings And Filter By File Name
I’m combining #3 and #5 from the earlier list because we will handle both with one block of templating code. This code will go grab files from the ./files/ folder, filter out .spec files if we choose, inject the template variable naming and user provided options, and finally use the movePath that we created earlier to move the templated files to their proper home.
I bet you thought that amount of functionality would result in a lot of code right? Angular Schematics make our lives much easier.
Merge Strategy
Finally, we need to determine how all of this code will (or will not) merge into our existing project. I’m just sticking with the default option for now.
Run The Resulting Rule
The last thing we need to do is return the rule we’ve created so that it can be run by Angular Schematics.
Wrapping Up The Angular Schematic
So, with all of those assumptions coded for what does our file look like now?
The code really isn’t that bad considering the plethora of features we’ve fit into this little code. That is really the power of Angular Schematics. Next we need to customize the code that is generated within our /files folder.
Customizing The Templates
At this point, you have a little Angular Schematic that spits out our hello.ts file. While this is nice it isn’t very helpful to have our template just keep creating the same Class. As such it is time to add some variables into our template. You can see a before and after below.
Before
After
What we’ve done is add in the variable name and told Schematics to classify the name to ensure the variable looks a specific way. We can even make these changes to the filename.
Before
hello.tsAfter
__name@dasherize__.tsThis takes the name variable and “dasherizes” it. This way we get consistent naming no matter what the user enters.
hello-world.ts // name="hello world"
hello.ts // name="hello"
hello.ts // name="Hello"
hello.ts // name="helLo"
Note: You can add/wrap the variable in as many functions as you want by chaining them together.
__name@dasherize@singularize__.tsThe Schema
With all of your code in place and you know the variables that your Angular Schematic takes it is time to write out your Schematic schema. This file is just a JSON file that specifies the variables that are used by your Angular Schematic, along with any defaults or rules around your variables. This is our current schema file with the name, spec, and flat variables added.
Now you just need to tie everything back together by ensuring everything is wired together in the collection.json file. We are now adding the schema property to the simple-schematic object.
We are now ready to run our Angular Schematic in a real project. Let’s do that now.
[Quickly] Run Your Schematic
With all of our code put together we now need to just create a new project, include our Angular Schematic and run it. The following command line code does just that.
$ cd /to/some/location # put the project somewhere
$ ng new simpletest # create a new angular project
$ cd simpletest # go into project
$ npm link ./path/to/schematic/simple-schematic/ # link schematic
$ ng g simple-schematic:simple-schematic --name="some name" # run
Now you should have a new Angular project with a new folder in the src/app/ folder named some-name/, including a some-name.ts and a some-name.spec.ts file. You Angular Schematic is complete!
Conclusion
That is it! This is all the code necessary to build an Angular Schematic of your own. If you’re as good as you think you are though there are still a few steps between you and something that will change the Angular World. In the next articles we will look at writing a unit test for your Schematic along with going a lot further than other series.
Give me a follow and let me know what questions you have!
Other Posts In This Series
Angular Schematics: ngMomentum
Angular Schematics are a fairly new development in the Angular ecosystem. With Angular Schematics you can transform…
Angular Schematics: Unit Testing
Building Schematics can be magical. With very little code you can build large structures that can be replicated over…
Jonathan Campos is an avid developer and fan of learning new things. I believe that we should always keep learning and growing and failing. I am always a supporter of the development community and always willing to help. So if you have questions or comments on this story please ad them below. Connect with me on LinkedIn or Twitter and mention this story.


 92
92


 被折叠的 条评论
为什么被折叠?
被折叠的 条评论
为什么被折叠?
 到【灌水乐园】发言


