


有天导师突然找我,让我搞一些关于人脸的应用,比如换个脸什么的……没办法那就先把人脸自动检测出来吧。人脸检测,即检测出图像中存在的人脸,并把它的位置准确地框出来。是人脸特征点检测、人脸识别的基础。可以谷歌Face Detection Benchmark寻找数据集和优秀论文,上thinkface论坛,搜集人脸检测数据集和方法。常用的人脸检测数据集,包括FDDB、AFLW、WIDER FACE等。随着近年来随着深度学习的快速发展,涌现出来很多优秀的人脸检测算法。
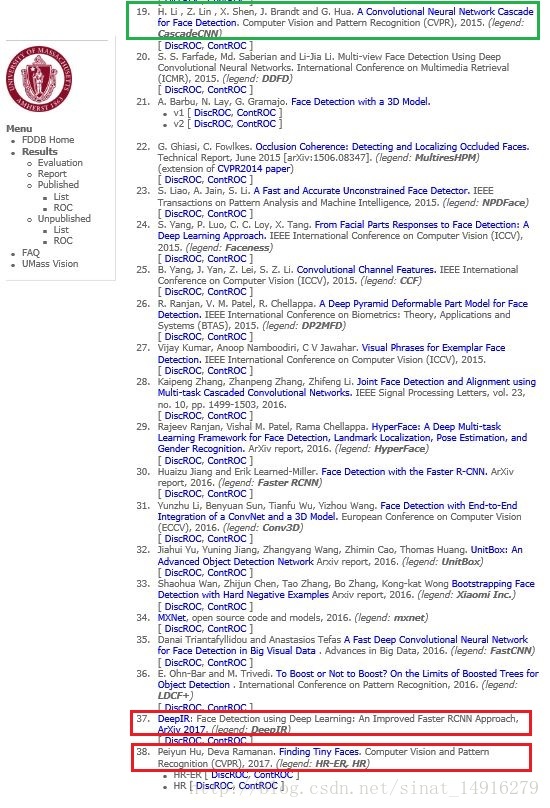
例如,FDDB数据库就提交了很多出色的人脸检测算法,例如采用级联CNN网络的人脸检测方法:A Convolutioanal Neural Network Cascade,改进的faster rcnn做人脸检测:Face Detection using Deep Learning:An Improved Faster RCNN Approach,还有对小脸检测非常成功的Finding tiny faces等等,建议找个三篇左右认真研读就行了,也不需要去一一实现,没有太大意义。
另外,像opencv、dlib、libfacedetect等也提供了人脸检测的接口。因为人脸检测是很基本的任务,所以很多公司都做了人脸检测的工作,而且做得很牛,例如face++。
下面仅介绍本人尝试并实现了的几种常见的人脸检测方法:
1.单个CNN人脸检测方法
2.级联CNN人脸检测方法
3.OpenCV人脸检测方法
4.Dlib人脸检测方法
5.libfacedetect人脸检测方法
6.Seetaface人脸检测方法
1.单个CNN人脸检测方法
该人脸检测方法的有点在于,思路简单,实现简单;缺点是速度较慢(在一块普通的gpu上对一副1000x600的图像进行多尺度检测也可能花上一两秒),检测效果还可以,但得到的人脸框不够准确。
首先训练一个判断人脸非人脸的二分类器。例如采用卷积神经网络caffenet进行二分类,可以在imagenet数据集训练过的模型,利用自己的人脸数据集,进行微调。也可以自定义卷积网络进行训练,为了能检测到更小的人脸目标,我们一般采用小一点的卷积神经网络作为二分类模型,减小图像输入尺寸,加快预测速度。
然后将训练好的人脸判断分类网络的全连接层改为卷积层,这样网络变成了全卷积网络,可以接受任意输入图像大小,图像经过全卷积网络将得到特征图,特征图上每一个“点”对应该位置映射到原图上的感受野区域属于人脸的概率,将属于人脸概率大于设定阈值的视为人脸候选框。
图像上人脸的大小是变化的,为了适应这种变化,最暴力的办法就是使用图像金字塔的方式,将待检测的图像缩放到不同大小,以进行多尺度人脸检测。对多个尺度下检测出来的所有人脸候选框,做非极大值抑制NMS,得到最后人脸检测的结果。
这里提供用caffe实现该方法的数据集、模型文件和代码打包的 下载链接
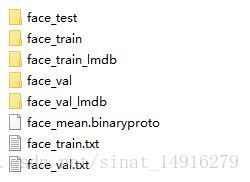
下面介绍用caffe实现该方法的具体过程。因为需要训练判断是否为人脸的CNN分类器,准备好正负训练样本,然后得到caffe训练所需的的数据集文件(由于采用的是48x48的网络,原始数据集归一化到了48x48)。
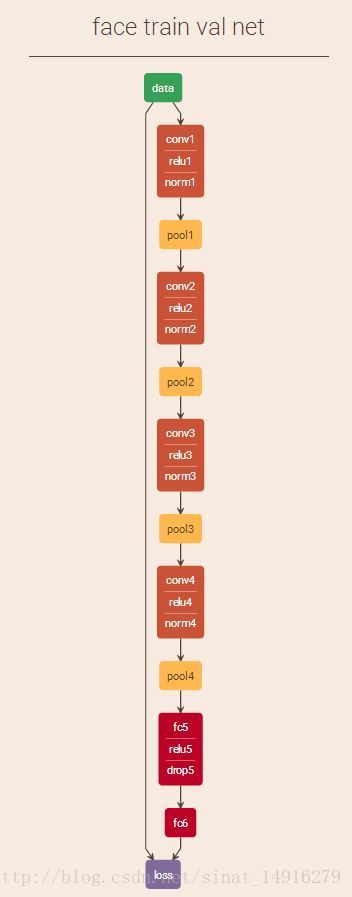
这里CNN采用的是DeepID卷积神经网络,网络结构如下,它的输入只有48x48大小,而采用AlexNet或CaffeNet网络会增加时间开销。
准备好网络模型文件train_val.prototxt和超参数配置文件solver.prototxt之后(下载链接中都有),开始训练,迭代10w次得到caffemodel。对测试集face_test文件夹中的图像进行测试,准备好测试用的deploy.prototxt。
测试单张图像的python脚本face_test.py如下:
# -*- coding: utf-8 -*-
"""
Created on Fri Mar 10 23:02:06 2017
@author: Administrator
"""
import numpy as np
import caffe
size = 48
image_file = 'C:/Users/Administrator/Desktop/caffe/data/face/face_test/0/253_faceimage07068.jpg'#测试图片路径
model_def = 'C:/Users/Administrator/Desktop/caffe/models/face/deploy.prototxt'
model_weights = 'C:/Users/Administrator/Desktop/caffe/models/face/_iter_10000.caffemodel'
net = caffe.Net(model_def, model_weights, caffe.TEST)

# 加载均值文件  也可指定数值做相应的操作
#mu = np.load('C:/Users/Administrator/Desktop/caffe/python/caffe/imagenet/ilsvrc_2012_mean.npy')  ###caffe 自带的文件
#mu = mu.mean(1).mean(1)  # average over pixels to obtain the mean (BGR) pixel values

transformer = caffe.io.Transformer({'data': net.blobs['data'].data.shape}) ##设定图片的shape格式(1,3,48,48),大小由deploy 文件指定
#transformer.set_mean('data', mu)            # 每个通道减去均值
# python读取的图片文件格式为H×W×K,需转化为K×H×W
transformer.set_transpose('data', (2,0,1))  #改变维度的顺序,由原始图片(48,48,3)变为(3,48,48)
# python中将图片存储为[0, 1],而caffe中将图片存储为[0, 255],所以需要一个转换
transformer.set_raw_scale('data', 255)      # 缩放到【0,255】之间
transformer.set_channel_swap('data', (2,1,0))   #交换通道,将图片由RGB变为BGR
#net.blobs['data'].reshape(1,3,size, size)  # 将输入图片格式转化为合适格式(与deploy文件相同)
#上面这句,第一参数:图片数量 第二个参数 :通道数 第三个参数:图片高度 第四个参数:图片宽度

image = caffe.io.load_image(image_file) #加载图片,始终是得到一副(h,w,3),rgb,0~1,float32的图像
net.blobs['data'].data[...]  = transformer.preprocess('data', image) #用上面的transformer.preprocess来处理刚刚加载图片

caffe.set_device(0)
caffe.set_mode_gpu()
output = net.forward()
output_prob = output['prob'][0].argmax()  # 给出概率最高的是第几类,需要自己对应到我们约定的类别去
print output_prob
print output['prob'][0][0] #或print output['prob'][0,1]
批量测试计算准确度的matlab脚本face_test.m如下:
%注意:caffe中维度顺序为(N,C,H,W),而matcaffe中Blob维度顺序为(W,H,C,N),即完全相反
%matlab加载图像为(h,w,c),得到的是rgb,而caffe使用的是bgr
function test_face()
clear;
addpath('..');%添加上级目录搜索路径
addpath('.');%添加当前目录搜索路径
caffe.set_mode_gpu(); %设置gpu模式
caffe.set_device(0); %gpu的id为0
%caffe.set_mode_cpu();
net_model = 'C:\Users\Administrator\Desktop\caffe\models\face\deploy.prototxt'; %网络模型deploy.prototxt
net_weights = 'C:\Users\Administrator\Desktop\caffe\models\face\_iter_10000.caffemodel'; %训练好的模型文件
%net_model = 'C:\Users\Administrator\Desktop\caffe\models\face2\deploy.prototxt'; %网络模型deploy.prototxt
%net_weights = 'C:\Users\Administrator\Desktop\caffe\models\face2\_iter_100000.caffemodel'; %训练好的模型文件
phase = 'test'; %不做训练,而是测试
net = caffe.Net(net_model, net_weights, phase); %获取网络
tic;
error = 0;
total = 0;
%批量读取图像进行测试
datadir = 'C:\Users\Administrator\Desktop\caffe\data\face\face_test\0';
imagefiles = dir(datadir);
for i = 3:length(imagefiles)
im = imread(fullfile(datadir,imagefiles(i).name));
[input_data,flag] = prepare_image(im); %图像数据预处理
if flag ~= 1
continue;
end
input_data ={input_data};
net.forward(input_data); %做前向传播
scores = net.blobs('prob').get_data();
[best_score,best] = max(scores);
% fprintf('*****%.3f %d %d\n',best_score,best - 1,classid(i-2));
best = best - 1; %matlab中从1开始,减1变成从0开始
if best ~= 0
error = error + 1;
fprintf('-----error: %d\n',error);
errorfile = ['error\' imagefiles(i).name];
%imwrite(im,errorfile);
end
total = total + 1;
end
datadir_1 = 'C:\Users\Administrator\Desktop\caffe\data\face\face_test\1';
imagefiles_1 = dir(datadir_1);
for i = 3:length(imagefiles_1)
im_1 = imread(fullfile(datadir_1,imagefiles_1(i).name));
[input_data_1,flag] = prepare_image(im_1); %图像数据预处理
if flag ~= 1
continue;
end
input_data_1 = {input_data_1};
net.forward(input_data_1); %做前向传播
scores_1 = net.blobs('prob').get_data();
[best_score_1,best_1] = max(scores_1);
% fprintf('*****%.3f %d %d\n',best_score,best - 1,classid(i-2));
best_1 = best_1 - 1; %matlab中从1开始,减1变成从0开始
if best_1 ~= 1
error = error + 1;
fprintf('error: %d-----\n',error);
errorfile = ['face_error\' imagefiles_1(i).name];
%imwrite(im,errorfile);
end
total = total + 1;
end
total_time = toc;
%打印到屏幕上
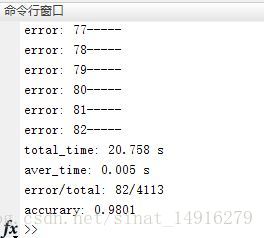
fprintf('total_time: %.3f s\n',total_time);
fprintf('aver_time: %.3f s\n',total_time/total);
fprintf('error/total: %d/%d\n',error,total);
fprintf('accurary: %.4f\n',1.0 - (error*1.0)/total);
%disp(['error/total: ',num2str(error),'/',num2str(length(imagefiles)-2)]);
end
function [im_data,flag] = prepare_image(im)
%d = load('../+caffe/imagenet/ilsvrc_2012_mean.mat');
%mean_data = d.mean_data;
%resize to 227 x 227
im_data = [];
im = imresize(im,[227 227],'bilinear');
%im = imresize(im,[48 48],'bilinear');
[h,w,c] = size(im);
if c ~= 3
flag = 0;
return;
end
flag = 1;
%caffe的blob顺序是[w h c num]
%matlab:[h w c] rgb -> caffe:[w h c] bgr
im_data = im(:,:,[3,2,1]); %rgb -> bgr
im_data = permute(im_data,[2,1,3]); %[h w c] -> [w h c]
[w,h,~] = size(im_data);
%ImageNet数据集的均值具有统计规律,这里可以直接拿来使用
mean_data(:,:,1) = ones(w,h) .* 104; %b
mean_data(:,:,2) = ones(w,h) .* 117; %g
mean_data(:,:,3) = ones(w,h) .* 123; %r
im_data = single(im_data);
%im_data = im_data - single(mean_data); %因为训练集和测试集都没有做去均值,所以这里也不做(如果只是这里做了去均值效果会变差)
end在测试集上进行批量测试,准确率达到了98%。
为了利用CNN分类器来检测人脸,需要将CNN网络中的全连接层替换为卷积层得到全卷积网络,修改好的全卷积网络deploy_full_conv.prototxt内容如下:
name: "face_full_conv_net"
layer {
  name: "data"
  type: "Input"
  top: "data"
  input_param { shape: { dim: 1 dim: 3 dim: 48 dim: 48 } }
}
layer {
  name: "conv1"
  type: "Convolution"
  bottom: "data"
  top: "conv1"
  convolution_param {
    num_output: 20
    kernel_size: 3
    stride: 1
    pad: 1
  }
}
layer {
  name: "relu1"
  type: "ReLU"
  bottom: "conv1"
  top: "conv1"
}
layer {
  name: "norm1"
  type: "LRN"
  bottom: "conv1"
  top: "conv1"
  lrn_param {
    local_size: 5
    alpha: 0.0001
    beta: 0.75
  }
}
layer {
  name: "pool1"
  type:  "Pooling"
  bottom: "conv1"
  top: "pool1"
  pooling_param {
    pool: MAX
    kernel_size: 2
    stride: 2
  }
}
layer {
  name: "conv2"
  type: "Convolution"
  bottom: "pool1"
  top: "conv2"
  convolution_param {
    num_output: 40
    kernel_size: 3
    pad: 1
  }
}
layer {
  name: "relu2"
  type: "ReLU"
  bottom: "conv2"
  top: "conv2"
}
layer {
  name: "norm2"
  type: "LRN"
  bottom: "conv2"
  top: "conv2"
  lrn_param {
    local_size: 5
    alpha: 0.0001
    beta: 0.75
  }
}
layer {
  name: "pool2"
  type: "Pooling"
  bottom: "conv2"
  top: "pool2"
  pooling_param {
    pool: MAX
    kernel_size: 2
    stride: 2
  }
}
layer {
  name: "conv3"
  type: "Convolution"
  bottom: "pool2"
  top: "conv3"
  convolution_param {
    num_output: 60
    kernel_size: 3
    pad: 1
  }
}
layer {
  name: "relu3"
  type: "ReLU"
  bottom: "conv3"
  top: "conv3"
}
layer {
  name: "norm3"
  type: "LRN"
  bottom: "conv3"
  top: "conv3"
  lrn_param {
    local_size: 5
    alpha: 0.0001
    beta: 0.75
  }
}
layer {
  name: "pool3"
  type: "Pooling"
  bottom: "conv3"
  top: "pool3"
  pooling_param {
    pool: MAX
    kernel_size: 2
    stride: 2
  }
}
layer {
  name: "conv4"
  type: "Convolution"
  bottom: "pool3"
  top: "conv4"
  convolution_param {
    num_output: 80
    kernel_size: 3
    pad: 1
  }
}
layer {
  name: "relu4"
  type: "ReLU"
  bottom: "conv4"
  top: "conv4"
}
layer {
  name: "norm4"
  type: "LRN"
  bottom: "conv4"
  top: "conv4"
  lrn_param {
    local_size: 5
    alpha: 0.0001
    beta: 0.75
  }
}
layer {
  name: "pool4"
  type: "Pooling"
  bottom: "conv4"
  top: "pool4"
  pooling_param {
    pool: MAX
    kernel_size: 2
    stride: 2
  }
}
#修改为卷积层
layer {
  name: "fc5-conv" ### fc5
  type: "Convolution" ### InnerProduct
  bottom: "pool4"
  top: "fc5-conv" ### fc5
  #inner_product_param {
   # num_output: 160
  #}
  convolution_param {
    num_output: 160
    kernel_size: 3
  }
}
layer {
  name: "relu5"
  type: "ReLU"
  bottom: "fc5-conv"
  top: "fc5-conv"
}
layer {
  name: "drop5"
  type:  "Dropout"
  bottom: "fc5-conv"
  top: "fc5-conv"
  dropout_param {
    dropout_ratio: 0.5
  }
}
#修改为卷积层
layer {
  name: "fc6-conv" ### fc6
  type:  "Convolution" ### InnerProduct
  bottom: "fc5-conv"
  top: "fc6-conv"
  #inner_product_param {
   # num_output: 2
  #}
  convolution_param {
    num_output: 2
    kernel_size: 1
  }
}
layer {
  name: "prob"
  type: "Softmax"
  bottom: "fc6-conv"
  top: "prob"
}
还需要将训练好的_iter_100000.caffemodel模型文件也转化为全卷积的,得到的_iter_100000_full_conv.caffemodel,转换脚本convert_full_conv.py如下:
# -*- coding: utf-8 -*-
"""
Created on Fri Mar 10 21:14:09 2017
@author: Administrator
"""
###首先需要手动将deploy.prototxt修改成全卷积的deploy_full_conv.prorotxt,特别要注意全连接层修改成卷积层的细节
###将训练好的分类模型caffemodel转换成可以接受任意输入大小,最后输出特征图的全卷积模型caffemodel

import numpy as np
import caffe

model_def = 'C:/Users/Administrator/Desktop/caffe/models/face/deploy.prototxt'
model_weights = 'C:/Users/Administrator/Desktop/caffe/models/face/_iter_100000.caffemodel'
net = caffe.Net(model_def,
                model_weights,
                caffe.TEST)
params = ['fc5', 'fc6']
# fc_params = {name: (weights, biases)}
fc_params = {pr: (net.params[pr][0].data, net.params[pr][1].data) for pr in params}
for fc in params:
    print '{} weights are {} dimensional and biases are {} dimensional'.format(fc, fc_params[fc][0].shape, fc_params[fc][1].shape)

# Load the fully convolutional network to transplant the parameters.
net_full_conv = caffe.Net('./deploy_full_conv.prototxt',
                          './_iter_100000.caffemodel',
                          caffe.TEST)
params_full_conv = ['fc5-conv', 'fc6-conv']
# conv_params = {name: (weights, biases)}
conv_params = {pr: (net_full_conv.params[pr][0].data, net_full_conv.params[pr][1].data) for pr in params_full_conv}
for conv in params_full_conv:
    print '{} weights are {} dimensional and biases are {} dimensional'.format(conv, conv_params[conv][0].shape, conv_params[conv][1].shape)

for pr, pr_conv in zip(params, params_full_conv):
    conv_params[pr_conv][0].flat = fc_params[pr][0].flat  # flat unrolls the arrays
    conv_params[pr_conv][1][...] = fc_params[pr][1]

net_full_conv.save('./_iter_100000_full_conv.caffemodel')
print 'success'
最后,就可以用deploy_full_conv.prototxt和_iter_100000_full_conv.caffemodel对任意输入尺寸的图像进行人脸检测了。对单张图像进行人脸检测的python脚本face_detect如下:
# -*- coding: utf-8 -*-
import numpy as np
import cv2 #需要安装opencv,然后将opencv安装目录下build\python\2.7\x64\cv2.pyd拷贝到python的安装目录下Anaconda2\Lib\site-packages文件夹下
from operator import itemgetter
import time
import caffe
caffe.set_device(0)
caffe.set_mode_gpu()
def IoU(rect_1, rect_2):
'''
:param rect_1: list in format [x11, y11, x12, y12, confidence]
:param rect_2: list in format [x21, y21, x22, y22, confidence]
:return: returns IoU ratio (intersection over union) of two rectangles
'''
x11 = rect_1[0] # first rectangle top left x
y11 = rect_1[1] # first rectangle top left y
x12 = rect_1[2] # first rectangle bottom right x
y12 = rect_1[3] # first rectangle bottom right y
x21 = rect_2[0] # second rectangle top left x
y21 = rect_2[1] # second rectangle top left y
x22 = rect_2[2] # second rectangle bottom right x
y22 = rect_2[3] # second rectangle bottom right y
x_overlap = max(0, min(x12,x22) -max(x11,x21))
y_overlap = max(0, min(y12,y22) -max(y11,y21))
intersection = x_overlap * y_overlap
union = (x12-x11) * (y12-y11) + (x22-x21) * (y22-y21) - intersection
return float(intersection) / union
def IoM(rect_1, rect_2):
'''
:param rect_1: list in format [x11, y11, x12, y12, confidence]
:param rect_2: list in format [x21, y21, x22, y22, confidence]
:return: returns IoM ratio (intersection over min-area) of two rectangles
'''
x11 = rect_1[0] # first rectangle top left x
y11 = rect_1[1] # first rectangle top left y
x12 = rect_1[2] # first rectangle bottom right x
y12 = rect_1[3] # first rectangle bottom right y
x21 = rect_2[0] # second rectangle top left x
y21 = rect_2[1] # second rectangle top left y
x22 = rect_2[2] # second rectangle bottom right x
y22 = rect_2[3] # second rectangle bottom right y
x_overlap = max(0, min(x12,x22) -max(x11,x21))
y_overlap = max(0, min(y12,y22) -max(y11,y21))
intersection = x_overlap * y_overlap
rect1_area = (y12 - y11) * (x12 - x11)
rect2_area = (y22 - y21) * (x22 - x21)
min_area = min(rect1_area, rect2_area)
return float(intersection) / min_area
def NMS(rectangles,threshold=0.3):
'''
:param rectangles: list of rectangles, which are lists in format [x11, y11, x12, y12, confidence]
:return: list of rectangles after local NMS
'''
rectangles = sorted(rectangles, key=itemgetter(4), reverse=True) #按照confidence降序排列
result_rectangles = rectangles[:] # list to return
'''
while not result_rectangles == []:
rect = result_rectangles[0]
for index in range(1,len(result_rectangles)):
iou = IoU(rect,result_rectangles[index])
if
'''
number_of_rects = len(result_rectangles)
#threshold = 0.3 # threshold of IoU of two rectangles
cur_rect = 0
while cur_rect < number_of_rects - 1: # start from first element to second last element
rects_to_compare = number_of_rects - cur_rect - 1 # elements after current element to compare
cur_rect_to_compare = cur_rect + 1 # start comparing with element after current
while rects_to_compare > 0: # while there is at least one element after current to compare
if (IoU(result_rectangles[cur_rect], result_rectangles[cur_rect_to_compare]) >= threshold or IoM(result_rectangles[cur_rect], result_rectangles[cur_rect_to_compare]) >= 0.3):
del result_rectangles[cur_rect_to_compare] # delete the rectangle
number_of_rects -= 1
else:
cur_rect_to_compare += 1 # skip to next rectangle
rects_to_compare -= 1
cur_rect += 1 # finished comparing for current rectangle
return result_rectangles
def face_detection(imgFile) :
#model_def = 'C:/Users/Administrator/Desktop/caffe/models/face/deploy_full_conv.prototxt'
#model_weights = 'C:/Users/Administrator/Desktop/caffe/models/face/_iter_10000_full_conv.caffemodel'
model_def = 'C:/Users/Administrator/Desktop/caffe/models/face2/deploy_full_conv.prototxt'
model_weights = 'C:/Users/Administrator/Desktop/caffe/models/face2/_iter_100000_full_conv.caffemodel'
net_full_conv = caffe.Net(model_def,
model_weights,
caffe.TEST)
mu = np.load('C:/Users/Administrator/Desktop/caffe/python/caffe/imagenet/ilsvrc_2012_mean.npy')
mu = mu.mean(1).mean(1) # average over pixels to obtain the mean (BGR) pixel values
#print 'mean-subtracted values:' , zip('BGR', mu)
start_time = time.time()
scales = [] #尺度变换和尺度变换因子
factor = 0.793700526
img = cv2.imread(imgFile) #opencv读取的图像为(h,w,c),bgr,caffe的blob维度为(n,c,h,w),使用的也是rgb
print img.shape
largest = min(2, 4000/max(img.shape[0:2])) #4000是人脸检测的经验值
scale = largest
minD = largest*min(img.shape[0:2])
while minD >= 48: #网络的输入是227x227??? #多尺度变换
scales.append(scale) #添加当前尺度
scale *= factor #乘以尺度变换因子
minD *= factor #得到新的尺度
true_boxes = []
for scale in scales:
scale_img = cv2.resize(img,((int(img.shape[1] * scale), int(img.shape[0] * scale)))) #将图像缩放到各尺度
cv2.imwrite('C:/Users/Administrator/Desktop/caffe/scale_img.jpg',scale_img)
im = caffe.io.load_image('C:/Users/Administrator/Desktop/caffe/scale_img.jpg') #利用caffe的io接口加载图像,始终是得到一副(h,w,3),rgb,0~1,float32的图像
net_full_conv.blobs['data'].reshape(1,3,scale_img.shape[0],scale_img.shape[1]) #重新设置网络data层Blob维度为:1,3,height,width
transformer = caffe.io.Transformer({'data': net_full_conv.blobs['data'].data.shape}) #为data层创建transformer
transformer.set_transpose('data', (2,0,1)) #(h,w,3)->(3,h,w)
#transformer.set_mean('data', mu) #设置均值,由于训练集没有去均值,这里也不去均值
transformer.set_raw_scale('data', 255.0) #rescale from [0,1] to [0,255]
transformer.set_channel_swap('data', (2,1,0)) #RGB -> BGR
net_full_conv.blobs['data'].data[...] = transformer.preprocess('data', im)
out = net_full_conv.forward()
print out['prob'][0,0].shape #输出层prob结果,行x列
#print out['prob'][0].argmax(axis=0)
featureMap = out['prob'][0,0] #out['prob'][0][0]属于人脸的概率特征图
stride = 16 #特征图感受野大小
cellSize = 48 #网络输入尺寸
thresh = 0.95
for (y,x),prob in np.ndenumerate(featureMap):
if prob > thresh :
true_boxes.append([float(x*stride)/scale,
float(y*stride)/scale,
float(x*stride + cellSize - 1)/scale,
float(y*stride + cellSize - 1)/scale,
prob])
true_boxes = NMS(true_boxes,0.2) #非极大值抑制
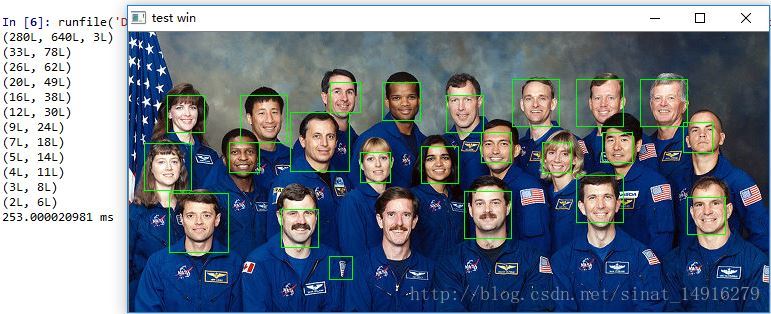
for true_box in true_boxes:
(x1, y1, x2, y2) = true_box[0:4] #取出人脸框的坐标
cv2.rectangle(img, (int(x1),int(y1)), (int(x2),int(y2)), (0,255,0)) #画人脸框
end_time = time.time()
print (end_time-start_time)*1000,'ms'
cv2.imwrite('output.jpg',img)
cv2.namedWindow('test win')
cv2.imshow('test win', img)
cv2.waitKey(0)
cv2.destroyWindow('test win')
if __name__ == "__main__":
imgFile = 'C:/Users/Administrator/Desktop/caffe/matlab/demo/1.jpg'
face_detection(imgFile)


 493
493

 被折叠的 条评论
为什么被折叠?
被折叠的 条评论
为什么被折叠?
 到【灌水乐园】发言


