


Quartz 使用
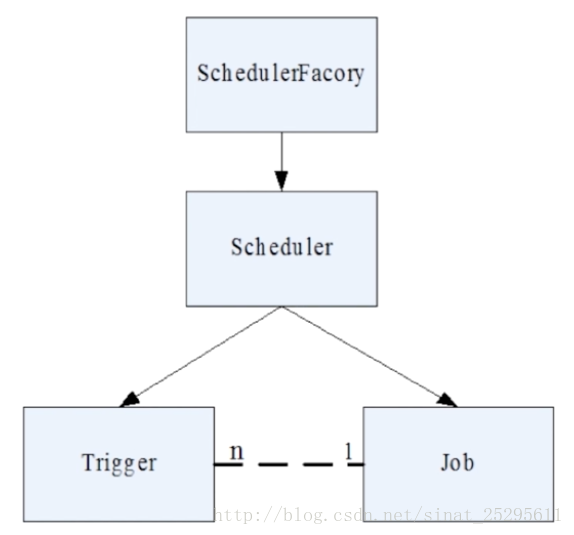
Quartz 核心:调度器Scheduler,任务JobDetail,触发器Trigger
调度器 Scheduler
Scheduler 接口为任务的调度者,相当于一个总指挥,由工厂模式(SchedulerFactory接口)创建,
SchedulerFactory接口有2个实现类:StdSchedulerFactory 和 DirectSchedulerFactory。
通常通过 StdSchedulerFactory实例的getScheduler() 方法创建调度器。
        SchedulerFactory schedulerFactory =new StdSchedulerFactory();
        Scheduler scheduler = schedulerFactory.getScheduler();
        scheduler.start();  //开启任务
        scheduler.scheduleJob(jobDetail, trigger1);
任务 JobDetail
JobDetail是具体Job任务的包装,包含一些描述信息和传递一些参数设置。
在设置自己的任务的时候需要实现Job接口:
package org.quartz;

public interface Job {
    void execute(JobExecutionContext var1) throws JobExecutionException;
}
JobExecutionContext 是任务执行的上下文对象,包含所有执行过程中的配置,类似于ServletContext容器
实现execute 方法为具体的任务逻辑。
public class HelloQuartz implements Job{
    @Override
    public void execute(JobExecutionContext jobExecutionContext) throws JobExecutionException {
        Date date = new Date();
        SimpleDateFormat sf = new SimpleDateFormat("yyyy MM dd HH:mm:ss");
        System.out.println("hello quartz at :" + sf.format(date));
    }
}使用JobDetail 对 Job进行包装,设置执行参数,如执行周期,分组,标识,要执行的任务等
JobDetail jobDetail = JobBuilder.newJob(HelloQuartz.class)
                .withIdentity("hello_job", "hello_group")
                .build();
触发器 Trigger
SimpleTrigger 和 CronTrigger,SimpleTrigger设置一些简单的条件,CronTrigger才能体现Quartz的强大之处。
SimpleTrigger作用:
在一个指定的时间段内执行一次作业
或是在指定的时间间隔内多次执行作业任务
示例:
任务:
public class HelloQuartz implements Job{
    @Override
    public void execute(JobExecutionContext jobExecutionContext) throws JobExecutionException {
        Date date = new Date();
        SimpleDateFormat sf = new SimpleDateFormat("yyyy MM dd HH:mm:ss");
        System.out.println("hello quartz at :" + sf.format(date));
    }
}
public class HelloScheduler {
public static void main(String[] args) throws SchedulerException, InterruptedException {
Date date = new Date();
SimpleDateFormat sf = new SimpleDateFormat("yyyy MM dd HH:mm:ss");
System.out.println("current time is:" + sf.format(date));
JobDetail jobDetail = JobBuilder.newJob(HelloQuartz.class)
.withIdentity("hello_job", "hello_group")
.build();
// TODO 1)在一个指定的时间段内执行一次作业
//设置距离当前时间4秒后执行,切仅执行一次, 无scheduler.shutdown()
date.setTime(date.getTime() + 4000L);
SimpleTrigger trigger = (SimpleTrigger) TriggerBuilder.newTrigger()
.withIdentity("hello_trigger")
.startAt(date)
.build();
// TODO 2)在指定的时间间隔内多次执行作业任务
//设置在4秒后执行,每隔2秒执行一次,执行4次,并且在6秒后结束执行
//注意:一旦设置了 endAt 结束时间,到达时间时就会结束,剩余次数不会执行
Date endTime = new Date();
endTime.setTime(endTime.getTime() + 6000L);
SimpleTrigger trigger1 =(SimpleTrigger) TriggerBuilder.newTrigger()
.withIdentity("trigger1")
.startAt(date)
.endAt(endTime)
.withSchedule(SimpleScheduleBuilder
.simpleSchedule()
.withIntervalInSeconds(2)
.withRepeatCount(4))
.build();
SchedulerFactory schedulerFactory =new StdSchedulerFactory();
Scheduler scheduler = schedulerFactory.getScheduler();
scheduler.start();
scheduler.scheduleJob(jobDetail, trigger1);
}
}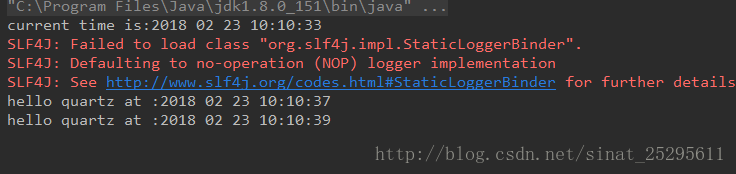
如图,重复2次之后结束,因为到达了endAt 指定时间
CronTrigger作用
基于日历的作业调度器,不是像SimpleTrigger那样精确指定间隔时间,更常用。
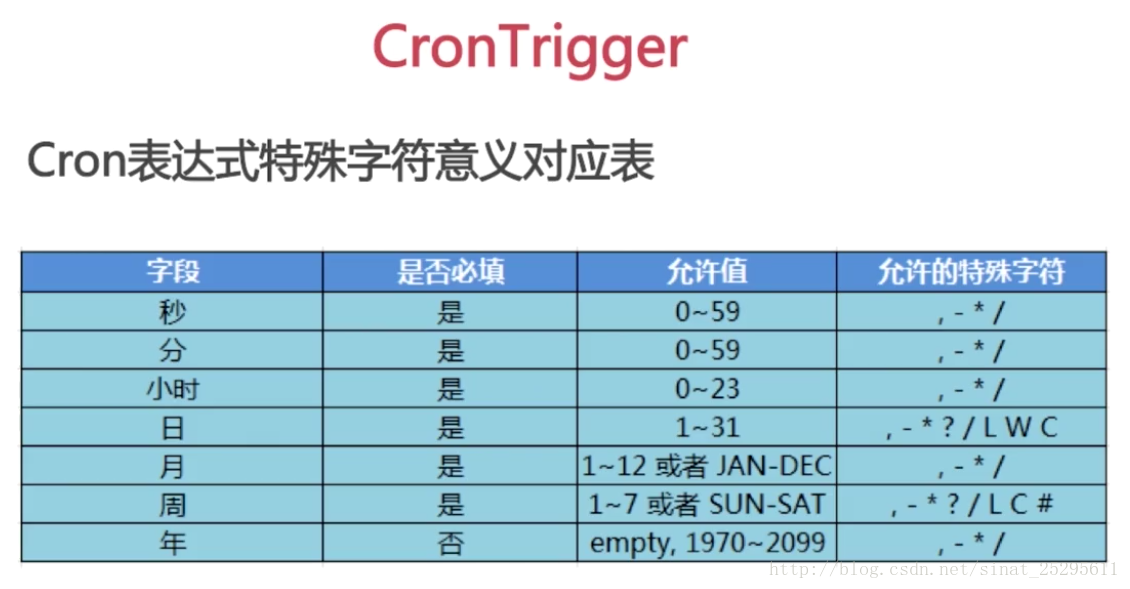
Cron表达式
用于配置CronTrigger 实例
由7个子表达式组成字符串
格式:[秒] [分] [小时] [日] [月] [周] [年]
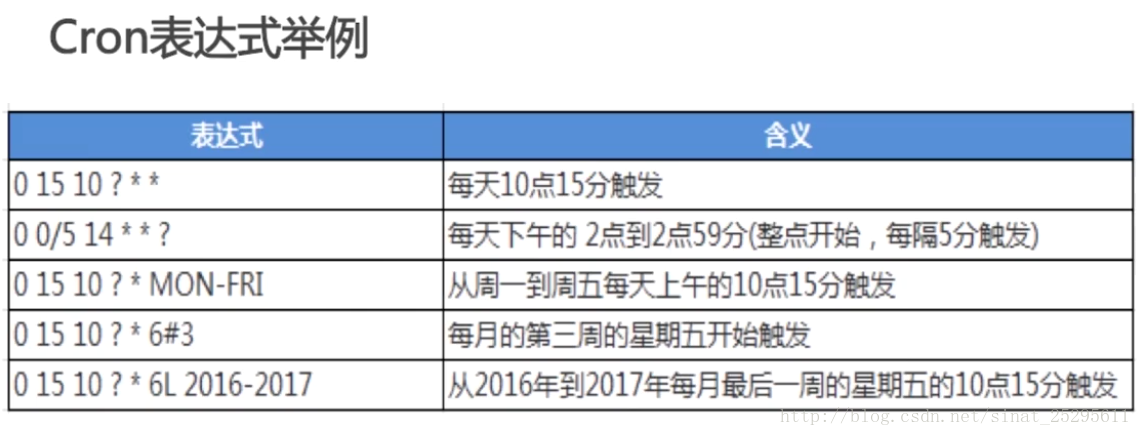
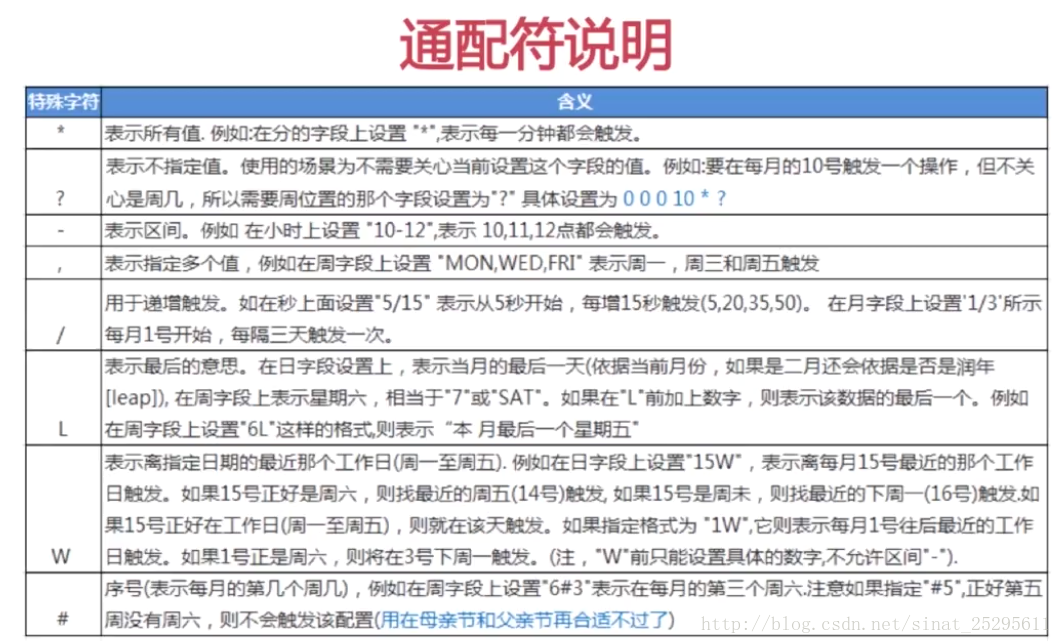
Cron表达式提示:
- ‘L’和’W’可以一组使用
比如:在日设置上,表示最后一个工作日(发工资?)
- 周字段英文不区分大小写
- 在线工具生成Cron表达式
Spring 与 Quartz 的整合
- 添加maven依赖:
<!-- 其他省略-->
<dependency>
      <groupId>org.springframework</groupId>
      <artifactId>spring-context-support</artifactId>
      <version>${spring.version}</version>
</dependency>
<dependency>
      <groupId>org.springframework</groupId>
      <artifactId>spring-tx</artifactId>
      <version>${spring.version}</version>
</dependency>
<dependency>
      <groupId>org.quartz-scheduler</groupId>
      <artifactId>quartz</artifactId>
      <version>2.2.3</version>
</dependency>- 配置quartz 任务的2种方式:
任务类一:
@Component("myBean")
public class MyBean {

    public void printMessage(){
        System.out.println("msssssssss..");
    }

}
任务类二:
@Component("anotherBean")
public class AnotherBean {
    public void printAnotherMessage() {
        System.out.println("AnotherMessage");
    }
}
任务类二注入的job:
public class FirstScheduledJob extends QuartzJobBean {

    private AnotherBean anotherBean;

    public void setAnotherBean(AnotherBean anotherBean){
        this.anotherBean = anotherBean;
    }

    @Override
    protected void executeInternal(JobExecutionContext arg0)
            throws JobExecutionException {
        Date date = new Date();
        SimpleDateFormat sf = new SimpleDateFormat("yyyy-MM-dd HH:mm:ss");
        System.out.println("FirstScheduledJob Executes!" + sf.format(date));
        this.anotherBean.printAnotherMessage();
    }
}
xml 配置:
<!-- 1)配置quartz 作业方式一:使用MethodInvokingJobDetailFactoryBean-->
    <bean id="simpleJobDetail"         class="org.springframework.scheduling.quartz.MethodInvokingJobDetailFactoryBean">
        <property name="targetObject" ref="myBean" />
        <property name="targetMethod" value="printMessage" />
    </bean>
<!-- 距离当前时间1秒之后执行,之后每隔两秒钟执行一次 -->
    <bean id="mySimpleTrigger" class="org.springframework.scheduling.quartz.SimpleTriggerFactoryBean">
        <property name="jobDetail"  ref="simpleJobDetail"/>
        <property name="startDelay"  value="1000"/>
        <property name="repeatInterval"  value="2000"/>
    </bean>


    <!-- 2)配置quartz 作业方式二:使用JobDetailFactoryBean-->
    <bean id="firstComplexJobDetail"
          class="org.springframework.scheduling.quartz.JobDetailFactoryBean">
        <property name="jobClass"
                  value="com.kay.quartz.FirstScheduledJob" />
        <property name="jobDataMap">
            <map>
                <entry key="anotherBean" value-ref="anotherBean" />
            </map>
        </property>
        <!-- job没有绑定trigger 仍然保留在Scheduler中-->
        <property name="Durability" value="true"/>
    </bean>
    <!-- 每隔5秒钟执行一次 -->
    <bean id="myCronTrigger" class="org.springframework.scheduling.quartz.CronTriggerFactoryBean">
        <property name="jobDetail"  ref="firstComplexJobDetail"/>
        <property name="cronExpression"  value="0/5 * * ? * *"/>
    </bean>

<!-- 最后交给Scheduler 进行调度-->
    <bean class="org.springframework.scheduling.quartz.SchedulerFactoryBean">
        <property name="jobDetails">
            <list>
                <ref bean="simpleJobDetail"/>
                <ref bean="firstComplexJobDetail"/>
            </list>
        </property>
        <property name="triggers">
            <list>
                <ref bean="mySimpleTrigger"/>
                <ref bean="myCronTrigger"/>
            </list>
        </property>
    </bean>
2种方式比较:
MethodInvokingJobDetailFactoryBean
配置简单,使用方便JobDetailFactoryBean
传递数据等,更加灵活,jobClass的类要继承QuartzJobBean
附:quartz.properties 配置文件
# Default Properties file for use by StdSchedulerFactory
# to create a Quartz Scheduler Instance, if a different
# properties file is not explicitly specified.
#
# ===========================================================================
# Configure Main Scheduler Properties 调度器属性
# ===========================================================================
org.quartz.scheduler.instanceName= DefaultQuartzScheduler
org.quartz.scheduler.instanceid=AUTO
org.quartz.scheduler.rmi.export= false
org.quartz.scheduler.rmi.proxy= false
org.quartz.scheduler.wrapJobExecutionInUserTransaction= false
# ===========================================================================
# Configure ThreadPool 线程池属性
# ===========================================================================
#线程池的实现类(一般使用SimpleThreadPool即可满足几乎所有用户的需求)
org.quartz.threadPool.class= org.quartz.simpl.SimpleThreadPool
#指定线程数,至少为1(无默认值)(一般设置为1-100直接的整数合适)
org.quartz.threadPool.threadCount= 10
#设置线程的优先级(最大为java.lang.Thread.MAX_PRIORITY 10,最小为Thread.MIN_PRIORITY 1,默认为5)
org.quartz.threadPool.threadPriority= 5
#设置SimpleThreadPool的一些属性
#设置是否为守护线程
#org.quartz.threadpool.makethreadsdaemons = false
#org.quartz.threadPool.threadsInheritContextClassLoaderOfInitializingThread= true
#org.quartz.threadpool.threadsinheritgroupofinitializingthread=false
#线程前缀默认值是:[Scheduler Name]_Worker
#org.quartz.threadpool.threadnameprefix=swhJobThead;
# 配置全局监听(TriggerListener,JobListener) 则应用程序可以接收和执行 预定的事件通知
# ===========================================================================
# Configuring a Global TriggerListener 配置全局的Trigger监听器
# MyTriggerListenerClass 类必须有一个无参数的构造函数,和 属性的set方法,目前2.2.x只支持原始数据类型的值(包括字符串)
# ===========================================================================
#org.quartz.triggerListener.NAME.class = com.swh.MyTriggerListenerClass
#org.quartz.triggerListener.NAME.propName = propValue
#org.quartz.triggerListener.NAME.prop2Name = prop2Value
# ===========================================================================
# Configuring a Global JobListener 配置全局的Job监听器
# MyJobListenerClass 类必须有一个无参数的构造函数,和 属性的set方法,目前2.2.x只支持原始数据类型的值(包括字符串)
# ===========================================================================
#org.quartz.jobListener.NAME.class = com.swh.MyJobListenerClass
#org.quartz.jobListener.NAME.propName = propValue
#org.quartz.jobListener.NAME.prop2Name = prop2Value
# ===========================================================================
# Configure JobStore 存储调度信息(工作,触发器和日历等)
# ===========================================================================
# 信息保存时间 默认值60秒
org.quartz.jobStore.misfireThreshold= 60000
#保存job和Trigger的状态信息到内存中的类
org.quartz.jobStore.class= org.quartz.simpl.RAMJobStore
# ===========================================================================
# Configure SchedulerPlugins 插件属性 配置
# ===========================================================================
# 自定义插件
#org.quartz.plugin.NAME.class = com.swh.MyPluginClass
#org.quartz.plugin.NAME.propName = propValue
#org.quartz.plugin.NAME.prop2Name = prop2Value
#配置trigger执行历史日志(可以看到类的文档和参数列表)
#org.quartz.plugin.triggHistory.class = org.quartz.plugins.history.LoggingTriggerHistoryPlugin
#org.quartz.plugin.triggHistory.triggerFiredMessage = Trigger {1}.{0} fired job {6}.{5} at= {4, date, HH=mm=ss MM/dd/yyyy}
#org.quartz.plugin.triggHistory.triggerCompleteMessage = Trigger {1}.{0} completed firing job {6}.{5} at {4, date, HH=mm=ss MM/dd/yyyy} with resulting trigger instruction code= {9}
#配置job调度插件  quartz_jobs(jobs and triggers内容)的XML文档
#加载 Job 和 Trigger 信息的类   (1.8之前用:org.quartz.plugins.xml.JobInitializationPlugin)
#org.quartz.plugin.jobInitializer.class = org.quartz.plugins.xml.XMLSchedulingDataProcessorPlugin
#指定存放调度器(Job 和 Trigger)信息的xml文件,默认是classpath下quartz_jobs.xml
#org.quartz.plugin.jobInitializer.fileNames = my_quartz_job2.xml
#org.quartz.plugin.jobInitializer.overWriteExistingJobs = false
#org.quartz.plugin.jobInitializer.failOnFileNotFound = true
#自动扫描任务单并发现改动的时间间隔,单位为秒
#org.quartz.plugin.jobInitializer.scanInterval = 10
#覆盖任务调度器中同名的jobDetail,避免只修改了CronExpression所造成的不能重新生效情况
#org.quartz.plugin.jobInitializer.wrapInUserTransaction = false
# ===========================================================================
# Sample configuration of ShutdownHookPlugin  ShutdownHookPlugin插件的配置样例
# ===========================================================================
#org.quartz.plugin.shutdownhook.class = \org.quartz.plugins.management.ShutdownHookPlugin
#org.quartz.plugin.shutdownhook.cleanShutdown = true
#
# Configure RMI Settings 远程服务调用配置
#
#如果你想quartz-scheduler出口本身通过RMI作为服务器,然后设置“出口”标志true(默认值为false)。
#org.quartz.scheduler.rmi.export = false
#主机上rmi注册表(默认值localhost)
#org.quartz.scheduler.rmi.registryhost = localhost
#注册监听端口号(默认值1099)
#org.quartz.scheduler.rmi.registryport = 1099
#创建rmi注册,false/never:如果你已经有一个在运行或不想进行创建注册
# true/as_needed=第一次尝试使用现有的注册,然后再回来进行创建
# always=先进行创建一个注册,然后再使用回来使用注册
#org.quartz.scheduler.rmi.createregistry = never
#Quartz Scheduler服务端端口,默认是随机分配RMI注册表
#org.quartz.scheduler.rmi.serverport = 1098
#true=链接远程服务调度(客户端),这个也要指定registryhost和registryport,默认为false
# 如果export和proxy同时指定为true,则export的设置将被忽略
#org.quartz.scheduler.rmi.proxy = false


 695
695


 被折叠的 条评论
为什么被折叠?
被折叠的 条评论
为什么被折叠?
 到【灌水乐园】发言


