


1、首先建一个maven webapp工程,然后pom里面 加上依赖的jar包
1) aopalliance-1.0.jar
2) commons-logging-1.1.3.jar
3) spring-aop-3.2.8.RELEASE.jar
4) spring-beans-3.2.8.RELEASE.jar
5) spring-context-3.2.8.RELEASE.jar
6) spring-core-3.2.8.RELEASE.jar
7) spring-expression-3.2.8.RELEASE.jar
8) spring-web-3.2.8.RELEASE.jar
9) spring-webmvc-3.2.8.RELEASE.jar
10) jstl-1.1.2.jar
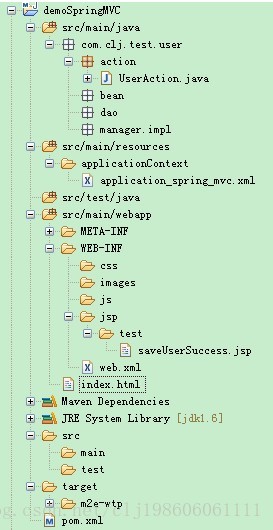
2、工程结构
1)application_spring_mvc.xml
- <?xml version="1.0" encoding="UTF-8"?>
- <beans
- xmlns="http://www.springframework.org/schema/beans"
- xmlns:xsi="http://www.w3.org/2001/XMLSchema-instance"
- xmlns:tx="http://www.springframework.org/schema/tx"
- xmlns:context="http://www.springframework.org/schema/context"
- xmlns:mvc="http://www.springframework.org/schema/mvc"
- xsi:schemaLocation="http://www.springframework.org/schema/beans
- http://www.springframework.org/schema/beans/spring-beans-3.2.xsd
- http://www.springframework.org/schema/tx
- http://www.springframework.org/schema/tx/spring-tx-3.2.xsd
- http://www.springframework.org/schema/context
- http://www.springframework.org/schema/context/spring-context-3.2.xsd
- http://www.springframework.org/schema/mvc
- http://www.springframework.org/schema/mvc/spring-mvc-3.2.xsd">
- <!-- 自动扫描的包名 -->
- <context:component-scan base-package="com.clj"/>
- <!-- 默认的注解映射的支持,自动注册DefaultAnnotationHandlerMapping和AnnotationMethodHandlerAdapter -->
- <mvc:annotation-driven />
- <!-- 视图解释类 -->
- <bean class="org.springframework.web.servlet.view.InternalResourceViewResolver">
- <property name="prefix" value="/WEB-INF/jsp/"/>
- <property name="suffix" value=".jsp"/>
- <property name="viewClass" value="org.springframework.web.servlet.view.JstlView" />
- </bean>
- <!-- 对静态资源文件的访问-->
- <mvc:resources mapping="/images/**" location="/WEB-INF/images/" cache-period="31556926"/>
- <mvc:resources mapping="/js/**" location="/WEB-INF/js/" cache-period="31556926"/>
- <mvc:resources mapping="/css/**" location="/WEB-INF/css/" cache-period="31556926"/>
- </beans>
3、web.xml
- <!DOCTYPE web-app PUBLIC
- "-//Sun Microsystems, Inc.//DTD Web Application 2.3//EN"
- "http://java.sun.com/dtd/web-app_2_3.dtd" >
- <web-app>
- <!-- ================spring mvc 适配器================ -->
- <servlet>
- <servlet-name>springMVC</servlet-name>
- <servlet-class>org.springframework.web.servlet.DispatcherServlet</servlet-class>
- <init-param>
- <param-name>contextConfigLocation</param-name>
- <param-value>classpath*:/applicationContext/application_spring_mvc.xml</param-value>
- </init-param>
- <load-on-startup>1</load-on-startup>
- </servlet>
- <servlet-mapping>
- <servlet-name>springMVC</servlet-name>
- <url-pattern>/</url-pattern>
- </servlet-mapping>
- <!-- ================================================== -->
- <servlet-mapping>
- <servlet-name>default</servlet-name>
- <url-pattern>*.html</url-pattern>
- </servlet-mapping>
- <welcome-file-list>
- <welcome-file>index.html</welcome-file>
- </welcome-file-list>
- </web-app>
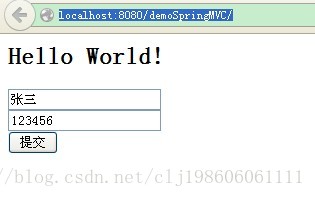
4、index.html
- <html>
- <body>
- <h2>Hello World!</h2>
- <form action="./user/save" method="get">
- <input id="name" name="name" value="张三"/><br/>
- <input id="password" name="password" value="123456"/><br/>
- <input type="submit" value="提交"/>
- </form>
- </body>
- </html>
5、UserAction.Java
- package com.clj.test.user.action;
- import org.springframework.context.annotation.Scope;
- import org.springframework.stereotype.Controller;
- import org.springframework.web.bind.annotation.RequestMapping;
- import org.springframework.web.bind.annotation.RequestMethod;
- import org.springframework.web.servlet.ModelAndView;
- /**
- * <一句话功能简述>
- * <功能详细描述>
- *
- * @author Administrator
- * @version [版本号, 2014年3月4日]
- * @see [相关类/方法]
- * @since [产品/模块版本]
- */
- @Controller
- @Scope("prototype")
- @RequestMapping("/user")
- public class UserAction
- {
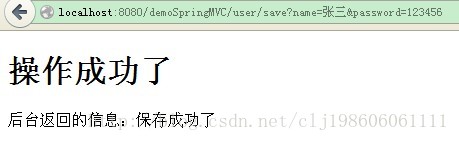
- @RequestMapping(value="/save",method=RequestMethod.GET)
- public ModelAndView save(String name,String password)
- {
- System.out.println("接收到的用户信息:"+name);
- ModelAndView mov=new ModelAndView();
- mov.setViewName("/test/saveUserSuccess");
- mov.addObject("msg", "保存成功了");
- return mov;
- }
- }
6、saveUserSuccess.jsp
- <%@ page language="java" contentType="text/html; charset=UTF-8" pageEncoding="UTF-8"%>
- <!DOCTYPE html PUBLIC "-//W3C//DTD HTML 4.01 Transitional//EN" "http://www.w3.org/TR/html4/loose.dtd">
- <html>
- <head>
- <meta http-equiv="Content-Type" content="text/html; charset=UTF-8">
- <title>添加用户成功</title>
- </head>
- <body>
- <h1>操作成功了</h1>
- 后台返回的信息:${msg}
- </body>
- </html>
四、发布工程到tomcat进行测试
具体eclipse中如何使用tomcat进行maven webapp项目测试请参看:
http://blog.csdn.net/clj198606061111/article/details/20221133
1) 浏览器中输入:http://localhost:8080/demoSpringMVC/
便可进入index.html页面,如下图:
2) 提交后


 2083
2083

 被折叠的 条评论
为什么被折叠?
被折叠的 条评论
为什么被折叠?
 到【灌水乐园】发言


