


自定义开关控件
Android自定义控件一般有三种方式
1、继承Android固有的控件,在Android原生控件的基础上,进行添加功能和逻辑。
2、继承ViewGroup,这类自定义控件是可以往自己的布局里面添加其他的子控件的。
3、继承View,这类自定义控件没有跟原生的控件有太多的相似的地方,也不需要在自己的肚子里添加其他的子控件。
ToggleView自定义开关控件表征上没有跟Android原生的控件有什么相似的地方,而且在滑动的效果上也没有沿袭Android原生的地方,所以我们的自定义ToggleView选择继承View
同样的自定义控件需要复写三个构造方法
//在布局中使用该控件的时候,而且有额外的style属性的时候调用该构造方法,
public ToggleView(Context context, AttributeSet attrs, int defStyle);
//在布局中使用该控件的时候调用该构造方法
public ToggleView(Context context, AttributeSet attrs)
//在Java代码中直接new该控件的时候,调用该构造方法
public ToggleView(Context context)
因为是自定义的控件,所以属性还是自己定义的比较好用一些。我们这里定义三个属性
1、背景图片
2、滑块的图片
3、布局中默认的开关的状态
所以就需要用到了自定义属性
在values目录下,新建xml文件,attrs.xml
在里面定义自己的属性
<?xml version="1.0" encoding="utf-8"?>
<resources>
     <declare-styleable name="toggle">

            <attr name="switchBackground" format="reference" />
            <attr name="slidingBackground" format="reference" />
            <attr name="toggleState" format="boolean" />
      </declare-styleable>
</resources><declare-styleable name属性>是可以在R文件中找到该属性名称的<attr>标签中,一个标签写一个属性 name属性表示属性名称,format表示属性类型这里定义了三个属性名和属性类型。
属性和自定义控件的三个构造方法已经完成,就我们就可以在布局文件中添加自定义的控件了
<RelativeLayout
    xmlns:android="http://schemas.android.com/apk/res/android"
    xmlns:hss="http://schemas.android.com/apk/res/com.hss.toggle"
    android:layout_width="match_parent"
    android:layout_height="match_parent"
     >

    <com.hss.toggle.ToggleView
        android:id="@+id/toggleView"
        android:layout_height="wrap_content"
        android:layout_width="wrap_content"
        android:layout_centerInParent="true"
        hss:switchBackground="@drawable/switch_background"
        hss:slidingBackground="@drawable/slide_button_background"
        hss:toggleState="true"
        >
        </com.hss.toggle.ToggleView>

</RelativeLayout>
注意:在我自定义控件com.hss.toggle.ToggleView中,部分属性是以android开头的,部分属性是以hss(我自己定义的命名空间)开头的,这是为什么呢?
注意看本片代码第二行,
xmlns:hss="http://schemas.android.com/apk/res/com.hss.toggle"我在这里写着样一行代码,就说明把values/attrs.xml中的每个条目都导入进来了,就可以直接使用我在attrs.xml里面的属性了
可以直接使用自定义的属性之后,问题应该聚焦到怎么在Java代码中获取到我自定义的属性的值呢?
根据命名空间和自定义属性的name值获取,看代码:
String namespace = "http://schemas.android.com/apk/res/com.hss.toggle";
        int toggle_switchbackground = attrs.getAttributeResourceValue(namespace, "switchBackground", -1);
        int toggle_slidingbackground = attrs.getAttributeResourceValue(namespace, "slidingBackground", -1);
        toggle_state  = attrs.getAttributeBooleanValue(namespace, "toggleState", false);
看到没?该方法用到了attr参数,所以获取自定义属性值的操作应该在两个参数的那里面执行。
整体的自定义控件的类见代码:
package com.hss.toggle;

import android.content.Context;
import android.graphics.Bitmap;
import android.graphics.BitmapFactory;
import android.graphics.Canvas;
import android.util.AttributeSet;
import android.util.Log;
import android.view.MotionEvent;
import android.view.View;

/**
 * 自定义开关控件
 * @author hss
 */
public class ToggleView extends View {
    private static final String TAG = "ToogleView";
    private Bitmap sliding_background;
    private Bitmap switch_background;
    private boolean isSliding = false;
    private boolean toggle_state = false;
    private int downX;
    private mToggleStateChangeListener;

    // 构造方法,在xml文件布局的时候,指定了style的时候调用
    public ToggleView(Context context, AttributeSet attrs, int defStyle) {
        super(context, attrs, defStyle);
    }

    // 构造方法,在xml文件中布局的时候,没有指定style的时候调用
    public ToggleView(Context context, AttributeSet attrs) {
        this(context, attrs, 0);
        //在Java代码中 获取到xml中自定义属性对应的值
        String namespace = "http://schemas.android.com/apk/res/com.hss.toggle";
        int toggle_switchbackground = attrs.getAttributeResourceValue(namespace, "switchBackground", -1);
        int toggle_slidingbackground = attrs.getAttributeResourceValue(namespace, "slidingBackground", -1);
        toggle_state  = attrs.getAttributeBooleanValue(namespace, "toggleState", false);
        Log.i(TAG,""+toggle_slidingbackground+"     "+toggle_switchbackground);
        // 设置自定义开关的图片
        setToggleSwitchBackground(toggle_switchbackground);
        setToggleSlidingBackground(toggle_slidingbackground);
        setToggleState(toggle_state);
    }

    // 构造方法 在代码中new的时候调用
    public ToggleView(Context context) {
        this(context, null);

    }

    /**
     * 给滑动的控件设置背景图片
     *
     * @param toggle_slidingbackground 图片ID
     */
    private void setToggleSlidingBackground(int toggle_slidingbackground) {
        sliding_background = BitmapFactory.decodeResource(getResources(),toggle_slidingbackground);
    }

    /**
     * 给背景的控件,设置背景图片
     *
     * @param toggle_switchbackground 图片ID
     */
    private void setToggleSwitchBackground(int toggle_switchbackground) {
        switch_background = BitmapFactory.decodeResource(getResources(),toggle_switchbackground);
    }

    @Override
    protected void onMeasure(int widthMeasureSpec, int heightMeasureSpec) {
        //测量控件的大小,设置控件的大小为背景图片的大小
        setMeasuredDimension(switch_background.getWidth(),switch_background.getHeight());
    }

    @Override
    protected void onDraw(Canvas canvas) {
        //开始画自定义控件,使用canvas对象先把背景图片画上来
        canvas.drawBitmap(switch_background, 0, 0, null);
        if (isSliding) {
        //如果是滑动状态
            //控件距离左边的相对距离为:(控件每时每刻的距离自己左上方的焦点的x轴距离)-(控件本身一半的x轴宽度)
            int left = downX - sliding_background.getWidth() / 2;
            //控件最大的滑动距离(距离左边最大的距离)就是:(背景图片的宽度)-(滑块图片的宽度)
            int rightAlign = switch_background.getWidth()- sliding_background.getWidth();
            //如果距离左边的距离小于0,,就不让他继续往左边动了
            if (left < 0) {
                left = 0;
            } else if (left > rightAlign) {
                //如果距离左边的距离》应该距离左边的最大距离,也不让他往右边移动了
                left = rightAlign;
            }
            //控制好属性之后就可以时时刻刻的跟着画了
            canvas.drawBitmap(sliding_background, left, 0, null);
        } else {
            //如果不滑动,则根据控件的属性中开关的状态,来画滑块的位置
            if (toggle_state) {
                //如果开关状态为真,滑块移动到最右边
                int left = switch_background.getWidth() - sliding_background.getWidth();
                canvas.drawBitmap(sliding_background, left, 0, null);
            } else {
                //如果开关状态为假,滑块移动到最左边
                canvas.drawBitmap(sliding_background, 0, 0, null);
            }
        }
        super.onDraw(canvas);
    }

    @Override
    public boolean onTouchEvent(MotionEvent event) {
        //重写触摸事件
        int action = event.getAction();
        switch (action) {
        case MotionEvent.ACTION_DOWN:
            //开始点击的时候,是否滑动置为真,获取到当前手指的距离
            isSliding = true;
            downX = (int) event.getX();
            break;
        case MotionEvent.ACTION_MOVE:
            downX = (int) event.getX();
            break;
        case MotionEvent.ACTION_UP:
            //当点击结束的时候将是否滑动记为假,获取到移动的x轴的坐标
            downX = (int) event.getX();
            isSliding = false;
            //获取到背景图片中间的那个值
            int center = switch_background.getWidth() / 2;

            boolean state = downX > center;
            //如果先后的状态不相同,则将新的状态赋给成员变量,然后调用监听的方法
            if (toggle_state != state) {
                toggle_state = state;
                if (null != mToggleStateChangeListener) {
                    mToggleStateChangeListener
                            .onToggleState(toggle_state);
                }
            }
            break;
        }
        //调用一次onDraw()方法
        invalidate();
        return true;
    }
    //给自定义开关控件设置监听的方法
    public void setOnToggleStateLinstener(OnToggleStateChangeListener listen){
        mToggleStateChangeListener = listen;

    }
    public void setToggleState(boolean b) {
        toggle_state = b;
    }
    //监听回调接口,方法由实现接口的类实现
    public interface OnToggleStateChangeListener {

        public void onToggleState(boolean state);
    }
}
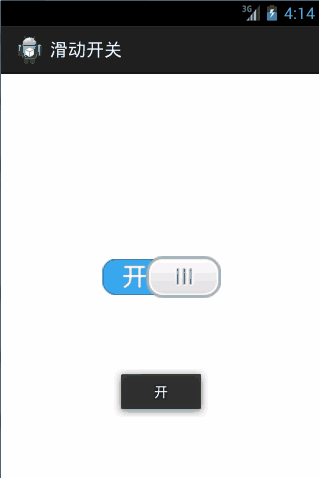
到此,我们的自定义控件部分的逻辑就写完了,,借下来再MainActivity中调用一下
package com.hss.toggle;

import android.app.Activity;
import android.os.Bundle;

import com.hss.toggle.ToggleView.OnToggleStateChangeListener;
import com.hss.toggle.utils.ToastUtil;

public class MainActivity extends Activity{

    private ToggleView toggleView;

    @Override
    protected void onCreate(Bundle savedInstanceState) {
        // TODO Auto-generated method stub
        super.onCreate(savedInstanceState);
        setContentView(R.layout.activity_main);
        toggleView = (ToggleView) findViewById(R.id.toggleView);
        toggleView.setOnToggleStateLinstener(new OnToggleStateChangeListener() {

            @Override
            public void onToggleState(boolean state) {
                showToast(state);
            }
        });
    }


    //这里调用到的自己封装的一个快速弹Toast的工具类
    private void showToast(boolean state) {
        ToastUtil.makeSuddenlyToast(getApplicationContext(), state?"开":"关");
    }
}
ToastUtil类如下:
package com.hss.toggle.utils;

import android.content.Context;
import android.widget.Toast;

/**
 * @title Toast工具类
 * @author hss
 */
public class ToastUtil {
    private static Toast toast;

    /**
     * 弹出短时间Toast
     * @param context 上下文对象
     * @param text 要弹出的文字
     */
    public static void makeShortToast(Context context,String text){
        toast = Toast.makeText(context, text, Toast.LENGTH_SHORT);
        toast.show();
    }

    /**
     * 弹出长时间的Toast
     * @param context 上下文对象
     * @param text 要弹出的文字
     */
    public static void makeLongToast(Context context,String text){
        toast = Toast.makeText(context, text, Toast.LENGTH_LONG);
        toast.show();
    }
    /**
     * 单例Toast
     * @param context 上下文对象
     * @param text 要弹出的文字
     */
    public static void makeSuddenlyToast(Context context,String text){
        if(toast==null){
            toast = Toast.makeText(context, text, Toast.LENGTH_SHORT);
        }
        toast.setText(text);
        toast.show();
    }
}
总结一下,其实本次自定义控件的步骤如下:
1、在values/attrs.xml自定义属性和属性值的数据类型
2、在Java代码中定义自定义控件类,继承View或者ViewGroup或者Android原生的控件,实现构造方法,获取到自定义属性的值,并且编写对应的逻辑和点击事件。
3、在布局文件中使用自定义控件和自定义属性(注意命名空间)。
4、在MainActivity中调用


 2279
2279

 被折叠的 条评论
为什么被折叠?
被折叠的 条评论
为什么被折叠?
 到【灌水乐园】发言


