首先,先看微信支付官方文档,根据文档来看。
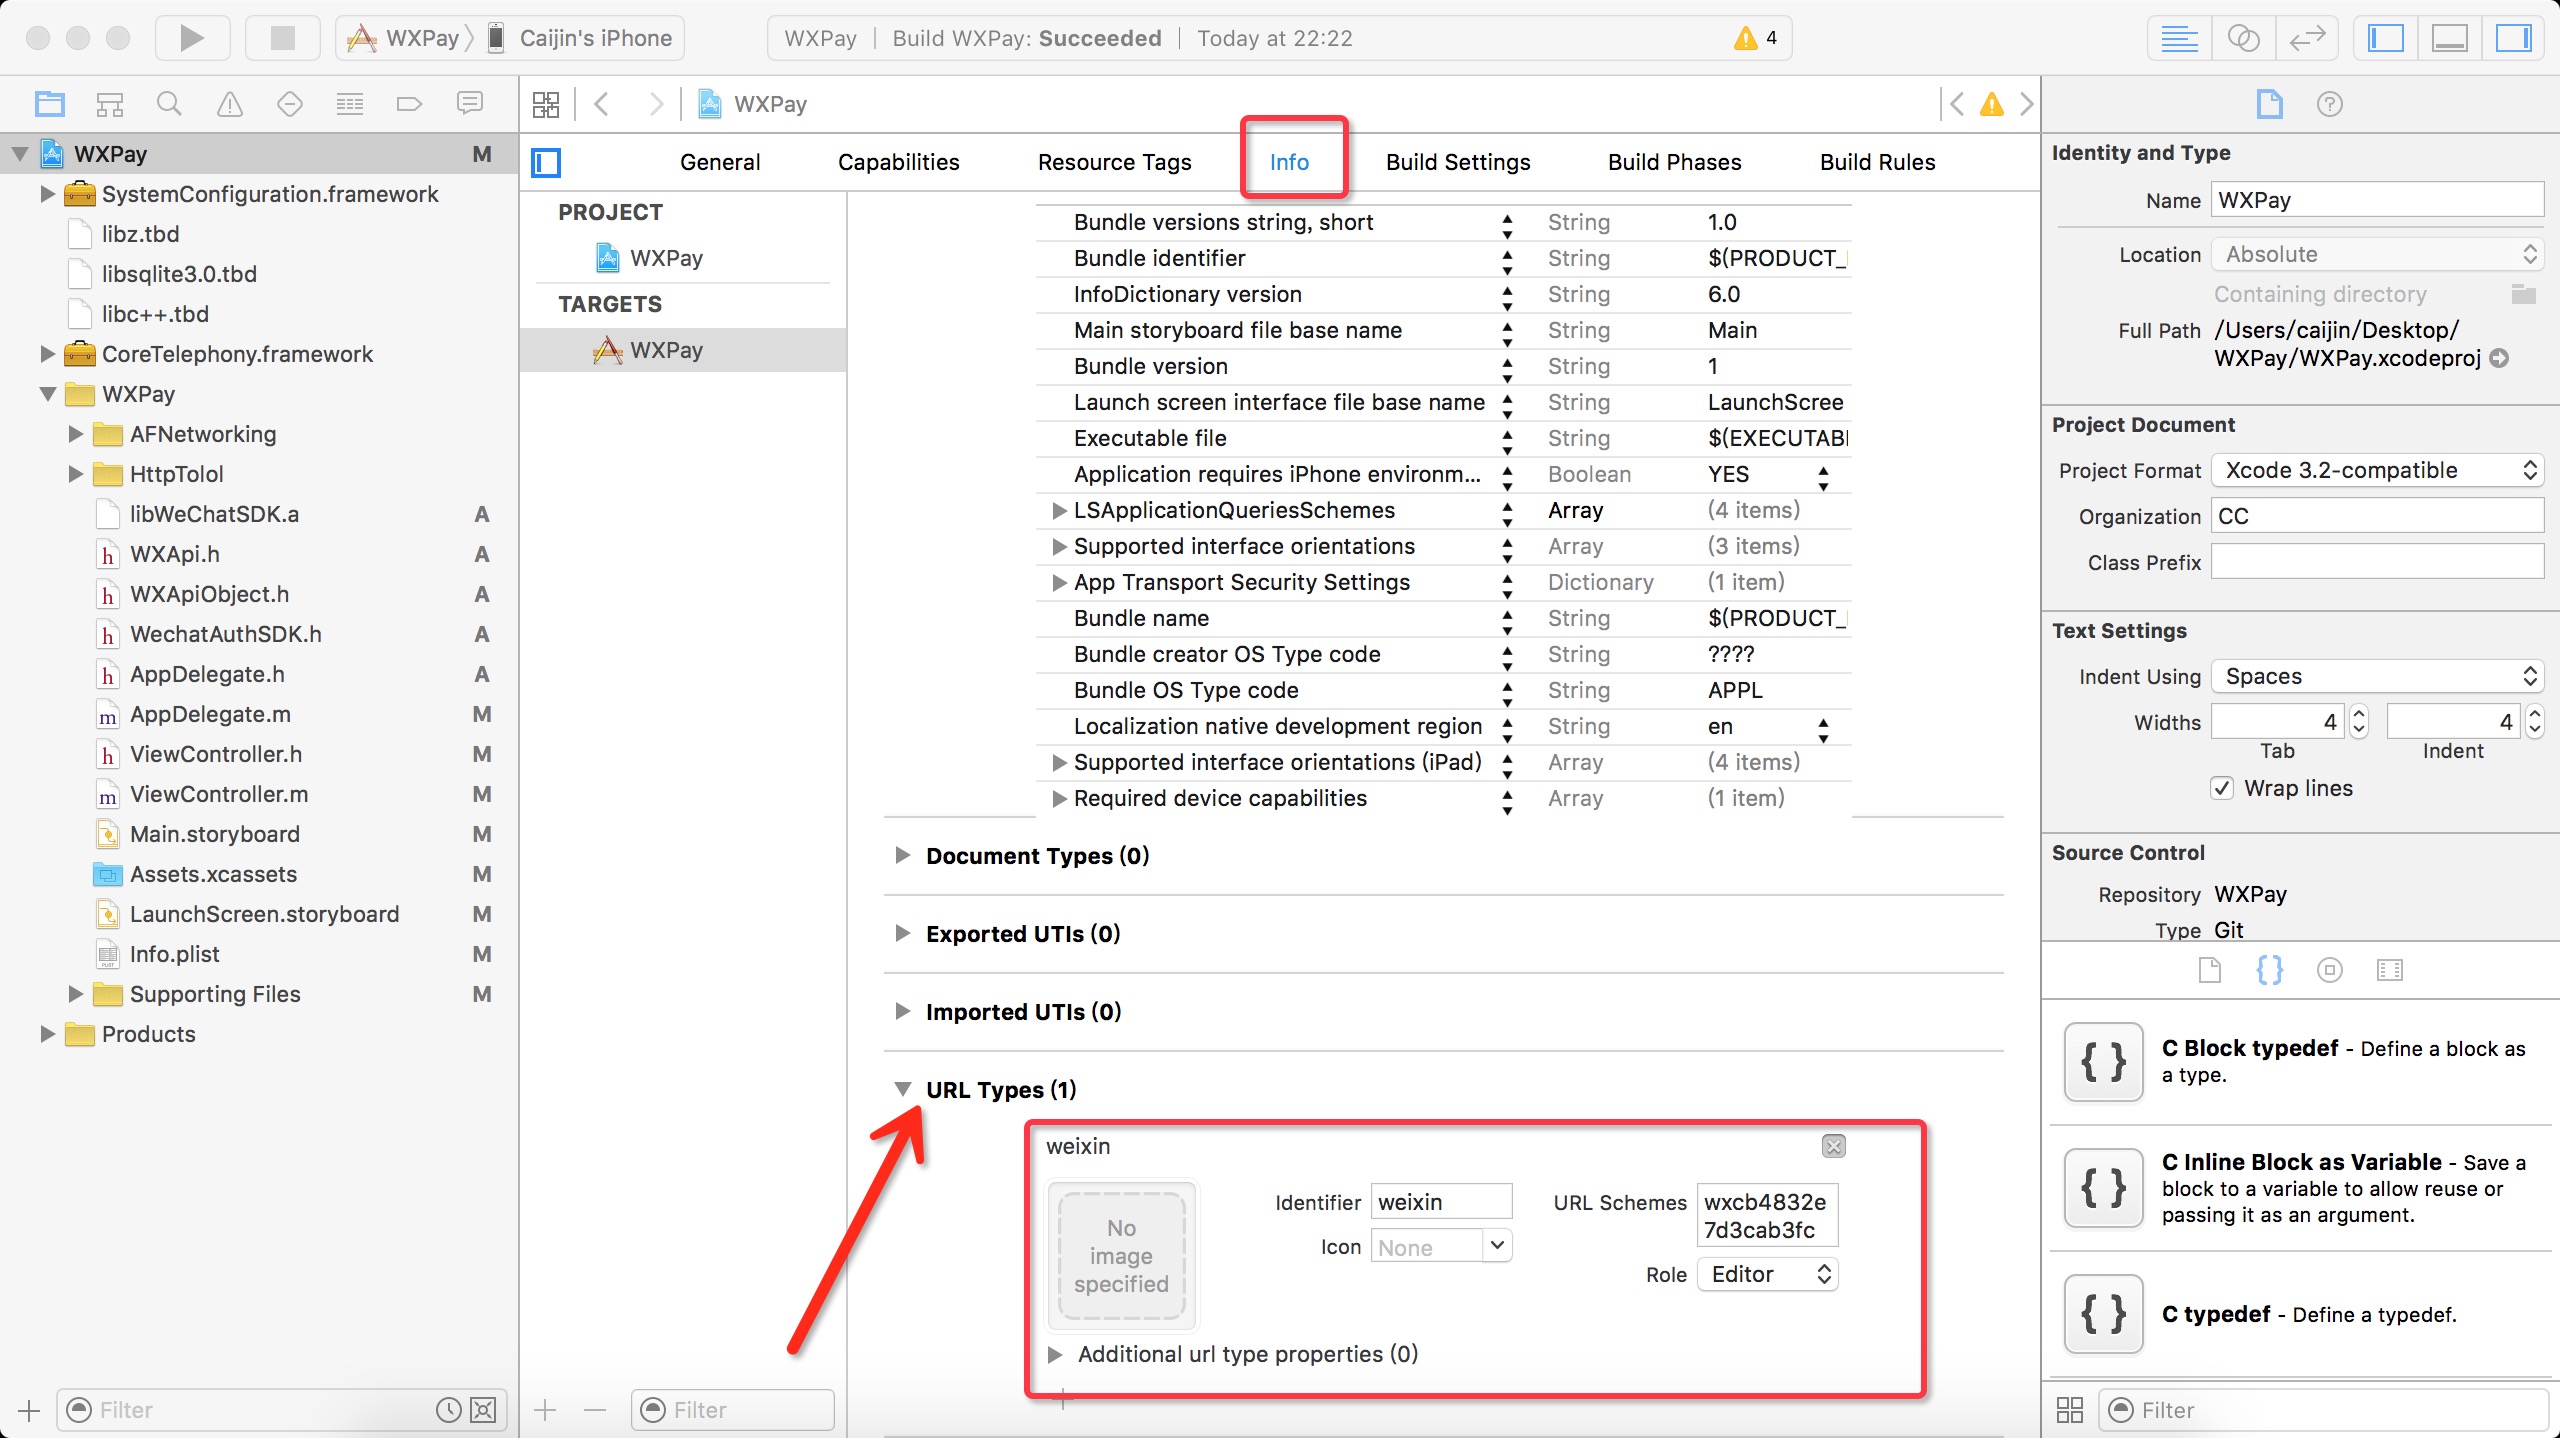
先在Info这里设置下AppId
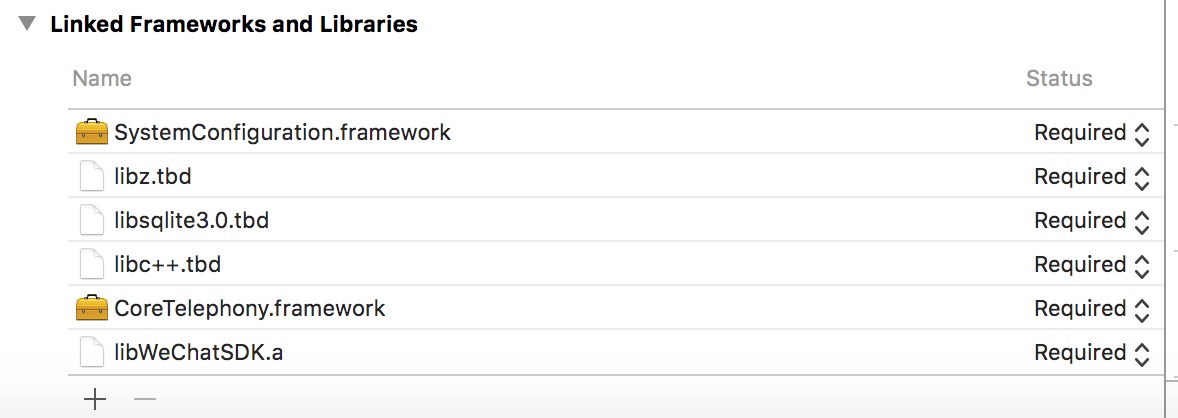
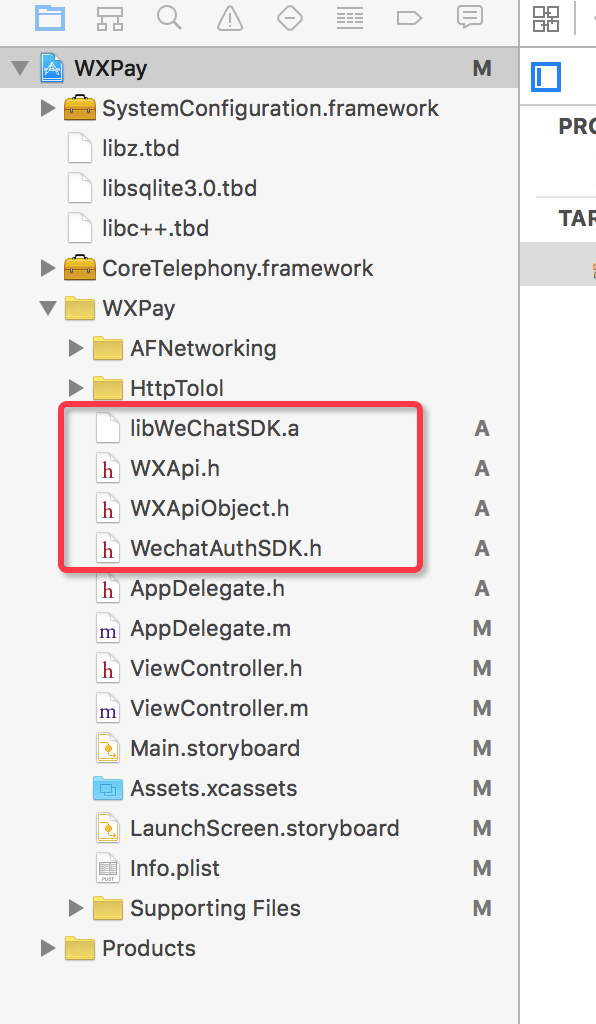
然后添加微信支付所需要的类库及SDK
然后就该注册了,在AppDelegate内注册微信
- (BOOL)application:(UIApplication *)application didFinishLaunchingWithOptions:(NSDictionary *)launchOptions {
    // 注册微信
    [WXApi registerApp:APP_ID];
    return YES;
}
下面这个方法用于调起微信客户端
- (BOOL)application:(UIApplication *)app openURL:(NSURL *)url options:(NSDictionary<NSString *,id> *)options
{
    //这里判断是否发起的请求为微信支付,如果是的话,用WXApi的方法调起微信客户端的支付页面(://pay 之前的那串字符串就是你的APPID,)
    if ([[NSString stringWithFormat:@"%@",url] rangeOfString:[NSString stringWithFormat:@"%@://pay",APP_ID]].location != NSNotFound) {
        return  [WXApi handleOpenURL:url delegate:self];
    }else{

    }
    return YES;
}
然后还要记得写个支付回调的方法
-(void)onResp:(BaseResp*)resp
{
    NSString *strMsg = [NSString stringWithFormat:@"errcode:%d", resp.errCode];
    NSString *strTitle;

    if([resp isKindOfClass:[SendMessageToWXResp class]])
    {
        strTitle = [NSString stringWithFormat:@"发送媒体消息结果"];
    }

    if([resp isKindOfClass:[PayResp class]]){
        //支付返回结果,实际支付结果需要去微信服务器端查询
        strTitle = [NSString stringWithFormat:@"支付结果"];

        switch (resp.errCode) {
            case WXSuccess:
            {
                strMsg = @"支付结果:成功!";
                [[NSNotificationCenter defaultCenter] postNotificationName:@"WXpayresult" object:@"1"];
                break;
            }
            default:
                strMsg = [NSString stringWithFormat:@"支付结果:失败!retcode = %d, retstr = %@", resp.errCode,resp.errStr];
                break;
        }
    }

    UIAlertView *alert = [[UIAlertView alloc] initWithTitle:strTitle message:strMsg delegate:self cancelButtonTitle:@"OK" otherButtonTitles:nil, nil];
    [alert show];
}
以上这些,如果工程内有微信分享,微信三方登录什么的,要把微信支付放在后面!放在后面!放在后面!
ok,这些工作做完后,就可以开始下一步了。
在这里,我的是根据后台接口获取到订单号,然后再把订单号当做参数传给后台,生成预支付单的信息返回给我们。(如果你们的接口不是这样或者写法不同的话,最后面我会放上Demo,可以看着改一改)
// 支付btn
- (IBAction)payBtn:(id)sender {

    NSMutableDictionary *params = [NSMutableDictionary dictionary];
    params[@"workId"] = @"29"; // 待付款工作id
    params[@"amount"] = @"0.01"; // 价格
    [HWHttpTool post:@"http://101.201.48.171:81/ycgj/api/member/payConfirm" params:params success:^(id json) {

        //由后台返回的订单号
        self.orderno = json[@"data"][@"orderNumber"];

        NSMutableDictionary *params = [NSMutableDictionary dictionary];
        params[@"orderNo"] = [NSString stringWithFormat:@"%@",self.orderno]; // 将订单号入参

        [HWHttpTool post:@"http://101.201.48.171:81/ycgj/api/WeChatPayApi" params:params success:^(id json) {

            NSDictionary *dict = json[@"data"];

            NSString *stamp  = [dict objectForKey:@"timestamp"];

            if (dict != nil) {
                // 生成预支付订单信息
                PayReq *req = [[PayReq alloc] init];
                req.partnerId = [NSString stringWithFormat:@"%@", [dict objectForKey:@"partnerid"]];
                req.prepayId = [NSString stringWithFormat:@"%@", [dict objectForKey:@"prepayid"]];
                req.nonceStr = [NSString stringWithFormat:@"%@", [dict objectForKey:@"nonceStr"]];
                req.timeStamp = stamp.intValue;
                req.package = [NSString stringWithFormat:@"%@", [dict objectForKey:@"package"]];
                req.sign = [NSString stringWithFormat:@"%@", [dict objectForKey:@"sign"]];
                [WXApi sendReq:req];
            }
        } failure:^(NSError *error) {
            NSLog(@"error:%@", error);
        }];
    } failure:^(NSError *error) {
        NSLog(@"error:%@", error);
    }];
}
好的,到此如果你都做好了,应该是没有问题的啦。
下面讲一讲我遇到的问题
1.Info.plist里面,这个东西还用写吗?

答:只要在Info - URL Types 写好,这个写不写都可以。
2.点击支付按钮后跳到微信页面只有个ok的button是怎么回事?
答:这个应该是你签名有问题,partnerId这里可能不对(看看大小写之类的),今天我的同事就遇到了-.-
3.[WXApi safeSendReq:req]; 这个方法废弃啦,改成 [WXApi sendReq:req];
4.还有个比较傻的问题,就是模拟器不能调起来微信,并不像支付宝似的有web页可以跳转。
过几天会写篇支付宝的集成博客。(比较懒,估计会过好久)
另外附上我的微信支付Demo。
有不对的地方请指教


 823
823

 被折叠的 条评论
为什么被折叠?


