


步骤一:线程池设计思路
线程池的思路和生产者消费模型很接近的。
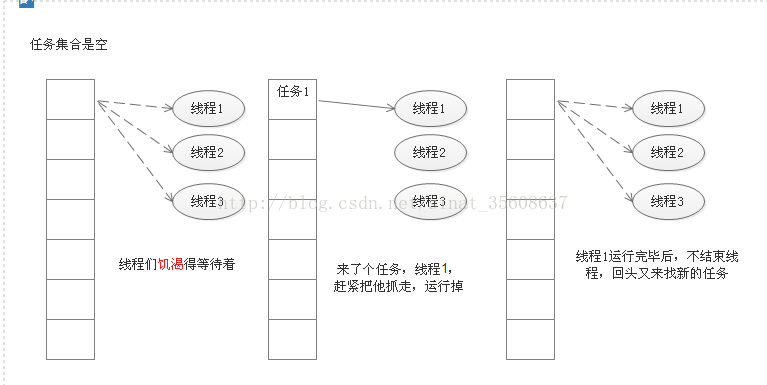
1.准备一个任务容器。
2 一次性启动10个消费者线程
3 刚开始任务容器是空的,所以线程都在wait上面。
4 直到一个外部线程往这个任务容器中扔了一个“任务”,就会有一个消费者线程被唤醒notify。
5 这个消费者线程取出“任务”,并且执行这个任务,执行完毕后,继续等待下一次任务的到来。
6 如果短时间内,有较多的任务加入,那么就会有多个线程被唤醒,去执行这些任务。
在整个过程中,都不需要创建新的线程,而是循环使用这些已经存在的线程。
这是一个自定义的线程池,虽然不够完善和健壮,但是已经足以说明线程池的工作原理。
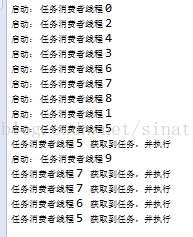
缓慢的给这个线程池添加任务,会看到有多条线程来执行这些任务。
线程5执行完毕任务后,又回到池子里,下一次任务来的时候,线程5又来执行新的任务。
import java.util.LinkedList;

public class ThreadPool {
	 // 线程池大小
    int threadPoolSize;

    // 任务容器
    LinkedList<Runnable> tasks = new LinkedList<Runnable>();

    // 试图消费任务的线程

    public ThreadPool() {
        threadPoolSize = 10;

        // 启动10个任务消费者线程
        synchronized (tasks) {
            for (int i = 0; i < threadPoolSize; i++) {
                new TaskConsumeThread("任务消费者线程 " + i).start();
            }
        }
    }

    public void add(Runnable r) {
        synchronized (tasks) {
            tasks.add(r);
            // 唤醒等待的任务消费者线程
            tasks.notifyAll();
        }
    }

    class TaskConsumeThread extends Thread {
        public TaskConsumeThread(String name) {
            super(name);
        }

        Runnable task;

        public void run() {
            System.out.println("启动: " + this.getName());
            while (true) {
                synchronized (tasks) {
                    while (tasks.isEmpty()) {
                        try {
                            tasks.wait();
                        } catch (InterruptedException e) {
                            // TODO Auto-generated catch block
                            e.printStackTrace();
                        }
                    }
                    task = tasks.removeLast();
                    // 允许添加任务的线程可以继续添加任务
                    tasks.notifyAll();

                }
                System.out.println(this.getName() + " 获取到任务,并执行");
                task.run();
            }
        }
    }


}
package multiplethread;

public class TestThread {
	 public static void main(String[] args) {
	        ThreadPool pool = new ThreadPool();

	        for (int i = 0; i < 5; i++) {
	            Runnable task = new Runnable() {
	                @Override
	                public void run() {
	                    //System.out.println("执行任务");
	                    //任务可能是打印一句话
	                    //可能是访问文件
	                    //可能是做排序
	                }
	            };

	            pool.add(task);

	            try {
	                Thread.sleep(1000);
	            } catch (InterruptedException e) {
	                // TODO Auto-generated catch block
	                e.printStackTrace();
	            }
	        }

	    }


}


 179
179


 被折叠的 条评论
为什么被折叠?
被折叠的 条评论
为什么被折叠?
 到【灌水乐园】发言


