


Description
This article provides information on how to upgrade and downgrade ScreenOS on the firewall.
Symptoms
- Upgrade ScreenOS via WebUI (Web Management) or CLI (Command Line Interface)
- How do I upgrade ScreenOS on the Juniper firewall -- SSG, ISG, or NS device?
- How do I update my ScreenOS?
- Procedure to upgrade or downgrade ScreenOS via the WebUI or CLI
Solution
Note: The following procedure is also documented in ScreenOS Upgrade Guide Release 6.3.0, Rev 02.
Refer to ScreenOS Dates & Milestones for supported firmware on your device.
IMPORTANT : Please review the following TSBs before proceeding further. You may need to update the image signing key on the firewall before an upgrade / downgrade.
- TSB16495 - How to Update the New Image Authentication Key and Upgrade Boot Loader/ScreenOS Firmware
- TSB16496 - New updated ScreenOS Signing Key, Boot Loader and ScreenOS images
Upgrade or Downgrade via WEBUI
To upgrade ScreenOS via the WebUI, perform the following procedure:
Note : You can download firmware updates from the Juniper website. For more information on recommended releases for your platform and downloading firmware updates from the website, refer to KB13444 .
- Open the WebUI. For more information on accessing WebUI, refer to KB4317 - [ScreenOS] Accessing your Juniper firewall device using the WebUI .
- Logon as the root admin or an admin with read-write privileges.
- Before upgrading or downgrading a security device, save the existing configuration file to avoid losing any data. From the ScreenOS options menu, go to Configuration > Update , and then click Save to File .

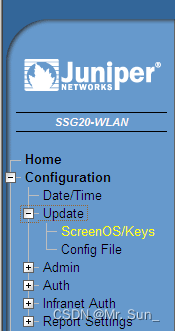
In the File Download dialog box, click Save . Navigate to the location, in which you want to save the configuration file (cfg.txt), and then click Save. - To upgrade, go to Configuration > Update > ScreenOS/Key s :
- From the ScreenOS/Keys page, select the Firmware Update checkbox and click Browse :
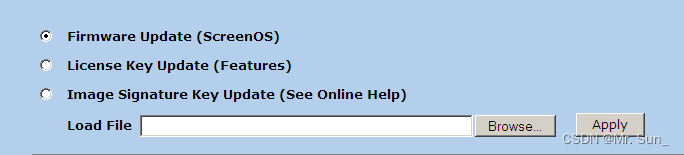
- From the Choose file dialog box, select the update file, and then click Save .
N ote : Ensure that the selected ScreenOS firmware has been extracted from the ZIP file.
For this example, the ssg5ssg20.6.1.0r1.0 update file was selected: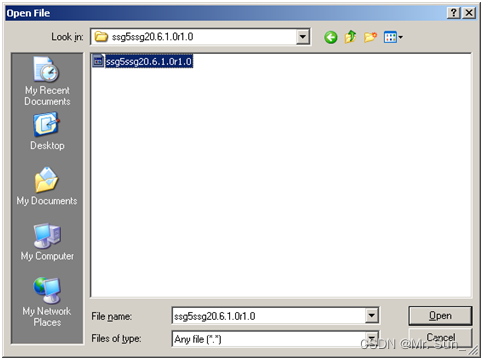
- From the ScreenOS/Keys page, click Apply . In the Microsoft Internet Explorer window, click OK.
Note : The firewall will automatically reboot, after OK is clicked and the firmware has been updated.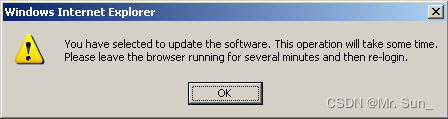
Note : This process takes some time. Do not click Cancel or the upgrade /downgrade will fail. If you click Cancel and the upgrade fails, power off the device and then power it on again. Restart the upgrade procedure from step 2. Leave your browser open for 5 minutes, Refresh the browser, and Login again.
Upgrade or Downgrade via the CLI
To upgrade and downgrade ScreenOS via the CLI, perform the following procedure:
Note : You can download firmware updates from the Juniper website. For more information on recommended releases for your platform and downloading firmware updates from the website, refer to KB13444 .
- Log in to the security device using an application such as Telnet or Secure Shell (SSH) or Hyper Terminal, if directly connected through the console port. Log in as the root admin or an admin with read-write privileges.
- Before upgrading or downgrading a security device, save the existing configuration file to avoid losing any data:
save config to tftp <ip_addr> <filename.cfg>
 For example:  save config to tftp 172.16.10.10 ssg5_date.cfg
where:ip_addris the IP address tftp serverfilename.cfgis the name of the Config File. - For simplicity, copy the ScreenOS firmware file to the TFTP server root folder.
N ote: Ensure that that the ScreenOS firmware has been extracted from the ZIP folder. - Start the TFTP server, by double-clicking on the TFTP server application.
- Save the ScreenOS firmware to flash by entering the command:
The following output is seen when the file is downloaded:save soft from tftp [ip_addr] [filename] to flash
Where:
ip_addr is the IP address of your computer
filename is the name of the ScreenOS firmware.ssg20-> save software from tftp 172.16.10.10 SSG5SSG20.5.4.0r10.0 to flash
Load software from TFTP 172.16.10.10 (file: SSG5SSG20.5.4.0r10.0).
!!!!!!!!!!!!!!!!!!!!!!!!!!!!!!!!!!!!!!!!!!!!!!!!!!!!!!!!!!!!!!!!!!!!!!!!!!!!!!!!!!!!!!!!!!!!!!!!!!!!!!!!!!!!!!!!!!!!!!!!
!!!!!!!!!!!!!!!!!!!!!!!!!!!!!!!!!!!!!!!!!!!!!!!!!!!!!!!!!!!!!!!!!!!!!!!!!!!!!!!!!!!!!!!!!!!!!!!!!!!!!!!!!!!!!!!!!!!!!!!!
!!!!!!!!!!!!!!!!!!!!!!!!!!!!!!!!!!!!!!!!!!!!!!!!!!!!!!!!!!!!!!!!!!!!!!!!!!!!!!!!!!!!!!!!!!!!!!!!!!!!!!!!!!!!!!!!!!!!!!!!
!!!!!!!!!!!!!!!!!!!!!!!!!!!!!!!!!!!!!!!!!!!!!!!!!!!!!!!!!!!!!!!!!!!!!!!!!!!!!!!!!!!!!!!!!!!!!!!!!!!!!!!!!!!!!!!!!!!!!!!!
!!!!!!!!!!!!!!!!!!!!!!!!!!!!!!!!!!!!!!!!!!!!!!!!!!!!!!!!!!!!!!!!!!!!!!!!!!!!!!!!!!!!!!!!!!!!!!!!!!!!!!!!!!!!!!!!!!!!!!!!
!!!!!!!!!!!!!!!!!!!!!!!!!!!!!!!!!!!!!!!!!!!!!!!!!!!!!!!!!!!!!!!!!!!!!!!!!!!!!!!!!!!!!!!!!!!!!!!!!!!!!!!!!!!!!!!!!!!!!!!!
!!!!!!!!!!!!!!!!!!!!!!!!!!!!!!!!!!!!!!!!!!!!!!!!!!!!!!!!!!!!!!!!!!!!!!!!!!!!!!!!!!!!!!!!!!!!!!!!!!!!!!!!!!!!!!!!!!!!!!!!
!!!!!!!!!!!!!!!!!!!!!!!!!!!!!!!!!!!!!!!!!!!!!!!!!!!!!!!!!!!!!!!!!!!!!!!!!!!!!!!!!!!!!!!!!!!!!!!!!!!!!!!!!!!!!!!!!!!!!!!!
tftp received octets = 12427198
tftp success!
TFTP Succeeded
Save to flash. It may take a few minutes ...platform = 20, cpu = 1, version = 18
update new flash image (04aa4020,12427198)
platform = 20, cpu = 1, version = 18
offset = 20, address = 8000000, size = 12427120
date = 71e0f038, sw_version = 71e0f03c, cksum = 41d65212
software major version is not same, accept this firmware? y/[n] y <==== Enter Y here
Program flash (12427198 bytes) ...
+++++++++++++++++++++++++++++++++++++++++++++++++++++++++++++++++++++++++++++++++++++++++++++++done
Done
ssg20-> - When the upgrade or downgrade is complete, you must reset the security device. Execute the reset command and enter y at the prompt to reset the device
ssg20-> reset  < Reboot the firewall using 'reset' command
 System reset, are you sure? y/[n]  y < Enter Y here
In reset ... - Wait a few minutes, and then log in to the security device again.
- Use the
get systemcommand to verify the version of the security device ScreenOS firmware. - Use the
get configcommand to review the configuation. - (Not required) If the existing configuration is incorrect, which can happen on a downgrade, upload the configuration file that was saved in step 3, by executing the following command:
Then execute the reset command and enter n at the prompt to save the config:
save config from tftp <tftp ip> <filename> to flash
Wait for a few minutes and then logon to the security device again.ssg20-> reset < Reboot the firewall using 'reset' command
ssg20> Configuration modified, save? [y]/n n < Enter 'n'; otherwise you will overwrite the configuration you just copied to flash
System reset, are you sure? y/[n] y < Enter Y here
ssg20-> reset
Note: If you inadvertently entered y at the 'Configuration modified, save?' prompt, then just repeat step 10 and enter n.
Modification History
2022-02-24: Replaced public IP 1.1.1.1 with RFC1918 private ip address
2020-06-24: Replaced outdated hyperlinks with newer information.This article is relevant.
2018-03-27: Minor edits done.
2017-12-07: Minor edits done.
2017-11-29: Article reviewed for accuracy. Important note and links to Technical Bulletins TSB16495 and TSB16496 added.


 被折叠的 条评论
为什么被折叠?
被折叠的 条评论
为什么被折叠?
 到【灌水乐园】发言


