


转载自:http://tmjfzy.blog.163.com/blog/static/664470252012225101017794/
代码:
#include "opencv2/core/core.hpp"
#include "opencv2/highgui/highgui.hpp"
#include "opencv2/imgproc/imgproc.hpp"
using namespace cv;
void drawArrow(cv::Mat& img, cv::Point pStart, cv::Point pEnd, int len, int alpha,
cv::Scalar& color, int thickness = 1, int lintType = 8);
int main(int argc, char** argv)
{
cv::Mat mat = imread("test.jpg");
namedWindow("test");
imshow("test", mat);
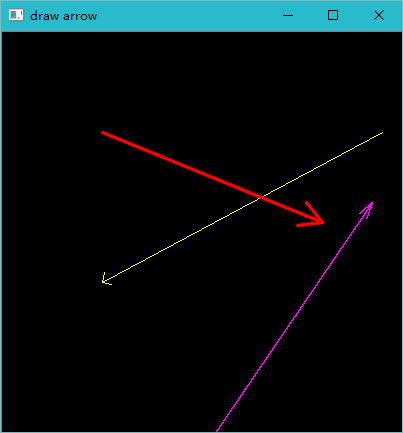
Mat m(400, 400, CV_8UC3, Scalar(0, 0, 0));
Point pStart(380, 100), pEnd(100, 250);
Scalar lineColor(0, 255, 255);
drawArrow(m, pStart, pEnd, 10, 45, lineColor);
pStart = Point(100, 100);
pEnd = Point(320, 190);
lineColor = Scalar(0, 0, 255);
drawArrow(m, pStart, pEnd, 25, 30, lineColor, 2, CV_AA);
pStart = Point(200, 420);
pEnd = Point(370, 170);
lineColor = Scalar(255, 0, 255);
drawArrow(m, pStart, pEnd, 17, 15, lineColor, 1, 4);
imshow("draw arrow", m);
waitKey();
return 0;
}
void drawArrow(cv::Mat& img, cv::Point pStart, cv::Point pEnd, int len, int alpha, cv::Scalar& color, int thickness, int lineType)
{
const double PI = 3.1415926;
Point arrow;
//计算 θ 角(最简单的一种情况在下面图示中已经展示,关键在于 atan2 函数,详情见下面)
double angle = atan2((double)(pStart.y - pEnd.y), (double)(pStart.x - pEnd.x));
line(img, pStart, pEnd, color, thickness, lineType);
//计算箭角边的另一端的端点位置(上面的还是下面的要看箭头的指向,也就是pStart和pEnd的位置)
arrow.x = pEnd.x + len * cos(angle + PI * alpha / 180);
arrow.y = pEnd.y + len * sin(angle + PI * alpha / 180);
line(img, pEnd, arrow, color, thickness, lineType);
arrow.x = pEnd.x + len * cos(angle - PI * alpha / 180);
arrow.y = pEnd.y + len * sin(angle - PI * alpha / 180);
line(img, pEnd, arrow, color, thickness, lineType);
}结果


 2246
2246

 被折叠的 条评论
为什么被折叠?
被折叠的 条评论
为什么被折叠?
 到【灌水乐园】发言


