1. 学习目标
- 学会使用 cv.arrowedLine 带箭头的直线;
- 绘制箭头的直线的注意事项。
2. 绘制箭头直线 cv.arrowedLine 函数说明
2.1 cv.arrowedLine() 函数使用
cv.arrowedLine(img, pt1, pt2, color[, thickness=1, line_type=8, shift=0, tipLength=0.1]) → img
2.2 参数说明
| 参数 | 说明 |
|---|
| img | 表示输入图像,允许单通道灰度图像或多通道彩色图像。 |
| pt1 | 表示线段第一个点的坐标,(x1, y1)。 |
| pt2 | 表示线段第二个点的坐标,(x2, y2)。 |
| color | 表示绘制直线的颜色,(b,g,r) 格式的元组,或者表示灰度值的标量。 |
| thickness | 表示绘制直线的粗细,默认值 1px。 |
| lineType | 表示绘制直线的线性,默认为 LINE_8。 |
| shift | 表示点坐标的小数位数,默认为 0。 |
| tipLength | 表示箭头部分长度与线段长度的比例,默认为 0.1 |
2.3 lineType 值说明
| 值 | 描述 |
|---|
| cv.FILLED | 表示内部填充(实心图形)。 |
| cv.LINE_4 | 表示 4 邻接线型。 |
| cv.LINE_8 | 表示 8 邻接线型。 |
| cv.LINE_AA | 表示抗锯齿线型,图像更平滑。 |
3. 实例
3.1 坐标轴实例代码
import cv2 as cv
import numpy as np

def create_csys():
  # 创建一个500*500的白色背景图片
  img = np.ones((500,500,3), dtype=np.uint8)*255
  h,w,c = img.shape
  # 设置坐标轴颜色
  color = (0,0,0)
  # 坐标轴x的起始坐标
  piontx1 = (10,int(h/2))
  pointx2 = (w - 10, int(h/2))
  # x轴绘制
  cv.arrowedLine(img, piontx1, pointx2, color)
  # 坐标轴y的起始坐标
  pionty1 = (int(w/2),h - 10)
  pointy2 = (int(w/2), 10)
  # y轴绘制
  cv.arrowedLine(img, pionty1, pointy2, color)
  cv.imshow("csys img", img)
  cv.waitKey(0)
  cv.destroyAllWindows()

if __name__ == "__main__":
  create_csys()
3.2 实例运行结果
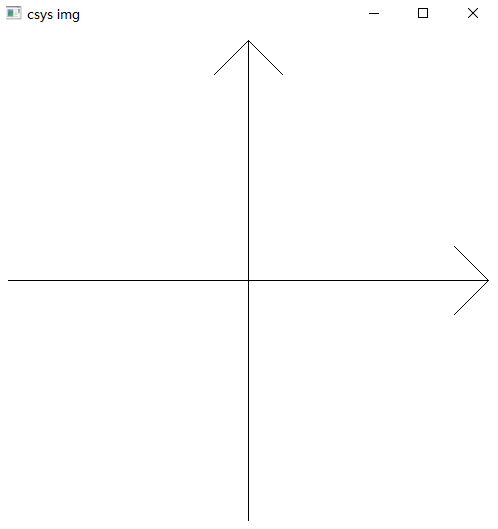
3.3 修改箭头大小实例代码
import cv2 as cv
import numpy as np

def create_csys():
  # 创建一个500*500的白色背景图片
  img = np.ones((500,500,3), dtype=np.uint8)*255
  h,w,c = img.shape
  # 设置坐标轴颜色
  color = (0,0,0)
  # 坐标轴箭头大小比例
  tipLength = 0.02
  # 坐标轴x的起始坐标
  piontx1 = (10,int(h/2))
  pointx2 = (w - 10, int(h/2))
  # x轴绘制
  cv.arrowedLine(img, piontx1, pointx2, color, tipLength=tipLength)
  # 坐标轴y的起始坐标
  pionty1 = (int(w/2),h - 10)
  pointy2 = (int(w/2), 10)
  # y轴绘制
  cv.arrowedLine(img, pionty1, pointy2, color, tipLength=tipLength)
  cv.imshow("csys img", img)
  cv.waitKey(0)
  cv.destroyAllWindows()

if __name__ == "__main__":
  create_csys()
3.4 运行结果
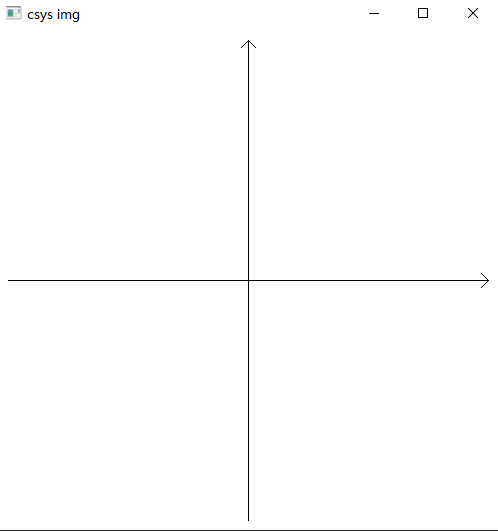
3.5 其他实例
import cv2 as cv
import numpy as np

def create_demo():
  # 创建一个500*500的白色背景图片
  img = np.ones((300,300,3), dtype=np.uint8)*255

  h,w,c = img.shape
  # 创建越界箭头直线
  cv.arrowedLine(img, (10,50), (w+10,50), (255,0,0), tipLength=0.05)
  # 非越界箭头
  cv.arrowedLine(img, (10,100), (w,100), (0,255,0), tipLength=0.08)
  # 双向箭头
  point1 = (10,150)
  point2 = (w - 10,150)
  cv.arrowedLine(img, point1, point2, (0,0,255))
  cv.arrowedLine(img, point2, point1, (0,0,255))

  cv.imshow("csys img", img)
  cv.waitKey(0)
  cv.destroyAllWindows()

if __name__ == "__main__":
  create_demo()
3.6 实例运行结果
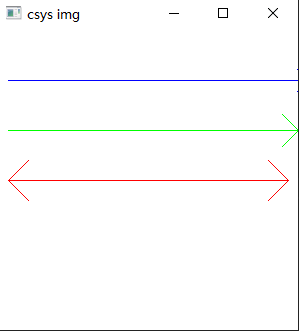
4. 注意
- 点坐标的格式是 (x,y) 而不是 (y,x);
- 坐标点必须是int类型;
- 双向箭头的绘制就是两条交换起点和终点的箭头直线;
- color的值是(b,g,r);
- tipLength表示箭头部分长度与线段长度的比例。


 783
783


 被折叠的 条评论
为什么被折叠?
被折叠的 条评论
为什么被折叠?
 到【灌水乐园】发言


