


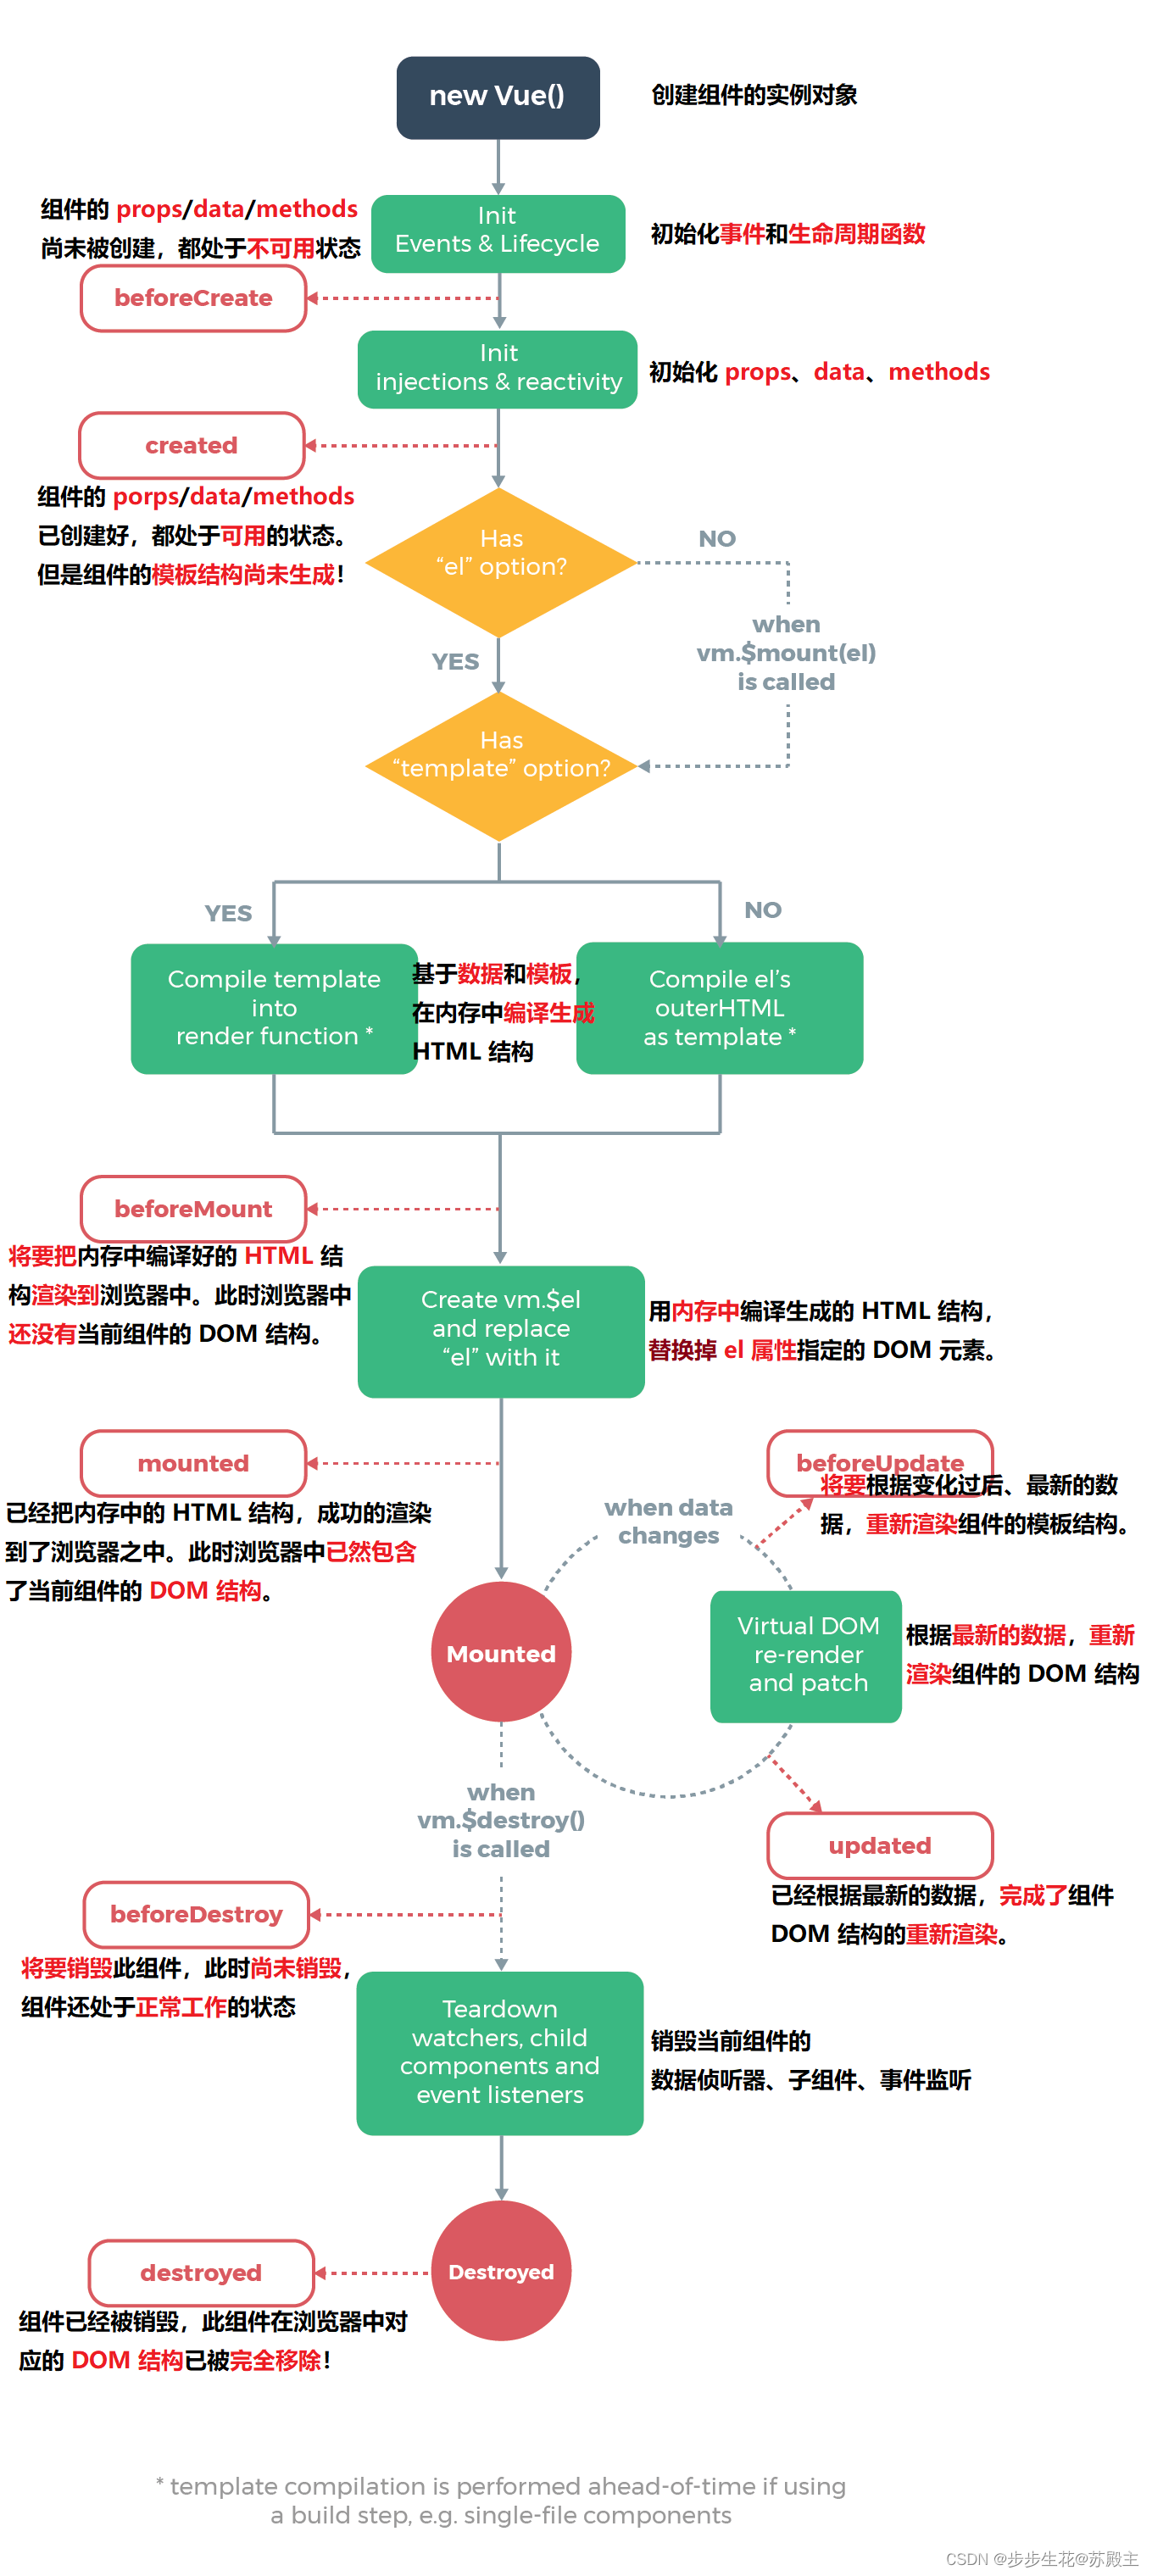
一、组件的生命周期
1、生命周期 & 生命周期函数
- 生命周期(Life Cycle)是指一个组件从
创建 -> 运行 -> 销毁的整个阶段,强调的是一个时间段。 - 生命周期函数:是由 vue 框架提供的
内置函数,会伴随着组件的生命周期,自动按次序执行。
注意:生命周期强调的是时间段,生命周期函数强调的是时间点。
2、组件生命周期函数分类
- 组件创建阶段:
new Vue()、beforeCreate、created、beforeMount、mounted - 组件运行阶段:
beforeUpdate、updated - 组件销毁阶段:
beforeDestroy、destroyed
3、生命周期详解图
二、组件之间的数据共享
1、组件之间的关系
在项目开发中,组件之间的最常见的关系分为如下两种:
① 父子关系
② 兄弟关系
2、父子组件之间的数据共享
① 父 -> 子共享数据
② 子 -> 父共享数据
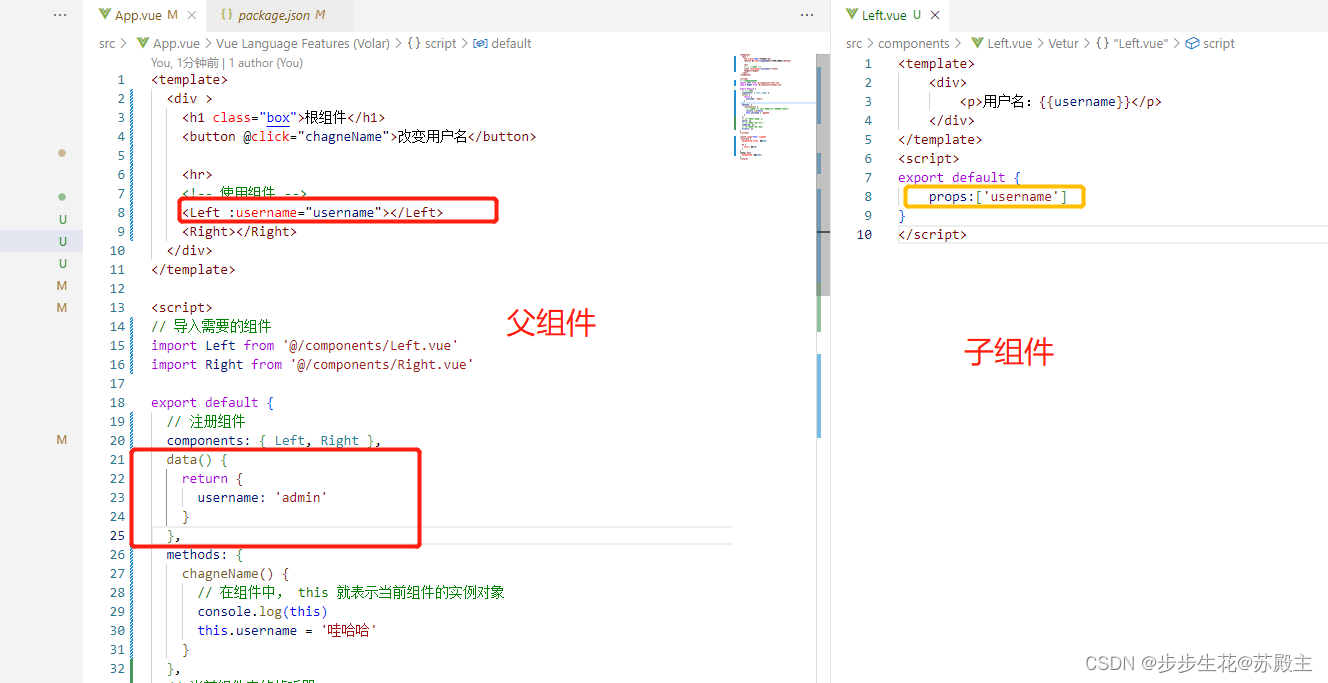
(1)父组件向子组件共享数据
父组件向子组件共享数据需要使用自定义属性。示例代码如下
// 父组件
<Left :username="username"></Left>

data() {
  return {
    username: 'admin'
  }
}

//  子组件
<template>
    <div>
        <p>用户名:{{username}}</p>
    </div>
</template>
<script>
export default {
    props:['username']
}
</script>
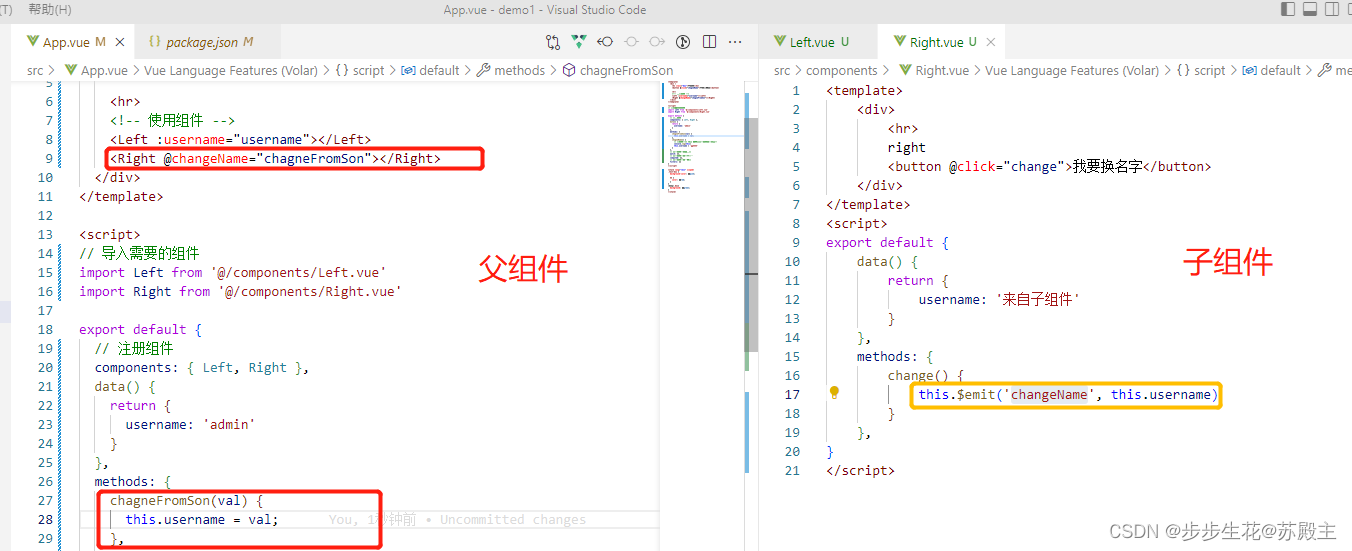
(2)子组件向父组件共享数据
子组件向父组件共享数据使用自定义事件。示例代码如下
// 父组件
<Right @changeName="chagneFromSon"></Right>
<script>
	methods: {
	  chagneFromSon(val) {
	    this.username = val;
	  }
	}
</script>

//  子组件
<template>
    <div>
        <button @click="change">我要换名字</button>
    </div>
</template>
<script>
export default {
    data() {
        return {
            username: '来自子组件'
        }
    },
    methods: {
        change() {
            this.$emit('changeName', this.username)
        }
    },
}
</script>
3、兄弟组件之间的数据共享
在 vue2.x 中,兄弟组件之间数据共享的方案是 EventBus。
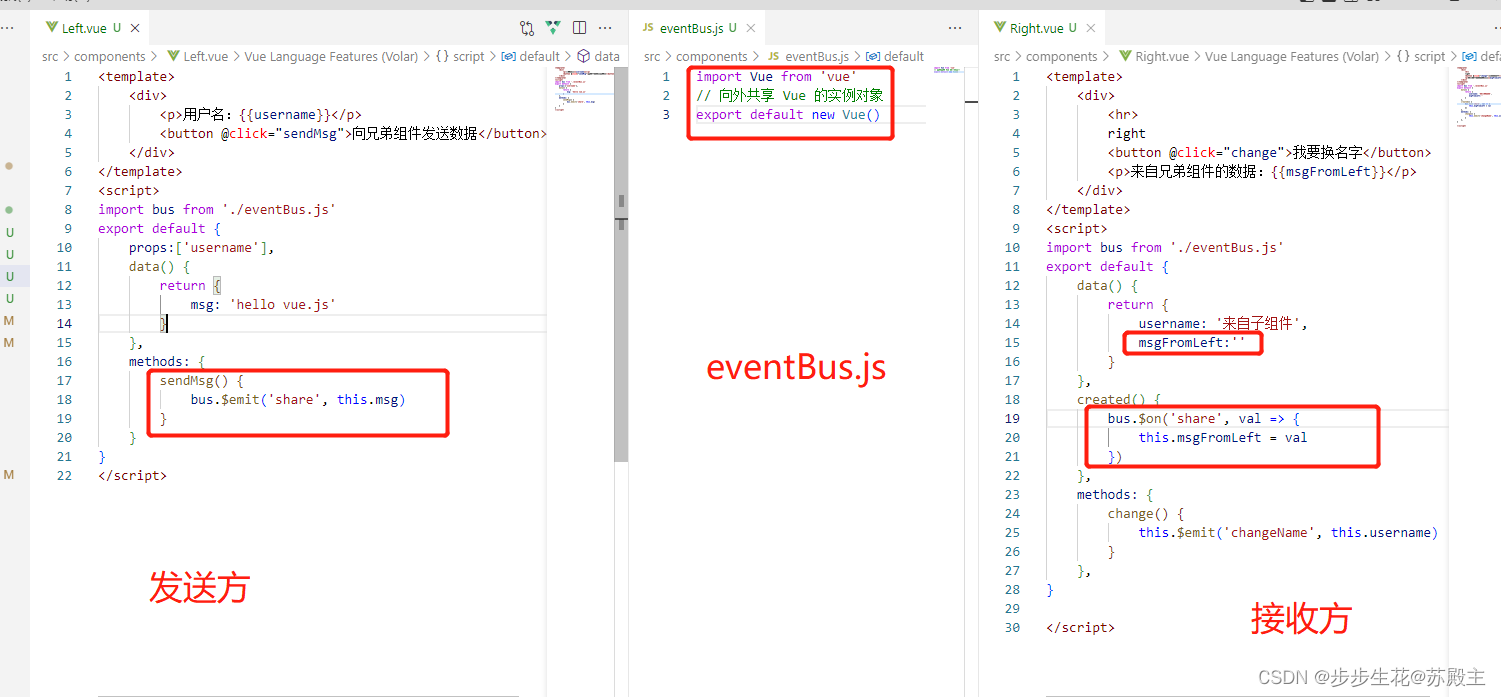
EventBus 的使用步骤
① 创建 eventBus.js 模块,并向外共享一个 Vue 的实例对象
import Vue from 'vue'
// 向外共享 Vue 的实例对象
export default new Vue()
② 在数据发送方,调用 bus.$emit('事件名称', 要发送的数据) 方法触发自定义事件
import bus from './eventBus.js'
export default {
    data() {
        return {
            msg: 'hello vue.js'
        }
    },
    methods: {
        sendMsg() {
            bus.$emit('share', this.msg)
        }
    }
}
③ 在数据接收方,调用 bus.$on('事件名称', 事件处理函数) 方法注册一个自定义事件
import bus from './eventBus.js'
export default {
    data() {
        return {
            msgFromLeft:''
        }
    },
    created() {
        bus.$on('share', val => {
            this.msgFromLeft = val
        })
    }
}
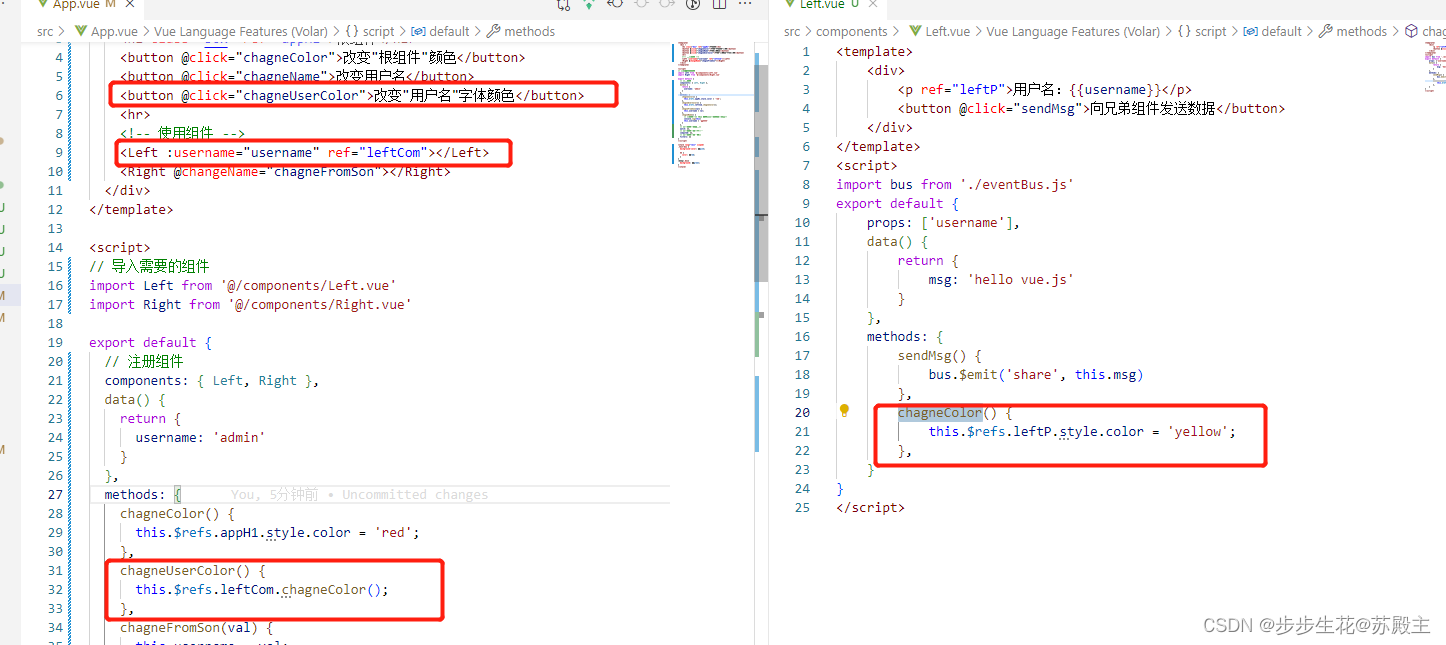
三、ref 引用
1、 什么是 ref 引用
- ref 用来辅助开发者在
不依赖于 jQuery 的情况下,获取 DOM 元素或组件的引用。 - 每个 vue 的组件实例上,都包含一个
$refs对象,里面存储着对应的 DOM 元素或组件的引用。默认情况下,组件的$refs指向一个空对象。
2、使用 ref 引用 DOM 元素
如果想要使用 ref 引用页面上的 DOM 元素,则可以按照如下的方式进行操作:
<h1 class="box" ref="appH1">根组件</h1>
<button @click="chagneColor">改变"根组件"颜色</button>

chagneColor() {
      this.$refs.appH1.style.color = 'red';
},
3、 使用 ref 引用组件实例
如果想要使用 ref 引用页面上的组件实例,则可以按照如下的方式进行操作:
<button @click="chagneUserColor">改变"用户名"字体颜色</button>
<Left :username="username" ref="leftCom"></Left>

methods: {
  chagneUserColor() {
    this.$refs.leftCom.chagneColor();
  }
},
4、 让文本框自动获得焦点
当文本框展示出来之后,如果希望它立即获得焦点,则可以为其添加 ref 引用,并调用原生 DOM 对象的.focus() 方法即可。示例代码如下
<input type="text" v-if="inputVis" ref="ipt">
<button v-else @click="showInput">展示输入框</button>

showInput(){
  this.inputVis=true;
  //数据已存在,但是还未渲染至页面,所以未实现,解决方法见(5、this.$nextTick(cb) 方法)
  this.$refs.ipt.focus();
},
5、 this.$nextTick(cb) 方法
组件的 $nextTick(cb) 方法,会把 cb 回调推迟到下一个 DOM 更新周期之后执行。通俗的理解是:等组件的DOM 更新完成之后,再执行 cb 回调函数。从而能保证 cb 回调函数可以操作到最新的 DOM 元素。
showInput(){
 this.inputVis=true;
 this.$nextTick(()=>{
   this.$refs.ipt.focus();
 })
},
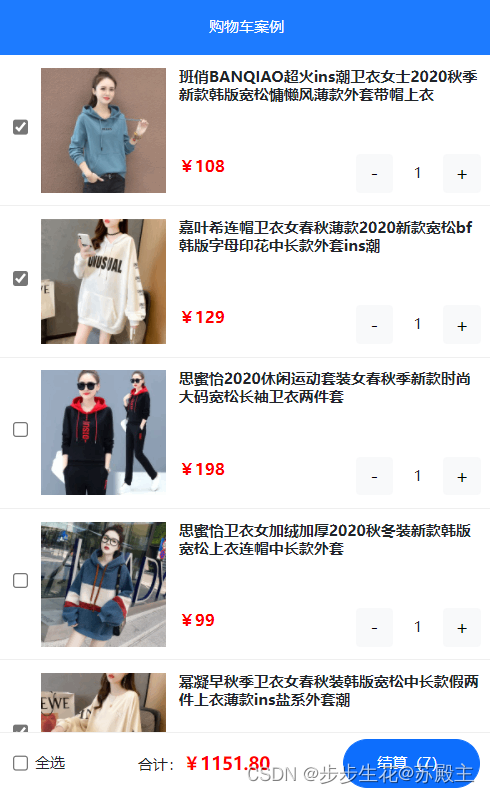
六、购物车案例
1、案例效果
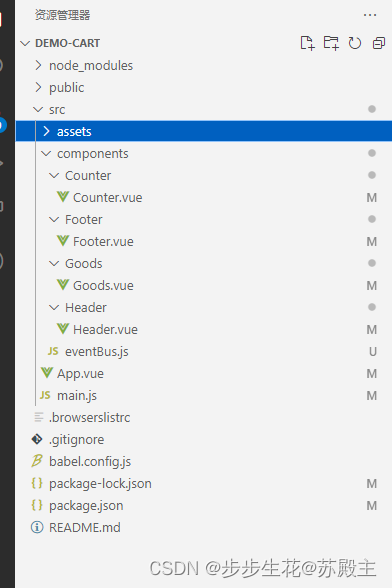
2、目录展示
3、代码实现
(1)main.js
import Vue from 'vue'
import App from './App.vue'
// 导入 bootstrap 样式表
import 'bootstrap/dist/css/bootstrap.min.css'

// 全局注册axios
import axios from 'axios'
Vue.prototype.axios = axios

Vue.config.productionTip = false

new Vue({
  render: h => h(App)
}).$mount('#app')
(2)app.vue
<template>
  <div class="app-container">
    <Header :title="title"></Header>
    <Goods v-for="item in list" :key="item.id" :id="item.id" :tit="item.goods_name" :price="item.goods_price+''"
      :pic="item.goods_img" :status="item.goods_state" :num="item.goods_count"  @status-change="statusChange"></Goods>
    <Footer :fullState="fullState" :amt="amount" :count="count" @change-full="changeFull"></Footer>
  </div>
</template>

<script>
import Header from './components/Header/Header.vue'
import Goods from './components/Goods/Goods.vue'
import Footer from './components/Footer/Footer.vue'
import bus from './components/eventBus'
export default {
  components: {
    Header,
    Goods,
    Footer
  },
  computed: {
    fullState() {
      return this.list.every(item => item.goods_state)
    },
    amount() {
      return this.list.filter(item => item.goods_state).reduce((sum, item) => sum += item.goods_price * item.goods_count, 0)
    },
    count() {
      return this.list.filter(item => item.goods_state).reduce((sum, item) => sum = sum + item.goods_count, 0)
    }
  },
  data() {
    return {
      title: '购物车案例',
      list: [],
    }
  },
  created() {
    // 获取购物车列表
    this.initCartList();
    bus.$on('num', (val) => {
      this.list.some(item => {
        if (item.id == val.id) {
          item.goods_count = val.value;
          return true
        }
      })
    })
  },
  methods: {
    // 获取购物车列表
    async initCartList() {
      const { data: res } = await this.axios.get('https://www.escook.cn/api/cart')
      if (res.status == 200) {
        this.list = res.list
      }
    },
    // 商品选中状态变化
    statusChange(e) {
      console.log(e)
      this.list.some(item => {
        if (item.id === e.id) {
          item.goods_state = e.value
          return true
        }
      })
    },
    // 商品是否全选
    changeFull(e) {
      this.list.forEach(item => item.goods_state = e)
    }
  }
}
</script>

<style lang="less" scoped>
.app-container {
  padding-top: 45px;
  padding-bottom: 50px;
}
</style>
(3)Header.vue
<template>
  <div class="header-container">{{title}}</div>
</template>

<script>
export default {
  props:['title']
}
</script>

<style lang="less" scoped>
.header-container {
  font-size: 12px;
  height: 45px;
  width: 100%;
  background-color: #1d7bff;
  display: flex;
  justify-content: center;
  align-items: center;
  color: #fff;
  position: fixed;
  top: 0;
  z-index: 999;
}
</style>
(4)Goods.vue
<template>
  <div class="goods-container">
    <!-- 左侧图片 -->
    <div class="thumb">
      <div class="custom-control custom-checkbox">
        <!-- 复选框 -->
        <input type="checkbox" class="custom-control-input" :id="'cb1'+id" :checked="status" @change="statuChange" />
        <label class="custom-control-label" :for="'cb1'+id">
          <!-- 商品的缩略图 -->
          <img :src="pic" alt="" />
        </label>
      </div>
    </div>
    <!-- 右侧信息区域 -->
    <div class="goods-info">
      <!-- 商品标题 -->
      <h6 class="goods-title">{{tit}}</h6>
      <div class="goods-info-bottom">
        <!-- 商品价格 -->
        <span class="goods-price">¥{{price}}</span>
        <!-- 商品的数量 -->
        <Counter :id="id" :num="num"></Counter>
      </div>
    </div>
  </div>
</template>

<script>
import Counter from '../Counter/Counter.vue'
export default {
  components: { Counter },
  props: {
    id: {
      require: true,
      type: Number,
    },
    tit: {
      default: '',
      type: String
    },
    pic: {
      default: '',
      type: String
    },
    price: {
      default: '',
      type: String
    },
    status: {
      default: true,
      type: Boolean
    },
    num: {
      default: 1,
      type: Number
    }
  },
  methods: {
    statuChange(e) {
      this.$emit('status-change', { id: this.id, value: e.target.checked })
    }
  }

}
</script>

<style lang="less" scoped>
.goods-container {
  +.goods-container {
    border-top: 1px solid #efefef;
  }

  padding: 10px;
  display: flex;

  .thumb {
    display: flex;
    align-items: center;

    img {
      width: 100px;
      height: 100px;
      margin: 0 10px;
    }
  }

  .goods-info {
    display: flex;
    flex-direction: column;
    justify-content: space-between;
    flex: 1;

    .goods-title {
      font-weight: bold;
      font-size: 12px;
    }

    .goods-info-bottom {
      display: flex;
      justify-content: space-between;

      .goods-price {
        font-weight: bold;
        color: red;
        font-size: 13px;
      }
    }
  }
}
</style>
(5)Counter.vue
<template>
  <div class="number-container d-flex justify-content-center align-items-center">
    <!-- 减 1 的按钮 -->
    <button type="button" class="btn btn-light btn-sm" @click="sub">-</button>
    <!-- 购买的数量 -->
    <span class="number-box">{{num}}</span>
    <!-- 加 1 的按钮 -->
    <button type="button" class="btn btn-light btn-sm" @click="add">+</button>
  </div>
</template>

<script>
import bus from '../eventBus'
export default {
  props: {
    id: {
      type: Number,
      require: true
    },
    num: {
      default: 1,
      type: Number,
    }
  },
  methods: {
    add() {
      bus.$emit('num', { id: this.id, value: this.num + 1 })
    },
    sub() {
      if (this.num > 1) {
        bus.$emit('num', { id: this.id, value: this.num - 1 })
      }
    }
  }
}
</script>

<style lang="less" scoped>
.number-box {
  min-width: 30px;
  text-align: center;
  margin: 0 5px;
  font-size: 12px;
}

.btn-sm {
  width: 30px;
}
</style>
(6)Footer.vue
<template>
  <div class="footer-container">
    <!-- 左侧的全选 -->
    <div class="custom-control custom-checkbox">
      <input type="checkbox" class="custom-control-input" id="cbFull" :checked="fullState" @change="fullChange" />
      <label class="custom-control-label" for="cbFull">全选</label>
    </div>

    <!-- 中间的合计 -->
    <div>
      <span>合计:</span>
      <span class="total-price">¥{{ amt.toFixed(2) }}</span>
    </div>

    <!-- 结算按钮 -->
    <button type="button" class="btn btn-primary btn-settle">结算({{ count }})</button>
  </div>
</template>

<script>
export default {
  props:{
    fullState:{
      default:false,
      type:Boolean
    },
    amt:{
      default:0,
      type:Number
    },
    count:{
      default:0,
      type:Number
    }
  },
  methods:{
    fullChange(e){
      this.$emit('change-full',e.target.checked)
    }
  }
}
</script>

<style lang="less" scoped>
.footer-container {
  font-size: 12px;
  height: 50px;
  width: 100%;
  border-top: 1px solid #efefef;
  position: fixed;
  bottom: 0;
  background-color: #fff;
  display: flex;
  justify-content: space-between;
  align-items: center;
  padding: 0 10px;
}

.custom-checkbox {
  display: flex;
  align-items: center;
}

#cbFull {
  margin-right: 5px;
}

.btn-settle {
  height: 80%;
  min-width: 110px;
  border-radius: 25px;
  font-size: 12px;
}

.total-price {
  font-weight: bold;
  font-size: 14px;
  color: red;
}
</style>
(7)eventBus.js
import Vue from 'vue'
export default new Vue();


 2530
2530


 被折叠的 条评论
为什么被折叠?
被折叠的 条评论
为什么被折叠?
 到【灌水乐园】发言


