1000memories已经在MIT协议下开源了它的iOS瀑布流视图控件"quilt"。
瀑布流(quilt)-以不同的纵横比在多个列中显示图片和媒体,是1000memories网站、iPhone和Android版ShoeBox的设计美学核心。它给了用户一种真实相册的感觉并强调了老照片的美。
好吧,上面两段话是摘抄过来的,算是开场白,我们直接入正题好了。
"quilt"的用法:
1.首先去github上下载开源的代码吧。
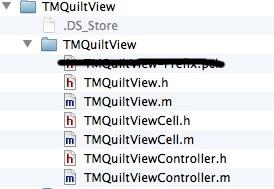
2.你会发现下载下来的代码中有好几个文件夹,将下面路径下的6个文件直接拖拽到你的工程里(不用像demo中添加那么多):

3.去往你要实现的类,在头文件中添加如下代码:
#import <UIKit/UIKit.h>
#import "TMQuiltView.h"
@interface WaterFlowVC : UIViewController<TMQuiltViewDataSource,TMQuiltViewDelegate>
{
    TMQuiltView *_tmQuiltView;
    NSMutableArray *_images;
}
@property (nonatomic,retain)TMQuiltView *tmQuiltView;
@property (nonatomic,retain)NSMutableArray *images;
@end其中tmQuiltView就是1000memories他们定义的瀑布流控件了,类似于tableView(从添加的协议就可以看的出来很像),_images是个数据源,存放图片的数组。
4.再去.m文件实现数据源和代理:
#pragma mark -
#pragma mark TMQuiltViewDataSource
-(NSInteger)quiltViewNumberOfCells:(TMQuiltView *)TMQuiltView
{
    return [self.images count];
}

-(TMQuiltViewCell *)quiltView:(TMQuiltView *)quiltView cellAtIndexPath:(NSIndexPath *)indexPath
{
    NSString *identifierStr = @"photoIdentifier";
    TMPhotoQuiltViewCell *cell = (TMPhotoQuiltViewCell *)[quiltView dequeueReusableCellWithReuseIdentifier:identifierStr];
    if (!cell)
    {
        cell = [[[TMPhotoQuiltViewCell alloc] initWithReuseIdentifier:identifierStr] autorelease];
    }
    cell.photoView.image = [self imageAtIndexPath:indexPath];
    cell.titleLabel.text = [NSString stringWithFormat:@"%d", indexPath.row + 1];
    return cell;
}
#pragma mark -
#pragma mark TMQuiltViewDelegate
//列数
- (NSInteger)quiltViewNumberOfColumns:(TMQuiltView *)quiltView
{
    return 2;
}
//单元高度
- (CGFloat)quiltView:(TMQuiltView *)quiltView heightForCellAtIndexPath:(NSIndexPath *)indexPath {

    float height = [self imageAtIndexPath:indexPath].size.height / [self quiltViewNumberOfColumns:quiltView];
    return height;
}
数据源和代理方法需要的就这么多,有其它需求可以跳转到定义数据源和代理的类看一下。给出的demo中将
-(NSArray *)images和- (UIImage *)imageAtIndexPath:(NSIndexPath *)indexPath两个方法也写在了数据源中,注意这两个方法不是数据源的方法。
其中TMPhotoQuiltViewCell是我直接从demo中拷贝出来的自定义的单元,你可以根据自己的需求将其改成你想要的外观。
代理方法与tableview的代理很是相似,所以也很容易懂。
5.最后是一些需要定义的变量了:
- (void)viewDidLoad
{
    [super viewDidLoad];
    self.view.backgroundColor = [UIColor blackColor];

    _tmQuiltView = [[TMQuiltView alloc] init];
    _tmQuiltView.frame = CGRectMake(0, 0, 320, [[UIScreen mainScreen] bounds].size.height-20-44);
    _tmQuiltView.delegate = self;
    _tmQuiltView.dataSource = self;

    [self.view addSubview:_tmQuiltView];
    [_tmQuiltView reloadData];

    NSMutableArray *imageNames = [[NSMutableArray alloc] init];
    for (int i = 0; i< kNumberOfCells;i++ )
    {
        [imageNames addObject:[NSString stringWithFormat:@"%d.jpeg",i % 10 + 1]];
    }
    self.images = imageNames;
    [imageNames release];

    [_tmQuiltView reloadData];
} //添加这句解决了阴影卡顿问题
self.layer.shadowPath =[UIBezierPath bezierPathWithRect:self.bounds].CGPath;
self.layer.shadowColor = [UIColor blackColor].CGColor;
self.layer.shadowOffset = CGSizeMake(1, 1);
self.layer.shadowOpacity = 0.5;


 469
469

 被折叠的 条评论
为什么被折叠?


