


DispatcherServlet初始化及加载流程梳理
web.xml加载
当我们启动一个web服务容器时,服务会首先加载web.xml配置文件。在项目启动时,会加载web.xml中的<listener>、<context-param>、<servlet> 、<servlet-mapping>等节点信息。
Spring MVC
在Spring MVC开发中,web.xml会加载一下两个java类
org.springframework.web.context.ContextLoaderListene
org.springframework.web.servlet.DispatcherServlet
他们主要的功能是加载applicationContext.xml配置文和spring-mvc.xml配置文件
<!-- Spring ApplicationContext配置文件的路径,可使用通配符,多个路径用,号分隔 此参数用于后面的Spring Context Loader -->
    <context-param>
        <param-name>contextConfigLocation</param-name>
        <param-value>
            classpath*:/applicationContext.xml
        </param-value>
    </context-param>

    <!--Spring的ApplicationContext 载入 -->
    <listener>
        <listener-class>org.springframework.web.context.ContextLoaderListener</listener-class>
    </listener>
<!-- Spring MVC Servlet -->
    <servlet>
        <servlet-name>springServlet</servlet-name>
        <servlet-class>org.springframework.web.servlet.DispatcherServlet</servlet-class>
        <init-param>
            <param-name>contextConfigLocation</param-name>
            <param-value>/WEB-INF/spring-mvc.xml</param-value>
        </init-param>
        <load-on-startup>1</load-on-startup>
    </servlet>
    <servlet-mapping>
        <servlet-name>springServlet</servlet-name>
        <url-pattern>/</url-pattern>
    </servlet-mapping>
ContextLoaderListene源码解析
我们首先说一下,ContextLoaderListene的作用,然后在进行源码的解析说明。它主要工作就是加载ROOT Web应用上下文,同时实力化和初始化Bean。
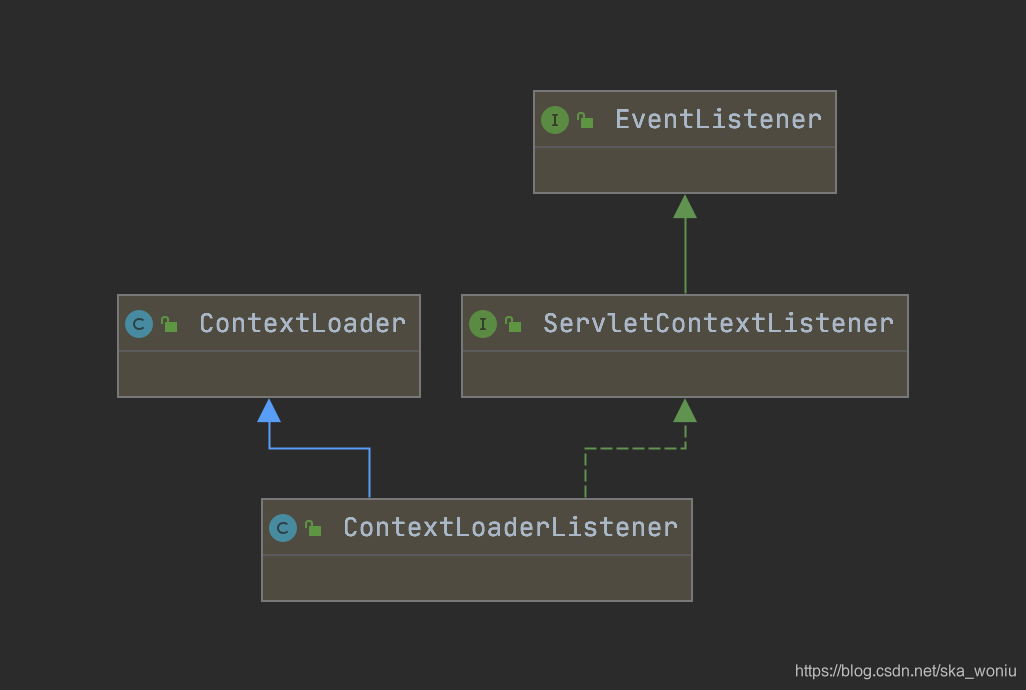
上图中就是ContextLoaderListener的类图,其实现ServletContextListener类接口。因ServletContextListener可以监听Servlet启动上下文事件,这又使得ContextLoaderListener有了可以感知ServletContext生命周期的能力。
ContextLoaderListener继承了ContextLoader类,使其可以加载Spring Root上下文事件。
我们首先看org.springframework.web.context.ContextLoaderListener这个类,代码中注释写的非常清晰。
	/**
	 * Initialize the root web application context.
	 */
	@Override
	public void contextInitialized(ServletContextEvent event) {
		initWebApplicationContext(event.getServletContext());
	}


	/**
	 * Close the root web application context.
	 */
	@Override
	public void contextDestroyed(ServletContextEvent event) {
		closeWebApplicationContext(event.getServletContext());
		ContextCleanupListener.cleanupAttributes(event.getServletContext());
	}
contextInitialized初始化root web 应用上下文
contextDestroyed关闭root web应用上下文
这两个方法都是ServletContextListener的接口实现
通过代码,大家可以发现ContextLoaderListener.contextInitialized方法非常简单,就使用调用了initWebApplicationContext方法。
而initWebApplicationContext方法在ContextLoader类中,所以我们主要分析ContextLoader的源码。
	/**
	 * Initialize Spring's web application context for the given servlet context,
	 * using the application context provided at construction time, or creating a new one
	 * according to the "{@link #CONTEXT_CLASS_PARAM contextClass}" and
	 * "{@link #CONFIG_LOCATION_PARAM contextConfigLocation}" context-params.
	 * @param servletContext current servlet context
	 * @return the new WebApplicationContext
	 * @see #ContextLoader(WebApplicationContext)
	 * @see #CONTEXT_CLASS_PARAM
	 * @see #CONFIG_LOCATION_PARAM
	 */
	public WebApplicationContext initWebApplicationContext(ServletContext servletContext) {
		//首先判断servletContext中是否以及存在root web 应用上下文,如果以及存在,就抛出异常
		if (servletContext.getAttribute(WebApplicationContext.ROOT_WEB_APPLICATION_CONTEXT_ATTRIBUTE) != null) {
			throw new IllegalStateException(
					"Cannot initialize context because there is already a root application context present - " +
					"check whether you have multiple ContextLoader* definitions in your web.xml!");
		}

		Log logger = LogFactory.getLog(ContextLoader.class);
		servletContext.log("Initializing Spring root WebApplicationContext");
		if (logger.isInfoEnabled()) {
			logger.info("Root WebApplicationContext: initialization started");
		}
		long startTime = System.currentTimeMillis();

		try {
			// Store context in local instance variable, to guarantee that
			// it is available on ServletContext shutdown.
			if (this.context == null) {
				//创建一个web 应用上下文,并赋值给context
				this.context = createWebApplicationContext(servletContext);
			}
			if (this.context instanceof ConfigurableWebApplicationContext) {
				//将context转换为ConfigurableWebApplicationContext
				ConfigurableWebApplicationContext cwac = (ConfigurableWebApplicationContext) this.context;
				if (!cwac.isActive()) {
					// The context has not yet been refreshed -> provide services such as
					// setting the parent context, setting the application context id, etc
					if (cwac.getParent() == null) {
						// The context instance was injected without an explicit parent ->
						// determine parent for root web application context, if any.
						ApplicationContext parent = loadParentContext(servletContext);
						cwac.setParent(parent);
					}
					//此方法会配置和刷新WebApplicationContext容器,此时会装在@Service、@Component等的BeanDefinition
					configureAndRefreshWebApplicationContext(cwac, servletContext);
				}
			}
			//将WebApplicationContext存入servletContext中
			servletContext.setAttribute(WebApplicationContext.ROOT_WEB_APPLICATION_CONTEXT_ATTRIBUTE, this.context);

			ClassLoader ccl = Thread.currentThread().getContextClassLoader();
			if (ccl == ContextLoader.class.getClassLoader()) {
				currentContext = this.context;
			}
			else if (ccl != null) {
				currentContextPerThread.put(ccl, this.context);
			}

			if (logger.isDebugEnabled()) {
				logger.debug("Published root WebApplicationContext as ServletContext attribute with name [" +
						WebApplicationContext.ROOT_WEB_APPLICATION_CONTEXT_ATTRIBUTE + "]");
			}
			if (logger.isInfoEnabled()) {
				long elapsedTime = System.currentTimeMillis() - startTime;
				logger.info("Root WebApplicationContext: initialization completed in " + elapsedTime + " ms");
			}

			return this.context;
		}
		catch (RuntimeException ex) {
			logger.error("Context initialization failed", ex);
			servletContext.setAttribute(WebApplicationContext.ROOT_WEB_APPLICATION_CONTEXT_ATTRIBUTE, ex);
			throw ex;
		}
		catch (Error err) {
			logger.error("Context initialization failed", err);
			servletContext.setAttribute(WebApplicationContext.ROOT_WEB_APPLICATION_CONTEXT_ATTRIBUTE, err);
			throw err;
		}
	}

	protected void configureAndRefreshWebApplicationContext(ConfigurableWebApplicationContext wac, ServletContext sc) {
		if (ObjectUtils.identityToString(wac).equals(wac.getId())) {
			// The application context id is still set to its original default value
			// -> assign a more useful id based on available information
			String idParam = sc.getInitParameter(CONTEXT_ID_PARAM);
			if (idParam != null) {
				wac.setId(idParam);
			}
			else {
				// Generate default id...
				wac.setId(ConfigurableWebApplicationContext.APPLICATION_CONTEXT_ID_PREFIX +
						ObjectUtils.getDisplayString(sc.getContextPath()));
			}
		}

		wac.setServletContext(sc);
		//获取web.xml配置中的contextConfigLocation参数
		String configLocationParam = sc.getInitParameter(CONFIG_LOCATION_PARAM);
		if (configLocationParam != null) {
			wac.setConfigLocation(configLocationParam);
		}

		// The wac environment's #initPropertySources will be called in any case when the context
		// is refreshed; do it eagerly here to ensure servlet property sources are in place for
		// use in any post-processing or initialization that occurs below prior to #refresh
		ConfigurableEnvironment env = wac.getEnvironment();
		if (env instanceof ConfigurableWebEnvironment) {
			((ConfigurableWebEnvironment) env).initPropertySources(sc, null);
		}

		customizeContext(sc, wac);
		//这里是最重要的,这里就是加载出生整个Spring bean的生命周期的地方
		//org.springframework.context.support.AbstractApplicationContext
		wac.refresh();
	}
到这个整个Spring 的 root WebApplicationContext就完成了加载,此时Service层、Dao层的bean都已经完成了实力话和出生化。
DispatcherServlet源码解析
DispatcherServlet这个组建,只要使用过Spring开发程序,基本上都见过,它的知名度还是蛮高的,下图是DispatcherServlet的类图结构。
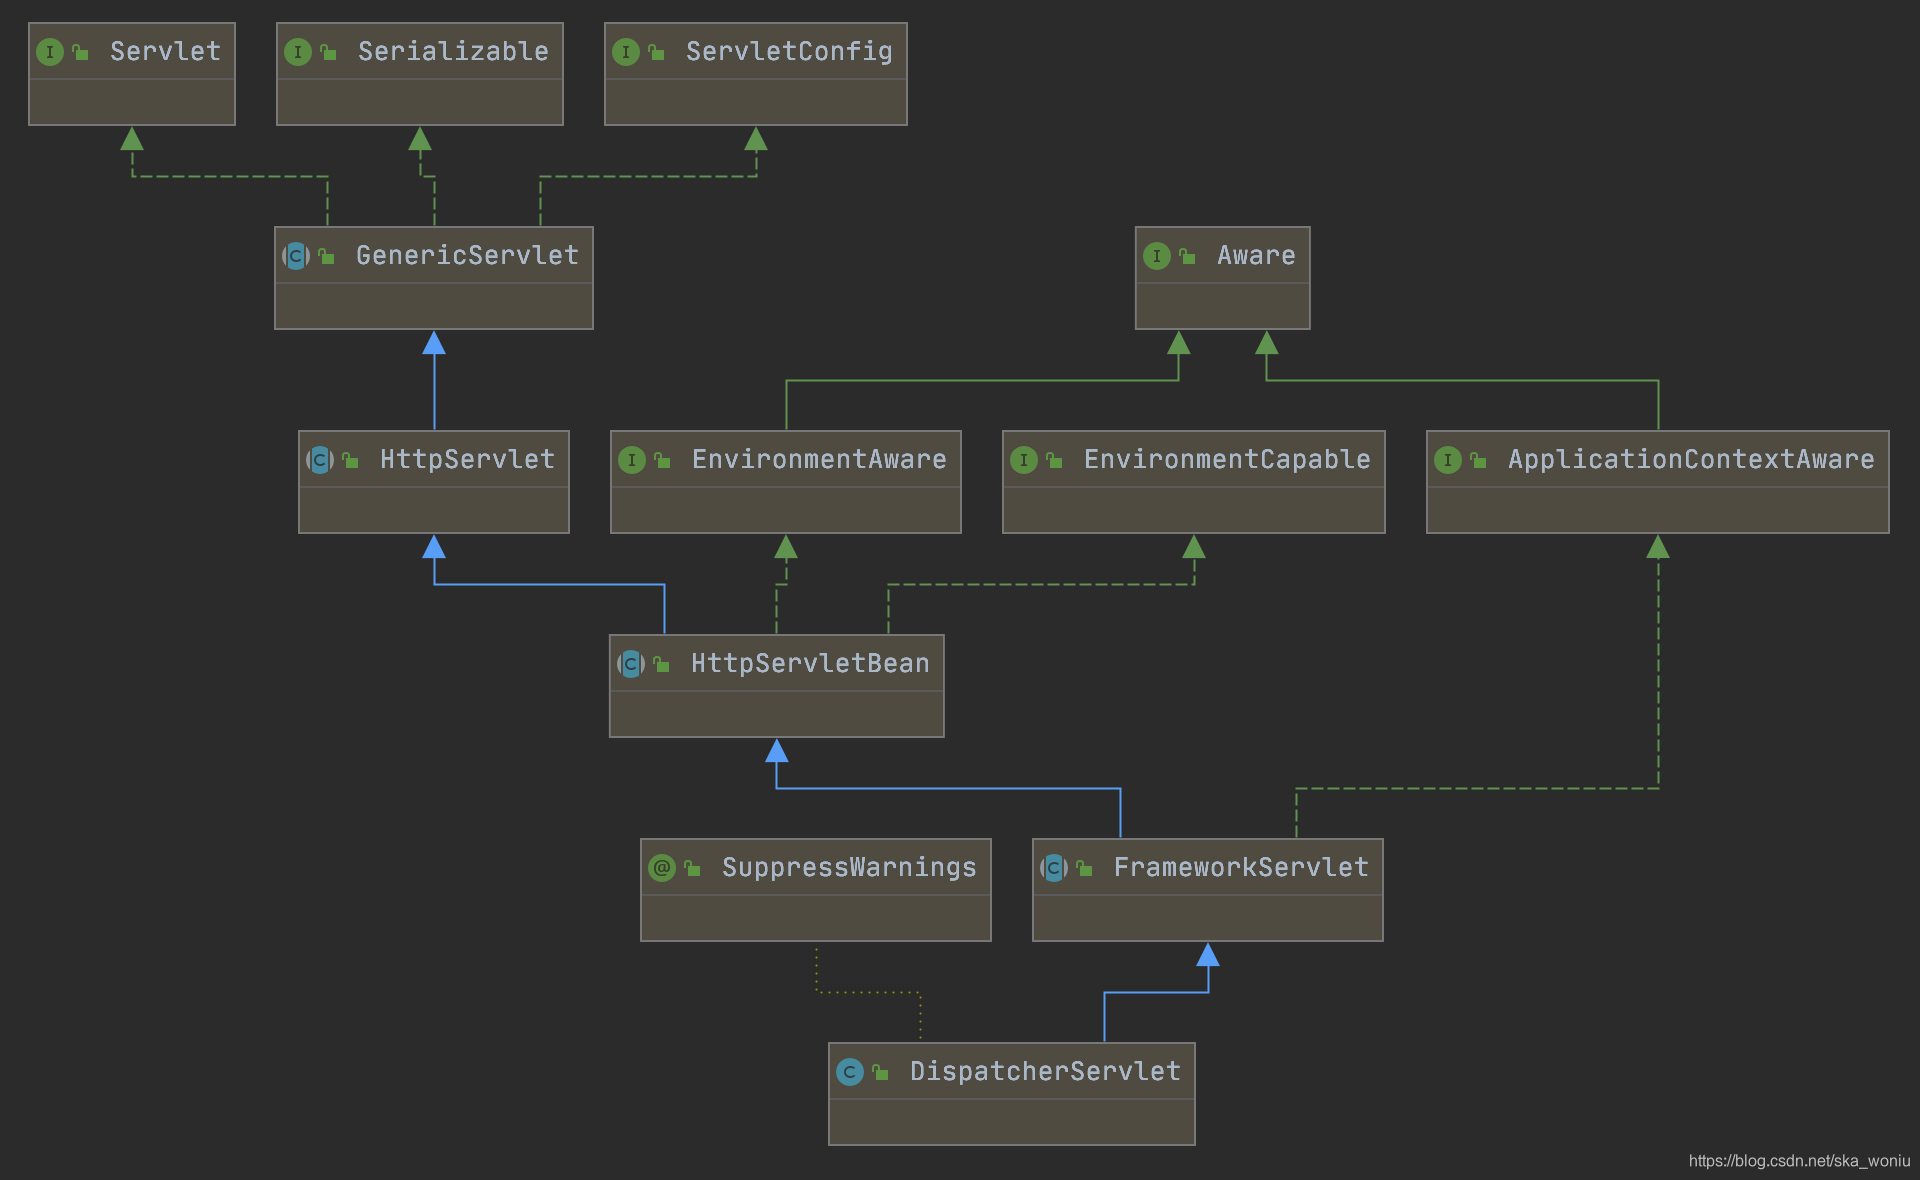
我们通过类图发现DispatcherServlet实现了Servlet接口,使其具有了Servlet的生命周期,因此我们首先需要找到init()方法。通过研读代码,我们可以发现init()的实现方法在抽象类GenericServlet中,GenericServlet定义了init()抽象方法。通过类图接口,我们最终发现init()的方法在HttpServletBean中进行的实现,因此我们首先分析org.springframework.web.servlet.HttpServletBean中的init()方法。
	/**
     * Called by the servlet container to indicate to a servlet that the
     * servlet is being placed into service.  See {@link Servlet#init}.
     *
     * <p>This implementation stores the {@link ServletConfig}
     * object it receives from the servlet container for later use.
     * When overriding this form of the method, call
     * <code>super.init(config)</code>.
     *
     * @param config 			the <code>ServletConfig</code> object
     *					that contains configutation
     *					information for this servlet
     *
     * @exception ServletException 	if an exception occurs that
     *					interrupts the servlet's normal
     *					operation
     *
     * @see 				UnavailableException
     */
    public void init(ServletConfig config) throws ServletException {
	this.config = config;
	this.init();
    }

	/**
     * A convenience method which can be overridden so that there's no need
     * to call <code>super.init(config)</code>.
     *
     * <p>Instead of overriding {@link #init(ServletConfig)}, simply override
     * this method and it will be called by
     * <code>GenericServlet.init(ServletConfig config)</code>.
     * The <code>ServletConfig</code> object can still be retrieved via {@link
     * #getServletConfig}.
     *
     * @exception ServletException 	if an exception occurs that
     *					interrupts the servlet's
     *					normal operation
     */
    public void init() throws ServletException {
		//定义一个空方法,其具体实现在HttpServletBean中
    }
org.springframework.web.servlet.HttpServletBean源码如下:
	@Override
	public final void init() throws ServletException {
		if (logger.isDebugEnabled()) {
			logger.debug("Initializing servlet '" + getServletName() + "'");
		}

		// Set bean properties from init parameters.
		PropertyValues pvs = new ServletConfigPropertyValues(getServletConfig(), this.requiredProperties);
		if (!pvs.isEmpty()) {
			try {
				BeanWrapper bw = PropertyAccessorFactory.forBeanPropertyAccess(this);
				ResourceLoader resourceLoader = new ServletContextResourceLoader(getServletContext());
				bw.registerCustomEditor(Resource.class, new ResourceEditor(resourceLoader, getEnvironment()));
				initBeanWrapper(bw);
				bw.setPropertyValues(pvs, true);
			}
			catch (BeansException ex) {
				if (logger.isErrorEnabled()) {
					logger.error("Failed to set bean properties on servlet '" + getServletName() + "'", ex);
				}
				throw ex;
			}
		}

		// Let subclasses do whatever initialization they like.
		//主要看这里,点击进去后,我们发现它是一个空方法,里面没有任何实现,
		initServletBean();

		if (logger.isDebugEnabled()) {
			logger.debug("Servlet '" + getServletName() + "' configured successfully");
		}
	}
	/**
	 * Subclasses may override this to perform custom initialization.
	 * All bean properties of this servlet will have been set before this
	 * method is invoked.
	 * <p>This default implementation is empty.
	 * @throws ServletException if subclass initialization fails
	 */
	protected void initServletBean() throws ServletException {
	//此处为空方法,具体实现在FrameworkServlet中
	}
org.springframework.web.servle.FrameworkServlet源码解析
/**
	 * Overridden method of {@link HttpServletBean}, invoked after any bean properties
	 * have been set. Creates this servlet's WebApplicationContext.
	 */
	@Override
	protected final void initServletBean() throws ServletException {
		getServletContext().log("Initializing Spring FrameworkServlet '" + getServletName() + "'");
		if (this.logger.isInfoEnabled()) {
			this.logger.info("FrameworkServlet '" + getServletName() + "': initialization started");
		}
		long startTime = System.currentTimeMillis();

		try {
			//初始化web 应用上下文,我们进入initWebApplicationContext方法,发现和上文中ContextLoaderListener中的初始化方法非常相似
			this.webApplicationContext = initWebApplicationContext();
			//空方法,没有任何实现
			initFrameworkServlet();
		}
		catch (ServletException ex) {
			this.logger.error("Context initialization failed", ex);
			throw ex;
		}
		catch (RuntimeException ex) {
			this.logger.error("Context initialization failed", ex);
			throw ex;
		}

		if (this.logger.isInfoEnabled()) {
			long elapsedTime = System.currentTimeMillis() - startTime;
			this.logger.info("FrameworkServlet '" + getServletName() + "': initialization completed in " +
					elapsedTime + " ms");
		}
	}
/**
	 * Initialize and publish the WebApplicationContext for this servlet.
	 * <p>Delegates to {@link #createWebApplicationContext} for actual creation
	 * of the context. Can be overridden in subclasses.
	 * @return the WebApplicationContext instance
	 * @see #FrameworkServlet(WebApplicationContext)
	 * @see #setContextClass
	 * @see #setContextConfigLocation
	 */
	protected WebApplicationContext initWebApplicationContext() {
		WebApplicationContext rootContext =
				WebApplicationContextUtils.getWebApplicationContext(getServletContext());
		WebApplicationContext wac = null;

		if (this.webApplicationContext != null) {
			//如果Spring MVC的应用上下文,不文空,就将其parent设置成root web application context
			//主要设置当前容器的父容器
			// A context instance was injected at construction time -> use it
			wac = this.webApplicationContext;
			if (wac instanceof ConfigurableWebApplicationContext) {
				ConfigurableWebApplicationContext cwac = (ConfigurableWebApplicationContext) wac;
				if (!cwac.isActive()) {
					// The context has not yet been refreshed -> provide services such as
					// setting the parent context, setting the application context id, etc
					if (cwac.getParent() == null) {
						// The context instance was injected without an explicit parent -> set
						// the root application context (if any; may be null) as the parent
						cwac.setParent(rootContext);
					}
					//可以参考ContentLoader中的configureAndRefreshWebApplicationContext方法
					configureAndRefreshWebApplicationContext(cwac);
				}
			}
		}
		if (wac == null) {
			// No context instance was injected at construction time -> see if one
			// has been registered in the servlet context. If one exists, it is assumed
			// that the parent context (if any) has already been set and that the
			// user has performed any initialization such as setting the context id
			//如果Spring MVC的应用上下文为空,就去ServletContext中查找,也就说明了Spring MVC的上下文在装载完成后也会存储到ServletContext中
			wac = findWebApplicationContext();
		}
		if (wac == null) {
			// No context instance is defined for this servlet -> create a local one
			//如果此时Spring MVC的应用上下文还是为空,就会创建一个Spring MVC上下文,同时将其parent设备为root WebApplicationContext
			//在此方法中会同时配置好和刷新Spring MVC上下文
			wac = createWebApplicationContext(rootContext);
		}

		if (!this.refreshEventReceived) {
			// Either the context is not a ConfigurableApplicationContext with refresh
			// support or the context injected at construction time had already been
			// refreshed -> trigger initial onRefresh manually here.
			//此方法最重要,它会加载Spring MVC中的其他9中组建
			//它也是一个空方法,具体实现在DispatcherServlet中
			onRefresh(wac);
		}

		if (this.publishContext) {
			// Publish the context as a servlet context attribute.
			String attrName = getServletContextAttributeName();
			getServletContext().setAttribute(attrName, wac);
			if (this.logger.isDebugEnabled()) {
				this.logger.debug("Published WebApplicationContext of servlet '" + getServletName() +
						"' as ServletContext attribute with name [" + attrName + "]");
			}
		}

		return wac;
	}
org.springframework.web.servlet.DispatcherServlet源码分析
	/**
	 * This implementation calls {@link #initStrategies}.
	 */
	@Override
	protected void onRefresh(ApplicationContext context) {
		initStrategies(context);
	}

	/**
	 * Initialize the strategy objects that this servlet uses.
	 * <p>May be overridden in subclasses in order to initialize further strategy objects.
	 */
	protected void initStrategies(ApplicationContext context) {
		//初始化文件上传解析器
		initMultipartResolver(context);
		//初始化本地信息解析器(国际化)
		initLocaleResolver(context);
		//初始化主题解析器
		initThemeResolver(context);
		//初始化处理器映射器
		initHandlerMappings(context);
		//初始化处理器适配器
		initHandlerAdapters(context);
		//初始化异常解析器
		initHandlerExceptionResolvers(context);
		//初始化请求跟视图名称的翻译器
		initRequestToViewNameTranslator(context);
		//初始化视图解析器
		initViewResolvers(context);
		//初始化动画映射管理器
		initFlashMapManager(context);
	}


 310
310


 被折叠的 条评论
为什么被折叠?
被折叠的 条评论
为什么被折叠?
 到【灌水乐园】发言


