


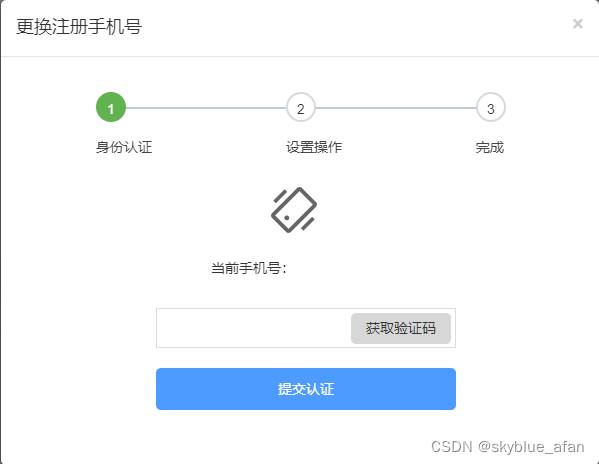
效果图
1、html部分
<div class="modal-body">
    <!-- 步骤条 -->
	<div class="steps">
         <div class="step">
              <div class="step-head">
              	<div class="step-line"></div>
              	<div class="step-icon">1</div>
          	  </div>
              <div class="step-main">身份认证</div>
          </div>
          <div class="step">
                <div class="step-head">
                     <div class="step-line"></div>
                     <div class="step-icon"> 2</div>
                 </div>
                 <div class="step-main">设置操作</div>
           </div>
           <div class="step">
                <div class="step-head">
                     <div class="step-icon">3</div>
                </div>
                <div class="step-main">完成</div>
           </div>
    </div>
    <!-- 身份认证内容 -->
    <div class="step_1" id="step_1">
         <div class="step1_icon"></div>
         <div class="right_register">
              <span>当前手机号:</span>
              <span id="step1_phone"></span>
         </div>
         <div class="step_code">
               <input type="input" name="" id="step1_value" value="" autocomplete="off" />
               <p id="step1_validate" style="color: #f56c6c;margin:0;float: left;"></p>
               <button class="code" id="yanzhengb" onclick="handelAuthCode()">获取验证码</button>
         </div>
         <div class="step_submit" onclick="addStep()">
              <input type="button" value="提交认证" />
         </div>
     </div>
     <!-- 设置操作 -->
     <div class="step_2" id="step_2">
          <div class="step2_title">设置绑定手机</div>
          <div class="step2_phone">
          <input type="input" name="" id="step2_value1" value="" autocomplete="off" />
          <p id="step2_validate1" style="margin:0;margin-left: 140px;color: #f56c6c;float: left;"></p>
     </div>
     <div class="step2_code">
         <input type="input" name="" id="step2_value2" value="" autocomplete="off" />
         <p id="step2_validate2" style="color: #f56c6c;margin:0;float: left;"></p>
         <button class="code authbtn" id="yanzhengb1" onclick="handelAuthCode1()">获取验证码</button>
     </div>
     <div class="step_submit" onclick="addStep()" style="margin-top: 20px;">
         <input type="button" value="提交绑定" />
     </div>
     </div>
     <!-- 完成 -->
     <div class="step_3" id="step_3">
          <div class="step3_succes">手机号绑定成功</div>
          <div class="step_submit" onclick="addStep()">
               <input type="button" value="重新登录" />
          </div>
     </div>
</div>
2、css部分
/* 步骤条样式 */

.step {
    position: relative;
    vertical-align: top;
    display: inline-block;
    margin: 20px 50px 20px 80px;
}

.step-head {
    width: 30px;
    height: 30px;
    border-radius: 50%;
    line-height: 30px;
    text-align: center;
    vertical-align: top;
    color: #333;
    font-size: 14px;
    border: 2px solid #D9D9D9;
    z-index: 10000;
    cursor: pointer;
}

.step-main {
    font-size: 12px;
    color: #48576a;
    margin-top: 15px;
    font-size: 14px;
    color: #444444;
}

.step-line {
    position: absolute;
    top: 15px;
    height: 2px;
    left: 30px;
    right: -134px;
    display: inline-block;
    background-color: #bfcbd9;
    z-index: 10000;
}

.step-circle {
    margin: 4px;
    width: 10px;
    height: 10px;
    border-radius: 50%;
    background-color: #bfcbd9;
}

.is-sucess>.step-head {
    border-color: #60B34F;
    background: #60B34F;
    color: #FFFFFF;
}

.is-sucess>.step-head .step-circle {
    background-color: #2f318e;
}

.is-sucess>.step-head>.step-line {
    background-color: #60B34F;
}

.last-sucess>.step-head {
    color: #ffffff;
    border-color: #60B34F;
    background: #60B34F;
}

.last-sucess>.step-head .step-circle {
    background-color: #2f318e;
}

.modal .modal-dialog .modal-content .modal-body .step_1 {
    display: block;
}

.modal .modal-dialog .modal-content .modal-body .step_1 .step1_icon {
    width: 46px;
    height: 46px;
    background: url('../images/step1.svg') no-repeat;
    margin-left: 255px;
    margin-top: 10px;
}

.modal .modal-dialog .modal-content .modal-body .step_1 .right_register {
    margin-left: 195px;
    margin-top: 25px;
}

.modal .modal-dialog .modal-content .modal-body .step_1 .step_code {
    position: relative;
    width: 300px;
    margin-left: 140px;
}

.modal .modal-dialog .modal-content .modal-body .step_1 .step_code input {
    border: 1px solid #DDDDDD;
    width: 300px;
    height: 40px;
    margin-top: 30px;
    padding-left: 10px;
}

.modal .modal-dialog .modal-content .modal-body .step_1 .step_code a {
    width: 82px;
    height: 30px;
    line-height: 30px;
    text-align: center;
    border-radius: 5px;
    background: #E6E6E6;
    color: #444444;
    position: absolute;
    text-decoration: none;
    top: 35px;
    right: 5px;
}

.modal .modal-dialog .modal-content .modal-body .step_1 .step_code p {
    color: red;
}

.modal .modal-dialog .modal-content .modal-body .step_submit {
    background: #4E9BFF;
    color: #ffffff;
    width: 300px;
    height: 42px;
    line-height: 42px;
    margin-left: 140px;
    margin-top: 20px;
    text-align: center;
    border-radius: 5px;
    margin-bottom: 40px;
    cursor: pointer;
}


/* 设置操作 */

.modal .modal-dialog .modal-content .modal-body .step_2 {
    display: none;
}

.modal .modal-dialog .modal-content .modal-body .step_2 .step2_title {
    font-size: 14px;
    font-weight: 700;
    margin-left: 140px;
    margin-top: 30px;
}

.modal .modal-dialog .modal-content .modal-body .step_2 .step2_phone {
    margin-top: 10px;
    margin-bottom: 20px;
}

.modal .modal-dialog .modal-content .modal-body .step_2 .step2_phone input {
    border: 1px solid #DDDDDD;
    width: 300px;
    height: 40px;
    margin-left: 140px;
    padding-left: 10px;
}

.modal .modal-dialog .modal-content .modal-body .step_2 .step2_code {
    width: 300px;
    height: 40px;
    margin-top: 15px;
    margin-left: 140px;
    position: relative;
}

.modal .modal-dialog .modal-content .modal-body .step_2 .step2_code input {
    border: 1px solid #DDDDDD;
    width: 300px;
    height: 40px;
    padding-left: 10px;
}

.modal .modal-dialog .modal-content .modal-body .step_2 .step2_code a {
    position: absolute;
    top: 5px;
    right: 5px;
    width: 82px;
    height: 30px;
    line-height: 30px;
    text-align: center;
    background: #CCCCCC;
    border-radius: 3px;
    color: #444444;
    text-decoration: none;
}


/* 完成 */

.modal .modal-dialog .modal-content .modal-body .step_3 .step3_succes {
    font-weight: 700;
    font-style: normal;
    font-size: 16px;
    margin-top: 70px;
    margin-bottom: 100px;
    margin-left: 225px;
}

.modal .modal-dialog .modal-content .modal-body .step_3 {
    display: none;
}
3、js部分
// 步骤条
var steps = $(".step");
var stepIndex = 0;
setStep(stepIndex);
// 动态添加class
function setStep(stepIndex) {
    $(steps).removeClass("is-sucess");
    $(steps).removeClass("last-sucess");
    for (var i = 0; i <= stepIndex; i++) {
        var step = steps[i];
        if (i < stepIndex) {
            $(step).addClass("is-sucess");
        } else {
            $(step).addClass("last-sucess");
        }
    }
    $('#step_1').css('display', 'none');
    $('#step_2').css('display', 'none');
    $('#step_3').css('display', 'none');
    //判断stepIndex,根据stepIndex显示对应的部分
    if (stepIndex == 0) {
        $('#step_1').css('display', 'block');
    }
    if (stepIndex == 1) {
        $('#step_2').css('display', 'block');
    }
    if (stepIndex == 2) {
        $('#step_3').css('display', 'block');
    }
}
// 重置
function clearSteps() {
    stepIndex = -1;
    setStep(stepIndex);
}
//下一步
function addStep(addnum) {
    if (stepIndex == 0) {
       //发送接口,获取数据或者提交数据
       stepIndex = 1;
       setStep(stepIndex);
    } else if (stepIndex == 1) {
        //发送接口,获取数据或者提交数据
       stepIndex = 2;
       setStep(stepIndex);
    } else {
    	 //stepIndex = 2 执行这部分
   		 //发送接口,获取数据或者提交数据
    }
}


 172
172


 被折叠的 条评论
为什么被折叠?
被折叠的 条评论
为什么被折叠?
 到【灌水乐园】发言


