


- 📌模板说明
粤嵌鸿蒙 -- 学习笔记
基本介绍任务创建
内核篇 : 1.Thread多线程 2.定时器 3.事件
拓展
- 📚课前准备
- 参考资料 ---- 以下笔记中出现的代码可以在该网址的“四、BearPi-HM_Nano 案例开发”中查找
- 📝听课记录
- 基本介绍任务创建
- 在applications/sample/BearPi/BearPi-HM_Nano/sample路径下创建01-hello文件夹,01-hello文件夹内包含文件如下:
- BUILD.gn 文件
- 内容:编写静态库文件hello,在编译的时候会编译到hello.c文件
- static_library中指定业务模块的编译结果,为静态库文件libhello.a,开发者根据实际情况完成填写
- sources中指定静态库.a所依赖的.c文件及其路径,若路径中包含“//”则表示绝对路径(此处为代码根路径),若不包含“//”则表示相对路径
- include_dirs中指定source所需要依赖的.h文件路径
- BUILD.gn 文件
- 在applications/sample/BearPi/BearPi-HM_Nano/sample路径下创建01-hello文件夹,01-hello文件夹内包含文件如下:
- 基本介绍任务创建

static_library("hello")
{ sources = [ "hello.c", ] }
-
-
-
- hello.c 文件
- 内容:1.程序所需要的头文件 2.创建函数--APP_FEATURE_INIT(func) func:创建的函数名
- hello.c 文件
-
-
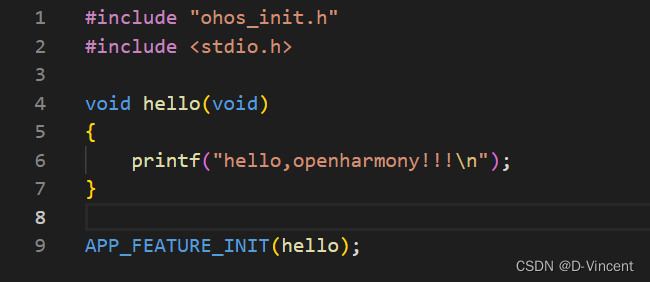
#include "ohos_init.h"
#include <stdio.h>
void hello(void)
{ printf("hello,openharmony!!!\n"); }
APP_FEATURE_INIT(hello);
#include "ohos_init.h"头文件包含:APP_FEATURE_INIT函数
#include <stdio.h>头文件包含:printf函数
-
- 编写模块编译构建文件BUILD.gn

- 编写模块BUILD.gn文件,指定需参与构建的特性模块
在applications/sample/BearPi/BearPi-HM_Nano/sample/BUILD.gn文件中填写如下代码:
import("//build/lite/config/component/lite_component.gni")
lite_component("sample") {
features = [
"01-hello:hello",
]
}
- 01-hello是相对路径,指向applications/sample/BearPi/BearPi-HM_Nano/sample/01-hello/BUILD.gn
- hello是目标:指向applications/sample/BearPi/BearPi-HM_Nano/sample/01-hello/BUILD.gn中的static_library("hello")。
- 编写模块BUILD.gn文件,指定需参与构建的特性模块
- 1.Thread多线程 -- 目标:掌握多线程的使用
- 函数osThreadNew -- 启动线程函数
- 编写模块编译构建文件BUILD.gn
osThreadId_t osThreadNew(osThreadFunc_t func, void *argument, const osThreadAttr_t *attr)
-
-
-
- 参数:
- func:线程函数
- argument:作为启动参数传递给线程函数的指针
- attr:线程属性
- 代码设计:
- 参数:
-
-

osThreadAttr_t attr; //指定线程的属性
attr.name = "thread1";
attr.attr_bits = 0U;
attr.cb_mem = NULL;
attr.cb_size = 0U;
attr.stack_mem = NULL;
attr.stack_size = 1024 * 4;
attr.priority = 25; //优先级
if (osThreadNew((osThreadFunc_t)thread1, NULL, &attr) == NULL) //创建线程 -- 后面编写线程函数thread1
{ printf("Falied to create thread1!\n"); }
-
-
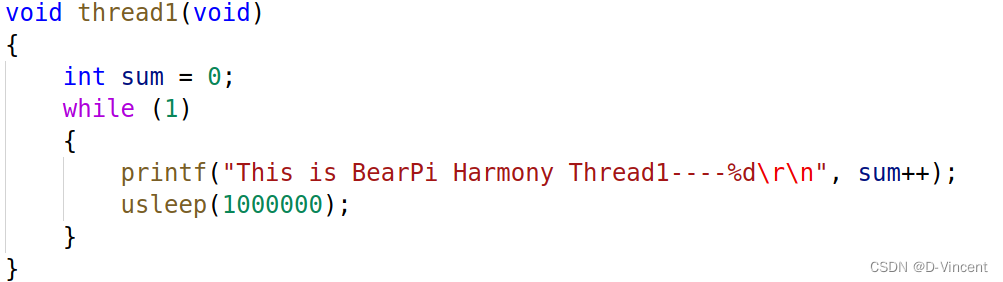
- thread1函数 -- 编写线程函数内容
- 每隔1,000,000us = 1s打印一次信息
- thread1函数 -- 编写线程函数内容
-
-
-
- 头文件部分详情:
- #include "cmsis_os2.h"头文件包含:osThreadNew、osTimerNewos、EventFlagsNew等内核函数以及osWaitForever、osNoWait等宏定义以及osStatus_t结构体定义
- 头文件部分详情:
- 2.定时器 -- 目标:定时器的使用
- 函数osTimerNew -- 创建一个一次性或周期性计时器,并将其与一个带参数的回调函数相关联
-
osTimerId_t osTimerNew(osTimerFunc_t func, osTimerType_t type, void *argument, const osTimerAttr_t *attr)
-
-
-
- 参数:
- func:函数指针指向回调函数
- type:定时器类型,osTimerOnce表示单次定时器,osTimerPeriodic周期表示周期性定时器
- osTimerOnce :表示一次性
- osTimerPeriodic :表示周期性
- argument:定时器回调函数的参数 -- 默认NULL
- attr:计时器属性 -- 默认NULL
- 代码设计:这里的id是我们创建完成后指定的计时器ID
- 参数:
-
-
osTimerId_t id = osTimerNew(callback, osTimerPeriodic, NULL, NULL);
或
osTimerId_t id1; id1 = osTimerNew(Timer1_Callback, osTimerPeriodic, &exec1, NULL);
-
-
- 函数osTimerStart -- 启动或重新启动制定参数ID的计时器。
-
osStatus_t osTimerStart(osTimerId_t timer_id, uint32_t ticks)
注意:不能再终端服务调用函数
-
-
-
- 参数:
- timer_id:由osTimerNew获得的计时器ID
- ticks:时间嘀嗒计时器的值 -- 定时的周期
- 代码设计:
- 参数:
-
-

// Hi3861 1U=10ms,100U=1S
timerDelay = 100U;
status = osTimerStart(id1, timerDelay);
if (status != osOK)
{ // Timer could not be started }
-
-
- 定时器的回调函数的编写
- 定时时间到达后执行的内容,如:打印信息
- 函数osTimerStop -- 停止定时器 (可以再任务中定时一定时间(运行5秒:osDelay(500))后执行该函数,用于停止定时器)
- 定时器的回调函数的编写
-
osStatus_t osTimerStop(osTimerId_t timer_id) 参数:创建的定时器的ID
-
-
- 函数osTimerDelete -- 删除定时器(在定时器停止后执行该函数,用于删除定时器)
-
osStatus_t osTimerDelete(osTimerId_t timer_id) 参数:创建的定时器的ID
-
- 3.事件 -- 事件标志
- 函数osEventFlagsNew -- 创建了一个新的事件标志对象,用于跨线程发送事件,并返回事件标志对象标识符的指针,或者在出现错误时返回NULL
- 3.事件 -- 事件标志
osEventFlagsId_t osEventFlagsNew(const osEventFlagsAttr_t *attr) 注意:不能在中断服务函数中调用该函数
-
-
-
- 参数:
- arrt:事件标志属性;空:默认值
- 代码设计:创建一个事件
- 参数:
-
-
![]()
evt_id = osEventFlagsNew(NULL); //attr为事件标志属性;空:默认值.
-
-
- 函数osEventFlagsSet -- 在一个由参数ef_id指定的事件标志对象中设置由参数flags指定的事件标志
-
uint32_t osEventFlagsSet(osEventFlagsId_t ef_id, uint32_t flags) 注意:不能在中断服务函数中调用该函数
-
-
-
- 参数:
- ef_id:事件标志由osEventFlagsNew获得的ID
- flags:只当设置的标志
- 代码设计:
- 参数:
-
-


#define FLAGS_MSK1 0x00000001U
osEventFlagsSet(evt_id,FLAGS_MSK1); osThreadYield(); -----> 挂起线程(可以不写)
-
-
- 函数osEventFlagsWait -- 挂起当前运行线程,直到设置了由参数ef_id指定的事件对象中的任何或所有由参数flags指定的事件标志。放这些事件标志被设置,函数立即返回。否则,吸纳成将被置于阻塞状态。
-
uint32_t osEventFlagsWait(osEventFlagsId_t ef_id, uint32_t flags, uint32_t options, uint32_t timeout)
注意:不能在中断服务函数中调用该函数
-
-
-
- 参数:
- ef_id:事件标志由osEventFlagsNew获得的ID
- flags:指定要等待的标志
- options:只当标记选项
- timeout:超时事件,0表示不超时
- 代码设计:
- 参数:
-
-

osEventFlagsWait(evt_id,FLAGS_MSK1,osFlagsWaitAny,osWaitForever); //等待 FLAGS_MSK1 事件
-
- 拓展:
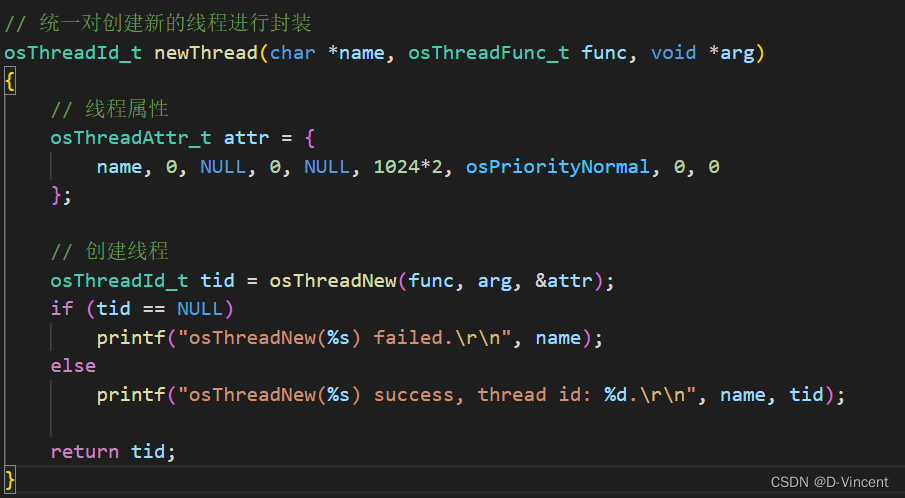
- 对创建新的线程进行封装 -- 后续创建线程可复制后直接调用该函数
- 内容:
- 代码
- 内容:
- 对创建新的线程进行封装 -- 后续创建线程可复制后直接调用该函数
- 拓展:
// 统一对创建新的线程进行封装
osThreadId_t newThread(char *name, osThreadFunc_t func, void *arg)
{
// 线程属性
osThreadAttr_t attr = { name, 0, NULL, 0, NULL, 1024*2, osPriorityNormal, 0, 0 };
// 创建线程
osThreadId_t tid = osThreadNew(func, arg, &attr);
if (tid == NULL)
printf("osThreadNew(%s) failed.\r\n", name);
else
printf("osThreadNew(%s) success, thread id: %d.\r\n", name, tid);
return tid;
}
-
-
-
-
- .
-
-
-
-
-
-
- 调用:
- 代码
- 调用:
-
-
// 创建线程
osThreadId_t t1 = newThread("feedCat", feedCat, NULL);
osThreadId_t t2 = newThread("feedDog", feedDog, NULL);
-
-
-
-
- .
-
-
-


 2623
2623


 被折叠的 条评论
为什么被折叠?
被折叠的 条评论
为什么被折叠?
 到【灌水乐园】发言


