


前言
注解我们可以分为两类,运行时注解和编译时注解,今天我们重点介绍一下编译时注解。
运行时注解
运行时注解的定义如下,在声明注解时指定@Retention(RetentionPolicy.RUNTIME)即可,
相比编译时注解,性能低,但是灵活性好,实现起来比较简单,写法如下
@Retention(RetentionPolicy.RUNTIME)
@Target(ElementType.TYPE)//java虚拟机在运行时保留该注解,可以通过反射获取注解信息
public @interface Bind {
}
编译时注解
今天我们重点看看编译时注解,编译时注解能够自动处理Java源文件并生成更多的源码、配置文件、脚本或其他可能想要生成的东西。java编译器集成了注解处理。通过在编译期间调用javac -processor命令可以调起注解处理器,它能够允许我们实现编译时注解的功能,从而提高函数库的性能。
android-apt插件
android-apt插件是在Android Studio中使用注解处理器的一个辅助插件,它的作用主要如下:
- 只在编译期间引入注解处理器所在的函数库作为依赖,不会打包到最终生成的APK中
- 为注解处理器生成的源代码设置好正确的路径,以便Android Studio能够正确找到
android-apt的使用如下
首先在项目最外层的build.gradle文件中引入apt插件
  dependencies {
        //添加apt插件
        classpath 'com.neenbedankt.gradle.plugins:android-apt:1.8'
    }
然后在使用到注解处理器的模块的build.gradle文件中应用插件
apply plugin: 'com.neenbedankt.android-apt'最后以apt的方式引入注解处理器函数库作为依赖,比如我们引入butterknife
apt 'com.jakewharton:butterknife-compiler:8.0.1'这样就完了,注意,Android Studio3.0以后不支持apt插件,用下面的一句话就可以代替,
annotationProcessor 'com.jakewharton:butterknife-compiler:8.0.1'下面我们用一个Demo演示一下注解处理器如何使用
新建一个module和两个java library
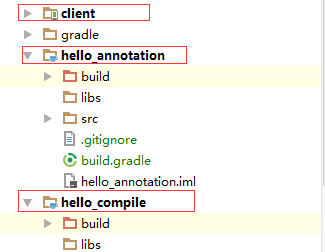
client:使用注解处理器的项目
在client的gradle文件中,关联hello_annotation这个类库,并且使用apt指定处理哪个类库
dependencies {
    compile project(':hello_annotation')
    apt project(':hello_compile')
}
hello_annotation:需要被处理的注解
hello_compile:处理注解的库
首先在hello_annotation中定义一个注解
/**
 * 被处理的注解
 */
@Target(ElementType.TYPE)
@Retention(RetentionPolicy.CLASS)
public @interface HelloAnnotation {
}
然后我们在hello_compile这个javalib的build.gradle文件中
dependencies {
    compile fileTree(dir: 'libs', include: ['*.jar'])
    compile 'com.squareup:javapoet:1.9.0'//用于生成代码
    compile 'com.google.auto.service:auto-service:1.0-rc2'//注册注解处理器
    compile project(':hello_annotation')
}
然后就是注解的具体处理
/**
 * 注解处理器
 */
@AutoService(Processor.class)//注册注解处理器
public class HelloProcessor extends AbstractProcessor {

    private Filer mFilter;
    //被系统注解处理工具调用
    @Override
    public synchronized void init(ProcessingEnvironment processingEnv) {
        super.init(processingEnv);
        mFilter = processingEnv.getFiler();//create new source, class
    }

    @Override
    public boolean process(Set<? extends TypeElement> annotations, RoundEnvironment roundEnv) {
        for (TypeElement element : annotations) {
            if (element.getQualifiedName().toString().equals(HelloAnnotation.class.getCanonicalName())) {
                MethodSpec main = MethodSpec.methodBuilder("main")
                        .addModifiers(Modifier.PUBLIC,Modifier.STATIC)
                        .returns(void.class)
                        .addParameter(String[].class,"args")
                        .addStatement("$T.out.println($S)",System.class,"Hello JavaPoet")
                        .build();
                //类的名称
                TypeSpec helloWorld = TypeSpec.classBuilder("HelloWorld")
                        .addModifiers(Modifier.PUBLIC)
                        .addMethod(main)
                        .build();
                JavaFile javaFile = JavaFile.builder("com.example",helloWorld)
                        .addFileComment("this codes are generated automatically,Do not modify")
                        .build();
                try {
                    javaFile.writeTo(mFilter);
                } catch (IOException e) {
                    e.printStackTrace();
                }
            }
        }
        return true;
    }
    //指定使用的java版本
    @Override
    public SourceVersion getSupportedSourceVersion() {
        return SourceVersion.latestSupported();
    }
   //指定注解处理器要处理那个注解
    @Override
    public Set<String> getSupportedAnnotationTypes() {
        //返回一个不可变集合,不能修改
        return Collections.singleton(HelloAnnotation.class.getCanonicalName());
    }
}
//编译JAVA文件时采用UTF-8 tasks.withType(JavaCompile) { options.encoding = "UTF-8" }在java类中加中文注解时,会提示编码GBK的不可映射字符,这是因为编译java源文件时默认采用的GBK,解决办法是在hello_compile的build.gradle文件中加入下面的设置
//编译JAVA文件时采用UTF-8
tasks.withType(JavaCompile) {
options.encoding = "UTF-8"
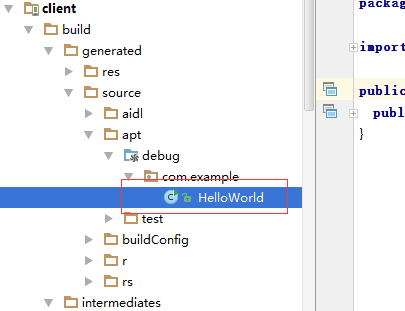
}编译项目,我们就可以看到生成的文件了。目录如下
然后我们就可以在client中使用注解了,
@HelloAnnotation
public class MainActivity extends Activity {

    @Override
    protected void onCreate(Bundle savedInstanceState) {
        super.onCreate(savedInstanceState);
        setContentView(R.layout.activity_main);
        HelloWorld.main(null);
    }
}
最后参考一个链接
你必须知道的APT、annotationProcessor、android-apt、Provided、自定义注解


 2198
2198

 被折叠的 条评论
为什么被折叠?
被折叠的 条评论
为什么被折叠?
 到【灌水乐园】发言


