


1. 简单介绍
Spring Cache 是 Spring 提供的一整套的缓存解决方案。虽然它本身并没有提供缓存的实现,但是它提供了一整套的接口和代码规范、配置、注解等,这样它就可以整合各种缓存方案了,比如 Redis、Ehcache,我们也就不用关心操作缓存的细节。
Spring 3.1 开始定义了 org.springframework.cache.Cache 和 org.springframework.cache.CacheManager 接口,位于org.springframework:spring-context包下,来统一不同的缓存技术,并支持使用注解来简化我们开发。
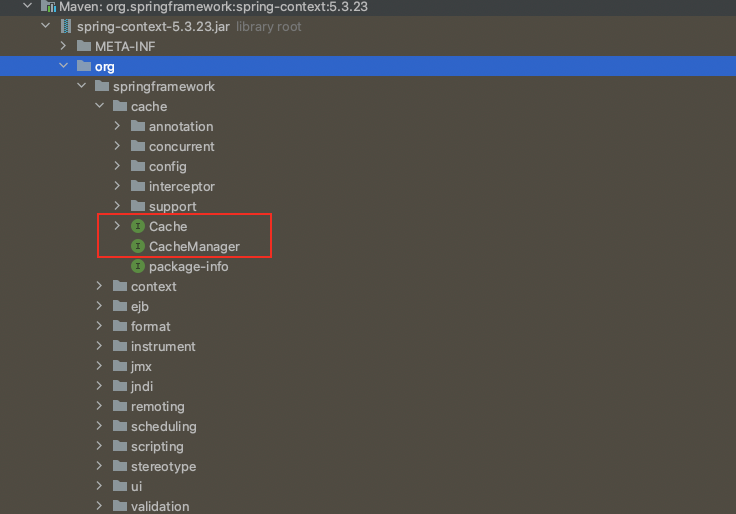
Cache 接口它包含了缓存的各种操作方式,同时还提供了各种xxxCache缓存的实现,比如 RedisCache 针对Redis,EhCacheCache 针对 EhCache,ConcurrentMapCache 针对 ConCurrentMap等等…
使用SpringCache可以在调用方法的时候,通过检查对应指定参数是否已经被调用过?
- 如果之前就被调用过,则就会从缓存中取出之前调用的结果
- 如果之前没有被调用过,则调用该方法,并缓存对应的结果,下一次直接从缓存中取结果
SpringCache主要提供了以下几个注解帮助我们完成缓存的各种操作:
| 注解名称 | 注解描述 |
|---|---|
| @Cacheable | 在调用方法之前,首先去缓存中获取方法的方法值,如果可以找到,则返回缓存中的值,否则就执行该方法,并将返回值放到缓存中去。 |
| @CachePut | 在方法调用之前不会去缓存中找,而选择直接执行方法,并将执行后的方法返回值放到缓存中去 |
| @Caching | 能够同时应用多个缓存注解 |
| @CacheEvict | 清理缓存中的一个或者多个记录 |
| @CacheConfig | 在类级别共享相同的缓存的配置 |
2. 快速使用
根据SpringBoot的版本自定义选择使用在pom文件引入相关依赖:
<dependency>
    <groupId>org.springframework.boot</groupId>
    <artifactId>spring-boot-starter-cache</artifactId>
</dependency>
在application.yml文件中配置选择的缓存类型,其中,SpringCache支持多种缓存中间件作为框架的缓存,如下图所示:
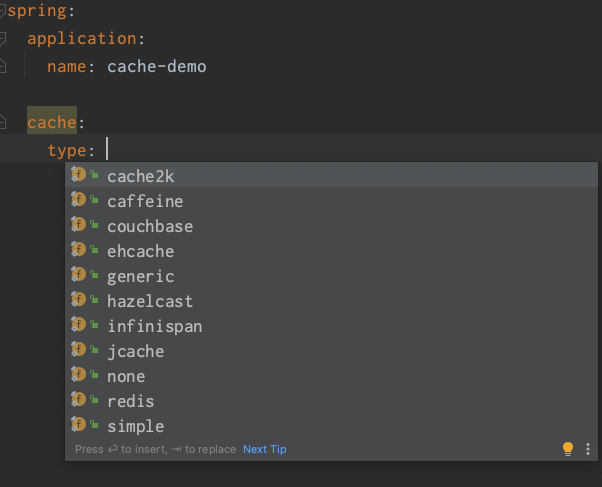
其中,依次分别为:
- cache2K:SpringBoot2.7新增加的本地缓存解决方案
- caffine:Caffeine 是一种高性能的缓存库,基于 Google Guava
- couchbase:CouchBase是一款非关系型JSON文档数据库
- ehcache:
- generic:由泛型机制和 static 组合实现的泛型缓存机制
- hazelcast:一个高度可扩展的数据分发和集群平台,可用于实现分布式数据存储、数据缓存
- infinispan:分布式的集群缓存系统
- jcache:JCache 作为缓存,它是 JSR107 规范中提到的缓存规范
- none:没有缓存
- redis:使用redis作为缓存
- simple:内存作为缓存
这里我们选择熟悉的Redis作为缓存:
spring:
  cache:
    type: redis
同时,注意在pom引入redis的对应依赖:
<dependency>
    <groupId>org.springframework.boot</groupId>
    <artifactId>spring-boot-starter-data-redis</artifactId>
</dependency>
然后,在application.yml文件中配置redis相关参数:
spring:
  redis:
    host: xxx.xxx.xxx.xxx
    port: 6379
    password: xxxxxx
最后,我们需要在启动类启用SpringCache:
@SpringBootApplication
@EnableCaching
public class CacheDemoApplication {

    public static void main(String[] args) {
        SpringApplication.run(CacheDemoApplication.class, args);
    }

}
上面配置以后,我们就可以使用SpringCache进行缓存的获取/更新/删除等操作了,下面通过一个简单的案例来测试一下SpringCache的使用:
简单定义一个/test/cache/get接口:
@GetMapping("/cache/get")
public String getCache() {
  return testService.getCache();
}
定义对应的Service,使用@Cacheable注解,定义缓存名称为“test”
@Cacheable({"test"})
public String getCache() {
  return "Cache Test Data";
}
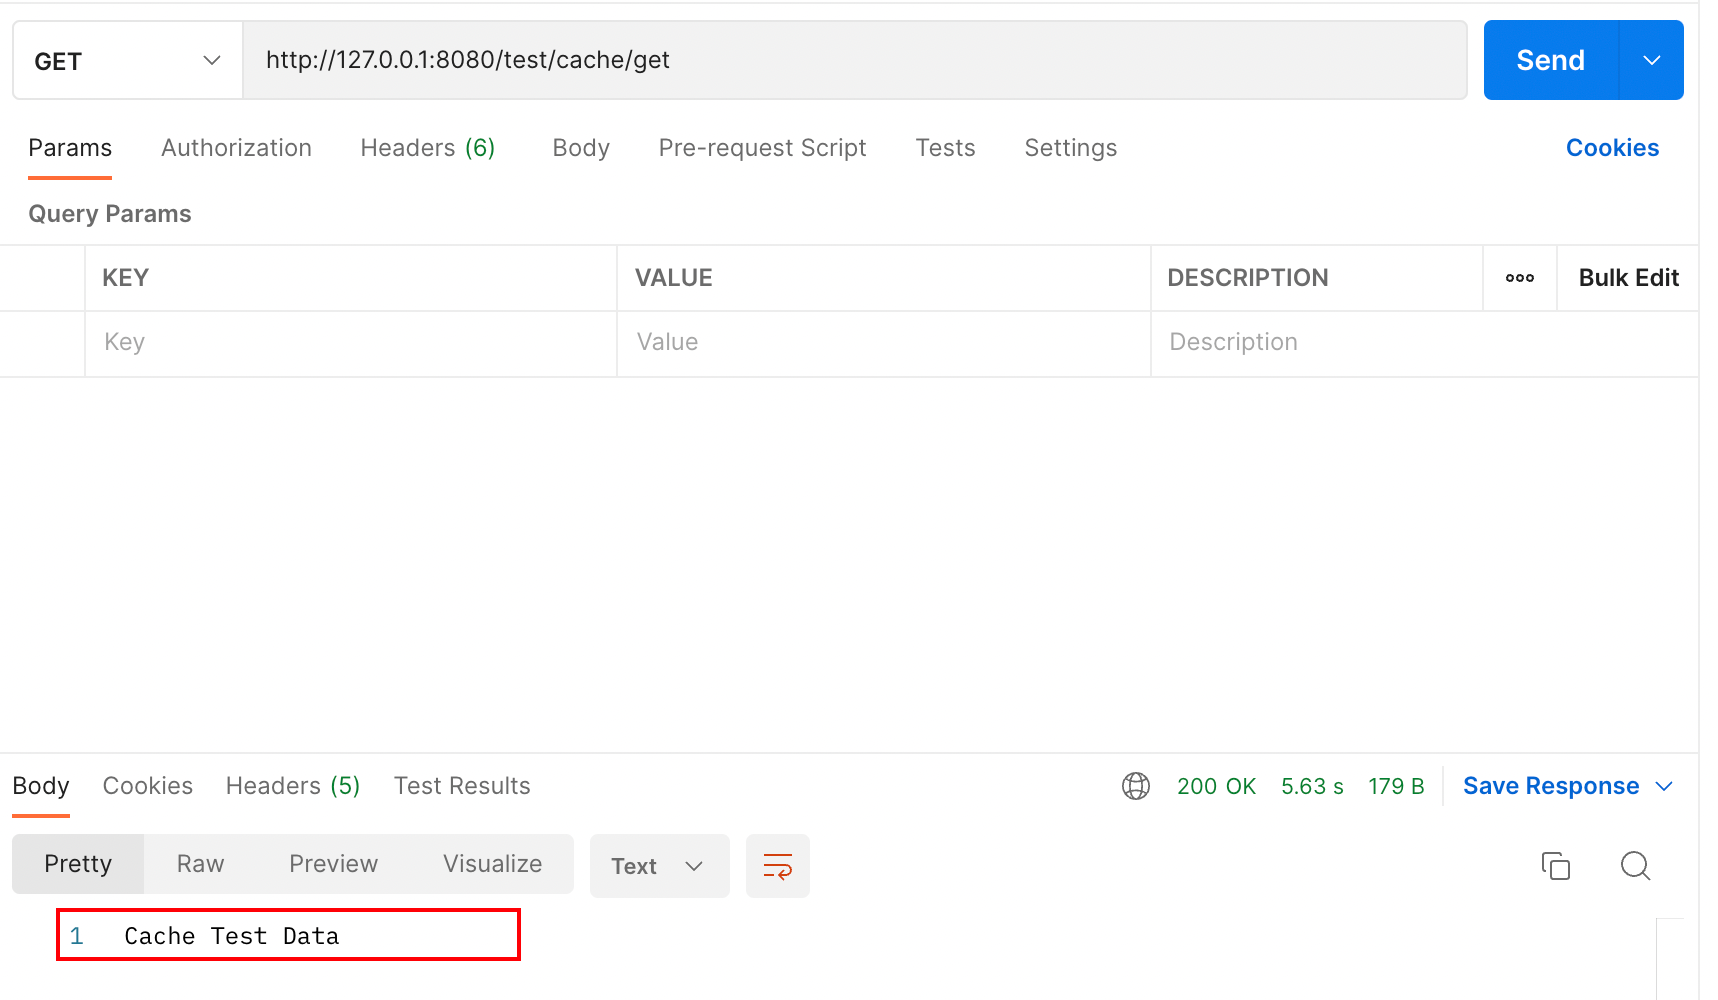
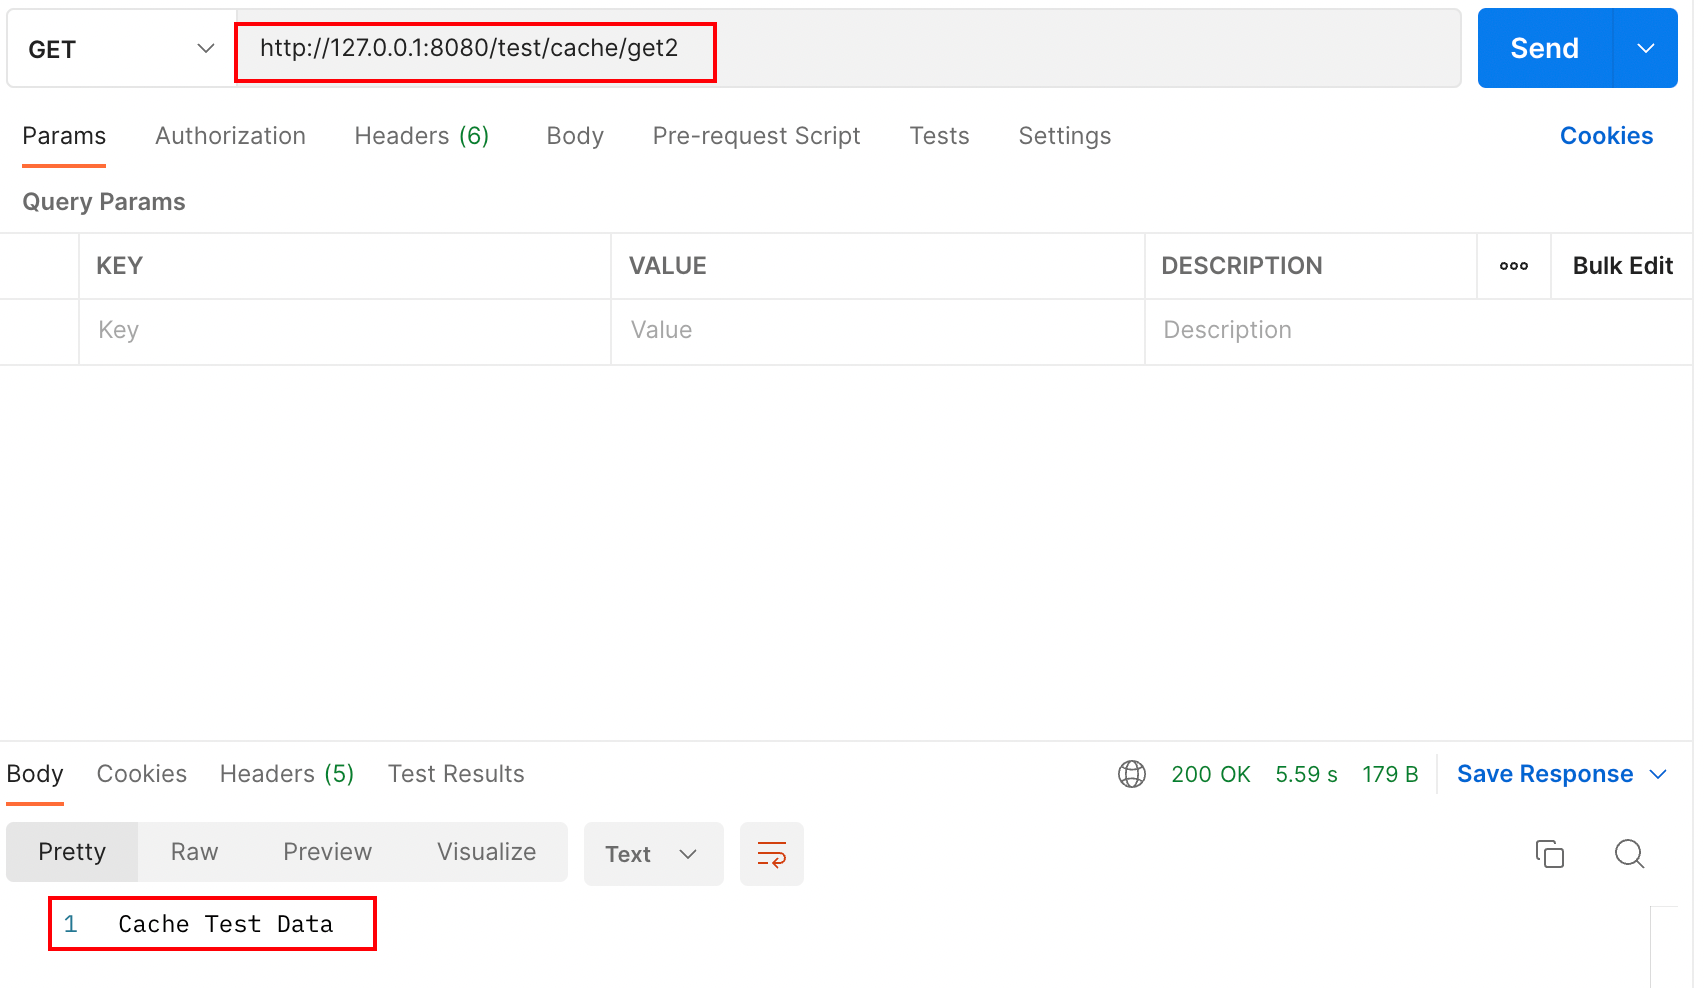
此时,第一次调用该接口的时候,由于缓存中不存在,会直接执行该方法,然后将执行结果放到redis缓存中去,通过postman调用该接口发现结果是我们想要的“Cache Test Data”:
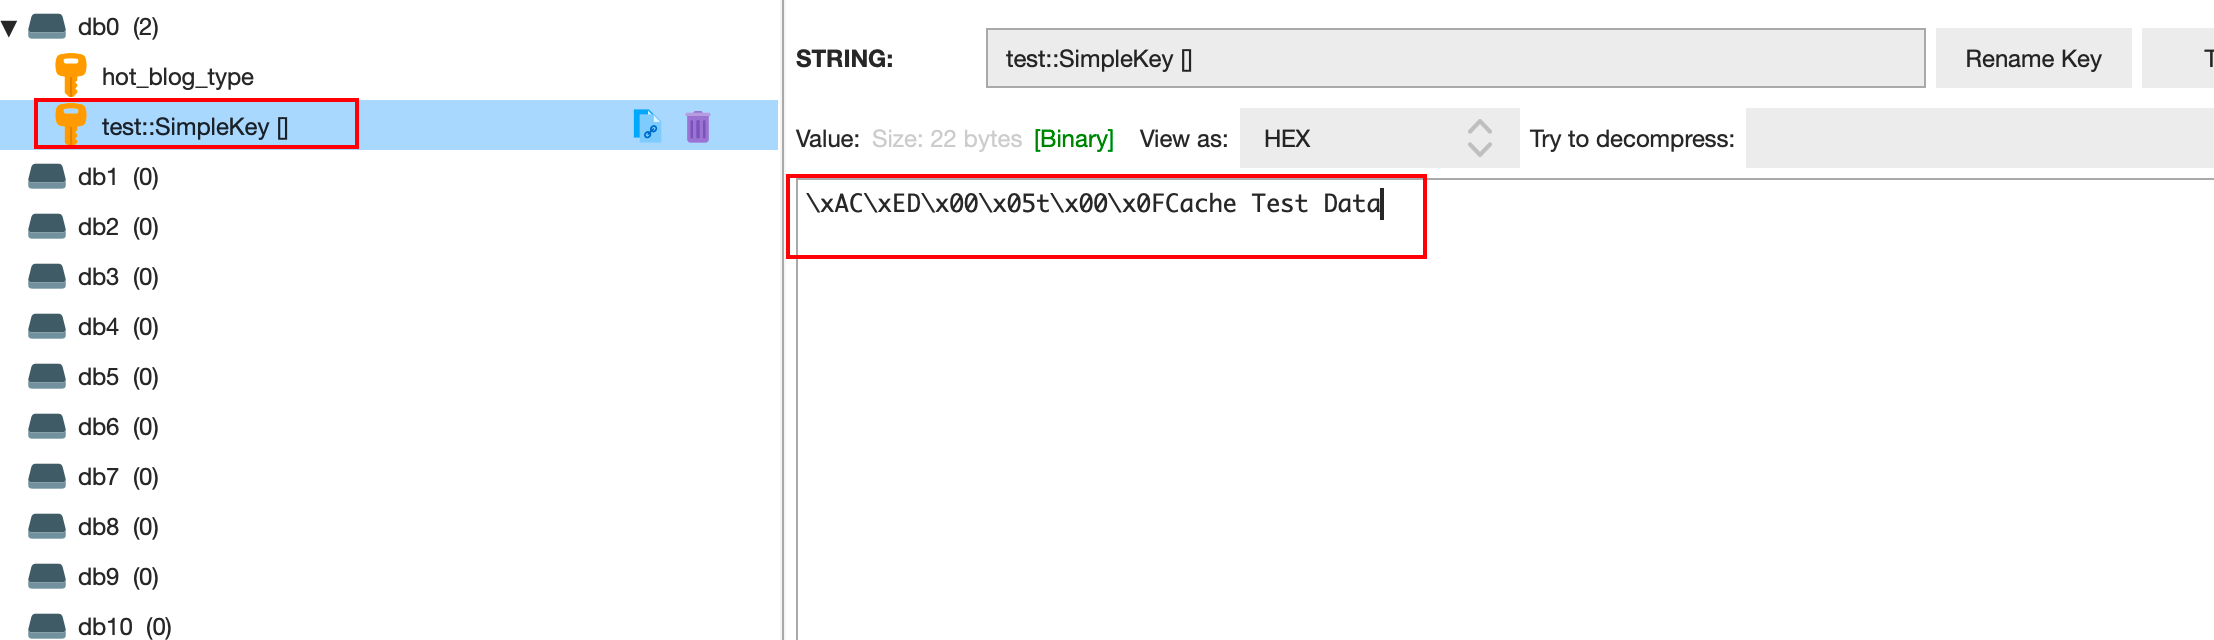
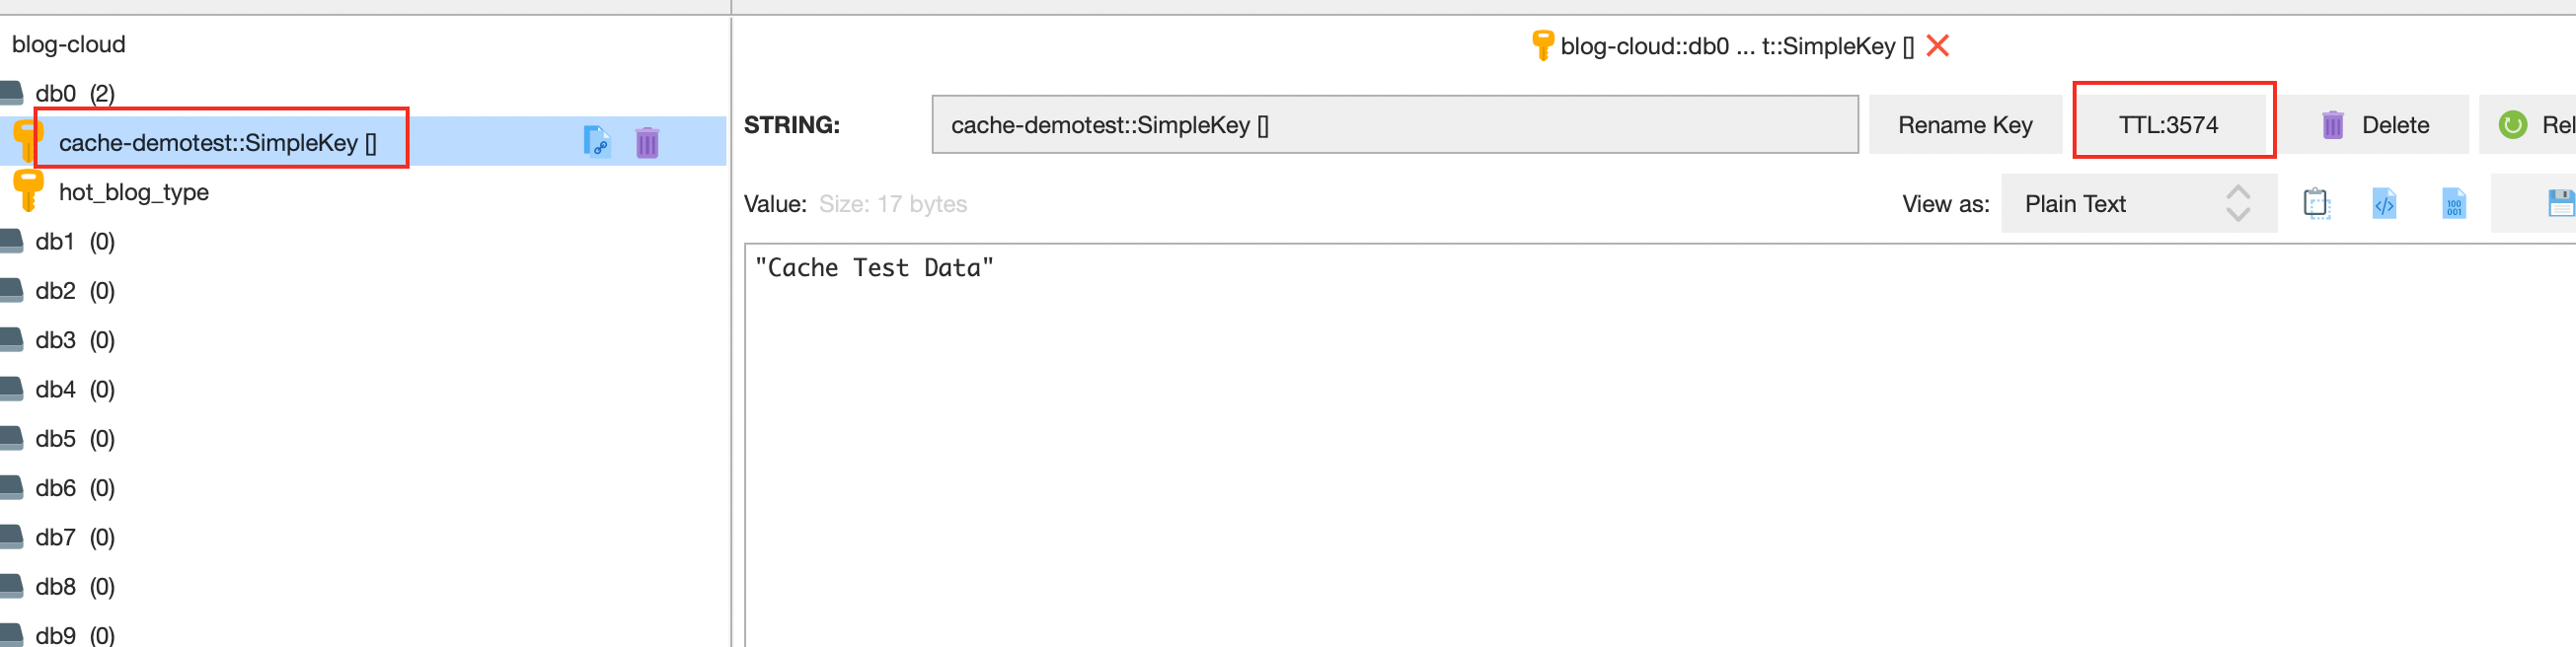
同时,检查Redis的缓存数据,发现确实增加了对应的缓存数据,其中缓存的key为“test::SimpleKey []”:
接下来,我们再一次调用该接口,由于此时Redis缓存中已经存在该Key了,就会直接从缓存中获取对应值了。这里可以通过在getCache方法中打断点,debug走一遍,就会发现走的是缓存。这里我们创建另外一个接口,同样使用该缓存key,但是方法本身返回的内容为“Cache Test02 Data”,调用该接口,会发现返回给我们的是缓存中的值,而并非方法的返回值,也就证明了确实走了缓存这一结论。
@GetMapping("/cache/get2")
public String getCache02() {
  return testService.getCache02();
}

@Cacheable({"test"})
public String getCache02() {
  return "Cache Test02 Data";
}
然后,我们使用@CacheEvict进行缓存的删除操作:
@DeleteMapping("/cache/delete/key")
public String deleteCacheKey() {
  testService.deleteCacheKey();
  return "delete CacheKey success";
}

@CacheEvict({"test"})
public void deleteCacheKey() {
  System.out.println("删除缓存");
}
执行该请求,发现Redis的缓存被删除干净…
总结:
我们会发现,当我们没有指定参数的话,默认我们缓存的后缀名为SimpleKey[]。缓存的value值默认使用jdk序列化机制,将序列化后的数据存到redis。同时缓存过期时间默认value为-1,即永不过期。
当然我们可以自定义参数来设置缓存的key值,同时也可以设置缓存的过期时间等,在高级使用进行讲解。
3. 高级使用
3.1 自定义配置Config
上面的简单快速上手使用的是SpringCache默认的配置,当然我们可以自定义配置:
首先,在application.yml文件中配置对应的自定义信息:
#SpringCache自定义配置
cache:
  redis:
    #缓存key前缀
    keyPrefix: ${spring.application.name}
    #是否开启缓存控制,防止缓存穿透
    cacheNullValues: true
    #缓存过期时间:3600s
    timeToLive: 3600000
    #是否使用key前缀
    useKeyPrefix: true
并创建对应的Properties类:
@Component
@Data
@ConfigurationProperties(prefix = "cache")
public class CacheProperties {
    //redis缓存配置信息
    private Redis redis;
    @Data
    public static class Redis {
        private String keyPrefix;
        private Boolean cacheNullValues;
        private Long timeToLive;
        private Boolean useKeyPrefix;
    }
}
然后,定义SpringCache的配置类,这里直接将启动Cache的注解改标注在该类上:
@Configuration
@EnableConfigurationProperties(CacheProperties.class)
@EnableCaching
public class MyCacheConfig {

    @Resource
    private CacheProperties cacheProperties;

    @Bean
    public RedisCacheConfiguration redisCacheConfiguration() {
        RedisCacheConfiguration config = RedisCacheConfiguration.defaultCacheConfig();
        config = config.serializeKeysWith(RedisSerializationContext.SerializationPair.fromSerializer(new StringRedisSerializer()));
        config = config.serializeValuesWith(RedisSerializationContext.SerializationPair.fromSerializer(new GenericJackson2JsonRedisSerializer()));
        CacheProperties.Redis redisProperties = cacheProperties.getRedis();
        if (!redisProperties.getUseKeyPrefix()) {
            config = config.disableKeyPrefix();
        }
        if (redisProperties.getKeyPrefix() != null) {
            config = config.prefixCacheNameWith(redisProperties.getKeyPrefix());
        }
        if (!redisProperties.getCacheNullValues()) {
            config = config.disableCachingNullValues();
        }
        if (redisProperties.getTimeToLive() != null) {
            config = config.entryTtl(Duration.ofMillis(redisProperties.getTimeToLive()));
        }
        return config;
    }
}
此时,我们再执行上面的接口方法,发现此时SpringCache的配置已经对应发生改变了:
3.2 自定义key&keyGenerator
首先我们通过一个例子了解一下key,在上面的案例当中,虽然我们配置了Key的前缀,但是发现上面的后缀SimpleKey[]依旧存在,这是由于其使用默认的key生成策略,这里我们先通过手动配置,自定义指定key的值。配置需要使用SpEL表达式。我们在Service层方法上指定对应的缓存key:
@Cacheable(value = {"test"}, key = "#root.method.name")
再测试发现,redis中的key发生了对应的变化,此时的key为对应的方法名:

同时,我们还可以指定key为其他内容,通过SpEL表达式来实现,其中SpEL的规则存在以下:
| SpEL表达式 | 描述信息 |
|---|---|
| #root.args | 传递给缓存方法的参数,形式为数组类型 |
| #root.caches | 该方法执行时对应的缓存,形式为数组类型 |
| #root.target | 目标对象 |
| #root.targetClass | 目标对象的类 |
| #root.method | 缓存的方法 |
| #root.methodName | 缓存方法的名字,也可以写成#root.method.name |
| #result | 方法调用的返回值(不能够用在@Cacheable注解上) |
| @Argument | 任意的方法参数名 |
| … |
通过上面的案例,我们能够自己去手动设置key的值,那么这里就引入了key和keyGenerator的概念:
KeyGenerator:
当我们再声明注解@Cacheable的时候,如果不指定key参数,那么该缓存下的key就会使用KeyGenerator根据参数自动生成,此时Spring默认使用的是SimpleKeyGenenrator,在SpringBoot自动化配置之下,该配置会自动注入,也就是上面我们得到的SimpleKey[]。该配置的规则为:
- 如果该缓存方法没有参数,返回 SimpleKey.[]
- 如果该缓存方法有一个参数,返回该参数的实例
- 如果该缓存方法有多个参数,返回一个包含所有参数的 SimpleKey
key:
官方更推荐我们手动指定key参数,这里就可以使用SpEL表示式来进行key的设置
注意:官方说 key 和 keyGenerator 参数是互斥的,同时指定两个会导致异常
3.3 自定义条件Conditon&Unless
我们除了可以自定义设置缓存的key,还是可以设置缓存的自定义条件,这里列举@Cacheable和@CachePut共有的一些自定义属性
| 属性 | 描述 |
|---|---|
| value | 设置缓存的名称 |
| key | SpEL表达式,设置自定义缓存的key |
| condition | SpEL表达式,如果得到的结果为fasle,则缓存不应用到方法调用上,即无法从缓存中获取数据 |
| unless | SpEL表达式,如果得到的结果为true,则返回值不放到缓存中去 |
//1. 如果返回结果中包含"Cache",则不会将其放到缓存中去
@Cacheable(value = {"test"}, key = "#root.method.name", unless = "#result.contains('Cache')")

//2. 如果方法名不包含”CacheName“,则不能够从缓存中获取,得执行该缓存方法,获取返回值
@Cacheable(value = {"test"}, key = "#root.method.name", condition = "#root.methodName.contains('CacheName')")
这里发现condition和unless都能决定是否进行缓存,那么同时指定这两个参数就会存在不同的结果:
| conditon | unless | 结果 |
|---|---|---|
| false | - | 一定不会缓存 |
| true | true | 不会缓存 |
| true | false | 缓存 |
@CacheEvict注解在方法调用时不会向缓存中添加任何内容,但是会从缓存中移除之前的缓存结果,除了上面的属性外,还有几种属性:
- allEntries:如果为true的话,特定缓存的所有条目全部都被移除
- beforeInvocation:如果为true的话,方法调用之前就会移除条目;否则,方法调用成功以后再移除条目
3.4 自定义配置管理和解析CacheManager&CacheResolver
上面的自定义配置我们简单设置了缓存的默认配置信息。但是其实在项目中我们经常不仅仅使用到一种缓存策略,可能存在多种,那么就要配置多种缓存,同时在使用@Cacheable等缓存注解的时候,需要指定使用的是哪种缓存,也可以使用哪种缓存解析器对其进行解析等。。。这便引入了我们的CacheManager和CacheResolver:
CacheManager:
CacheManager称为缓存管理器,是用来管理(检索)一类缓存的。通常来讲,缓存管理器是与缓存组件类型相关联的。我们知道,spring 缓存抽象的目的是为使用不同缓存组件类型提供统一的访问接口,以向开发者屏蔽各种缓存组件的差异性。那么 CacheManager 就是承担了这种屏蔽的功能。spring 为其支持的每一种缓存的组件类型提供了一个默认的 manager,如:RedisCacheManager 管理 redis 相关的缓存的检索、EhCacheManager 管理 ehCache 相关的缓存等。
CacherResolver:
CacheResolver称为缓存解析器,是用来管理缓存管理器的。CacheResolver 保持一个 cacheManager 的引用,并通过它来检索缓存。CacheResolver 与 CacheManager 的关系有点类似于 KeyGenerator 跟 key。spring 默认提供了一个 SimpleCacheResolver,开发者可以自定义并通过 @Bean 来注入自定义的解析器,以实现更灵活的检索。
实际生产中,一般情况下我们只会配置一种缓存,此时我们就不用显式化指定cacheManager或者cacheResolver。但是Spring允许我们的系统同时配置多种缓存组件,这种情况下,我们需要指定@Cacheable的cacheManager或者cacheResolver参数
3.5 自定义sync 同步参数
当我们在高并发请求的情况下,对于同一个缓存方法,可能会同时进行计算,访问数据库,这样就无法达到缓存高效的目的。在这种情况下,我们可以使用sync = true开启同步模式,它就会告诉底层的缓存提供者将缓存的入口锁住,当有n个线程过来时,只会有一个线程进行数据库访问,将计算结果放入缓存,同时将缓存信息同步到其他的n -1个线程,这样就能减少n - 1次的数据访问,有效地避免了缓存击穿问题。
4. 原理剖析
参考博客地址:https://blog.csdn.net/weixin_37943811/article/details/116462248
首先,SpringCache的一切的开始来源于@EnabCaching注解,该注解即帮助我们启动了Springcache功能,我们点开该注解:
@Target({ElementType.TYPE})
@Retention(RetentionPolicy.RUNTIME)
@Documented
@Import({CachingConfigurationSelector.class})
public @interface EnableCaching {
    //是否直接代理目标类,默认为false
    boolean proxyTargetClass() default false;
		//同时的类型,默认为代理类型
    AdviceMode mode() default AdviceMode.PROXY;
		//顺序
    int order() default Integer.MAX_VALUE;
}
在该注解中引入了CachingConfigurationSelector类,进入该类查看其实现的逻辑:
public class CachingConfigurationSelector extends AdviceModeImportSelector<EnableCaching> {
    public CachingConfigurationSelector() {
    }

   //核心方法,就是根据传入的AdviceMode类型选择对应的配置类型,默认是代理PROXY
    public String[] selectImports(AdviceMode adviceMode) {
        switch (adviceMode) {
            case PROXY:
                return this.getProxyImports();
            case ASPECTJ:
                return this.getAspectJImports();
            default:
                return null;
        }
    }

    private String[] getProxyImports() {
        List<String> result = new ArrayList(3);
        //当使用PROXY模式的时候,需要引入AutoProxyRegistrar和ProxyCachingConfiguration两个配置
        result.add(AutoProxyRegistrar.class.getName());
        result.add(ProxyCachingConfiguration.class.getName());
        //jsr107是关于java关于缓存的规范提案,使用的话需要引入javax.cache相关包,了解即可
        if (jsr107Present && jcacheImplPresent) {
            result.add("org.springframework.cache.jcache.config.ProxyJCacheConfiguration");
        }

        return StringUtils.toStringArray(result);
    }

    private String[] getAspectJImports() {
        List<String> result = new ArrayList(2);
        result.add("org.springframework.cache.aspectj.AspectJCachingConfiguration");
        if (jsr107Present && jcacheImplPresent) {
            result.add("org.springframework.cache.aspectj.AspectJJCacheConfiguration");
        }

        return StringUtils.toStringArray(result);
    }

    static {
        ClassLoader classLoader = CachingConfigurationSelector.class.getClassLoader();
        jsr107Present = ClassUtils.isPresent("javax.cache.Cache", classLoader);
        jcacheImplPresent = ClassUtils.isPresent("org.springframework.cache.jcache.config.ProxyJCacheConfiguration", classLoader);
    }
}
这个类做的事情其实很简答,基于不同的配置模式加载不同的配置类,我们默认使用的PROXY模式,那么除了缓存规范的ProxyJCacheConfiguration以外,还需要引入AutoProxyRegistrar和ProxyCachingConfiguration,这里重点来看一下这两个类干了些什么事??
ProxyCachingConfiguration -缓存配置及工作流程
查看该类的结构图,如下所示:
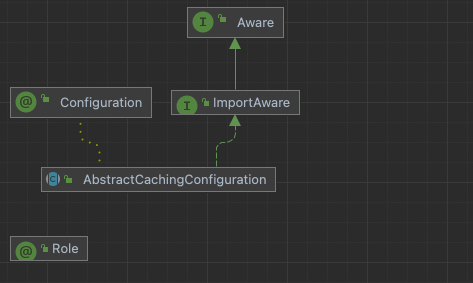
观察该结构图,可知该类继承了AbstractCachingConfiguration,那我们先来看看看它的父类AbstractCachingConfiguration做了些啥?
- 解析注解元数据
- 装配缓存组件
public abstract class AbstractCachingConfiguration implements ImportAware {
    @Nullable
    protected AnnotationAttributes enableCaching;
    @Nullable
    protected Supplier<CacheManager> cacheManager;
    @Nullable
    protected Supplier<CacheResolver> cacheResolver;
    @Nullable
    protected Supplier<KeyGenerator> keyGenerator;
    @Nullable
    protected Supplier<CacheErrorHandler> errorHandler;

    public AbstractCachingConfiguration() {
    }

  //获取出注解元数据,将其进行解析成AnnotationAttributes
    public void setImportMetadata(AnnotationMetadata importMetadata) {
        this.enableCaching = AnnotationAttributes.fromMap(importMetadata.getAnnotationAttributes(EnableCaching.class.getName()));
        if (this.enableCaching == null) {
            throw new IllegalArgumentException("@EnableCaching is not present on importing class " + importMetadata.getClassName());
        }
    }

  //将用户的自定义缓存组件进行装配,得到cacheManager,cacheResolver,keyGenerator,errorHandler
    @Autowired
    void setConfigurers(ObjectProvider<CachingConfigurer> configurers) {
        Supplier<CachingConfigurer> configurer = () -> {
            List<CachingConfigurer> candidates = (List)configurers.stream().collect(Collectors.toList());
            if (CollectionUtils.isEmpty(candidates)) {
                return null;
            } else if (candidates.size() > 1) {
                throw new IllegalStateException(candidates.size() + " implementations of CachingConfigurer were found when only 1 was expected. Refactor the configuration such that CachingConfigurer is implemented only once or not at all.");
            } else {
                return (CachingConfigurer)candidates.get(0);
            }
        };
        this.useCachingConfigurer(new CachingConfigurerSupplier(configurer));
    }

    protected void useCachingConfigurer(CachingConfigurerSupplier cachingConfigurerSupplier) {
        this.cacheManager = cachingConfigurerSupplier.adapt(CachingConfigurer::cacheManager);
        this.cacheResolver = cachingConfigurerSupplier.adapt(CachingConfigurer::cacheResolver);
        this.keyGenerator = cachingConfigurerSupplier.adapt(CachingConfigurer::keyGenerator);
        this.errorHandler = cachingConfigurerSupplier.adapt(CachingConfigurer::errorHandler);
    }
}
然后,我们来看看类ProxyCachingConfiguration本身具体实现:
public class ProxyCachingConfiguration extends AbstractCachingConfiguration {
    @Bean(
        name = {"org.springframework.cache.config.internalCacheAdvisor"}
    )
   //添加了下面的Bean:cacheOperationSource和cacheInterceptor
    @Role(2)
    public BeanFactoryCacheOperationSourceAdvisor cacheAdvisor(CacheOperationSource cacheOperationSource, CacheInterceptor cacheInterceptor) {
        BeanFactoryCacheOperationSourceAdvisor advisor = new BeanFactoryCacheOperationSourceAdvisor();
        advisor.setCacheOperationSource(cacheOperationSource);
        advisor.setAdvice(cacheInterceptor);
        if (this.enableCaching != null) {
            advisor.setOrder((Integer)this.enableCaching.getNumber("order"));
        }

        return advisor;
    }

   //注册了AnnotationCacheOperationSource
    @Bean
    @Role(2)
    public CacheOperationSource cacheOperationSource() {
        return new AnnotationCacheOperationSource();
    }
	 //注册CacheInterceptor拦截器,并将父类装配的缓存组件设置进去,同时设置cacheOperationSource
    @Bean
    @Role(2)
    public CacheInterceptor cacheInterceptor(CacheOperationSource cacheOperationSource) {
        CacheInterceptor interceptor = new CacheInterceptor();
        interceptor.configure(this.errorHandler, this.keyGenerator, this.cacheResolver, this.cacheManager);
        interceptor.setCacheOperationSource(cacheOperationSource);
        return interceptor;
    }
}
AnnotationCacheOperationSource
其中,我们首先来看一下注册的Bean:AnnotationCacheOperationSource,该类继承自类AbstractFallbackCacheOperationSource,而该父类又实现了接口CacheOperationSource,其中父类中的
getCacheOperations方法是将目标方法中的缓存注解解析成了缓存操作的集合:
public Collection<CacheOperation> getCacheOperations(Method method, @Nullable Class<?> targetClass) {
  if (method.getDeclaringClass() == Object.class) {
    return null;
  } else {
    //这里的getCacheKey是将mehtod和class对象进行整合得到,如果缓存中已经存在缓存集合,则直接返回,否则就需要进行计算(computeCacheOperations方法)得到对应的缓存集合
    Object cacheKey = this.getCacheKey(method, targetClass);
    Collection<CacheOperation> cached = (Collection)this.attributeCache.get(cacheKey);
    if (cached != null) {
      return cached != NULL_CACHING_ATTRIBUTE ? cached : null;
    } else {
      	Collection<CacheOperation> cacheOps = this.computeCacheOperations(method, targetClass);
        this.attributeCache.put(cacheKey, cacheOps);
      } else {
        this.attributeCache.put(cacheKey, NULL_CACHING_ATTRIBUTE);
      }
      return cacheOps;
    }
  }
}
再来看看类AnnotationCacheOperationSource本身的实现:
//默认构造器指定使用SpringCacheAnnotationParser作为解析器
public AnnotationCacheOperationSource(boolean publicMethodsOnly) {
  this.publicMethodsOnly = publicMethodsOnly;
  this.annotationParsers = Collections.singleton(new SpringCacheAnnotationParser());
}
//通过SpringCacheAnnotationParser的parseCacheAnnotations方法进行解析操作
@Nullable
protected Collection<CacheOperation> findCacheOperations(Class<?> clazz) {
  return this.determineCacheOperations((parser) -> {
    return parser.parseCacheAnnotations(clazz);
  });
}
进入AnnotationCacheOperationSource,看看它是如何解析的??
代码过长,可以自行点进去看看,这里就是将每一个注解解析为了对应的操作CacheOperation。
CacheInterceptor
再来看看CacheInterceptor,它实现了Advice接口,并继承了CacheAspectSupport
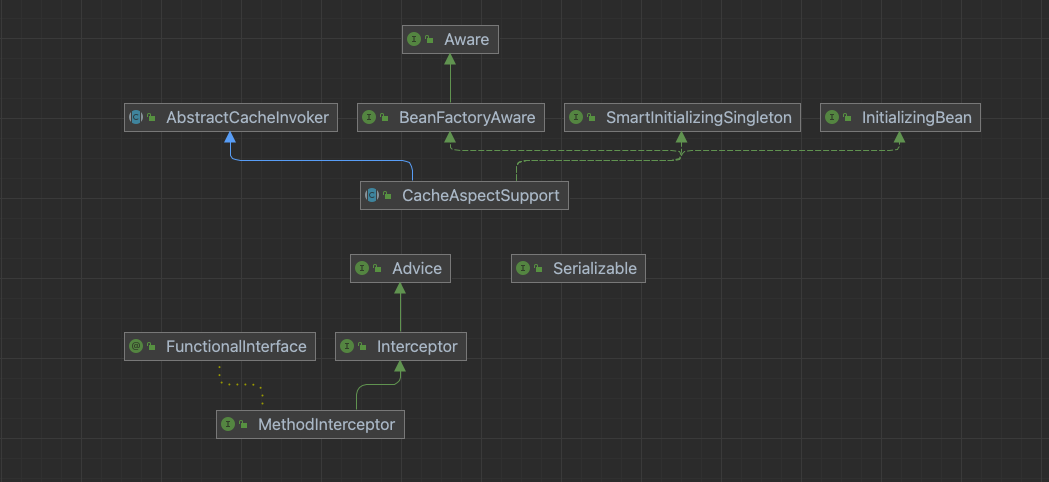
看一下该拦截器的实现:
public class CacheInterceptor extends CacheAspectSupport implements MethodInterceptor, Serializable {
    public CacheInterceptor() {
    }

    @Nullable
    public Object invoke(final MethodInvocation invocation) throws Throwable {
        Method method = invocation.getMethod();
        CacheOperationInvoker aopAllianceInvoker = () -> {
            try {
                return invocation.proceed();
            } catch (Throwable var2) {
                throw new CacheOperationInvoker.ThrowableWrapper(var2);
            }
        };
        Object target = invocation.getThis();
        Assert.state(target != null, "Target must not be null");

        try {
          //通过父类CacheAspectSupport进行方法的执行
            return this.execute(aopAllianceInvoker, target, method, invocation.getArguments());
        } catch (CacheOperationInvoker.ThrowableWrapper var6) {
            throw var6.getOriginal();
        }
    }
}
父类CacheAspectSupport实现了SmartInitializingSingleton接口,在单例初始化后容器会调用afterSingletonsInstantiated方法,检查是否存在合适的CacheManager,并将initialized状态设置为true。
public void afterSingletonsInstantiated() {
  if (this.getCacheResolver() == null) {
    Assert.state(this.beanFactory != null, "CacheResolver or BeanFactory must be set on cache aspect");

    try {
      this.setCacheManager((CacheManager)this.beanFactory.getBean(CacheManager.class));
    } catch (NoUniqueBeanDefinitionException var2) {
      throw new IllegalStateException("No CacheResolver specified, and no unique bean of type CacheManager found. Mark one as primary or declare a specific CacheManager to use.", var2);
    } catch (NoSuchBeanDefinitionException var3) {
      throw new IllegalStateException("No CacheResolver specified, and no bean of type CacheManager found. Register a CacheManager bean or remove the @EnableCaching annotation from your configuration.", var3);
    }
  }

  this.initialized = true;
}
接着看该类的核心方法execute:
protected Object execute(CacheOperationInvoker invoker, Object target, Method method, Object[] args) {
  if (this.initialized) {
    Class<?> targetClass = this.getTargetClass(target);
    //获取CacheOperationSource缓存注解操作集合,将其构造到CacheOperationContexts上下文对象中
    CacheOperationSource cacheOperationSource = this.getCacheOperationSource();
    if (cacheOperationSource != null) {
      Collection<CacheOperation> operations = cacheOperationSource.getCacheOperations(method, targetClass);
      if (!CollectionUtils.isEmpty(operations)) {
        //重载execute方法,并构建CacheOperationContexts对象,参数即为缓存注解操作集合
        return this.execute(invoker, method, new CacheOperationContexts(operations, method, args, target, targetClass));
      }
    }
  }

  return invoker.invoke();
}
execute(invoker, method, new CacheOperationContexts(operations, method, args, target, targetClass)):缓存操作的核心逻辑方法
第一步:检查是否为同步操作(@Cacheable(sync = true)):
- 如果是切满足条件,则调用缓存获取逻辑并将结果返回
- 如果不是则返回业务逻辑,即return this.invokeOperation(invoker);
第二步:执行@CacheEvict的前置清除操作,即在方法调用前清除缓存
第三步:检查@Cacheable是否命中缓存:
- 如果没有命中缓存,则需要将其放到CachePutRequest列表中,然后检查是否命中且没有需要更新的缓存:
- 如果满足条件,则返回结果,并将结果进行缓存
- 如果不满足条件,则需要访问数据库等操作,进行业务查询,将结果返回,并将结果进行缓存
第四步:@CachePut操作:
将@CachePut和@Cacheable未命中缓存的操作同步到缓存中
第五步:执行@CacheEvict的后置清除操作,即在方法调用结束清除缓存
private Object execute(final CacheOperationInvoker invoker, Method method, CacheOperationContexts contexts) {
  if (contexts.isSynchronized()) {
    CacheOperationContext context = (CacheOperationContext)contexts.get(CacheableOperation.class).iterator().next();

    if (!this.isConditionPassing(context, CacheOperationExpressionEvaluator.NO_RESULT)) {
      return this.invokeOperation(invoker);
    }

    Object key = this.generateKey(context, CacheOperationExpressionEvaluator.NO_RESULT);
    Cache cache = (Cache)context.getCaches().iterator().next();

    try {
      return this.wrapCacheValue(method, this.handleSynchronizedGet(invoker, key, cache));
    } catch (Cache.ValueRetrievalException var10) {
      ReflectionUtils.rethrowRuntimeException(var10.getCause());
    }
  }

  this.processCacheEvicts(contexts.get(CacheEvictOperation.class), true, CacheOperationExpressionEvaluator.NO_RESULT);
  Cache.ValueWrapper cacheHit = this.findCachedItem(contexts.get(CacheableOperation.class));
  List<CachePutRequest> cachePutRequests = new ArrayList();
  if (cacheHit == null) {
    this.collectPutRequests(contexts.get(CacheableOperation.class), CacheOperationExpressionEvaluator.NO_RESULT, cachePutRequests);
  }

  Object returnValue;
  Object cacheValue;
  if (cacheHit != null && !this.hasCachePut(contexts)) {
    cacheValue = cacheHit.get();
    returnValue = this.wrapCacheValue(method, cacheValue);
  } else {
    returnValue = this.invokeOperation(invoker);
    cacheValue = this.unwrapReturnValue(returnValue);
  }

  this.collectPutRequests(contexts.get(CachePutOperation.class), cacheValue, cachePutRequests);
  Iterator var8 = cachePutRequests.iterator();

  while(var8.hasNext()) {
    CachePutRequest cachePutRequest = (CachePutRequest)var8.next();
    cachePutRequest.apply(cacheValue);
  }

  this.processCacheEvicts(contexts.get(CacheEvictOperation.class), false, cacheValue);
  return returnValue;
}
AutoProxyRegistrar - 缓存代理的注册装配
AutoProxyRegistrar实现了ImportBeanDefinitionRegistrar接口,registerBeanDefinitions会从启用缓存注解@EnableCaching提取属性,然后手动注册自动代理创建器:
public void registerBeanDefinitions(AnnotationMetadata importingClassMetadata, BeanDefinitionRegistry registry) {
  boolean candidateFound = false;
  Set<String> annTypes = importingClassMetadata.getAnnotationTypes();
  Iterator var5 = annTypes.iterator();

  while(var5.hasNext()) {
    String annType = (String)var5.next();
    AnnotationAttributes candidate = AnnotationConfigUtils.attributesFor(importingClassMetadata, annType);
    if (candidate != null) {
      Object mode = candidate.get("mode");
      Object proxyTargetClass = candidate.get("proxyTargetClass");
      if (mode != null && proxyTargetClass != null && AdviceMode.class == mode.getClass() && Boolean.class == proxyTargetClass.getClass()) {
        candidateFound = true;
        if (mode == AdviceMode.PROXY) {
          AopConfigUtils.registerAutoProxyCreatorIfNecessary(registry);
          if ((Boolean)proxyTargetClass) {
            AopConfigUtils.forceAutoProxyCreatorToUseClassProxying(registry);
            return;
          }
        }
      }
    }
  }

  if (!candidateFound && this.logger.isInfoEnabled()) {
    String name = this.getClass().getSimpleName();
    this.logger.info(String.format("%s was imported but no annotations were found having both 'mode' and 'proxyTargetClass' attributes of type AdviceMode and boolean respectively. This means that auto proxy creator registration and configuration may not have occurred as intended, and components may not be proxied as expected. Check to ensure that %s has been @Import'ed on the same class where these annotations are declared; otherwise remove the import of %s altogether.", name, name, name));
  }
}
后面的源码这里不展开分析,大致流程就是在Bean的创建过程中织入增强逻辑,即自动生成代理类并将缓存的逻辑织入进去。而后检查目标类和方法上是否有缓存相关注解(@Cacheable,@CachePut,@CacheEvict等),如果有说明增强器对目标代理类适用,然后找到合适的增强器列表在APC中调用createProxy创建代理工厂,这里选择是否需要直接代理目标类,然后装配增强器,接着调用JdkDynamicAopProxy或者CglibAopProxy创建代理。
缓存配置
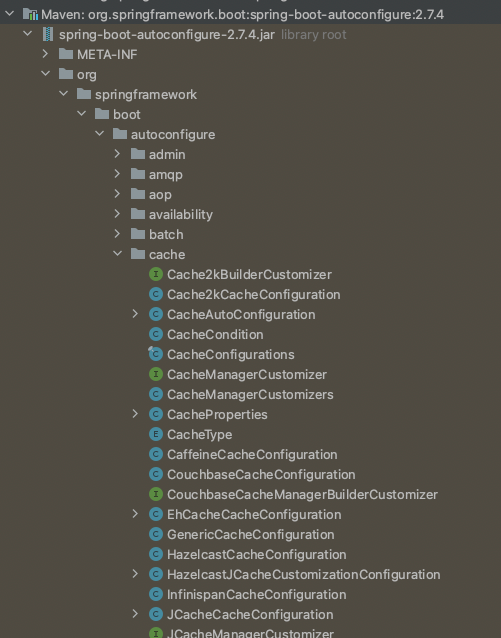
在SpringBoot中我们只需要引入缓存的依赖,使用@EnableCaching即可开启缓存功能,这一切源于spring-boot-autoconfigure,其中的cache包中定义了开启缓存配置的各种Configuration:


 1909
1909


 被折叠的 条评论
为什么被折叠?
被折叠的 条评论
为什么被折叠?
 到【灌水乐园】发言


