


作者简介:大家好,我是smart哥,前中兴通讯、美团架构师,现某互联网公司CTO
联系qq:184480602,加我进群,大家一起学习,一起进步,一起对抗互联网寒冬
学习必须往深处挖,挖的越深,基础越扎实!
阶段1、深入多线程
阶段2、深入多线程设计模式
阶段3、深入juc源码解析
码哥源码部分
码哥讲源码-原理源码篇【2024年最新大厂关于线程池使用的场景题】
码哥讲源码-原理源码篇【揭秘join方法的唤醒本质上决定于jvm的底层析构函数】
码哥源码-原理源码篇【Doug Lea为什么要将成员变量赋值给局部变量后再操作?】
码哥讲源码【谁再说Spring不支持多线程事务,你给我抽他!】
打脸系列【020-3小时讲解MESI协议和volatile之间的关系,那些将x86下的验证结果当作最终结果的水货们请闭嘴】
我曾在分布式理论篇——服务化拆分中介绍过微服务,Spring Cloud就是微服务架构的集大成者,将一系列优秀的组件进行了整合。通过Spring Cloud,我们可以快速构建一套基于微服务架构的分布式系统。
Spring Cloud的组件相当繁多,其提供的核心组件如下:
- Eureka:服务注册中心
- Feign:服务调用
- Ribbon:负载均衡
- Zuul / Spring Cloud Gatway:网关

纯粹的讲Spring Cloud的各个组件非常枯燥,对于很多初学者童鞋也不太友好。所以,本章我将引入一个电商系统作为案例背景,讲解Spring Cloud的各个核心组件的基本使用。
读者可以参考Spring Cloud的官网资料: Spring Cloud ,对其进行更多的了解。我如果后面有时间,也会在实战篇中详细讲解Spring Cloud的核心应用。
一、案例背景
我们的案例是一个普通的电商系统,拆分成四个子系统:订单系统、库存系统、仓储系统、积分系统,看过分布式理论篇的童鞋肯定已经不陌生了。系统的逻辑架构图如下:
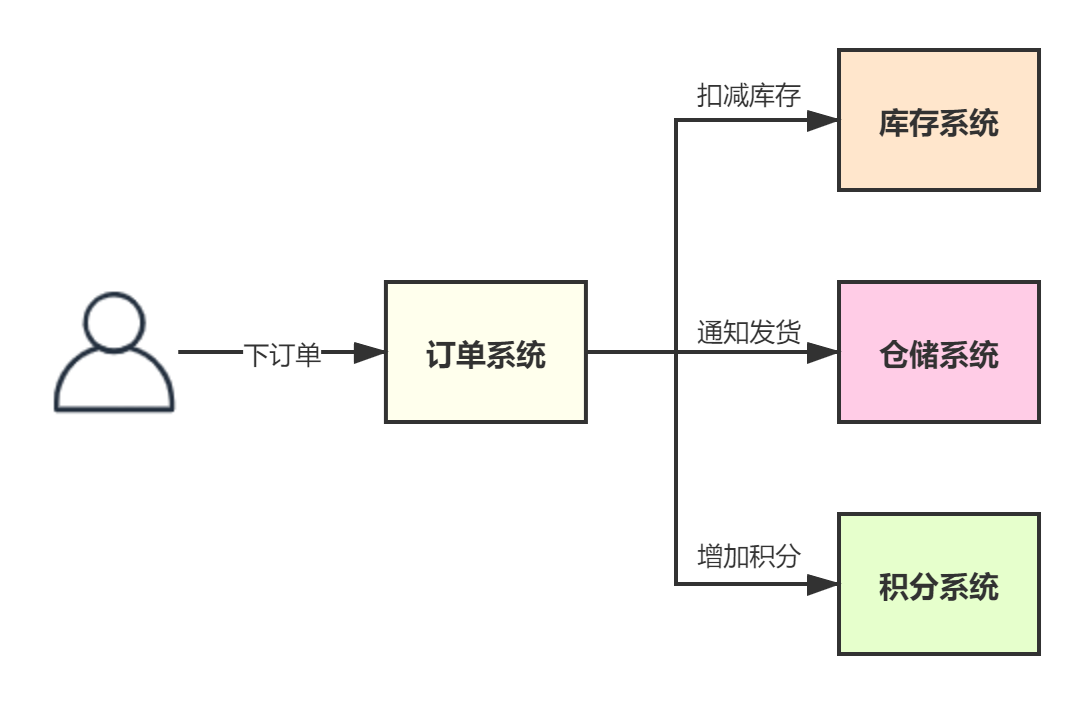
一次下订单的请求需要多个子系统协作完成,每个子系统都完成一部分的功能,多个子系统分别完成自己负责的事情,最终这个请求就处理完毕 。
下面我们就来看下,如果引入Spring Cloud,如果对这些子系统进行管理,使他们能够有条不紊地相互协作。
二、服务注册中心(Eureka)
2.1 作用
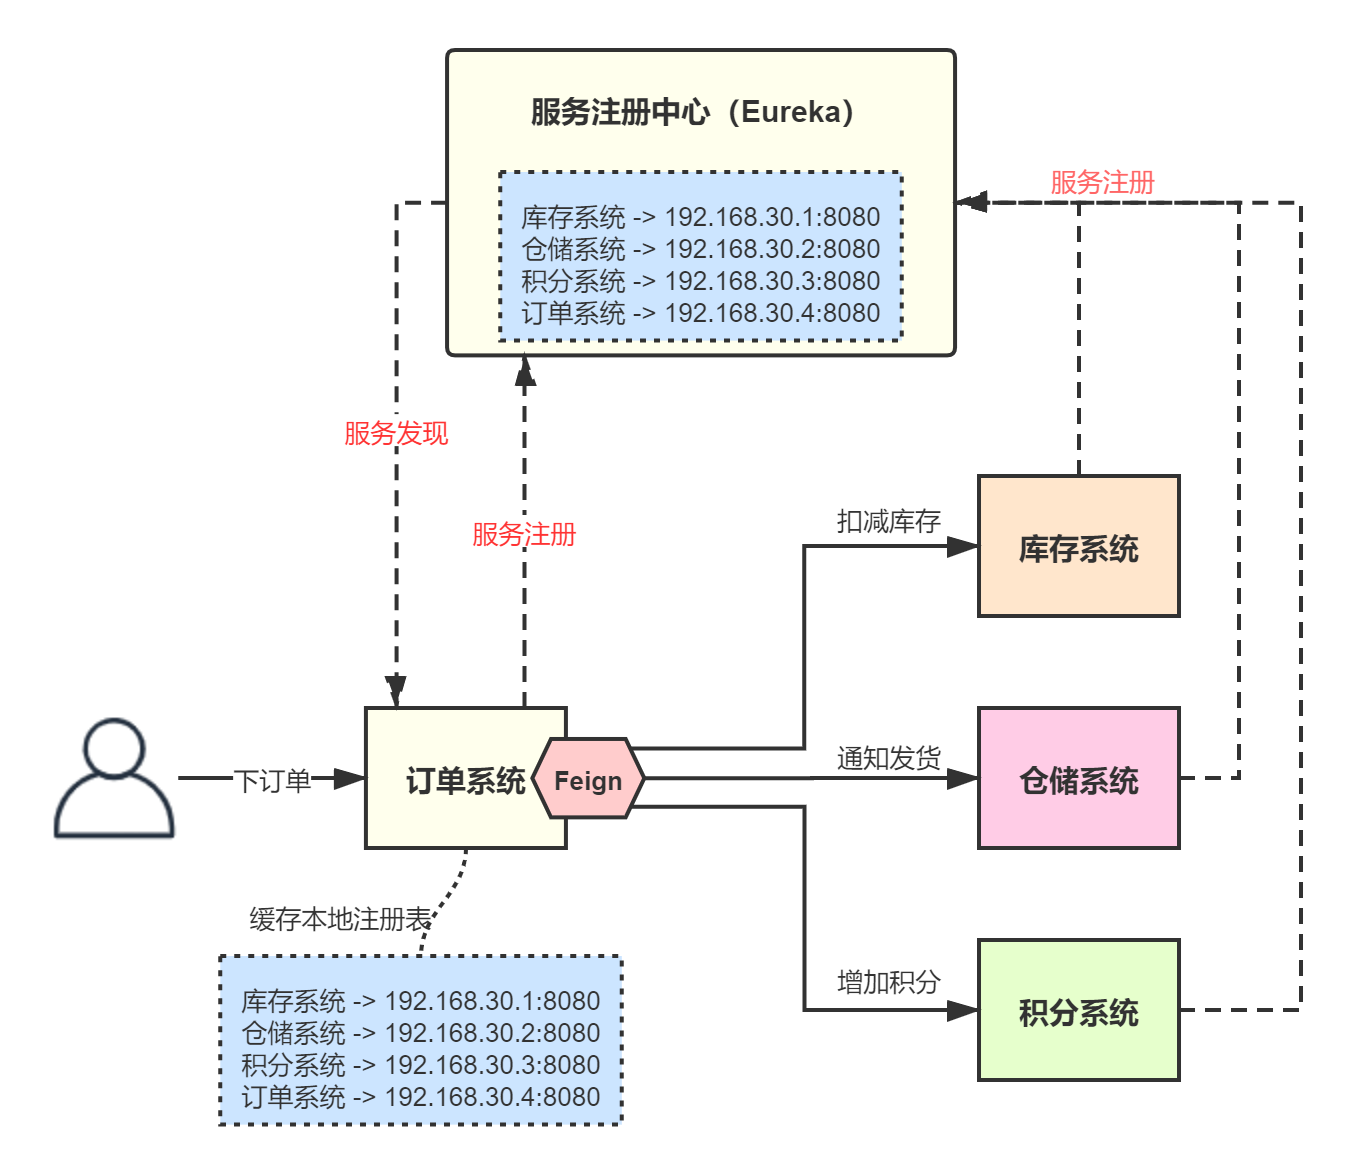
首先,我们需要一个服务注册中心,当服务提供方启动后,需要向服务注册中心注册自己的服务信息(接口URI、机器地址、端口等),这一过程叫做服务注册。
与此同时,服务消费方也要从 Eureka 拉取一份服务注册清单,方便自己后续调用其它服务使用,这一过程也叫做服务发现。
在Spring Cloud中,由 Eureka 来担任注册中心的角色:

2.2 使用方式
Eureka的使用方式很简单,首先,我们创建一个Spring Boot应用,配置application.yml文件:
    server:
      port: 8761

    eureka:
      instance:
        hostname: localhost
        leaseExpirationDurationInSeconds: 2
      client:
        registerWithEureka: false
        fetchRegistry: false
        serviceUrl:
          defaultZone: http://peer1:8761/eureka/
      server:
        enableSelfPreservation: false
        responseCacheUpdateIntervalMs: 1000
        evictionIntervalTimerInMs: 1000
上面各个参数的含义,我会在讲Eureka原理时详细讲解。这里注意下defaultZone这个参数,这个参数表示Eureka对外提供服务的一个地址。我们可以通过下面这样启动Eureka:
    @SpringBootApplication
    @EnableEurekaServer
    public class EurekaServer {
        public static void main(String[] args) {
            SpringApplication.run(EurekaServer.class, args);
        }
    }
2.3 服务注册
有了服务注册中心,我们就可以注册服务了。下面我们来创建库存、仓储、积分三个服务。
库存服务
    // 库存服务接口
    public interface InventoryApi {
        String deductStock(Long productId, Long stock);
    }

    // 库存API实现
    @RestController
    @RequestMapping("/inventory")
    public class InventoryService implements InventoryApi {

        @RequestMapping(value = "/deduct/{productId}/{stock}", method = RequestMethod.PUT)
        public String deductStock(@PathVariable("productId") Long productId,
                @PathVariable("stock") Long stock) {
            System.out.println("对商品【productId=" + productId + "】扣减库存:" + stock);
            return "{'msg': 'success'}";
        }
    }
然后是库存服务的yml配置:
    server:
      port: 8080
    spring:
      application:
        name: inventory-service
    eureka:
      instance:
        hostname: localhost
      client:
        serviceUrl:
          defaultZone: http://peer1:8761/eureka
        registryFetchIntervalSeconds: 1
        leaseRenewalIntervalInSeconds: 1

    ribbon:
      eager-load:
        enable: true

    feign:
      hystrix:
        enabled: false
最后,我们可以这样启动库存服务:
    @SpringBootApplication
    @EnableEurekaClient
    public class InventoryServiceApplication {
        public static void main(String[] args) {
            SpringApplication.run(InventoryServiceApplication.class, args);
        }
    }
仓储服务
    // 仓储服务接口
    public interface WmsApi {
        String delivery(Long productId);
    }

    // 仓储API实现
    @RestController
    @RequestMapping("/wms")
    public class WmsService implements WmsApi {

        @RequestMapping(value = "/delivery/{productId}", method = RequestMethod.PUT)
        public String delivery(@PathVariable("productId") Long productId) {
            System.out.println("对商品【productId=" + productId + "】进行发货");
            return "{'msg': 'success'}";
        }
    }
然后是仓储服务的yml配置:
    server:
      port: 8081

    spring:
      application:
        name: wms-service

    eureka:
      instance:
        hostname: localhost
      client:
        serviceUrl:
          defaultZone: http://localhost:8761/eureka
        registryFetchIntervalSeconds: 1
        leaseRenewalIntervalInSeconds: 1

    ribbon:
      eager-load:
        enable: true

    feign:
      hystrix:
        enabled: false
最后,我们可以这样启动仓储服务:
    @SpringBootApplication
    @EnableEurekaClient
    public class WmsServiceApplication {
        public static void main(String[] args) {
            SpringApplication.run(WmsServiceApplication.class, args);
        }
    }
积分服务
    // 积分服务接口
    public interface CreditApi {
        String add(Long userId, Long credit);
    }

    // 积分API实现
    @RestController
    @RequestMapping("/credit")
    public class CreditService implements CreditApi {

        @RequestMapping(value = "/add/{userId}/{credit}", method = RequestMethod.PUT)
        public String add(@PathVariable("userId") Long userId,
                @PathVariable("credit") Long credit) {
            System.out.println("对用户【userId=" + userId + "】增加积分:" + credit);
            return "{'msg': 'success'}";
        }
    }
然后是积分服务的yml配置:
    server:
      port: 8082

    spring:
      application:
        name: credit-service

    eureka:
      instance:
        hostname: localhost
      client:
        serviceUrl:
          defaultZone: http://localhost:8761/eureka
        registryFetchIntervalSeconds: 1
        leaseRenewalIntervalInSeconds: 1

    ribbon:
      eager-load:
        enable: true

    feign:
      hystrix:
        enabled: false
最后,我们可以这样启动积分服务:
    @SpringBootApplication
    @EnableEurekaClient
    public class CreditServiceApplication {
        public static void main(String[] args) {
            SpringApplication.run(CreditServiceApplication.class, args);
        }
    }
三、服务调用(Feign)
3.1 作用
服务之间需要能够互相调用,我们曾经介绍过Dubbo的使用及其原理,Spring Cloud也有类似的分布式服务调用框架—— Feign 。如下图所示,订单系统如果要调用其它系统提供的服务,在Spring Cloud中实际是通过Feign组件完成的:
3.2 使用方式
我们以订单服务为例,看下如何使用Feign。首先,订单服务要通过Feign远程调用库存、积分、仓库服务,所以我们需要定义三个接口,加上@Feign注解。这些接口的签名需要与服务提供方完全一致,包含请求的URI:
    /**
     * 库存服务Feign
     */
    @FeignClient(value = "inventory-service")
    @RequestMapping("/inventory")
    public interface InventoryServiceFeign {
        @RequestMapping(value = "/deduct/{productId}/{stock}", method = RequestMethod.PUT)
        String deductStock(Long productId, Long stock);
    }

    /**
     * 仓储服务Feign
     */
    @FeignClient(value = "wms-service")
    @RequestMapping("/wms")
    public interface WmsFeignService {
        @RequestMapping(value = "/delivery/{productId}", method = RequestMethod.PUT)
        String delivery(Long productId);
    }

    /**
     * 积分服务Feign
     */
    @FeignClient(value = "credit-service")
    @RequestMapping("/credit")
    public interface CreditFeignService {
        @RequestMapping(value = "/add/{userId}/{credit}", method = RequestMethod.PUT)
        String add(Long userId, Long credit);
    }
上面的@FeignClient注解的value表示要消费的服务名称,是在服务提供方的yml文件中配置的。Feign会自动生成访问后台服务的代理接口服务,后续我们讲Feign原理时会专门讲解。
3.3 服务调用
订单服务的实现,主要用来接受客户端请求,然后创建订单,最后发起对下游依赖服务的调用:
    @RestController
    @RequestMapping("/order")
    public class OrderController {

        @Autowired
        private InventoryServiceFeign inventoryService;
        @Autowired
        private WmsServiceFeign wmsService;
        @Autowired
        private CreditServiceFeign creditService;

        @RequestMapping(value = "/create", method = RequestMethod.GET)
        public String greeting(
                @RequestParam("productId") Long productId,
                @RequestParam("userId") Long userId,
                @RequestParam("count") Long count,
                @RequestParam("totalPrice") Long totalPrice) {

            System.out.println("创建订单");

            inventoryService.deductStock(productId, count);
            wmsService.delivery(productId);
            creditService.add(userId, totalPrice);

            return "success";
        }

    }
然后是Spring Boot启动类:
    @SpringBootApplication
    @EnableEurekaClient
    @EnableFeignClients
    public class OrderServiceApplication {
        public static void main(String[] args) {
            SpringApplication.run(OrderServiceApplication.class, args);
        }
    }
最后是订单服务的yml配置:
    server:
      port: 9090

    spring:
      application:
        name: order-service

    eureka:
      instance:
        hostname: localhost
      client:
        serviceUrl:
          defaultZone: http://localhost:8761/eureka
        registryFetchIntervalSeconds: 1
        leaseRenewalIntervalInSeconds: 1

    ribbon:
      eager-load:
        enable: true

    # 默认先关掉的hystrix(设计好完整高可用方案再打开),防止因为hystrix的默认行为影响对程序结果的判断
    feign:
      hystrix:
        enabled: false
四、负载均衡(Ribbon)
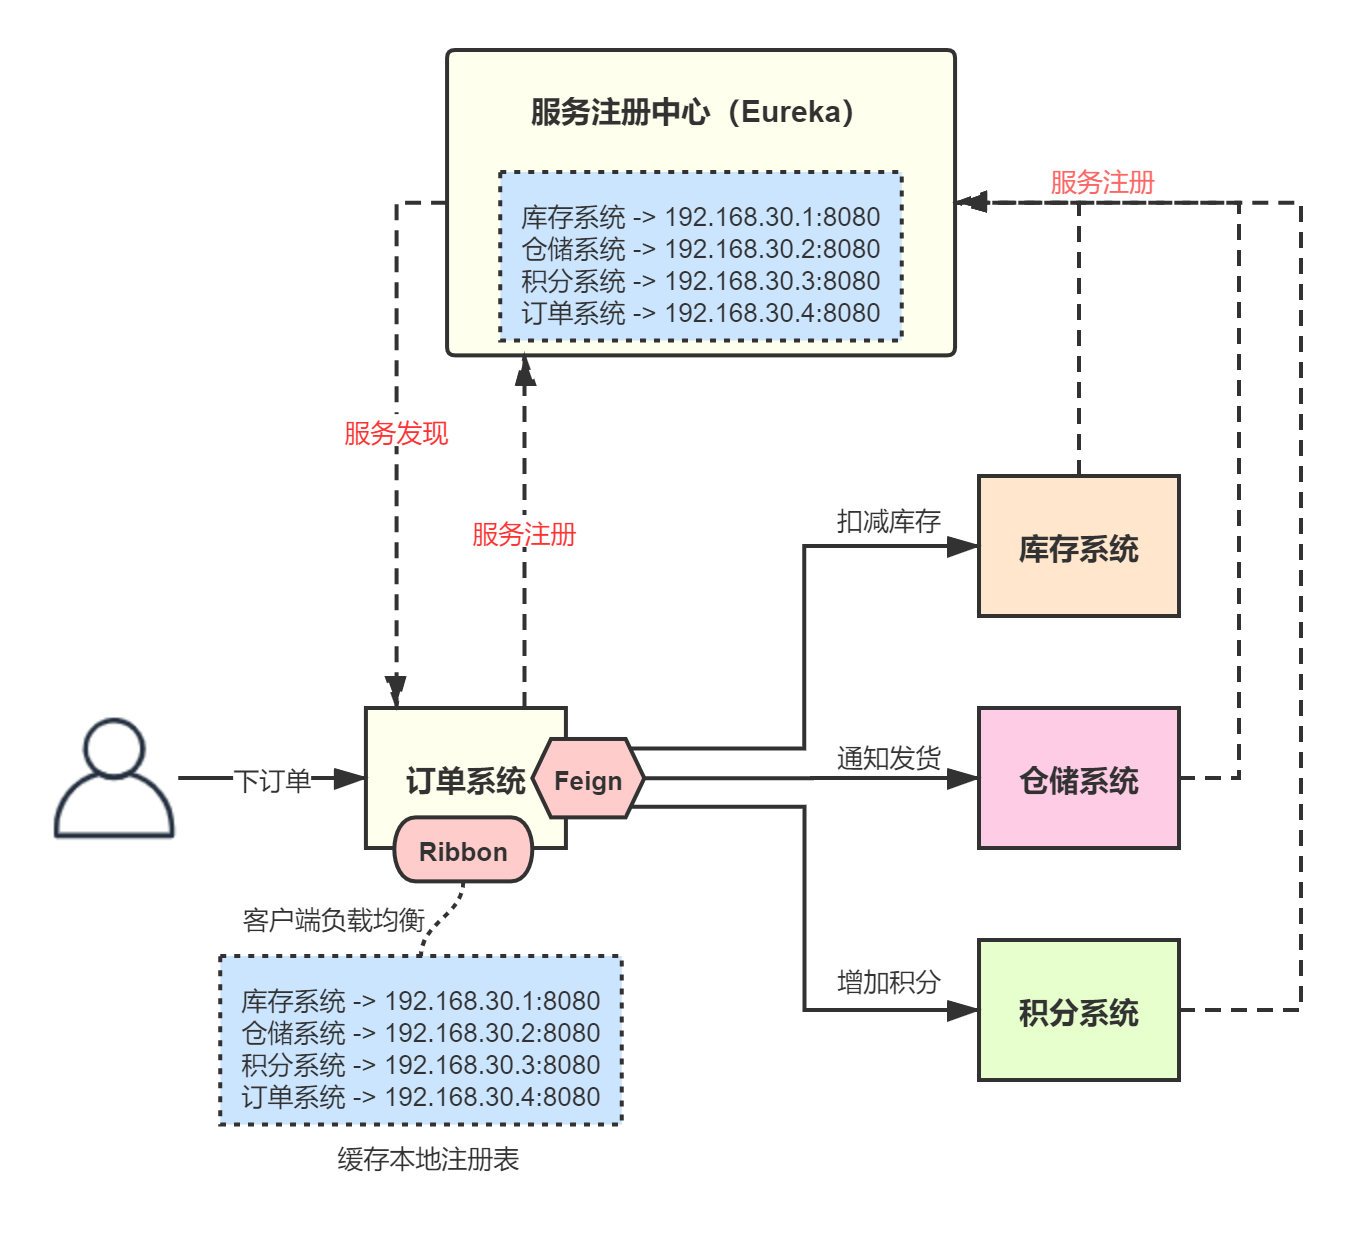
如果某个子系统部署了多个对等服务,那也会在注册中心注册多个相同的服务,以订单系统来说,那可能拉取到的注册表中有多个库存系统服务,此时调用方就需要选择一个服务发起调用,这其实就是客户端负载均衡。
Dubbo提供了Cluster路由层来完成客户端负载均衡,而Spring Cloud提供了 Ribbon 作为客户端负载均衡组件:
4.1 超时配置
上述的库存、积分、仓库服务,第一次被请求的时候,都会去初始化一个Ribbon组件,初始化组件需要耗费一定的时间,很容易会导致超时问题。所以,生产环境一般都会对服务进行配置,使服务启动时就初始化Ribbon相关的组件,避免第一次请求时再初始化。
以库存服务为例,可以在application.yml中做加上如下Ribbon配置:
    # 启用饥饿加载,服务启动时即加载ribbon组件
    ribbon:
      eager-load:
          enable: true
      ConnectTimeout: 1000
      ReadTimeout: 1000
      OkToRetryOnAllOperations: true
      # 对于当前调用服务的重试次数
      MaxAutoRetries: 1
      # 其它对等服务的重试次数
      MaxAutoRetriesNextServer: 1
上述除了饥饿加载外,还加上了超时时间和重试次数的配置,这样就可以通过Ribbon来控制服务调用方发生调用超时时的行为。
五、API网关(Zuul)
客户端一般通过Nginx与后端服务进行交互,每个微服务一般会有不同的网络地址,当服务越来越多后,客户端可能需要调用多个服务的接口才能完成一次业务请求,如果让客户端直接与各个微服务通信,会有以下的问题:
- 认证复杂,每个服务都需要独立认证;
- 客户端会多次请求不同的微服务,增加了客户端的复杂性;
- 难以重构,随着项目的迭代,可能需要重新划分微服务,如果客户端直接与微服务通信,那么重构将会很难实施。
所以,我们需要一个统一的构件来处理上述问题。Spring Cloud Gateway 或者Zuul作为API网关可以解决上述问题。
5.1 作用
以Zuul为例,Zuul是介于客户端和服务器端之间的中间层,所有的客户端请求都会先经过网关这一层。网关提供了API全托管服务,辅助管理大规模的API,还包括灰度发布、统一熔断、统一降级、统一缓存、统一限流、统一授权认证等功能。
5.2 使用方式
我们使用Zuul来作为API网关,可以新建一个Spring Boot应用,做如下配置:
    server:
      port: 9000

    spring:
      application:
        name: zuul-gateway

    eureka:
      instance:
        hostname: localhost
      client:
        serviceUrl:
          defaultZone: http://localhost:8761/eureka/
        registryFetchIntervalSeconds: 1
        leaseRenewalIntervalInSeconds: 1

    zuul:
      retryable: true
      routes:
        order-service:
          path: /order/**

    ribbon:
      eager-load:
          enable: true
      ConnectTimeout: 3000
      ReadTimeout: 3000
      OkToRetryOnAllOperations: true
      # 对于当前调用服务的重试次数
      MaxAutoRetries: 1
      # 其它对等服务的重试次数
      MaxAutoRetriesNextServer: 1
网关的启动类如下:
    @SpringBootApplication
    @EnableZuulProxy
    public class ZuulGatewayApplication {
        public static void main(String[] args) {
            SpringApplication.run(ZuulGatewayApplication.class, args);
        }
    }
上述9000是网关的服务端口,处理/order路径的所有请求。
六、总结
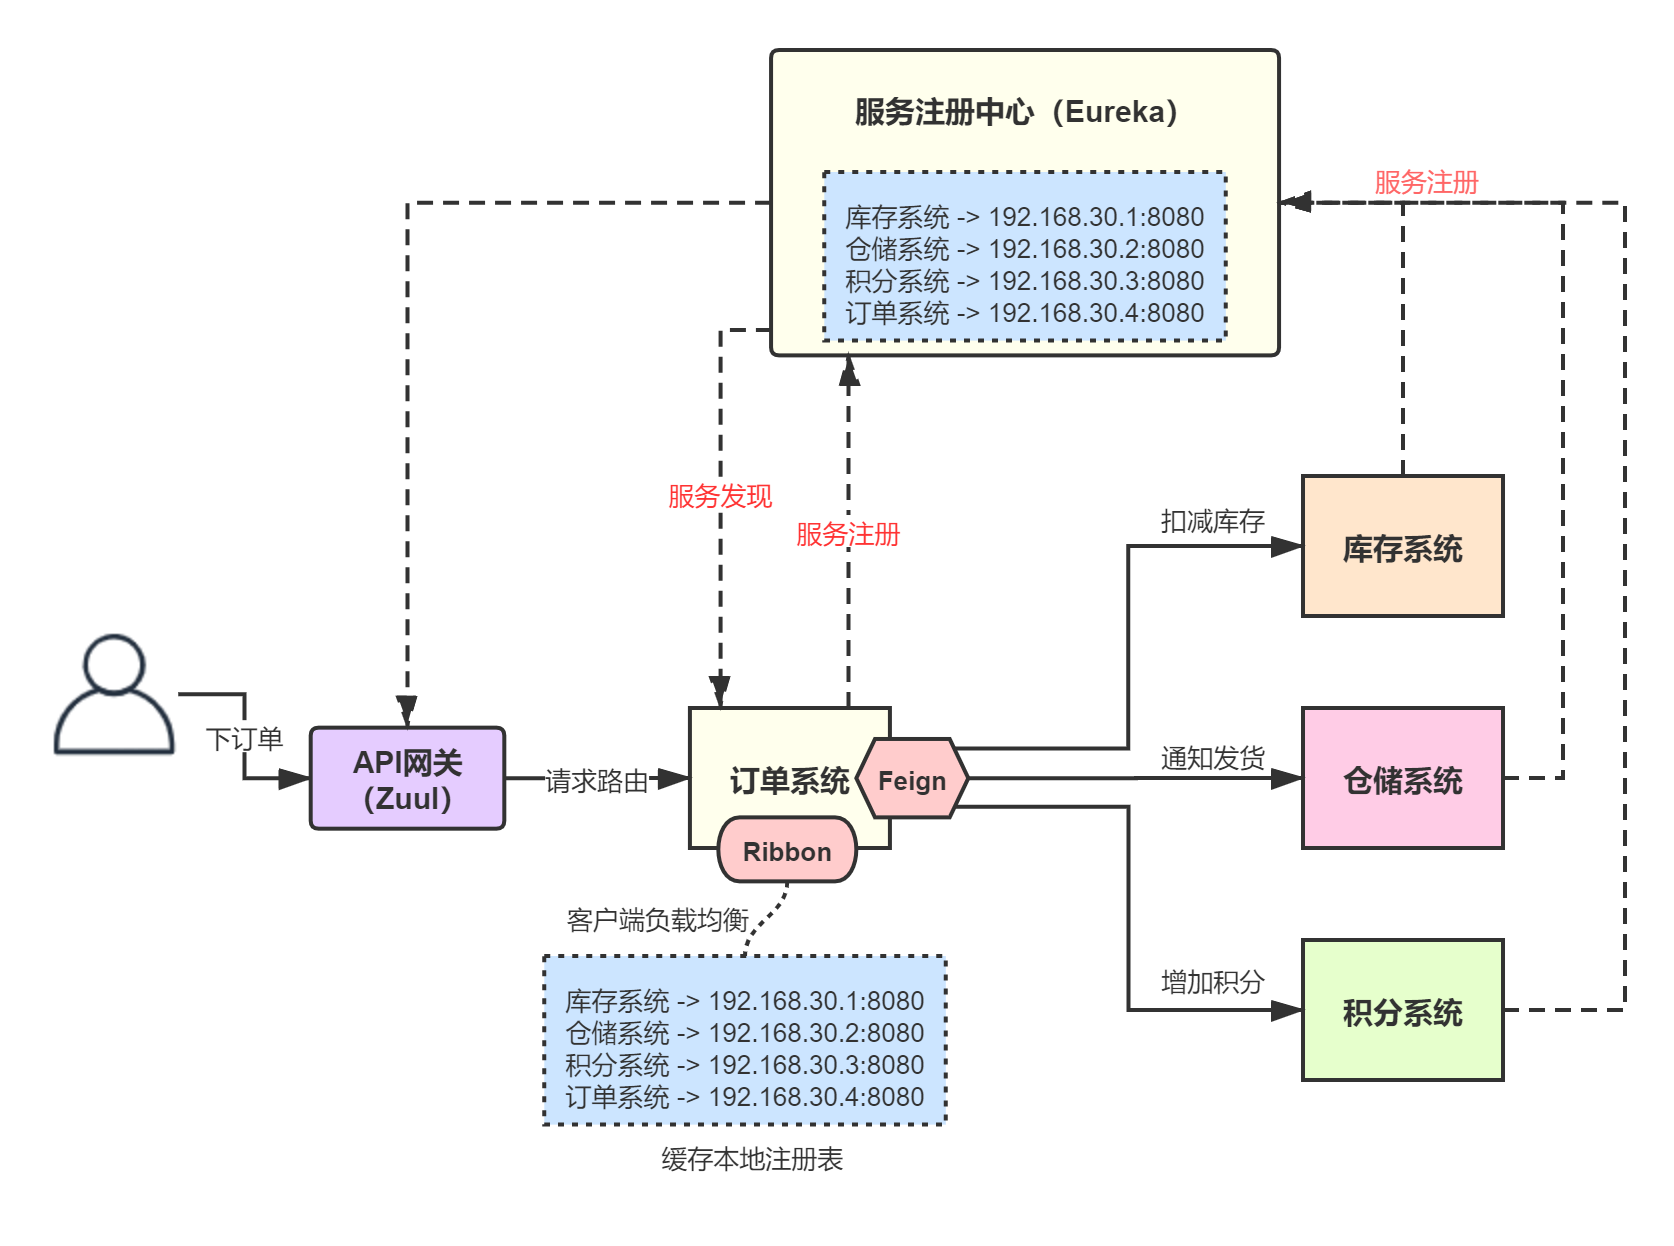
综上,一套最简单的微服务系统就搭建起来了,整个项目的模块划分如下图:

客户端要进行下单操作时,直接访问以下接口:
http://localhost:9000/order/order/create?productId=1&userId=1&count=3&totalPrice=300
其中 http://localhost:9000 是Zuul网关的地址,通过/order可以映射到后端的订单服务。


 1万+
1万+


 被折叠的 条评论
为什么被折叠?
被折叠的 条评论
为什么被折叠?
 到【灌水乐园】发言


