


作者简介:大家好,我是smart哥,前中兴通讯、美团架构师,现某互联网公司CTO
联系qq:184480602,加我进群,大家一起学习,一起进步,一起对抗互联网寒冬
学习必须往深处挖,挖的越深,基础越扎实!
阶段1、深入多线程
阶段2、深入多线程设计模式
阶段3、深入juc源码解析
码哥源码部分
码哥讲源码-原理源码篇【2024年最新大厂关于线程池使用的场景题】
码哥讲源码-原理源码篇【揭秘join方法的唤醒本质上决定于jvm的底层析构函数】
码哥源码-原理源码篇【Doug Lea为什么要将成员变量赋值给局部变量后再操作?】
码哥讲源码【谁再说Spring不支持多线程事务,你给我抽他!】
打脸系列【020-3小时讲解MESI协议和volatile之间的关系,那些将x86下的验证结果当作最终结果的水货们请闭嘴】
KafkaProdcuer在发送消息时,需要指定消息的Topic,但实际发送消息时一定是会发送到某个Broker中的。那么,Producer就必须知道Broker集群的元数据信息,比如有哪些Topic,这些Topic都有哪些分区,每个分区在哪个Broker上等等。
本章,我就来讲解KafkaProducer内部是如何保存和更新集群元数据信息的。我们将了解,对集群元数据的客户端缓存,Kafka是如何根据不同的需求、使用和场景,采用不同的数据结构来进行存放的,这也是我们需要重点关注的地方。
一、元数据结构
KafkaProducer在构造时,有这么几行代码:
    // 1.创建Metadata对象
    this.metadata = new Metadata(retryBackoffMs, config.getLong(ProducerConfig.METADATA_MAX_AGE_CONFIG), true, clusterResourceListeners);
    // 2.解析Broker地址
    List<InetSocketAddress> addresses = ClientUtils.parseAndValidateAddresses(config.getList(ProducerConfig.BOOTSTRAP_SERVERS_CONFIG));
    // 3.更新元数据
    this.metadata.update(Cluster.bootstrap(addresses), Collections.<String>emptySet(), time.milliseconds());
首先,KafkaProducer创建了一个MetaData对象;
接着,根据我们自己配置的bootstrap.servers地址,创建一个Cluster对象——Cluster.bootstrap(addresses);
最后,调用MetaData.update()进行元数据的更新。
1.1 MetaData元数据
我们来看下MetaData到底是个什么东西?从字段定义可以看出来,它内部就是保存了一些Topic的更新策略,同时封装了一个Cluster对象。也就是MetaData只是一个壳,仅仅定义了元数据的更新策略,真正的元数据信息保存在Cluster对象中:
    public final class Metadata {
        public static final long TOPIC_EXPIRY_MS = 5 * 60 * 1000;
        private static final long TOPIC_EXPIRY_NEEDS_UPDATE = -1L;

        private final long refreshBackoffMs;
        private final long metadataExpireMs;
        private int version;
        private long lastRefreshMs;
        private long lastSuccessfulRefreshMs;
        private Cluster cluster;
        private boolean needUpdate;
        private final Map<String, Long> topics;
        private final List<Listener> listeners;
        private final ClusterResourceListeners clusterResourceListeners;
        private boolean needMetadataForAllTopics;
        private final boolean topicExpiryEnabled;

        public Metadata(long refreshBackoffMs, long metadataExpireMs, boolean topicExpiryEnabled, ClusterResourceListeners clusterResourceListeners) {
            this.refreshBackoffMs = refreshBackoffMs;
            this.metadataExpireMs = metadataExpireMs;
            this.topicExpiryEnabled = topicExpiryEnabled;
            this.lastRefreshMs = 0L;
            this.lastSuccessfulRefreshMs = 0L;
            this.version = 0;
            this.cluster = Cluster.empty();
            this.needUpdate = false;
            this.topics = new HashMap<>();
            this.listeners = new ArrayList<>();
            this.clusterResourceListeners = clusterResourceListeners;
            this.needMetadataForAllTopics = false;
        }

        //...
    }
KafkaProducer在初始化时,调用了Metadata的update方法,这个方法是加锁的,也就是说每次只能有一个线程执行更新操作:
    public synchronized void update(Cluster cluster, Set<String> unavailableTopics, long now) {
        this.needUpdate = false;
        this.lastRefreshMs = now;
        this.lastSuccessfulRefreshMs = now;
        this.version += 1;

        if (topicExpiryEnabled) {    // 是否允许Topic元数据过期,默认true
            for (Iterator<Map.Entry<String, Long>> it = topics.entrySet().iterator(); it.hasNext(); ) {
                Map.Entry<String, Long> entry = it.next();
                long expireMs = entry.getValue();
                if (expireMs == TOPIC_EXPIRY_NEEDS_UPDATE)
                    entry.setValue(now + TOPIC_EXPIRY_MS);
                else if (expireMs <= now) {
                    it.remove();
                    log.debug("Removing unused topic {} from the metadata list, expiryMs {} now {}", entry.getKey(), expireMs, now);
                }
            }
        }
        // 回调监听器
        for (Listener listener: listeners)
            listener.onMetadataUpdate(cluster, unavailableTopics);

        String previousClusterId = cluster.clusterResource().clusterId();

        if (this.needMetadataForAllTopics) {
            this.needUpdate = false;
            this.cluster = getClusterForCurrentTopics(cluster);
        } else {
            this.cluster = cluster;
        }

        // The bootstrap cluster is guaranteed not to have any useful information
        if (!cluster.isBootstrapConfigured()) {
            String clusterId = cluster.clusterResource().clusterId();
            if (clusterId == null ? previousClusterId != null : !clusterId.equals(previousClusterId))
                log.info("Cluster ID: {}", cluster.clusterResource().clusterId());
            clusterResourceListeners.onUpdate(cluster.clusterResource());
        }

        // 唤醒其它阻塞线程
        notifyAll();
        log.debug("Updated cluster metadata version {} to {}", this.version, this.cluster);
    }
上述代码并没有真正去Broker获取元数据信息,而是简单的做了一个最最基本的初始化,仅仅把我们配置的Broker的地址放了进去。那么,元数据到底是什么时候更新的呢?别急,下一节会详细讲解。
1.2 Cluster元数据
我们再来看下Cluster.bootstrap(addresses)方法,该方法就是解析bootstrap.servers并构建一个Cluster对象,Cluster内部维护了整个Broker集群的信息,相当于对Broker集群的抽象:
    // Cluster.java

    public static Cluster bootstrap(List<InetSocketAddress> addresses) {
        List<Node> nodes = new ArrayList<>();
        int nodeId = -1;
        for (InetSocketAddress address : addresses)
            nodes.add(new Node(nodeId--, address.getHostString(), address.getPort()));
        return new Cluster(null, true, nodes, new ArrayList<PartitionInfo>(0), Collections.<String>emptySet(), Collections.<String>emptySet());
    }
Cluster的字段信息如下,它按照不同维度对分区信息进行了归类:
    public final class Cluster {
        private final boolean isBootstrapConfigured;
        // Broker列表
        private final List<Node> nodes;
        // 未授权Topic列表
        private final Set<String> unauthorizedTopics;
        // 内部Topic列表
        private final Set<String> internalTopics;
        // 分区维度的PartitionInfo
        private final Map<TopicPartition, PartitionInfo> partitionsByTopicPartition;
        // Topic维度的所有PartitionInfo列表
        private final Map<String, List<PartitionInfo>> partitionsByTopic;
        // Topic维度的可用PartitionInfo列表
        private final Map<String, List<PartitionInfo>> availablePartitionsByTopic;
        // Broker维度的可用PartitionInfo列表收到
        private final Map<Integer, List<PartitionInfo>> partitionsByNode;
        // broker.id -> Node的映射
        private final Map<Integer, Node> nodesById;
        private final ClusterResource clusterResource;

        //...
    }
二、元数据拉取
Topic的元数据拉取是在消息发送过程中进行的,并且是 按需更新 。比如说,现在要发送一个Topic = "order"的消息,那么KafkaProducer首先会从本地缓存查看是否有对应的元数据信息,没有的话再从Broker集群请求获取元数据。
2.1 send方法
KafkaProducer发送消息是通过send()方法完成的:
    // KafkaProducer.java

    public Future<RecordMetadata> send(ProducerRecord<K, V> record, Callback callback) {
        // 1.如果配置了拦截器,先调用拦截器
        ProducerRecord<K, V> interceptedRecord = this.interceptors == null ? record : this.interceptors.onSend(record);
        // 2.发送消息
        return doSend(interceptedRecord, callback);
    }
内部调用了doSend方法,我们重点关注第一步——Topic元数据的获取:
    // KafkaProducer.java

    private Future<RecordMetadata> doSend(ProducerRecord<K, V> record, Callback callback) {
        TopicPartition tp = null;
        try {
            // 1.阻塞获取Topic对应的元数据信息,maxBlockTimeMs是最大阻塞时间,这段时间内获取不到则抛出异常
            ClusterAndWaitTime clusterAndWaitTime = waitOnMetadata(record.topic(), record.partition(), maxBlockTimeMs);

            // 2.计算剩余时间,消息发送必须在剩余时间内完成,否则也抛出异常
            long remainingWaitMs = Math.max(0, maxBlockTimeMs - clusterAndWaitTime.waitedOnMetadataMs);

            // 3. K/V序列化
            Cluster cluster = clusterAndWaitTime.cluster;
            byte[] serializedKey;
            try {
                serializedKey = keySerializer.serialize(record.topic(), record.key());
            } catch (ClassCastException cce) {
                throw new SerializationException("Can't convert key of class " + record.key().getClass().getName() +
                                                 " to class " + producerConfig.getClass(ProducerConfig.KEY_SERIALIZER_CLASS_CONFIG).getName() +
                                                 " specified in key.serializer");
            }
            byte[] serializedValue;
            try {
                serializedValue = valueSerializer.serialize(record.topic(), record.value());
            } catch (ClassCastException cce) {
                throw new SerializationException("Can't convert value of class " + record.value().getClass().getName() +
                                                 " to class " + producerConfig.getClass(ProducerConfig.VALUE_SERIALIZER_CLASS_CONFIG).getName() +
                                                 " specified in value.serializer");
            }

            // 4.选择发送的分区
            int partition = partition(record, serializedKey, serializedValue, cluster);

            // 5.消息校验
            int serializedSize = Records.LOG_OVERHEAD + Record.recordSize(serializedKey, serializedValue);
            ensureValidRecordSize(serializedSize);

            // 6.设置回调函数,消息发送完成后回调
            tp = new TopicPartition(record.topic(), partition);
            long timestamp = record.timestamp() == null ? time.milliseconds() : record.timestamp();
            log.trace("Sending record {} with callback {} to topic {} partition {}", record, callback, record.topic(), partition);
            Callback interceptCallback = this.interceptors == null ? callback : new InterceptorCallback<>(callback, this.interceptors, tp);

            // 7.将消息发送到缓冲区
            RecordAccumulator.RecordAppendResult result = accumulator.append(tp, timestamp, serializedKey, serializedValue, interceptCallback, remainingWaitMs);
            // 如果batch满了或者是新建的batch,立即唤醒Sender线程发送消息
            if (result.batchIsFull || result.newBatchCreated) {
                log.trace("Waking up the sender since topic {} partition {} is either full or getting a new batch", record.topic(), partition);
                this.sender.wakeup();
            }

            // 8.返回一个Future
            return result.future;
        }

        //...
    }
2.2 waitOnMetadata方法
上述doSend方法内部调用了waitOnMetadata方法,按需加载Topic元数据。整个流程,可以用下面这张图表述:
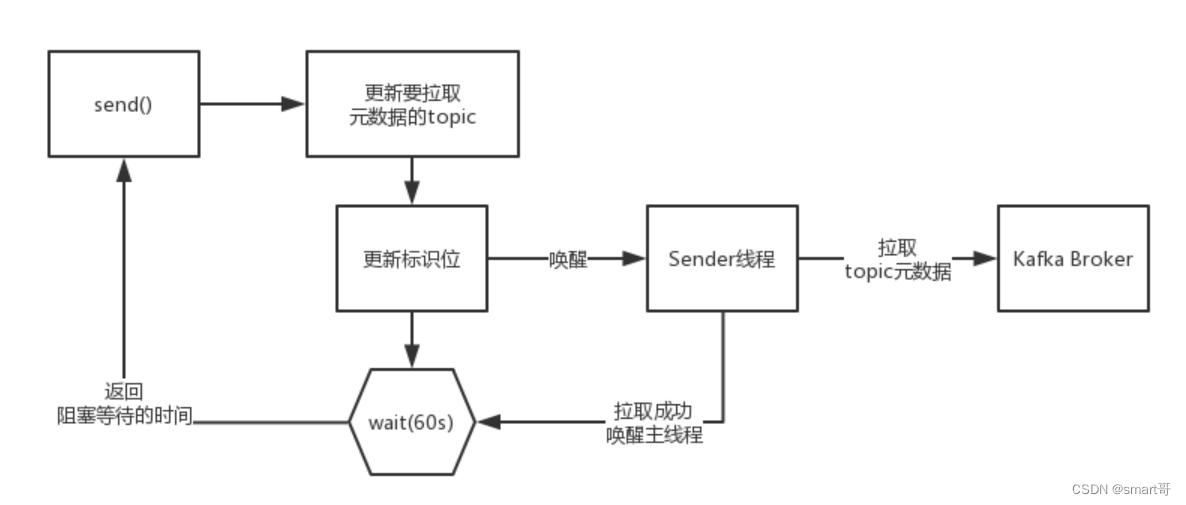
也就是说, Topic元数据的拉取是由Sender线程异步进行的,但是主线程会进行阻塞等待 :
    // KafkaProducer.java

    private ClusterAndWaitTime waitOnMetadata(String topic, Integer partition, long maxWaitMs) throws InterruptedException {
        // 1.将Topic添加到MetaData内部,会改变元数据更新标志位
        metadata.add(topic);

        // 2.判断是否有元数据缓存,有的话直接返回缓存
        Cluster cluster = metadata.fetch();
        Integer partitionsCount = cluster.partitionCountForTopic(topic);
        if (partitionsCount != null && (partition == null || partition < partitionsCount))
            return new ClusterAndWaitTime(cluster, 0);

        // 3.等待Sender线程进行Topic元数据拉取
        long begin = time.milliseconds();
        long remainingWaitMs = maxWaitMs;
        long elapsed;
        do {
            log.trace("Requesting metadata update for topic {}.", topic);
            // version表示当前更新的版本号,每完成一次元数据拉取,version加1
            int version = metadata.requestUpdate();
            // 唤醒Sender线程
            sender.wakeup();
            try {
                // 等待Sender线程更新元数据
                metadata.awaitUpdate(version, remainingWaitMs);
            } catch (TimeoutException ex) {
                // 抛出超时异常
                throw new TimeoutException("Failed to update metadata after " + maxWaitMs + " ms.");
            }

            // 执行到这里,可能是主线程被意外唤醒,需要计算剩余时间,并重新等待
            cluster = metadata.fetch();
            elapsed = time.milliseconds() - begin;
            // 如果超过了最大等待时间,则抛出超时异常
            if (elapsed >= maxWaitMs)
                throw new TimeoutException("Failed to update metadata after " + maxWaitMs + " ms.");
            if (cluster.unauthorizedTopics().contains(topic))
                throw new TopicAuthorizationException(topic);
            // 计算剩余可用时间
            remainingWaitMs = maxWaitMs - elapsed;
            partitionsCount = cluster.partitionCountForTopic(topic);
        } while (partitionsCount == null);

        if (partition != null && partition >= partitionsCount) {
            throw new KafkaException(
                String.format("Invalid partition given with record: %d is not in the range [0...%d).", partition, partitionsCount));
        }

        // 4.执行到这里,说明Sender线程更新元数据成功了
        return new ClusterAndWaitTime(cluster, elapsed);
    }
先来看第一行代码metadata.add(topic),Metadata内部用一个Map保存缓存过的Topic元数据,Key是Topic名称,Value是过期时间。如果是首次往某个Topic发送消息,就会触发对该Topic元数据的拉取和缓存:
    // Metadata.java

    public final class Metadata {
        private final Map<String, Long> topics;

        public synchronized void add(String topic) {
            // 首次添加会返回null,触发请求更新元数据
            if (topics.put(topic, TOPIC_EXPIRY_NEEDS_UPDATE) == null) {
                // 请求更新元数据
                requestUpdateForNewTopics();
            }
        }

        // 拉取并缓存元数据,这个方法会加锁
        private synchronized void requestUpdateForNewTopics() {
            this.lastRefreshMs = 0;
            requestUpdate();
        }

        // 请求更新
        public synchronized int requestUpdate() {
            this.needUpdate = true;
            return this.version;
        }
    }
可以看到,实际并没有发送请求去拉取元数据,而是将needUpdate标志位设置成true,因为真正发送请求获取元数据的操作是由Sender线程异步执行,主线程会通过awaitUpdate方法等待Sender线程的执行完成:
    // Metadata.java

    public synchronized void awaitUpdate(final int lastVersion, final long maxWaitMs)
        throws InterruptedException {
        if (maxWaitMs < 0) {
            throw new IllegalArgumentException("Max time to wait for metadata updates should not be < 0 milli seconds");
        }
          // 边等待边计算剩余时间
        long begin = System.currentTimeMillis();
        long remainingWaitMs = maxWaitMs;
        // 版本号+1,说明拉取元数据成功了
        while (this.version <= lastVersion) {
            if (remainingWaitMs != 0)
                wait(remainingWaitMs);
            long elapsed = System.currentTimeMillis() - begin;
            // 超过了最大等待时间,抛出超时异常
            if (elapsed >= maxWaitMs)
                throw new TimeoutException("Failed to update metadata after " + maxWaitMs + " ms.");
            remainingWaitMs = maxWaitMs - elapsed;
        }
    }
三、Sender线程
既然Topic元数据的拉取操作最终是在Sender线程中完成的,我们就来看下它的内部结构。
3.1 构造
KafkaProducer在构造过程中,会创建Sender:
    // KafkaProducer.java

    this.sender = new Sender(client, this.metadata, this.accumulator,
                             config.getInt(ProducerConfig.MAX_IN_FLIGHT_REQUESTS_PER_CONNECTION) == 1,
                             config.getInt(ProducerConfig.MAX_REQUEST_SIZE_CONFIG),
                             (short) parseAcks(config.getString(ProducerConfig.ACKS_CONFIG)),
                             config.getInt(ProducerConfig.RETRIES_CONFIG),
                             this.metrics, Time.SYSTEM, this.requestTimeoutMs);
    String ioThreadName = "kafka-producer-network-thread" + (clientId.length() > 0 ? " | " + clientId : "");
    this.ioThread = new KafkaThread(ioThreadName, this.sender, true);
    this.ioThread.start();
可以看到,Sender的本质是一个Runnable任务,然后由 KafkaThread 包裹执行:
    // Sender.java

    public class Sender implements Runnable {
        private final KafkaClient client;
        private final RecordAccumulator accumulator;
        private final Metadata metadata;
        // 是否有序消息,通过参数控制max.in.flight.requests.per.connection控制
        private final boolean guaranteeMessageOrder;
        private final int maxRequestSize;
        private final short acks;
        private final int retries;
        private final Time time;
        private volatile boolean running;
        private volatile boolean forceClose;
        private final SenderMetrics sensors;
        private final int requestTimeout;

        public Sender(KafkaClient client, Metadata metadata, RecordAccumulator accumulator,
                      boolean guaranteeMessageOrder, int maxRequestSize, short acks,
                      int retries, Metrics metrics, Time time, int requestTimeout) {
            this.client = client;
            this.accumulator = accumulator;
            this.metadata = metadata;
            this.guaranteeMessageOrder = guaranteeMessageOrder;
            this.maxRequestSize = maxRequestSize;
            this.running = true;
            this.acks = acks;
            this.retries = retries;
            this.time = time;
            this.sensors = new SenderMetrics(metrics);
            this.requestTimeout = requestTimeout;
        }
    }
KafkaThread就是一个普通的线程类,Kafka在设计后台线程的时候,把线程本身和线程的执行逻辑切分开来,Sender就是Runnable线程执行的逻辑,KafkaThread其实代表了这个线程本身:
    // KafkaThread.java

    public class KafkaThread extends Thread {

        public KafkaThread(final String name, Runnable runnable, boolean daemon) {
            super(runnable, name);
            configureThread(name, daemon);
        }

        private void configureThread(final String name, boolean daemon) {
            setDaemon(daemon);
            setUncaughtExceptionHandler(new Thread.UncaughtExceptionHandler() {
                public void uncaughtException(Thread t, Throwable e) {
                    log.error("Uncaught exception in " + name + ": ", e);
                }
            });
        }
    }
3.2 拉取元数据
我们再来看Sender启动后,内部是如何拉取元数据的,整个过程涉及Sender内部的消息发送机制:
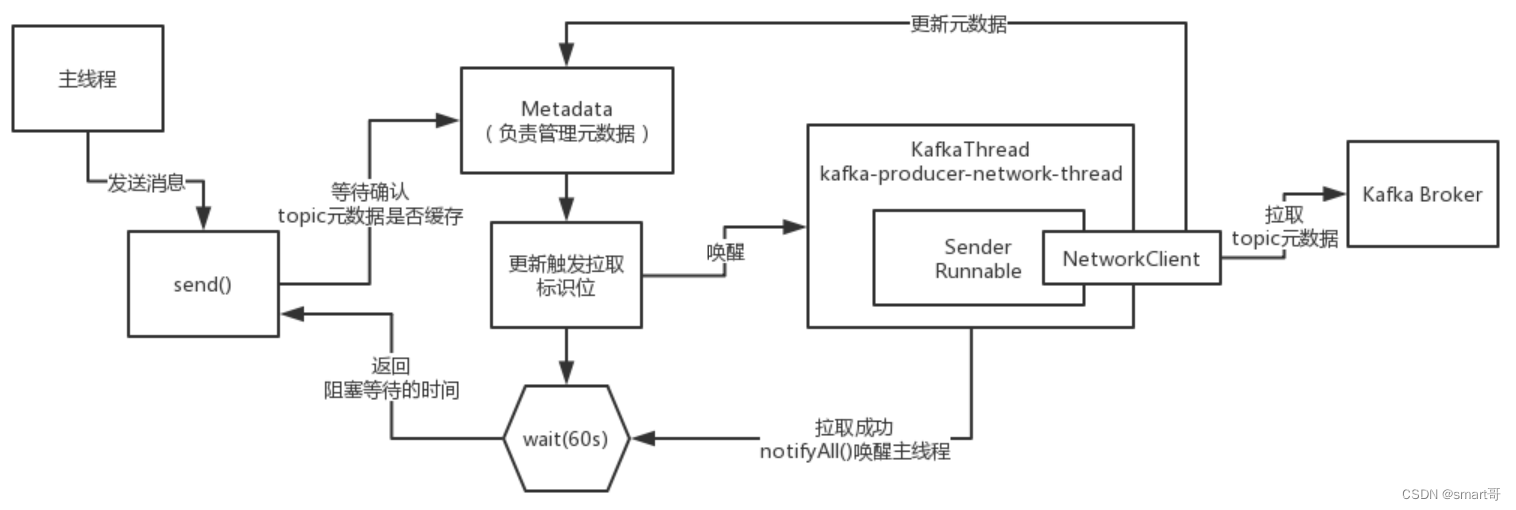
我们重点关注最后一行代码:
    // Sender.java

    public void run() {
        while (running) {
            try {
                run(time.milliseconds());
            } catch (Exception e) {
                log.error("Uncaught error in kafka producer I/O thread: ", e);
            }
        }
        //...
    }

    void run(long now) {
        Cluster cluster = metadata.fetch();
        // 1.获取准备好要发送的批数据
        RecordAccumulator.ReadyCheckResult result = this.accumulator.ready(cluster, now);

        // 2.如果存在未知Leader的分区,则强制更新元数据
        if (!result.unknownLeaderTopics.isEmpty()) {
            // 这里只是更新标志位,实际的拉取操作在最后面
            for (String topic : result.unknownLeaderTopics)
                this.metadata.add(topic);
            this.metadata.requestUpdate();
        }

        // 3.去除未准备就绪的Node
        Iterator<Node> iter = result.readyNodes.iterator();
        long notReadyTimeout = Long.MAX_VALUE;
        while (iter.hasNext()) {
            Node node = iter.next();
            if (!this.client.ready(node, now)) {
                iter.remove();
                notReadyTimeout = Math.min(notReadyTimeout, this.client.connectionDelay(node, now));
            }
        }

        // 4.按照Broker维度,重新编排要批量发送的数据
        Map<Integer, List<RecordBatch>> batches = this.accumulator.drain(cluster, result.readyNodes,
                                                                         this.maxRequestSize, now);
        // 5.对需要保证顺序的消息进行特殊处理
        if (guaranteeMessageOrder) {
            // Mute all the partitions drained
            for (List<RecordBatch> batchList : batches.values()) {
                for (RecordBatch batch : batchList)
                    this.accumulator.mutePartition(batch.topicPartition);
            }
        }

        // 6.移除过期的批消息
        List<RecordBatch> expiredBatches = this.accumulator.abortExpiredBatches(this.requestTimeout, now);
        for (RecordBatch expiredBatch : expiredBatches)
            this.sensors.recordErrors(expiredBatch.topicPartition.topic(), expiredBatch.recordCount);
        sensors.updateProduceRequestMetrics(batches);

        // 7.计算超时时间
        long pollTimeout = Math.min(result.nextReadyCheckDelayMs, notReadyTimeout);
        if (!result.readyNodes.isEmpty()) {
            log.trace("Nodes with data ready to send: {}", result.readyNodes);
            pollTimeout = 0;
        }
        // 8.发送消息
        sendProduceRequests(batches, now);

        // 9.处理响应
        this.client.poll(pollTimeout, now);
    }
Sender内部的运行流程是比较复杂的,它的核心思想是先对我们要发送的消息格式进行各种转换,最后通过底层的通信组件 NetworkClient 采用NIO的方式发送消息。
Topic的元数据在以下情况都会进行更新:
- KafkaProdcuer中没有Topic的元数据信息;
- 超过
metadata.max.age.ms时间没有更新元数据,默认5分钟;
元数据的更新操作是在NetworkClient.poll()中:
    // NetworkClient.java

    public List<ClientResponse> poll(long timeout, long now) {
        // 更新元数据
        long metadataTimeout = metadataUpdater.maybeUpdate(now);
        try {
            this.selector.poll(Utils.min(timeout, metadataTimeout, requestTimeoutMs));
        } catch (IOException e) {
            log.error("Unexpected error during I/O", e);
        }

        //...
    }

    public long maybeUpdate(long now) {
        // should we update our metadata?
        long timeToNextMetadataUpdate = metadata.timeToNextUpdate(now);
        long waitForMetadataFetch = this.metadataFetchInProgress ? requestTimeoutMs : 0;

        long metadataTimeout = Math.max(timeToNextMetadataUpdate, waitForMetadataFetch);
        if (metadataTimeout > 0) {
            return metadataTimeout;
        }

        // 找到一个负载最小的Broker
        Node node = leastLoadedNode(now);
        if (node == null) {
            log.debug("Give up sending metadata request since no node is available");
            return reconnectBackoffMs;
        }
        // 执行更新元数据
        return maybeUpdate(now, node);
    }
更新元数据时,会先挑选出一个 leastLoadedNode ,也就是负载最小的节点,然后向这个 Node 发送 MetadataRequest 请求来获取具体的元数据信息。请求的发送和正常消息的发送流程是相同的,我后面讲 ClientRequest 请求缓存时会重点讲解:
    // NetworkClient.java

    private long maybeUpdate(long now, Node node) {
        // 负载最小的Node的ID
        String nodeConnectionId = node.idString();

        if (canSendRequest(nodeConnectionId)) {
            this.metadataFetchInProgress = true;
            MetadataRequest.Builder metadataRequest;
            if (metadata.needMetadataForAllTopics())
                metadataRequest = MetadataRequest.Builder.allTopics();
            else
                metadataRequest = new MetadataRequest.Builder(new ArrayList<>(metadata.topics()));

            log.debug("Sending metadata request {} to node {}", metadataRequest, node.id());
            // 发送请求获取元数据
            sendInternalMetadataRequest(metadataRequest, nodeConnectionId, now);
            return requestTimeoutMs;
        }
        //...
    }

    private void sendInternalMetadataRequest(MetadataRequest.Builder builder,
                                             String nodeConnectionId, long now) {
        ClientRequest clientRequest = newClientRequest(nodeConnectionId, builder, now, true);
        doSend(clientRequest, true, now);
    }

    private void doSend(ClientRequest clientRequest, boolean isInternalRequest, long now) {
        String nodeId = clientRequest.destination();

        // 构造请求Request
        AbstractRequest request = null;
        AbstractRequest.Builder<?> builder = clientRequest.requestBuilder();
        try {
            NodeApiVersions versionInfo = nodeApiVersions.get(nodeId);
            if (versionInfo == null) {
                if (discoverBrokerVersions && log.isTraceEnabled())
                    log.trace("No version information found when sending message of type {} to node {}. " +
                              "Assuming version {}.", clientRequest.apiKey(), nodeId, builder.version());
            } else {
                short version = versionInfo.usableVersion(clientRequest.apiKey());
                builder.setVersion(version);
            }
            request = builder.build();
        } catch (UnsupportedVersionException e) {
            log.debug("Version mismatch when attempting to send {} to {}",
                      clientRequest.toString(), clientRequest.destination(), e);
            ClientResponse clientResponse = new ClientResponse(clientRequest.makeHeader(),
                                                               clientRequest.callback(), clientRequest.destination(), now, now, false, e, null);
            abortedSends.add(clientResponse);
            return;
        }
        // 构造请求头
        RequestHeader header = clientRequest.makeHeader();
        if (log.isDebugEnabled()) {
            int latestClientVersion = ProtoUtils.latestVersion(clientRequest.apiKey().id);
            if (header.apiVersion() == latestClientVersion) {
                log.trace("Sending {} to node {}.", request, nodeId);
            } else {
                log.debug("Using older server API v{} to send {} to node {}.",
                          header.apiVersion(), request, nodeId);
            }
        }
        // 发送请求
        Send send = request.toSend(nodeId, header);
        InFlightRequest inFlightRequest = new InFlightRequest(
            header,
            clientRequest.createdTimeMs(),
            clientRequest.destination(),
            clientRequest.callback(),
            clientRequest.expectResponse(),
            isInternalRequest,
            send,
            now);
        this.inFlightRequests.add(inFlightRequest);
        selector.send(inFlightRequest.send);
    }
KafkaProducer通过每个 Node 在 InFlightRequests 中还未确认的请求数判断Node的负载,未确认的请求越多则认为负载越大 。
四、总结
本章,我对Producer的Topic元数据拉取机制进行了讲解,Topic的元数据都是按需拉取的,这是一种 延迟加载 的思想。KafkaProducer在拉取Topic的元数据信息时,主线程会阻塞等待,整体分为两种情况:
- Sender线程成功的在
max.block.ms时间内(默认60秒),把Topic元数据加载到了,然后缓存到了Metadata里去,更新了version版本号,此时会尝试把阻塞等待的主线程唤醒; - 主线程等待超过60秒,Sender线程还没有完成元数据加载,则抛出超时异常。
另外,Sender线程在实际拉取元数据时,会挑选一个负载最小的Broker节点,然后向这个 节点发送 MetadataRequest 请求来获取具体的元数据信息。


 847
847


 被折叠的 条评论
为什么被折叠?
被折叠的 条评论
为什么被折叠?
 到【灌水乐园】发言


