


Android 自定义attr Style styleable以及其应用,应用界面主题Theme使用方法
http://www.jianshu.com/p/61b79e7f88fc
相信每一位从事Android开发的猿都遇到过需要自己去自定义View的需求,如果想通过xml指定一些我们自己需要的参数,就需要自己声明一个styleable,并在里面自己定义一些attr属性,这个过程相信大家都比较了解。当然,属性其实也不一定需要和View配合使用,比如我想通过一个Theme中的style对一个库进行一些简单参数的配置,这应该怎么做呢?我今天在封装一个库时在这个地方浪费了较多时间,最后没办法,到处搜搜资料,记录在这里吧,相信对大家都有帮助。
attr和styleable的关系
首先要明确一点,attr不依赖于styleable,styleable只是为了方便attr的使用。
我们自己定义属性完全可以不放到styleable里面,比如直接在resources文件中定义一些属性:
<attr name="custom_attr1" format="string" />
<attr name="custom_attr2" format="string" />
定义一个attr就会在R文件里面生成一个Id,那么我们去获取这个属性时,必须调用如下代码:
int[] custom_attrs = {R.attr.custom_attr1,R.custom_attr2};
TypedArray typedArray = context.obtainStyledAttributes(set,custom_attrs);
而通过定义一个styleable,我们可以在R文件里自动生成一个int[],数组里面的int就是定义在styleable里面的attr的id。所以我们在获取属性的时候就可以直接使用styleable数组来获取一系列的属性。
<declare-styleable name="custom_attrs">
<attr name="custom_attr1" format="string" /> <attr name="custom_attr2" format="string" /> </declare-styleable>获取:
TypedArray typedArray = context.obtainStyledAttributes(set,R.styleable.custom_attrs);由上面的例子可以知道,定义一个declare-styleable,在获取属性的时候为我们自动提供了一个属性数组。此外,我觉得使用declare-styleable的方式有利于我们我们把相关的属性组织起来,有一个分组的概念,属性的使用范围更加明确。
obtainStyledAttributes函数获取属性
其实我们在前面已经使用了obtainStyledAttributes来获取属性了,现在来看看这个函数的声明吧:
- obtainAttributes(AttributeSet set, int[] attrs) //从layout设置的属性集中获取attrs中的属性
- obtainStyledAttributes(int[] attrs) //从系统主题中获取attrs中的属性
- obtainStyledAttributes(int resId,int[] attrs) //从资源文件定义的style中读取属性
- obtainStyledAttributes ( AttributeSet set, int[] attrs, int defStyleAttr, int defStyleRes)
//这是最复杂的一种情况,后面细说。
这么多重载的方法是不是已经看懵了?其实你只需要理解其中的参数就能掌握各个方法的使用方法。所谓获取属性,无非就是需要两个参数:第一,我需要获取那些属性;第二:我从哪里去获取这些属性(数据源)。
attrs
attrs:int[],每个方法中都有的参数,就是告诉系统需要获取那些属性的值。
set
set:表示从layout文件中直接为这个View添加的属性的集合,如:android:layout_width="match_parent"。注意,这里面的属性必然是通过xml配置添加的,也就是由LayoutInflater加载进来的布局或者View`才有这个属性集。
现在你知道为啥我们在自己定义View的时候至少要重写(Context context, AttributeSet set)构造器了吧?因为不重写时,我们将无法获取到layout中配置的属性!!当然,也因为这样,LayoutInflater在inflater布局时会通过反射去调用View的(Context context, AttributeSet attrs)构造器。
set 中实际上又有两种数据来源,当然最后都会包含在set中。一种是直接使用android:layout_width="wrap_content"这种直接指定的,还有一种是通过style="@style/somestyle"这样指定的。
defStyleAttr
这个参数是本文的关键所在,也是自定义一个可以在Theme中配置的样式的关键,先看个栗子吧:
如果我想通过在系统主题里面设置一个样式,修改所有textview的样式,你一般会这么做:
<style name="AppTheme" parent="Theme.AppCompat.Light.DarkActionBar">
//在主题中设置textview的style
<item name="android:textViewStyle">@style/textviewstyle</item>
</style>
<style name="textviewstyle" parent="android:style/Widget.TextView">
<!--指定一些属性-->
</style>
首先android:textViewStyle其实就是一个普通的在资源文件中定义的属性attr,它的format="reference"。那问题来了,TextView是怎么得知我们自己定义的textviewstyle的呢?这其实就是defStyleAttr的应用场景:定义Theme可配置样式。
public TextView(Context context, AttributeSet attrs){
//指定属性textViewStyle为defStyleAttr,然后系统会去搜索Theme中你为这个 //属性配置的stylethis(context, attrs, com.android.internal.R.attr.textViewStyle);
}public TextView(Context context, AttributeSet attrs, int defStyleAttr){
this(context, attrs, defStyleAttr,0);
//最终调用到View的第四个构造器时,调用了obtainStyledAttributes TypedArray a = theme.obtainStyledAttributes(attrs,com.android.internal.R.styleable.TextViewAppearance, defStyleAttr, defStyleRes);
}resId=defStyleRes
resId or defStyleRes:直接从资源文件中定义的某个样式中读取。
NULL
看看第二个方法吧,里面除了指定了attrs属性集之外没有任何属性值来源,数据从哪儿来呢?原来我们可以直接在Theme中指定属性的值,那么NULL表示直接从Theme中读取属性。
是不是看到这里你已经有点迷糊了?不要紧,耐心看下去,后面有一个例子,看完例子你再回头看看这里的说明就ok了。
四个参数的obtainStyledAttributes
看看这个方法,返回的结果还是我们所关心的attrs(int[])中包含的属性集。那么数据来源呢?一共有4个,set,defStyleAttr,NULL,defStyleRes,如果一个属性在多个地方都被定义了,那么以哪个为准?
优先级如下:set > defStyleAttr(主题可配置样式) > defStyleRes(默认样式) > NULL(主题中直接指定)
栗子终于来了!!下载地址-GitHub
attr资源文件中如下定义:
//定义属性<declare-styleable name="custom_attrs">
<attr name="custom_color1" format="color"></attr> <attr name="custom_color2" format="color"></attr> <attr name="custom_color3" format="color"></attr> <attr name="custom_color4" format="color"></attr> <attr name="custom_color5" format="color"></attr></declare-styleable>
//定义theme可配置style<attr name="custom_style" format="reference"></attr>
//定义默认style<style name="default_style">
<item name="custom_color1">#ff333333</item>
<item name="custom_color2">#ff333333</item>
<item name="custom_color3">#ff333333</item>
<item name="custom_color4">#ff333333</item>
</style>
styles资源文件中如下定义:
<style name="AppTheme"parent="Theme.AppCompat.Light.DarkActionBar">
//配置style<item name="custom_style">@style/custom_theme</item>
//直接在主题中指定<item name="custom_color1">#ff444444</item>
<item name="custom_color2">#ff444444</item>
<item name="custom_color3">#ff444444</item>
<item name="custom_color4">#ff444444</item>
<item name="custom_color5">#ff444444</item>
</style> //主题中配置的style<style name="custom_theme">
<item name="custom_color1">#ff222222</item>
<item name="custom_color2">#ff222222</item>
<item name="custom_color3">#ff222222</item>
</style> //直接在layout文件中引用的style,最后会被放到set中<style name="myStyle">
<item name="custom_color1">#ff111111</item>
<item name="custom_color2">#ff111111</item>
</style>layout中如下定义:
<com.exmp.MyCustomView android:layout_width="wrap_content"android:layout_height="wrap_content"
android:style="@style/myStyle"
app:custom_color1="#ff000000"
>
</com.exmp.MyCustomView>
在MyCustomView的构造器中:
public MyCustomView(Context context) {
this(context,null);
}public MyCustomView(Context context, AttributeSet set) {
this(context,set, R.attr.custom_style);
}public LinearRecyclerView(Context context, AttributeSet set, int defStyle) {
super(context,set, defStyle);
final TypedArray a = context.obtainStyledAttributes(set, R.styleable.custom_attrs, defStyle, R.style.default_style);
}如上配置之后,TypedArray中获取的属性值分别是:
custom_color1=#ff000000 //布局文件中直接指定,优先级最高
custom_color2=#ff111111 //布局同通过style指定,也包含在set中,优先级第二
custom_color3=#ff222222 //布局通过主题中配置风格style
custom_color4=#ff444444 //由系统Theme直接指定的
custom_color5=#ff444444
这里看到我们的默认style没有效果,原因是只有当defStyle(Theme中可配置style)不为0 而且在Theme中已经配置了defStyle时,默认style不起效果。
TypedArray
我们看到在获取到属性值之后,都会返回一个TypedArray对象,它又是什么鬼?TypedArray主要有两个作用,第一是内部去转换attrid和属性值数组的关系;第二是提供了一些类型的自动转化,比如我们getString时,如果你是通过@string/hello这种方式设置的,TypedArray会自动去将ResId对应的string从资源文件中读出来。说到底,都是为了方便我们获取属性参数。
回到开始
现在我们应该知道如何为我们的自定义View添加在主题中可配置的Style,主要是通过obtainStyledAttributes (AttributeSet set, int[] attrs, int defStyleAttr, int defStyleRes)方法来做,需要注意的是,defStyleAttr和defStyleRes都可以设置成0表示不去搜索可配置的风格和默认风格。
问题来了,如果来实现我的第二个需求为一个普通的类添加一个可以在Theme中可以配置的样式(主要不就是为了业务方使用库时配置或者传入一些简单的值,这里不去讨论这种方式的优劣,只讨论可行性)?其实很简单:
首先定义:
<attr name="config_style"reformat="referenc"/>
publicclassClassNeedConfig{
public ClassNeedConfig(Context context){
//因为这个类不是通过Inflate进来的,所以肯定没有set,直接给null就ok //attrs 你需要获取的属性,通常是自己定义的 //指定在Theme中搜索的属性 // 0表示不去搜索默认的样式TypedArray a = context.obtainStyledAttributes(null,attrs,R.attr.config_style,0);
}}本文主要参考:
Android 深入理解Android中的自定义属性
Android中自定义样式与View的构造函数中的第三个参数defStyle的意义
2016-01-14更新
优先级如下:
set>defStyleAttr(主题可配置样式)>defStyleRes(默认样式)>
NULL(主题中直接指定)
这个优先级需要说明一点,defStyleRes只有在defStyleAttr为0或者主题中没有配置时,才会生效;所以上面例子中
custom_color4=#ff444444 而不是333333,因为此时的defStyleAttr我们配置了。
文/楚云之南(简书作者)
原文链接:http://www.jianshu.com/p/61b79e7f88fc
著作权归作者所有,转载请联系作者获得授权,并标注“简书作者”。
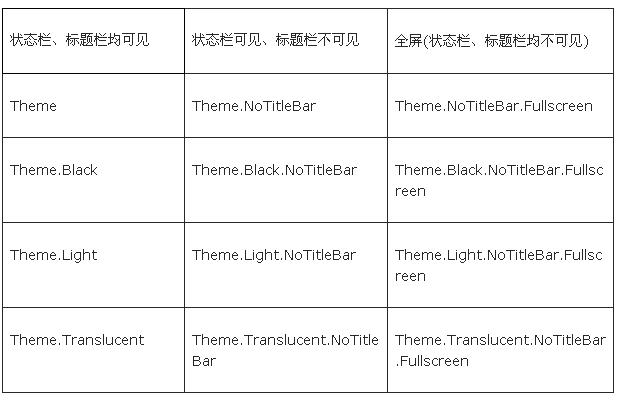
主题Theme就是用来设置界面UI风格,可以设置整个应用或者某个活动Activity的界面风格。在Android SDK中内置了下面的Theme,可以按标题栏Title Bar和状态栏Status Bar是否可见来分类:
[html] view plain copy
- •android:theme="@android:style/Theme.Dialog" 将一个Activity显示为能话框模式
- •android:theme="@android:style/Theme.NoTitleBar" 不显示应用程序标题栏
- •android:theme="@android:style/Theme.NoTitleBar.Fullscreen" 不显示应用程序标题栏,并全屏
- •android:theme="Theme.Light" 背景为白色
- •android:theme="Theme.Light.NoTitleBar" 白色背景并无标题栏
- •android:theme="Theme.Light.NoTitleBar.Fullscreen" 白色背景,无标题栏,全屏
- •android:theme="Theme.Black" 背景黑色
- •android:theme="Theme.Black.NoTitleBar" 黑色背景并无标题栏
- •android:theme="Theme.Black.NoTitleBar.Fullscreen" 黑色背景,无标题栏,全屏
- •android:theme="Theme.Wallpaper" 用系统桌面为应用程序背景
- •android:theme="Theme.Wallpaper.NoTitleBar" 用系统桌面为应用程序背景,且无标题栏
- •android:theme="Theme.Wallpaper.NoTitleBar.Fullscreen" 用系统桌面为应用程序背景,无标题栏,全屏
- •android:theme="Translucent" 半透明
- •android:theme="Theme.Translucent.NoTitleBar" 半透明、无标题栏
- •android:theme="Theme.Translucent.NoTitleBar.Fullscreen" 半透明、无标题栏、全屏
- •android:theme="Theme.Panel"
- •android:theme="Theme.Light.Panel"
这些主题可以应用到整个应用Application范围或者某个活动Activity范围中。
应用Application范围
在AndroidManifest.xml中的application节点中设置theme属性,主题theme应用到整个应用程序中。
<application
Android:icon=”@drawable/icon”
Android:icon=”@string/app_name”
Android:icon=”@android:style/ Theme.Black.NoTitleBar”>
活动Activity范围
使用Java代码或者在AndroidManifest.xml中对活动Activity的主题进行设置,主题仅应用到当前活动中。
在AndroidMainifest.xml设置方法:
<activity
android:name=“.About”
android:label=“@string/app_name”
android:theme=“@android:style/ Theme.Black.NoTitleBar” >
使用java代码进行设置,在当前活动Activity的onCreate中进行设置:
@Override
public void onCreate(Bundle savedInstanceState){
super.onCreate(savedInstanceState);
setTheme(android.R.style.Theme_Translucent_NoTitleBar);
setContentView(R.layout.main);
}


 4337
4337

 被折叠的 条评论
为什么被折叠?
被折叠的 条评论
为什么被折叠?
 到【灌水乐园】发言


