


5.RabbitMq-workqueues
5.1.workqueues的思想
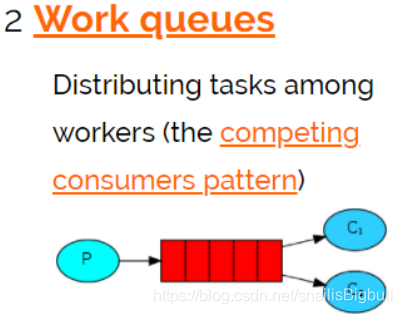
work queues与入门程序相比,多了一个消费端,两个消费端共同消费同一个队列中的消息。
应用场景:对于任务过重或任务较多情况使用工作队列可以提高任务处理的速度。
5.2.workqueues代码实现
5.2.1.创建消息发送者
同 helloword一样,只是改个队列的名字
5.2.2.创建多个消息接受者
同 helloword一样,只是改个队列的名字
5.2.3.设置能者多劳
设置接受者同时只能处理一个消息
channel.basicQos(1);
6.发布订阅模型
6.1.原理图
解读:
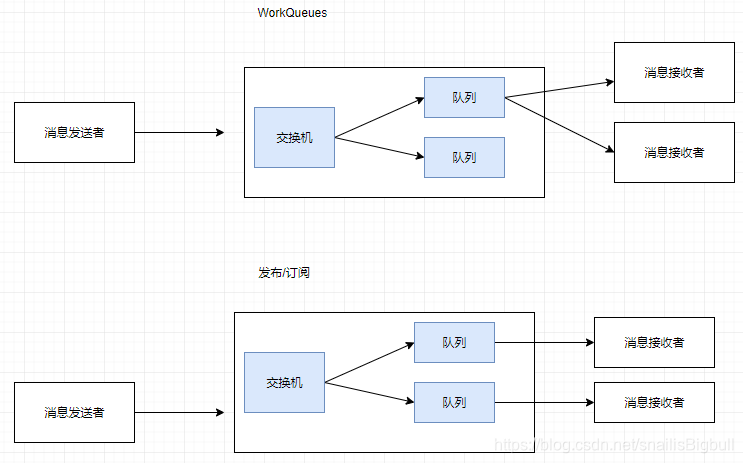
1、1个生产者,多个消费者
2、每一个消费者都有自己的一个队列
3、生产者没有将消息直接发送到队列,而是发送到了交换机
4、每个队列都要绑定到交换机
5、生产者发送的消息,经过交换机到达队列,实现一个消息被多个消费者获取的目的
X(Exchanges):交换机一方面:接收生产者发送的消息。另一方面:知道如何处理消息,例如递交给某个特别队列、递交给所有队列、或是将消息丢弃。到底如何操作,取决于Exchange的类型。
6.2.Exchange分类
-
Fanout:广播
将消息交给所有绑定到交换机的队列 all
-
Direct:定向
把消息交给符合指定routing key 的队列 一堆或一个
-
Topic:通配符
把消息交给符合routing pattern(路由模式)的队列 一堆或者一个
7.Fanout广播模式
7.1.Fanout广播模式
Exchange(交换机)只负责转发消息,不具备存储消息的能力,因此如果没有任何队列与Exchange绑定,或者没有符合路由规则的队列,那么消息会丢失!
7.2.Fanout模式的原理
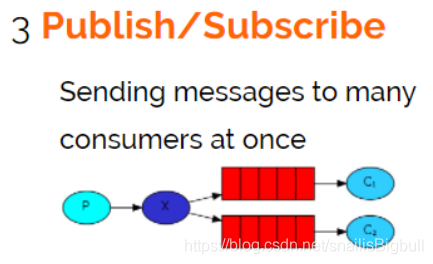
在广播模式下,消息发送流程是这样的:
- 1) 可以有多个消费者
- 2) 每个消费者有自己的queue(队列)
- 3) 每个队列都要绑定到Exchange(交换机)
- 4) 生产者发送的消息,只能发送到交换机,交换机来决定要发给哪个队列,生产者无法决定。
- 5) 交换机把消息发送给绑定过的所有队列
- 6) 队列的消费者都能拿到消息。实现一条消息被多个消费者消费
7.3.实现Fanout模式
发送者需要声明交换机 ,不需要声明队列,发送消息的时候需要指定交换机,不需要指定routingkey接受者需要声明队列 , 需要给队列绑定交换机 ,接受者的交换机和消息发送者的交换机要一致。多个消息接受者,声明的队列的名字需要不一样,而交换机的名字需要一样。
7.3.1.消息发送者
public class Sen {

    //交换机的名字
    private static final String EXCHANGE_FANOUT = "exchange_fanout";

    public static void main(String[] args) {
        Connection connection = null;
        Channel channel = null;
        try{
            //1.创建链接对象
            connection = ConnectionUtil.getConnection();

            //2.创建通道
            channel = connection.createChannel();

            //3.声明交换机指定类型为fanout
            channel.exchangeDeclare(EXCHANGE_FANOUT, BuiltinExchangeType.FANOUT);

            //4.发送消息:交换机 ; 队列名(routingkey) ;参数 ;消息了内容
            String message = "我是一个fanout消息";

            channel.basicPublish(EXCHANGE_FANOUT, "" ,null ,message.getBytes() );

            System.out.println("已经发送消息:"+message);

        } catch (Exception e) {
            e.printStackTrace();
        }finally {
            if(channel != null){
                try {
                    channel.close();
                } catch (Exception e) {
                    e.printStackTrace();
                }
            }
            if(connection != null){
                try {
                    connection.close();
                } catch (Exception e) {
                    e.printStackTrace();
                }
            }
        }


    }
}
7.3.2.消息接收者1
public class Rev {

    //队列的名字
    private static final String FANOUT_QUEUE_1 = "fanout_queue_1";

    //交换机的名字
    private static final String EXCHANGE_FANOUT = "exchange_fanout";

    public static void main(String[] args) {
        try {
            //1.创建链接
            Connection connection = ConnectionUtil.getConnection();

            //2.创建通道
            Channel channel = connection.createChannel();

            //3.声明队列
            channel.queueDeclare(FANOUT_QUEUE_1, false, false, false, null);

            //4.队列绑定交换机
            channel.queueBind(FANOUT_QUEUE_1, EXCHANGE_FANOUT, "");

            //设置同时处理一个消息
            channel.basicQos(1);

            Consumer consumer = new DefaultConsumer(channel){
                @Override
                public void handleDelivery(String consumerTag, Envelope envelope,
                                           AMQP.BasicProperties properties, byte[] body)throws IOException {
                    //交换机
                    String exchange = envelope.getExchange();
                    //System.out.println("exchange:"+exchange);
                    //路由key
                    String routingKey = envelope.getRoutingKey();
                    //System.out.println("routingKey:"+routingKey);
                    //消息id
                    long deliveryTag = envelope.getDeliveryTag();
                    System.out.println("deliveryTag:"+deliveryTag);
                    //消息内容
                    String msg = new String(body, "utf8");
                    System.out.println("收到消息:" + msg);
                    //System.out.println(1 / 0);

                    channel.basicAck(deliveryTag, false);
                }
            };

            //4.接受消息 :队列 ; 签收方式(true:自动签收)
            channel.basicConsume(FANOUT_QUEUE_1, false,consumer);


        } catch (Exception e) {
            e.printStackTrace();
        }

    }
}
7.3.3.消息接收者2
public class Rev2 {

    //队列的名字
    private static final String FANOUT_QUEUE_2 = "fanout_queue_2";

    //交换机的名字
    private static final String EXCHANGE_FANOUT = "exchange_fanout";

    public static void main(String[] args) {
        try {
            //1.创建链接
            Connection connection = ConnectionUtil.getConnection();

            //2.创建通道
            Channel channel = connection.createChannel();

            //3.声明队列
            channel.queueDeclare(FANOUT_QUEUE_2, false, false, false, null);

            //4.队列绑定交换机
            channel.queueBind(FANOUT_QUEUE_2, EXCHANGE_FANOUT, "");

            //设置同时处理一个消息
            channel.basicQos(1);

            Consumer consumer = new DefaultConsumer(channel){
                @Override
                public void handleDelivery(String consumerTag, Envelope envelope,
                                           AMQP.BasicProperties properties, byte[] body)throws IOException {
                    //交换机
                    String exchange = envelope.getExchange();
                    //System.out.println("exchange:"+exchange);
                    //路由key
                    String routingKey = envelope.getRoutingKey();
                    //System.out.println("routingKey:"+routingKey);
                    //消息id
                    long deliveryTag = envelope.getDeliveryTag();
                    System.out.println("deliveryTag:"+deliveryTag);
                    //消息内容
                    String msg = new String(body, "utf8");
                    System.out.println("收到消息:" + msg);
                    //System.out.println(1 / 0);

                    channel.basicAck(deliveryTag, false);
                }
            };

            //4.接受消息 :队列 ; 签收方式(true:自动签收)
            channel.basicConsume(FANOUT_QUEUE_2, false,consumer);


        } catch (Exception e) {
            e.printStackTrace();
        }

    }
}
8.direct定向模式
direct定向模式是交换机根据product指定的routingkey,收到消息后去匹配指定routingkey的队列,将消息发送给队列,消费者进行消费
8.1.工作模式
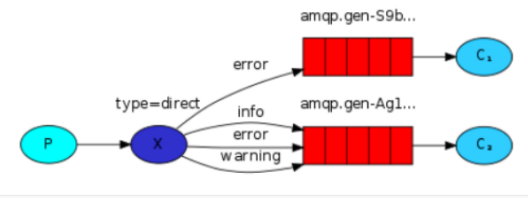
P:生产者,向Exchange发送消息,发送消息时,会指定一个routing key。
X:Exchange(交换机),接收生产者的消息,然后把消息递交给 与routing key完全匹配的队列
C1:消费者,其所在队列指定了需要routing key 为 error 的消息
C2:消费者,其所在队列指定了需要routing key 为 info、error、warning 的消息
8.2.direct实现
8.2.1.发送者
public class Sen {

    //交换机的名字
    private static final String EXCHANGE_DIRECT = "exchange_direct";

    public static void main(String[] args) {
        Connection connection = null;
        Channel channel = null;
        try{
            //1.创建链接对象
            connection = ConnectionUtil.getConnection();

            //2.创建通道
            channel = connection.createChannel();

            //3.声明交换机指定类型为DIRECT
            channel.exchangeDeclare(EXCHANGE_DIRECT, BuiltinExchangeType.DIRECT);

            //4.发送消息:交换机 ; 队列名(routingkey) ;参数 ;消息了内容
            String message = "我是一个DIRECT消息";

            //使用 定向的交换机 ,往 rotingkey为 update的队列中发送消息
            channel.basicPublish(EXCHANGE_DIRECT, "delete" ,null ,message.getBytes() );

            System.out.println("已经发送消息:"+message);
...
8.2.2.接收者
public class Rev {

    //队列的名字
    private static final String DIRECT_QUEUE_1 = "direct_queue_1";

    //交换机的名字
    private static final String EXCHANGE_DIRECT = "exchange_direct";

    public static void main(String[] args) {
        try {
            //1.创建链接
            Connection connection = ConnectionUtil.getConnection();

            //2.创建通道
            Channel channel = connection.createChannel();

            //3.声明队列
            channel.queueDeclare(DIRECT_QUEUE_1, false, false, false, null);

            //4.队列绑定交换机
            channel.queueBind(DIRECT_QUEUE_1, EXCHANGE_DIRECT, "update");
            channel.queueBind(DIRECT_QUEUE_1, EXCHANGE_DIRECT, "delete");

            //设置同时处理一个消息
            channel.basicQos(1);

            Consumer consumer = new DefaultConsumer(channel){
                @Override
                public void handleDelivery(String consumerTag, Envelope envelope,
                                           AMQP.BasicProperties properties, byte[] body)throws IOException {
                    //交换机
                    String exchange = envelope.getExchange();
                    //System.out.println("exchange:"+exchange);
                    //路由key
                    String routingKey = envelope.getRoutingKey();
                    //System.out.println("routingKey:"+routingKey);
                    //消息id
                    long deliveryTag = envelope.getDeliveryTag();
                    System.out.println("deliveryTag:"+deliveryTag);
                    //消息内容
                    String msg = new String(body, "utf8");
                    System.out.println("收到消息:" + msg);
                    //System.out.println(1 / 0);

                    channel.basicAck(deliveryTag, false);
                }
            };

            //4.接受消息 :队列 ; 签收方式(true:自动签收)
            channel.basicConsume(DIRECT_QUEUE_1, false,consumer);


        } catch (Exception e) {
            e.printStackTrace();
        }

    }
}
注意:多个消息接收者,只需要声明不同的队列即可 , 交换机是相同的 ,并且绑定队列的时候要指定队列的routingkey
9.topic通配符
topic的工作模式跟 direct是一样的 , direct定向模式是交换机根据product指定的routingkey,收到消息后去匹配指定routingkey的队列,将消息发送给队列,消费者进行消费 , 只是不一样的是,消费者在绑定队列的时候队列的routingkey可以使用通配符
9.1.topic工作模式
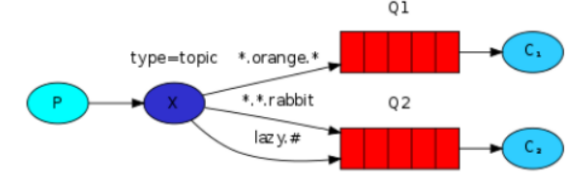
# 匹配多个
* 匹配一个
9.1.topic代码实现
9.1.1.发送者
public class Sen {

    //交换机的名字
    private static final String EXCHANGE_TOPIC = "exchange_topic";

    public static void main(String[] args) {
        Connection connection = null;
        Channel channel = null;
        try{
            //1.创建链接对象
            connection = ConnectionUtil.getConnection();

            //2.创建通道
            channel = connection.createChannel();

            //3.声明交换机指定类型为TOPIC
            channel.exchangeDeclare(EXCHANGE_TOPIC, BuiltinExchangeType.TOPIC);

            //4.发送消息:交换机 ; 队列名(routingkey) ;参数 ;消息了内容
            String message = "我是一个TOPIC消息";

            //使用 定向的交换机 ,往 rotingkey为 update的队列中发送消息
            channel.basicPublish(EXCHANGE_TOPIC, "user.update" ,null ,message.getBytes() );

            System.out.println("已经发送消息:"+message);

...
9.1.2.接收者
public class Rev2 {

    //队列的名字
    private static final String TOPIC_QUEUE_2 = "topic_queue_2";

    //交换机的名字
    private static final String EXCHANGE_TOPIC = "exchange_topic";

    public static void main(String[] args) {
        try {
            //1.创建链接
            Connection connection = ConnectionUtil.getConnection();

            //2.创建通道
            Channel channel = connection.createChannel();

            //3.声明队列
            channel.queueDeclare(TOPIC_QUEUE_2, false, false, false, null);

            //4.队列绑定交换机 , routingkey使用通配符
            channel.queueBind(TOPIC_QUEUE_2, EXCHANGE_TOPIC, "user.*");

            //设置同时处理一个消息
            channel.basicQos(1);

            Consumer consumer = new DefaultConsumer(channel){
                @Override
                public void handleDelivery(String consumerTag, Envelope envelope,
                                           AMQP.BasicProperties properties, byte[] body)throws IOException {
                    //交换机
                    String exchange = envelope.getExchange();
                    //System.out.println("exchange:"+exchange);
                    //路由key
                    String routingKey = envelope.getRoutingKey();
                    //System.out.println("routingKey:"+routingKey);
                    //消息id
                    long deliveryTag = envelope.getDeliveryTag();
                    System.out.println("deliveryTag:"+deliveryTag);
                    //消息内容
                    String msg = new String(body, "utf8");
                    System.out.println("收到消息:" + msg);
                    //System.out.println(1 / 0);

                    channel.basicAck(deliveryTag, false);
                }
            };

            //4.接受消息 :队列 ; 签收方式(true:自动签收)
            channel.basicConsume(TOPIC_QUEUE_2, false,consumer);


        } catch (Exception e) {
            e.printStackTrace();
        }

    }
}
注意:不是说一样就非得使用通配符
10.header模式
10.1.工作模式
header模式与routing不同的地方在于,header模式取消routingkey,使用header中的 key/value(键值对)匹配 队列。
案例: 根据用户的通知设置去通知用户,设置接收Email的用户只接收Email,设置接收sms的用户只接收sms,设置两种 通知类型都接收的则两种通知都有效。
10.2.实现
10.2.1发送者
public class Sen {

    //交换机的名字
    public static final String EXCHANGE_HEADER = "exchange_header";

    public static void main(String[] args) {
        Connection connection = null;
        Channel channel = null;
        try{
            //1.创建链接对象
            connection = ConnectionUtil.getConnection();

            //2.创建通道
            channel = connection.createChannel();

            //3.声明交换机指定类型为TOPIC
            channel.exchangeDeclare(EXCHANGE_HEADER, BuiltinExchangeType.HEADERS);

            //4.发送消息:交换机 ; 队列名(routingkey) ;参数 ;消息了内容
            String message = "我是一个header消息";

            //使用 定向的交换机 ,往 rotingkey为 update的队列中发送消息

            Map<String,Object> headers = new Hashtable<String, Object>();
            headers.put("inform_type_email", "email");//匹配email通知消费者绑定的header
            headers.put("inform_type_sms", "sms");//匹配email通知消费者绑定的header

            AMQP.BasicProperties.Builder properties = new AMQP.BasicProperties.Builder();
            properties.headers(headers);

            channel.basicPublish(EXCHANGE_HEADER, "" ,properties.build() ,message.getBytes() );

            System.out.println("已经发送消息:"+message);
10.2.2接收者
public class Rev {

    //队列的名字
    private static final String HEADER_QUEUE_1 = "header_queue_1";


    public static void main(String[] args) {
        try {
            //1.创建链接
            Connection connection = ConnectionUtil.getConnection();

            //2.创建通道
            Channel channel = connection.createChannel();

            //3.声明队列
            channel.queueDeclare(HEADER_QUEUE_1, false, false, false, null);

            //4.队列绑定交换机
            Map<String, Object> headersEmail = new Hashtable<String, Object>();
            headersEmail.put("inform_type_email", "email");
            channel.queueBind(HEADER_QUEUE_1, Sen.EXCHANGE_HEADER, "",headersEmail);

            //设置同时处理一个消息
            channel.basicQos(1);

            Consumer consumer = new DefaultConsumer(channel){
                @Override
                public void handleDelivery(String consumerTag, Envelope envelope,
                                           AMQP.BasicProperties properties, byte[] body)throws IOException {
                    //交换机
                    String exchange = envelope.getExchange();
                    //System.out.println("exchange:"+exchange);
                    //路由key
                    String routingKey = envelope.getRoutingKey();
                    //System.out.println("routingKey:"+routingKey);
                    //消息id
                    long deliveryTag = envelope.getDeliveryTag();
                    System.out.println("deliveryTag:"+deliveryTag);
                    //消息内容
                    String msg = new String(body, "utf8");
                    System.out.println("收到消息:" + msg);
                    //System.out.println(1 / 0);

                    channel.basicAck(deliveryTag, false);
                }
            };

            //4.接受消息 :队列 ; 签收方式(true:自动签收)
            channel.basicConsume(HEADER_QUEUE_1, false,consumer);


        } catch (Exception e) {
            e.printStackTrace();
        }

    }
}
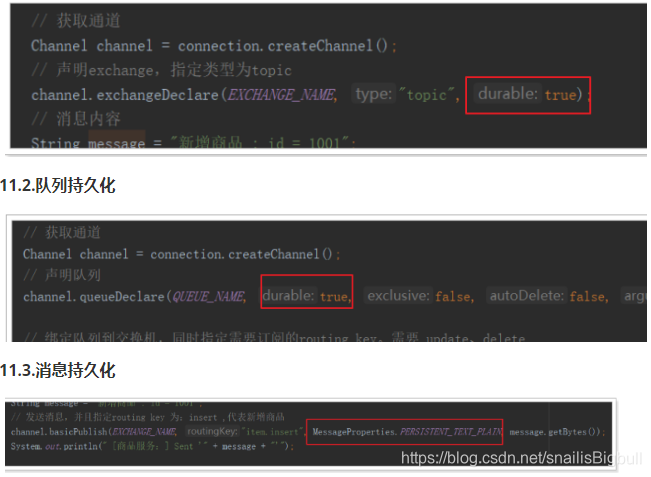
11.持久化
11.1交换机持久化
12.如何避免消息丢失?
12.1 .手动签收
消费者的ACK机制。可以防止消费者丢失消息。
12.2 .持久化
持久化可以防止消费者丢失消息。
13.SpringBoot集成RabbitMQ
13.1.导入依赖
<dependencies>
        <dependency>
            <groupId>org.springframework.boot</groupId>
            <artifactId>spring-boot-starter-web</artifactId>
        </dependency>
        <dependency>
            <groupId>org.springframework.boot</groupId>
            <artifactId>spring-boot-starter-test</artifactId>
        </dependency>
        <!--spirngboot集成rabbitmq-->
        <dependency>
            <groupId>org.springframework.boot</groupId>
            <artifactId>spring-boot-starter-amqp</artifactId>
        </dependency>

    </dependencies>
13.2.创建主配置类
13.3.创建配置文件
...
rabbitmq:
  host: 127.0.0.1
  port: 5672
  username: guest
  password: guest
  virtualHost: /
13.4.创建Rabbitmq的配置类
import org.springframework.amqp.core.*;
import org.springframework.beans.factory.annotation.Qualifier;
import org.springframework.context.annotation.Bean;
import org.springframework.context.annotation.Configuration;

@Configuration
public class MQConfig {
    //针对发邮件的队列
    public static final String QUEUE_INFORM_EMAIL = "queue_inform_email";
    //针对发短信的队列
    public static final String QUEUE_INFORM_SMS = "queue_inform_sms";
    //交换机,类型是topics
    public static final String EXCHANGE_TOPICS_INFORM = "exchange_topics_inform";

    /**
     * 交换机配置
     * ExchangeBuilder提供了fanout、direct、topic、header交换机类型的配置
     */
    @Bean(EXCHANGE_TOPICS_INFORM)
    public Exchange EXCHANGE_TOPICS_INFORM() {
        //durable(true)持久化,消息队列重启后交换机仍然存在
        return ExchangeBuilder.topicExchange(EXCHANGE_TOPICS_INFORM).durable(true).build();
    }

    //声明队列:针对sms的队列
    @Bean(QUEUE_INFORM_SMS)
    public Queue QUEUE_INFORM_SMS() {
        Queue queue = new Queue(QUEUE_INFORM_SMS);
        return queue;
    }

    //声明队列:针对于emial的队列
    @Bean(QUEUE_INFORM_EMAIL)
    public Queue QUEUE_INFORM_EMAIL() {
        Queue queue = new Queue(QUEUE_INFORM_EMAIL);
        return queue;
    }

    /**
     * channel.queueBind(INFORM_QUEUE_SMS,"inform_exchange_topic","inform.#.sms.#");
     * 绑定队列到交换机 .
     * 把:SMS的队列绑定到交换机,并且指定该队列的routingkey为   "inform.#.sms.#"
     */
    @Bean
    public Binding BINDING_QUEUE_INFORM_SMS(
            @Qualifier(QUEUE_INFORM_SMS) Queue queue,
            @Qualifier(EXCHANGE_TOPICS_INFORM) Exchange exchange) {

        return BindingBuilder.bind(queue).to(exchange).with("inform.sms.#").noargs();
    }

    /**
     * 把:EMAIL的队列绑定到交换机,并且指定该队列的routingkey为   "inform.#.email.#"
     */
    @Bean
    public Binding BINDING_QUEUE_INFORM_EMAIL(@Qualifier(QUEUE_INFORM_EMAIL) Queue queue,
                                              @Qualifier(EXCHANGE_TOPICS_INFORM) Exchange exchange) {
        return BindingBuilder.bind(queue).to(exchange).with("inform.email.#").noargs();
    }
}
13.5.创建发送者
import org.springframework.amqp.core.*;
import org.springframework.beans.factory.annotation.Qualifier;
import org.springframework.context.annotation.Bean;
import org.springframework.context.annotation.Configuration;

@Configuration
public class MQConfig {
    //针对发邮件的队列
    public static final String QUEUE_INFORM_EMAIL = "queue_inform_email";
    //针对发短信的队列
    public static final String QUEUE_INFORM_SMS = "queue_inform_sms";
    //交换机,类型是topics
    public static final String EXCHANGE_TOPICS_INFORM = "exchange_topics_inform";

    /**
     * 交换机配置
     * ExchangeBuilder提供了fanout、direct、topic、header交换机类型的配置
     */
    @Bean(EXCHANGE_TOPICS_INFORM)
    public Exchange EXCHANGE_TOPICS_INFORM() {
        //durable(true)持久化,消息队列重启后交换机仍然存在
        return ExchangeBuilder.topicExchange(EXCHANGE_TOPICS_INFORM).durable(true).build();
    }

    //声明队列:针对sms的队列
    @Bean(QUEUE_INFORM_SMS)
    public Queue QUEUE_INFORM_SMS() {
        Queue queue = new Queue(QUEUE_INFORM_SMS);
        return queue;
    }

    //声明队列:针对于emial的队列
    @Bean(QUEUE_INFORM_EMAIL)
    public Queue QUEUE_INFORM_EMAIL() {
        Queue queue = new Queue(QUEUE_INFORM_EMAIL);
        return queue;
    }

    /**
     * channel.queueBind(INFORM_QUEUE_SMS,"inform_exchange_topic","inform.#.sms.#");
     * 绑定队列到交换机 .
     * 把:SMS的队列绑定到交换机,并且指定该队列的routingkey为   "inform.#.sms.#"
     */
    @Bean
    public Binding BINDING_QUEUE_INFORM_SMS(
            @Qualifier(QUEUE_INFORM_SMS) Queue queue,
            @Qualifier(EXCHANGE_TOPICS_INFORM) Exchange exchange) {

        return BindingBuilder.bind(queue).to(exchange).with("inform.sms.#").noargs();
    }

    /**
     * 把:EMAIL的队列绑定到交换机,并且指定该队列的routingkey为   "inform.#.email.#"
     */
    @Bean
    public Binding BINDING_QUEUE_INFORM_EMAIL(@Qualifier(QUEUE_INFORM_EMAIL) Queue queue,
                                              @Qualifier(EXCHANGE_TOPICS_INFORM) Exchange exchange) {
        return BindingBuilder.bind(queue).to(exchange).with("inform.email.#").noargs();
    }
}
13.6.创建消费者
@Component
public class RevHandler {

    //消费sms
    @RabbitListener(queues = MQConfig.QUEUE_INFORM_SMS)
    public void smsHandler(String msg , Message message , Channel channel){
        System.out.println("sms收到消息:"+msg);
    }


    //消费email
    @RabbitListener(queues = MQConfig.QUEUE_INFORM_EMAIL)
    public void emailHandler(String msg , Message message , Channel channel){
        System.out.println("email收到消息:"+msg);
    }
}
三.页面静态化
1.页面静态化分析
1.1.什么是页面静态化
传统的页面的渲染方式是,请求某个页面的时候,后台需要查询数据 , 然后视图解析器会找到对应的页面的模板进行视图的渲染 ,然后写到浏览器 , 而页面静态化就是把前面的这个动作提前做好, 也就是说事先就把这个页面的内容渲染好,生成html,放到项目中 , 以后浏览器访问这个页面的时候就直接返回html即可,不要在走查询数据,渲染数据等流程。
注意:如果页面数据发生改变,那么页面需要重新触发页面静态化,重新渲染数据。所以那些页面数据经常变的,并发本身就不高的页面不适合做页面静态化。
1.2.为什么要做页面静态化
因为有些页面的并发比较高,那么这个页面所需要的数据的查询就会造成服务器(数据库)很大的压力 , 而且有些页面的数据不会经常变, 那么基于这种情况我就可以考虑做页面静态化来提升页面的查询数据,服务器的压力。
1.3.怎么做页面静态化、页面静态化的原理
使用模板技术:(JSP、Thymeleaf 3、Velocity 1.7、Freemarker 2.3.23) 把模板(页面)和数据进行合并成html
1.4.我们的hrm的页面静态化的需求
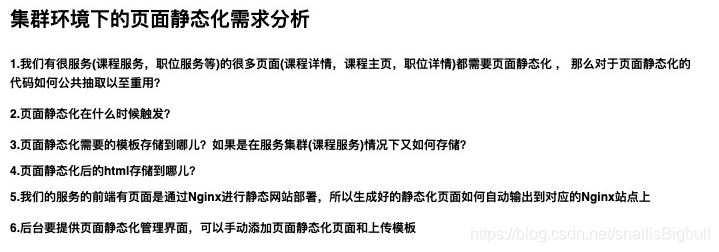
2.页面静态化步骤分析
2.1.页面静态化管理 pager
2.1.1.数据库hrm-page
2.1.2.页面静态化服务hrm-page-parent
2.1.3.完成页面的管理
添加:添加页面 , 上传模板到fastdfs
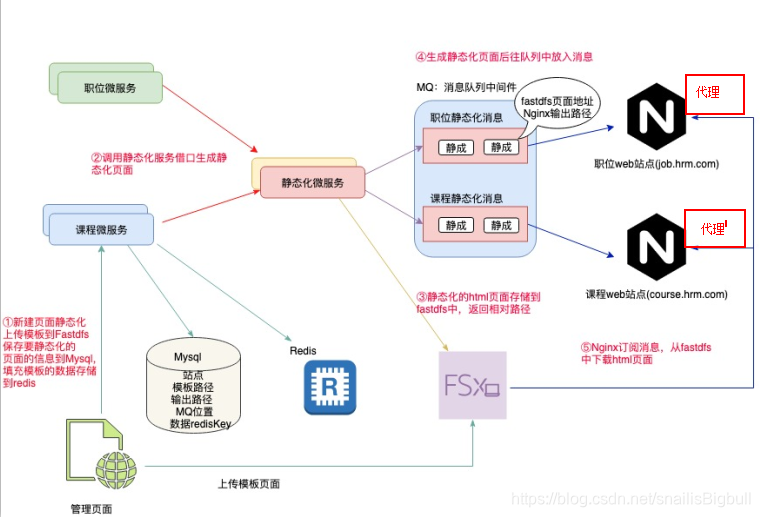
2.2.触发页面静态化
2.2.1.获取到pager,
2.2.2.查询填充数据,存储到Redis , 拿到key
2.2.3.调用页面静态化服务(数据:key ,pager )
2.3.页面静态化服务
2.3.1.下载模板 - fastdfs (解压工具ZipUtils)
2.3.2.根据key获取填充的数据
2.3.3.合并生成html ( 工具VelocityUtils)
2.3.4.把html上传到Fastdfs ,拿到fastdfs中html路径
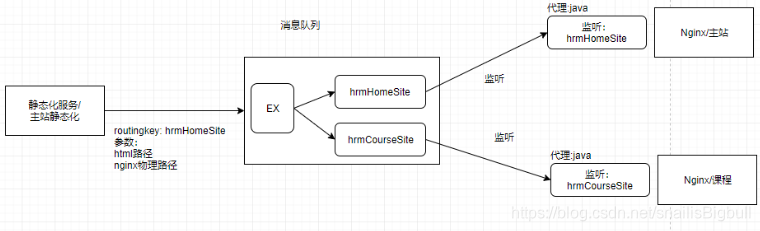
2.3.5.往消息队列放入消息(routingkey , html的路径 ,html输出到nginx的路径 )
2.4.Nginx的代理服务
2.4.1.监听消息队列,获取到消息
2.4.2.从fastdfs获取html,下载
2.4.3.把html保存到nginx中(html输出到nginx的路径 )
发送消息到消息队列 流程图
3.Page管理
3.1.创建Page服务
hrm-page-parent
hrm-page-service-2060
hrm-page-client
模板引擎
 <dependency>
     <groupId>org.apache.velocity</groupId>
     <artifactId>velocity</artifactId>
     <version>1.7</version>
 </dependency>
压缩工具 - ZipUtils

 <dependency>
     <groupId>org.apache.ant</groupId>
     <artifactId>ant</artifactId>
     <version>1.7.1</version>
 </dependency>
3.2.生成Page服务基础代码
3.3.完成前端Page的管理
3.4.完成Page的添加功能 - 上传模板zip
4.主站主页的页面静态化
4.1.触发主页页面静态化 - 课程服务
private void doPageStaticForHome(){
//1.准备页面静态化的 page的name
String pageName = "home";
//2.准备好填充的数据
//模板路径:指的是,从fastdfs把模板的压缩包下载,解压到本地目录之后的那个本地目录路径
//模板路径交个pager服务去确定
//课程类型的层级结构的列表
//这里需要把有层级结构的课程类型的数据存储到redis
List<CourseType> courseTypes = treeData();
Map<String,Object> map = new HashMap<>();
map.put("courseTypes",courseTypes);
redisClient.set(RedisConstants.KEY_TREEDATA_COURSETYPE, JSON.toJSONString(map));
//3.调用pager服务做页面静态化
pageClient.page(pageName, RedisConstants.KEY_TREEDATA_COURSETYPE);
}
4.2.静态化服务
@Override
public void staticPage(String pageName, String dataKey) {
//1.根据PageName查询pager对象
Pager pager = baseMapper.selectByPageName(pageName);
//2.从Pager中拿到模板的路径(fastdfs)
String templateUrlInFastDfs = pager.getTemplateUrl();
//3.根据模板路径下载模板的zip
byte[] vmBytes = fastdfsClient.download(templateUrlInFastDfs);
if(null == vmBytes || vmBytes.length == 0){
throw new GlobalException("下载模板失败");
}
//4.解压模板到本地目录: 系统的临时目录
//4.1.确定模板压缩包的存储路径 C:\Users\0427\AppData\Local\Temp/index.zip
String basePath = System.getProperty("java.io.tmpdir")+"static/";
String vmZipPath = basePath+pageName+".zip";
try {
File zipFile = new File(vmZipPath);
//文件是否存在
if(!zipFile.exists()){
zipFile.getParentFile().mkdirs();
zipFile.createNewFile();
}
//把文件拷贝到本地 C:\Users\0427\AppData\Local\Temp/index.zip
FileCopyUtils.copy(vmBytes, zipFile );
//new FileOutputStream( new File(vmZipPath)).write(vmBytes);
//解压模板zip压缩包
ZipUtils.unZip(vmZipPath, basePath);
} catch (Exception e) {
e.printStackTrace();
}
//5.拿到解压目录的路径(系统的临时目录),作为填充数据 basePath
//6.根据dataKey从redis中获取到填充的数据
AjaxResult dataAjaxResult = redisClient.get(dataKey);
if(!dataAjaxResult.isSuccess() || dataAjaxResult.getResultObj() == null){
throw new GlobalException("填充数据获取失败");
}
//List<CourseType>
//转换填充的数据
Map<String,Object> map = JSON.parseObject(dataAjaxResult.getResultObj().toString(), Map.class);
map.put("staticRoot", basePath);
//7.使用模板引擎合并模板,生成html
//C:\Users\0427\AppData\Local\Temp\static\home.vm
String templatePath = basePath+pageName+".vm";
String htmlOutPath = basePath+pageName+".html";
//合并模板
VelocityUtils.staticByTemplate(map, templatePath,htmlOutPath );
//8.把生成好的html上传到fastdfs ,返回路径
try {
byte[] bytes = FileCopyUtils.copyToByteArray(new File(htmlOutPath));
AjaxResult htmlAjaxResult = fastdfsClient.uploadBytes(bytes, "html");
if(!htmlAjaxResult.isSuccess()){
throw new GlobalException("html上传到fastdfs失败");
}
//9.保存一个 page-config记录到mysql
PageConfig pageConfig = new PageConfig();
//redis的数据的key
pageConfig.setDataKey(dataKey);
//文件服务器的类型 1:fastdfs
pageConfig.setDfsType(1L);
//pager表的id
pageConfig.setPageId(pager.getId());
//html在fastdfs的路径
pageConfig.setPageUrl(htmlAjaxResult.getResultObj().toString());
//html需要拷贝到nginx的那个磁盘路径
pageConfig.setPhysicalPath(pager.getPhysicalPath());
pageConfig.setTemplateUrl(pager.getTemplateUrl());
//todo
pageConfigMapper.insert(pageConfig);
//10.发送一个Rabiitmq到队列中
} catch (Exception e) {
e.printStackTrace();
}
}
4.3.Fastdfs服务修改-增加下载方法


 2225
2225


 被折叠的 条评论
为什么被折叠?
被折叠的 条评论
为什么被折叠?
 到【灌水乐园】发言


