1.1 Thread类
static Thread.currentThread 返回当前正在执行的线程对象的引用。
join 等待线程终止。
yield 暂停当前正在执行的线程对象,并执行其他线程。
Demo1-1中给出的程序中,主函数中创建了两个线程,每个子线程第一条输出语句执行结束后,放弃了执行权,从而让其他线程有机会继续执行。这样就会看到子线程1和子线程2交叉输出的信息。在主线程中使用了join方法,阻塞等待子线程执行结束,当两个子线程将其内部的信息全部输出后,主线程才将其线程线性输出。(Thread.currentThread的输出格式为,[子线程名,线程优先级,线程组名])。最后,在main函数内部需要调用内部类,内部类应当为static。一般情况下,内部类和内部接口都应当是static的。
Demo 1-1 Thread 类的用法
package com.upc.upcgrid.guan.advancedJava.chapter02;
public class YieldTest {
public static class ThreadImpl implements Runnable{
@Override
public void run() {
System.err.println(Thread.currentThread());
Thread.yield();
System.err.println(Thread.currentThread());
}
}
public static void main(String[] args) throws InterruptedException {
Thread t1 = new Thread(new ThreadImpl());
Thread t2 = new Thread(new ThreadImpl());
t1.start();
t2.start();
t1.join();
t2.join();
System.err.println(Thread.currentThread());
}
}
Demo1-1 输出结果
Thread[Thread-0,5,main]
Thread[Thread-1,5,main]
Thread[Thread-0,5,main]
Thread[Thread-1,5,main]
Thread[main,5,main]
1.2 Executor 接口
Executor可以定制创建特殊的子线程。例如,在创建一系列的子线程时,对子线程进行同样的配置,如果,需要修改或增强子线程的开启或配置,只需修改Executor的实现即可。
在Demo1-2中,主线程通过Executor接口创建和执行一个新的线程。在Executor接口的ExecutorInterface实现中,可以对所有的线程进行一些默认的配置,然后启动执行这个线程。如果,此时我们需要修改这个系列线程的优先级,只需要修改ExecutorInterface接口中的相应值即可,无需修改代码中的所有创建线程的地方。(有时可以在Executor的executor的方法实现中使用一定的线程调度策略,这样可以为线程调度提供灵活性,当修改线程调度的实现时,不影响外部使用的代码)。
Demo1-3实现了一个线程优先队列的Executor,在这样的Executor中,每次提交的任务会被放入一个队列中,Executor最多只开启一个线程执行这个队列中的任务,而且队列使用优先级策略,就是优先级高的线程将会先被Executor执行,优先级低的线程将需等待优先级高的线程执行结束后,才能获得执行权。从代码中看出,创建了5个线程,设置了不同的优先级,并提交个Executor去执行。从执行结果可以看出,线程基本是按照线程优先级次序执行的(线程优先级5先执行,因为在他提交的时候队列中并没有其他线程,他的优先级最高,因此它被最先执行了,也就是说这个优先级还与线程的提交次序有关)。Executor更倾向于开启一个线程,在稍后对ExecutorFactory介绍时,可以看出,他们一个是执行线程,一个是创建线程。
Demo 1-2 Executor接口的使用
package com.upc.upcgrid.guan.SpecialUse.chapter01;
import java.lang.Thread.UncaughtExceptionHandler;
import java.util.concurrent.Executor;
public class ExecutorInterface implements Executor{
@Override
public void execute(Runnable command) {
Thread t = new Thread(command);
t.setDaemon(false);
t.setPriority(6);
t.setUncaughtExceptionHandler(new UncaughtExceptionHandler() {
@Override
public void uncaughtException(Thread t, Throwable e) {
System.err.println(e.getMessage());
}
});
t.start();
}
private static class RunnableImpl implements Runnable{
@Override
public void run() {
System.err.println(Thread.currentThread());
}
}
public static void main(String[] args) throws InterruptedException {
ExecutorInterface e = new ExecutorInterface();
e.execute(new RunnableImpl());
e.execute(new RunnableImpl());
}
}
Demo1-3 线程池的初探
package com.upc.upcgrid.guan.SpecialUse.chapter01;
import java.util.concurrent.BlockingQueue;
import java.util.concurrent.Executor;
import java.util.concurrent.PriorityBlockingQueue;
public class ExecutorInterfaceWithSchedule implements Executor{
private BlockingQueue<Runnable> queue = new PriorityBlockingQueue<Runnable>();
private Thread t;
public ExecutorInterfaceWithSchedule() {
Thread inner =new Thread(new Runnable() {
@Override
public void run() {
try {
while(true)
{
t = new Thread(queue.take());
t.start();
t.join();//等待线程结束
}
} catch (InterruptedException e) {
}
}
});
inner.setDaemon(true);
inner.start();
}
@Override
public void execute(Runnable command) {
try {
queue.put(command);
} catch (InterruptedException e) {
}
}
private static class ThreadImpl implements Runnable,Comparable<ThreadImpl>{
public int priority;
public ThreadImpl(int priority) {
this.priority = priority;
}
@Override
public void run() {
System.err.println(Thread.currentThread() + String.valueOf(priority));
}
@Override
public int compareTo(ThreadImpl o) {
return o.priority > priority?1:0;
}
}
public static void main(String[] args) throws InterruptedException {
ThreadImpl t1 = new ThreadImpl(5);
ThreadImpl t2 = new ThreadImpl(6);
ThreadImpl t3 = new ThreadImpl(7);
ThreadImpl t4 = new ThreadImpl(1);
ThreadImpl t5 = new ThreadImpl(4);
ExecutorInterfaceWithSchedule executor = new ExecutorInterfaceWithSchedule();
executor.execute(t1);
executor.execute(t2);
executor.execute(t3);
executor.execute(t4);
executor.execute(t5);
Thread.sleep(10000);
}
}
Demo1-3执行结果:
Thread[Thread-1,5,main]5
Thread[Thread-2,5,main]7
Thread[Thread-3,5,main]6
Thread[Thread-4,5,main]4
Thread[Thread-5,5,main]1
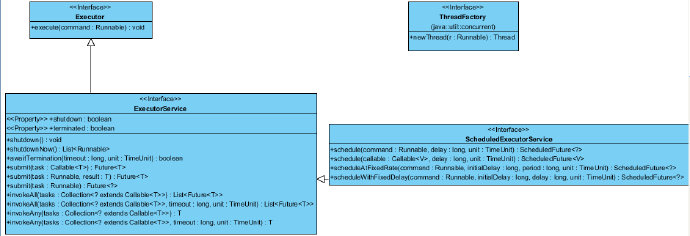
Graphic 1-1 与Executor有关的接口

1.3 ExecutorService接口
ExecutorService接口用于管理Executor接口,用于跟踪一个和多个异步任务的执行。简单的说就是提供一个线程池的功能,可以向线程池中提交多个任务,线程池根据具体的实现,采用一定的调度方法和策略对提交的线程进行排队和执行。
ExecutorService提供了shutDown方法,可以终止线程池继续接受新的任务,使用shutDown方法并不会立即取消正在执行的任务,他会在线程任务执行结束后,自动关闭并释放线程资源。shutDownNow方法则不同,线程池会尝试试图关闭正在执行的线程。
Submit扩展了Executor接口的executor方法,并返回一个Future,用来取消或查询线程任务。invokeAll和invokeAny方法是批量执行任务的常见形式。invokeAll是等待所有任务结束才返回,而invokeAny是其中有一个任务完成就返回。
一般通过Executors类的静态函数来创建相应的ExecutorService实例。
Demo 1-4中,主线程先创建了十个任务,然后将这十个任务的集合提交给线程池执行,线程池的大小是3,线程池根据内部的调度策略去调度执行任务,从最终的输出可以看出,线程池的子线程1执行的任务最多。最终在主线程中进行结果统计,关闭线程池。需要注意的是,线程池的关闭需要手动代码,而且还要给出出错的情况下如何合理的终结线程池。
Demo 1-4 线程池的使用:
package com.upc.upcgrid.guan.SpecialUse.chapter01;
import java.util.ArrayList;
import java.util.List;
import java.util.concurrent.Callable;
import java.util.concurrent.ExecutionException;
import java.util.concurrent.ExecutorService;
import java.util.concurrent.Executors;
import java.util.concurrent.Future;
import java.util.concurrent.TimeUnit;
public class ExecuteServiceInterface {
public static final int THREAD_SIZE = 10;
private static class onceCompute implements Callable<Integer>{
private int start;
private int end;
public onceCompute(int start,int end) {
this.start = start;
this.end = end;
}
@Override
public Integer call() throws Exception {
int sum = 0;
for(int i = start ; i < end ; i++)
{
sum += i;
}
System.err.println(Thread.currentThread());
return sum;
}
}
public static void main(String[] args) throws InterruptedException, ExecutionException {
ExecutorService pool = Executors.newFixedThreadPool(3);//创建3个线程的线程池
List<Callable<Integer>> calls = new ArrayList<Callable<Integer>>();//任务集合
for(int i = 0 ; i < THREAD_SIZE ;i++)//创建任务
{
calls.add(new onceCompute(i*100, (i+1)*100));
}
List<Future<Integer>> futures = pool.invokeAll(calls);//阻塞等待任务完成
int sum = 0;
for(Future<Integer> f : futures)//汇总任务计算结果
{
sum +=f.get();
}
System.out.println(sum);//输出结果
//线程池的关闭策略
pool.shutdown();
try {
pool.awaitTermination(1000, TimeUnit.MILLISECONDS);
} catch (InterruptedException e) {
pool.shutdownNow();
Thread.currentThread().interrupt();
}
}
}
Demo 1-4 的执行结果:
Thread[pool-1-thread-1,5,main]
Thread[pool-1-thread-1,5,main]
Thread[pool-1-thread-1,5,main]
Thread[pool-1-thread-1,5,main]
Thread[pool-1-thread-2,5,main]
Thread[pool-1-thread-3,5,main]
Thread[pool-1-thread-2,5,main]
Thread[pool-1-thread-1,5,main]
Thread[pool-1-thread-2,5,main]
Thread[pool-1-thread-3,5,main]
499500
1.4 ScheduleExecutorService
从Graphic1-1可以看出ScheduleExecutorService是继承于ExecutorService的一个增强的接口。这个接口在ExecutorService接口的基础上增加了四个操作,可以分为三种类型,一种类型是schedule函数,用于在指定延时后创建一个线程执行某项任务,一种是scheduleAtFixedRate在指定延时后,创建一个周期性执行的线程任务,还有一种是scheduleWithFixedDelay,在指定延时后以一定的延时执行线程任务。第二和第三种的区别在于,第二种计算的是周期,这个时间间隔是指定好的。第三种是延时,是指从一次执行结束,到下一次执行开始的这段时间,这种方式将线程执行的时间也考虑在内。
Demo 1-5 给出了这个示例,每个1s中输出当前时间。
Demo1-5 定期任务
package com.upc.upcgrid.guan.SpecialUse.chapter01;
import java.text.DateFormat;
import java.text.SimpleDateFormat;
import java.util.Date;
import java.util.concurrent.Executors;
import java.util.concurrent.ScheduledExecutorService;
import java.util.concurrent.TimeUnit;
public class ScheduleExecutorServiceInterface {
public static void main(String[] args) throws InterruptedException {
ScheduledExecutorService pool = Executors.newSingleThreadScheduledExecutor();
pool.scheduleAtFixedRate(new Runnable() {
DateFormat df = new SimpleDateFormat("yyyy-MM-dd HH:mm:ss");
@Override
public void run() {
System.err.println(df.format(new Date()));
}
}, 1000,1000,TimeUnit.MILLISECONDS);
Thread.sleep(10000);
pool.shutdownNow();
}
}
1.5 ThreadFactory接口
这个接口用于创建一个新的线程,它与Executor接口的区别在于,Executor接口更强调的是执行和管理一个线程,而ThreadFactory强调的是如何创建一个线程。在很多的Executor实现中,需要提供一个ThreadFactory实例,毕竟Executor类中使用new方法创建一个线程是不合理的,因为如果用户对新线程的配置进行更改,这种更改将会被延伸到Executor接口的所有实现子类,这不利于代码的扩展。ThreadFactory仅有一个方法newThread,实现这个方法,用于创建自己的线程逻辑。
Demo1-6中,ThreadFactory用来指定创建多线程的方式,定制多线程的创建方法,而Executor则更强调如何执行,如何管理多线程。所以,在Executor类中应当有一个ThreadFactory引用,这样在Executor类中就无需显示使用new,并且负责与线程相关的配置,当需要对线程的属性进行配置时,不会影响到Executor的内部实现。
ThreadFactory主要使用的是设计模式中的工厂方法模式,可以参考设计模式的相应章节。
Demo1-6 ThreadFactory与Executor的关系
package com.upc.upcgrid.guan.SpecialUse.chapter01;
import java.util.concurrent.Executor;
import java.util.concurrent.ThreadFactory;
public class ThreadFactoryInterface {
private static class ExecutorImp implements Executor{
private static ThreadFactory threadFactory;
@SuppressWarnings("unused")
public ExecutorImp() {
threadFactory = new ThreadFactory() {
@Override
public Thread newThread(Runnable r) {
return new Thread(r);
}
};
}
@SuppressWarnings("static-access")
public ExecutorImp(ThreadFactory tf){
this.threadFactory = tf;
}
@Override
public void execute(Runnable command) {
Thread t = threadFactory.newThread(command);
t.start();
}
}
private static class ThreadFacotoryImp implements ThreadFactory{
@Override
public Thread newThread(Runnable r) {
Thread t = new Thread(r);
t.setDaemon(false);
t.setPriority(7);
return t;
}
}
public static void main(String[] args) {
Executor executor = new ExecutorImp(new ThreadFacotoryImp());
executor.execute(new Runnable() {
@Override
public void run() {
System.out.println(Thread.currentThread());
}
});
}
}


 1万+
1万+

 被折叠的 条评论
为什么被折叠?


