


一、DB-GPT简介
DB-GPT是一个开源的数据库领域大模型框架。目的是构建大模型领域的基础设施,通过开发多模型管理、Text2SQL效果优化、RAG框架以及优化、Multi-Agents框架协作等多种技术能力,让围绕数据库构建大模型应用更简单,更方便。
 https://github.com/eosphoros-ai/DB-GPT.git
1、名词术语
| 名词 | 说明 |
| DB-GPT | DataBase Generative Pre-trained Transformer,一个围绕数据库与大模型的开源框架 |
| Text2SQL/NL2SQL | Text to SQL,利用大语言模型能力,根据自然语言生成SQL语句,或者根据SQL语句给出解释说明 |
| KBQA | Knowledge-Based Q&A 基于知识库的问答系统 |
| GBI | Generative Business Intelligence 生成式商业智能,基于大模型与数据分析,通过对话方式提供商业智能分析与决策 |
| LLMOps | 大语言模型操作框架,提供标准的端到端工作流程,用于训练、调整、部署和监控LLM,以加速生成AI模型的应用程序部署 |
| Embedding | 将文本、音频、视频等资料转换为向量的方法 |
| RAG | Retrieval-Augmented Generation 检索能力增强 |
2、系统架构
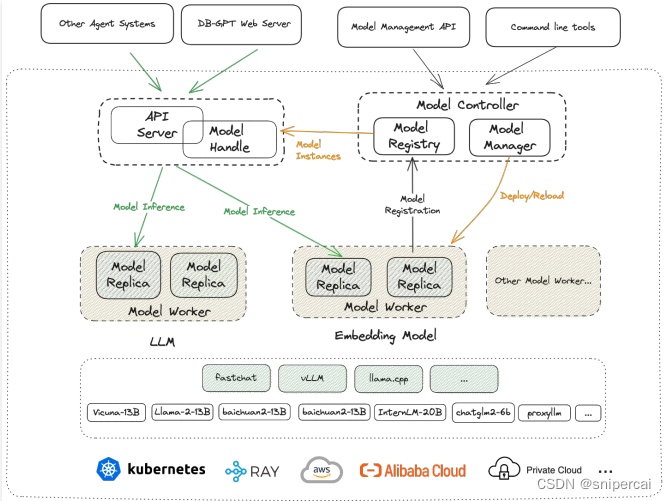
Model Controller:
Model Worker:
Web Server:
API Server:
3、环境要求
二、源码部署
1、环境要求
| 启动模式 | CPU * MEM | GPU | 备注 |
| 代理模型 | 4C*8G | 代理模型不依赖GPU | |
| 本地模型 | 8C*32G | 24G | 本地启动最好有24G以上GPU |
2、源码下载
可以在Github上下载最新版本:https://github.com/eosphoros-ai/DB-GPT/releases
wget https://github.com/eosphoros-ai/DB-GPT/archive/refs/tags/v0.4.3.tar.gz3、Miniconda安装
Miniconda 是一个 Anaconda 的轻量级替代,默认只包含了 python 和 conda,但是可以通过 pip 和 conda 来安装所需要的包。
也可以在miniconda官网下载最新安装包:Miniconda — miniconda documentation
mkdir -p ~/miniconda3
wget https://repo.anaconda.com/miniconda/Miniconda3-latest-Linux-x86_64.sh -O ~/miniconda3/miniconda.sh
bash ~/miniconda3/miniconda.sh -b -u -p ~/miniconda3
rm -rf ~/miniconda3/miniconda.sh
~/miniconda3/bin/conda init bash
source ~/.bashrc
4、配置国内conda源
各系统都可以通过修改用户目录下的 .condarc 文件来使用清华镜像源
conda config --set show_channel_urls yes修改~/.condarc的配置文件
channels:
  - defaults
show_channel_urls: true
default_channels:
  - https://mirrors.tuna.tsinghua.edu.cn/anaconda/pkgs/main
  - https://mirrors.tuna.tsinghua.edu.cn/anaconda/pkgs/r
  - https://mirrors.tuna.tsinghua.edu.cn/anaconda/pkgs/msys2
custom_channels:
  conda-forge: https://mirrors.tuna.tsinghua.edu.cn/anaconda/cloud
  msys2: https://mirrors.tuna.tsinghua.edu.cn/anaconda/cloud
  bioconda: https://mirrors.tuna.tsinghua.edu.cn/anaconda/cloud
  menpo: https://mirrors.tuna.tsinghua.edu.cn/anaconda/cloud
  pytorch: https://mirrors.tuna.tsinghua.edu.cn/anaconda/cloud
  pytorch-lts: https://mirrors.tuna.tsinghua.edu.cn/anaconda/cloud
  simpleitk: https://mirrors.tuna.tsinghua.edu.cn/anaconda/cloud
deepmodeling: https://mirrors.tuna.tsinghua.edu.cn/anaconda/cloud/# 中科大镜像源
conda config --add channels https://mirrors.ustc.edu.cn/anaconda/pkgs/main/
conda config --add channels https://mirrors.ustc.edu.cn/anaconda/pkgs/free/
conda config --add channels https://mirrors.ustc.edu.cn/anaconda/cloud/conda-forge/
conda config --add channels https://mirrors.ustc.edu.cn/anaconda/cloud/msys2/
conda config --add channels https://mirrors.ustc.edu.cn/anaconda/cloud/bioconda/
conda config --add channels https://mirrors.ustc.edu.cn/anaconda/cloud/menpo/
conda config --add channels https://mirrors.ustc.edu.cn/anaconda/cloud/
# 阿里镜像源
conda config --add channels https://mirrors.aliyun.com/pypi/simple/
# 豆瓣的python的源
conda config --add channels http://pypi.douban.com/simple/
# 显示检索路径,每次安装包时会将包源路径显示出来
conda config --set show_channel_urls yes
conda config --set always_yes True
conda config --set auto_activate_base False
#执行以下命令清除索引缓存,保证用的是镜像站提供的索引
conda clean -i
# 显示所有镜像通道路径命令
conda config --show channels5、创建Python环境
因为编译源码需要python >= 3.10,所以使用conda创建python环境
conda create -n dbgpt_env python=3.10
conda activate dbgpt_env
6、配置国内pip源
pip config set global.index-url https://pypi.tuna.tsinghua.edu.cn/simple或修改pip配置文件,如 vi /root/.config/pip/pip.conf
[global]
index-url = https://pypi.tuna.tsinghua.edu.cn/simple
其他国内源:
阿里云:https://mirrors.aliyun.com/pypi/simple/
7、编译源码
tar -zxf v0.4.3.tar.gz
cd DB-GPT-0.4.3
pip install -e ".[default]"
编译时间较长,知道提示编译成功

三、模型部署
直接是用git下载huggingface.co开源网站的模型文件会使用到git-lfs,需要提前安装。
apt-get install git-lfs在DB-GPT目录下创建models目录,用于存放下载的本地模型文件
cd DB-GPT-0.4.3
mkdir models
1、下载embedding model
1.1 text2vec-large-chinese
git clone https://huggingface.co/GanymedeNil/text2vec-large-chinese1.2 m3e-large
git clone https://huggingface.co/moka-ai/m3e-large2、下载llm model
2.1 Vicuna
2.1.1 硬件需求说明
| Model | Quantize | VRAM Size |
| Vicuna-7b-1.5 | 4-bit | 8GB |
| Vicuna-7b-1.5 | 8-bit | 12GB |
| vicuna-13b-v1.5 | 4-bit | 12GB |
| vicuna-13b-v1.5 | 8-bit | 24GB |
2.1.2 下载地址
git clone https://huggingface.co/lmsys/vicuna-13b-v1.52.1.3 环境变量配置
在 .env 文件中配置LLM_MODEL参数
LLM_MODEL=vicuna-13b-v1.52.2 ChatGLM2
2.1.1 硬件需求说明
| Model | Quantize | VRAM Size |
| ChatGLM-6b | 4-bit | 7GB |
| ChatGLM-6b | 8-bit | 9GB |
| ChatGLM-6b | FP16 | 14GB |
2.1.2 下载地址
git clone https://huggingface.co/THUDM/chatglm2-6b2.1.3 环境变量配置
在 .env 文件中配置LLM_MODEL参数
LLM_MODEL=chatglm2-6b2.3 llama.cpp(CPU运行)
2.3.1 直接下载
下载已经转换好的文件TheBloke/vicuna-13B-v1.5-GGUF,将模型重命名为: ggml-model-q4_0.gguf,存放在models目录
git clone https://huggingface.co/TheBloke/vicuna-13B-v1.5-GGUF2.3.2 手工转换
自行转换模型文件,将模型重命名为: ggml-model-q4_0.gguf,存放在models目录
# obtain the original LLaMA model weights and place them in ./models
ls ./models
65B 30B 13B 7B tokenizer_checklist.chk tokenizer.model
  # [Optional] for models using BPE tokenizers
  ls ./models
  65B 30B 13B 7B vocab.json

# install Python dependencies
python3 -m pip install -r requirements.txt

# convert the 7B model to ggml FP16 format
python3 convert.py models/7B/

  # [Optional] for models using BPE tokenizers
  python convert.py models/7B/ --vocabtype bpe

# quantize the model to 4-bits (using q4_0 method)
./quantize ./models/7B/ggml-model-f16.gguf ./models/7B/ggml-model-q4_0.gguf q4_0

# update the gguf filetype to current if older version is unsupported by another application
./quantize ./models/7B/ggml-model-q4_0.gguf ./models/7B/ggml-model-q4_0-v2.gguf COPY


# run the inference
./main -m ./models/7B/ggml-model-q4_0.gguf -n 128
2.3.3 安装依赖
llama.cpp在DB-GPT中是可选安装项, 你可以通过以下命令进行安装
pip install -e ".[llama_cpp]"2.3.4 环境变量修改
修改.env文件使用llama.cpp
LLM_MODEL=llama-cpp
llama_cpp_prompt_template=vicuna_v1.1
四、数据库部署
1、安装Mysql
# 更新apt源
apt update
#下载mysql-server
apt install mysql-server
#查看mysql的状态,开启mysql
service mysql status
service mysql start

#进入mysql终端
mysql
#设置root密码,注意这里的密码应该和DB-GPT中的.env文件保持一致
ALTER USER 'root'@'localhost' IDENTIFIED WITH mysql_native_password BY 'Mysql2023';
#登录mysql,这里会提示输入密码,可以查看自己密码创建是否正确
mysql -u root -p
2、数据库配置
修改.env文件中数据库的配置
#*******************************************************************#
#**                  DB-GPT METADATA DATABASE SETTINGS            **#
#*******************************************************************#
### SQLite database (Current default database)
#LOCAL_DB_TYPE=sqlite

### MYSQL database
LOCAL_DB_TYPE=mysql
LOCAL_DB_USER=root
LOCAL_DB_PASSWORD={your_password}
LOCAL_DB_HOST=127.0.0.1
LOCAL_DB_PORT=3306
LOCAL_DB_NAME=dbgpt
3、测试数据
bash ./scripts/examples/load_examples.sh五、运行服务
1、整体启动
通过命令一键启动整个DB-GPT服务
python dbgpt/app/dbgpt_server.py2、分服务启动
2.1 启动Model Controller
Model Server默认端口为8000
dbgpt start controller启动成功如下:

2.2 启动Model Worker
2.2.1 启动chatglm2-6b模型Worker
dbgpt start worker --model_name chatglm2-6b \
--model_path /DB-GPT-0.4.3/models/chatglm2-6b \
--port 8001 \
--controller_addr http://127.0.0.1:8000
如果报错 'ChatGLMTokenizer' object has no attribute 'tokenizer',则需要降级transformers,存在问题的版本为4.36.0,改为4.33.3
pip uninstall transformers
pip install transformers==4.33.3
2.2.2 启动vicuna-13b-v1.5模型Worker
dbgpt start worker --model_name vicuna-13b-v1.5 \
--model_path /DB-GPT-0.4.3/models/vicuna-13b-v1.5 \
--port 8002 \
--controller_addr http://127.0.0.1:8000
2.3 启动Embedding模型服务
dbgpt start worker --model_name text2vec \
--model_path /DB-GPT-0.4.3/models/text2vec-large-chinese \
--worker_type text2vec \
--port 8003 \
--controller_addr http://127.0.0.1:8000
2.4 查看并检查已部署模型
dbgpt model list显示当前运行的模型信息如下

2.5 启动Web Server服务
--light 表示不启动嵌入式模型服务,嵌入式模型服务默认为
dbgpt start webserver --light2.6 浏览页面
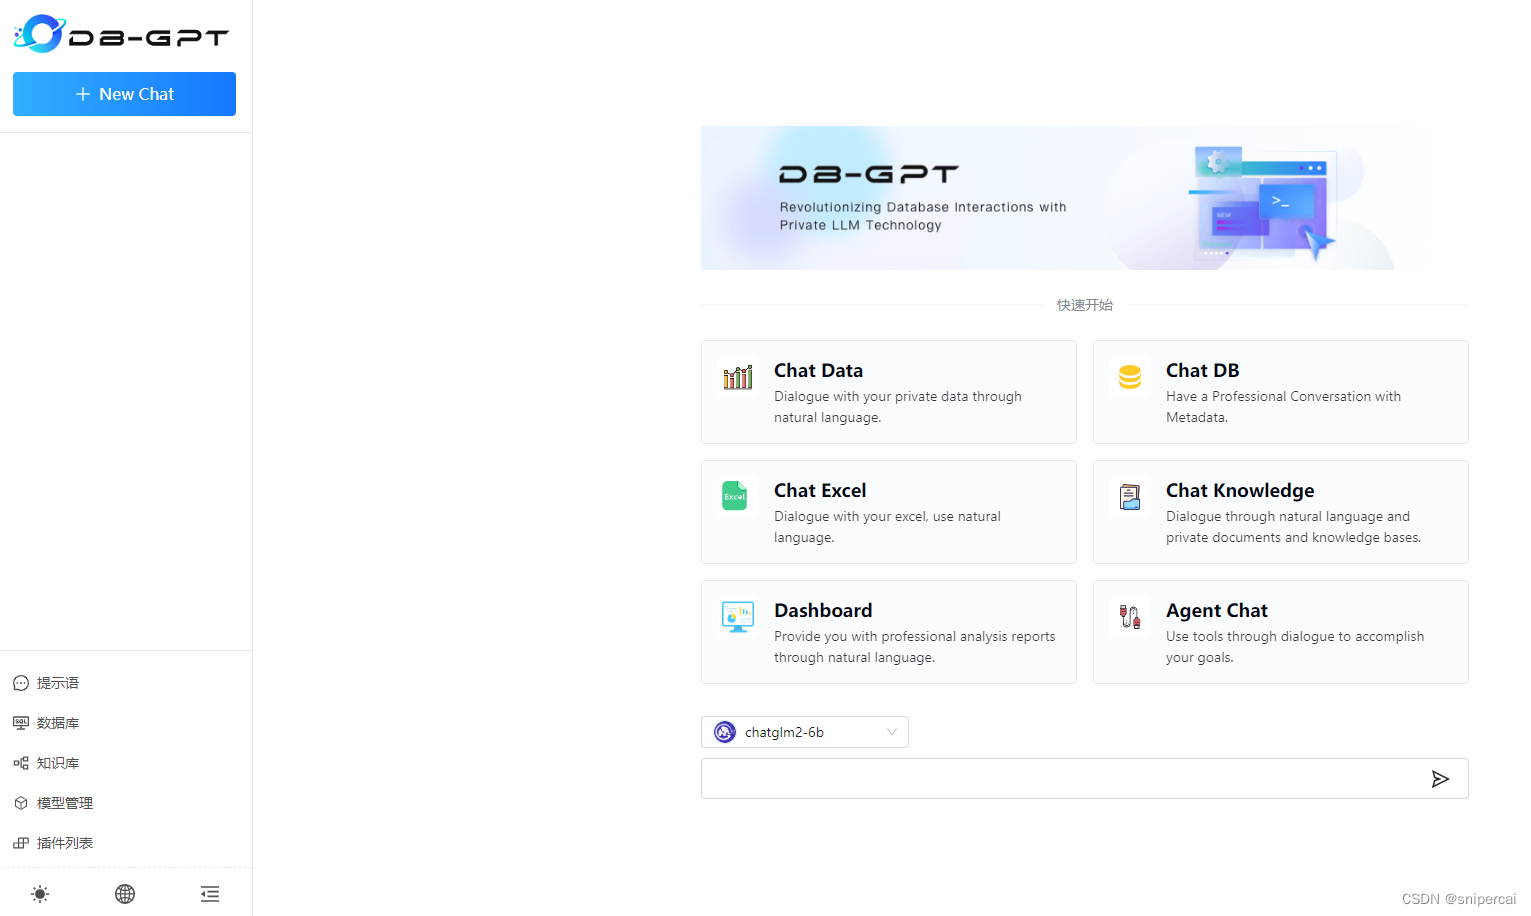
使用浏览器访问页面http://localhost:5000/
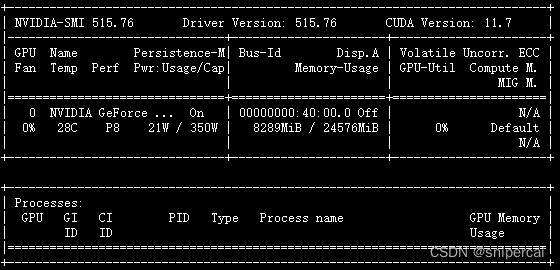
2.7 查看显存使用
nvidia-smi显示显卡使用信息如下:


 被折叠的 条评论
为什么被折叠?
被折叠的 条评论
为什么被折叠?
 到【灌水乐园】发言


