


1.基本环境:eclipse+jdk1.8+Tomcat9.0+springmvc各种jar
2.把jar导入到lib下,在build path中添加这些jar
3.创建一个server,作为运行时用。
4.目录如下:
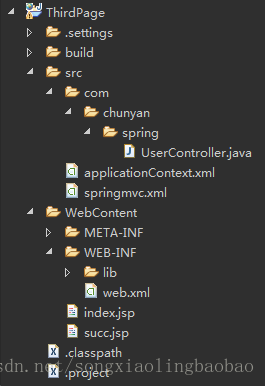
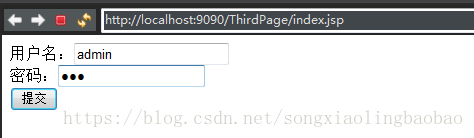
index.jsp
<%@ page language="java" contentType="text/html; charset=utf-8"
    pageEncoding="utf-8"%>
<!DOCTYPE html>
<html>
<head>
<meta http-equiv="Content-Type" content="text/html; charset=utf-8">
<title>Insert title here</title>
</head>
<body>
	<form action="login.do" method="post">
		<label>用户名:</label><input type="text" name="username"/><br>
		<label>密码:</label><input type="password" name="password"/><br>
		<input type="submit" value="提交"/>
	</form>
</body>
</html>
succ.jsp
<%@ page language="java" contentType="text/html; charset=utf-8"
pageEncoding="utf-8"%>
<!DOCTYPE html>
<html>
<head>
<meta http-equiv="Content-Type" content="text/html; charset=utf-8">
<title>成功</title>
</head>
<body>
<div>
<%
String name = (String)request.getAttribute("username");
String pwd = (String)request.getAttribute("password");
%>
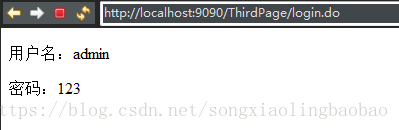
<p>用户名:<%=name %></p>
<p>密码:<%=pwd %></p>
</div>
</body>
</html>applicationContext.xml
<?xml version="1.0" encoding="UTF-8"?>
<beans xmlns="http://www.springframework.org/schema/beans"
    xmlns:xsi="http://www.w3.org/2001/XMLSchema-instance" xmlns:tx="http://www.springframework.org/schema/tx"
    xmlns:context="http://www.springframework.org/schema/context"
    xmlns:mvc="http://www.springframework.org/schema/mvc" xmlns:aop="http://www.springframework.org/schema/aop"
    xsi:schemaLocation="http://www.springframework.org/schema/aop http://www.springframework.org/schema/aop/spring-aop-4.0.xsd
        http://www.springframework.org/schema/mvc http://www.springframework.org/schema/mvc/spring-mvc-3.0.xsd
        http://www.springframework.org/schema/beans http://www.springframework.org/schema/beans/spring-beans-3.0.xsd
        http://www.springframework.org/schema/tx http://www.springframework.org/schema/tx/spring-tx-3.0.xsd
        http://www.springframework.org/schema/context http://www.springframework.org/schema/context/spring-context-3.0.xsd">
</beans>
springmvc.xml
<?xml version="1.0" encoding="UTF-8"?>
<beans xmlns="http://www.springframework.org/schema/beans"
    xmlns:xsi="http://www.w3.org/2001/XMLSchema-instance" xmlns:context="http://www.springframework.org/schema/context"
    xmlns:mvc="http://www.springframework.org/schema/mvc"
    xsi:schemaLocation="http://www.springframework.org/schema/beans http://www.springframework.org/schema/beans/spring-beans.xsd
        http://www.springframework.org/schema/context http://www.springframework.org/schema/context/spring-context-4.0.xsd
        http://www.springframework.org/schema/mvc http://www.springframework.org/schema/mvc/spring-mvc-4.0.xsd">
  <!-- 启用spring mvc注解 -->
    <context:component-scan base-package="com.chunyan.spring"></context:component-scan>
    <bean class="org.springframework.web.servlet.view.InternalResourceViewResolver">
        <property name="prefix" value="/"></property>
        <property name="suffix" value=".jsp"></property>
    </bean>
<!--  在名为'springmvc'的DispatcherServlet中找不到具有URI [/ThirdPage/login.do]的HTTP请求的映射 -->

    <!-- 在实际开发中通常都需配置 mvc:annotation-driven 标签 -->
     <mvc:annotation-driven></mvc:annotation-driven>
</beans>
web.xml
<?xml version="1.0" encoding="UTF-8"?>
<web-app xmlns:xsi="http://www.w3.org/2001/XMLSchema-instance" xmlns="http://xmlns.jcp.org/xml/ns/javaee" xsi:schemaLocation="http://xmlns.jcp.org/xml/ns/javaee http://xmlns.jcp.org/xml/ns/javaee/web-app_3_1.xsd" id="WebApp_ID" version="3.1">
  <display-name>ThirdPage</display-name>
  <welcome-file-list>
    <welcome-file>index.jsp</welcome-file>
  </welcome-file-list>

  <listener>
	<listener-class>org.springframework.web.context.ContextLoaderListener</listener-class>
  </listener>

  <context-param>
        <param-name>contextConfigLocation</param-name>
        <param-value>classpath*:applicationContext.xml</param-value>
  </context-param>

  <servlet>
      <servlet-name>springmvc</servlet-name>
      <servlet-class>org.springframework.web.servlet.DispatcherServlet</servlet-class>
      <init-param>
          <param-name>contextConfigLocation</param-name>
          <param-value>/WEB-INF/classes/springmvc.xml</param-value>
      </init-param>
      <load-on-startup>1</load-on-startup>
  </servlet>

  <servlet-mapping>
       <servlet-name>springmvc</servlet-name>
        <url-pattern>*.do</url-pattern>
  </servlet-mapping>
</web-app>
Usercontroller.java
package com.chunyan.spring;

import javax.servlet.http.HttpServletRequest;

import org.springframework.stereotype.Controller;
import org.springframework.web.bind.annotation.RequestMapping;
@Controller
public class UserController{
	@RequestMapping("/login")
	public String login(String username, String password, HttpServletRequest request) {
		System.out.println("用户名:"+username+"\t密码:"+password);
		request.setAttribute("username", username);
		request.setAttribute("password", password);

		return "succ";
	}
}
运行结果:


 3万+
3万+


 被折叠的 条评论
为什么被折叠?
被折叠的 条评论
为什么被折叠?
 到【灌水乐园】发言


