前段时间玩了Robotium,做了一些基本的尝试之后,发现了这个玩意儿有个蛮大的问题。
比如点击某个app的button之后,弹出了系统设置的items,这时候Robotium就搞不定了
网上也有人在抱怨这个问题,例如
http://stackoverflow.com/questions/4237449/access-to-android-device-menu-in-robotium-framework
为了能解决这个问题,我找到了以下的办法,利用Andoird的uiautomator库,我们可以先把这些设置设好,然后再安装程序,就可以避免在自动化运行的时候弹出系统窗口的尴尬。
我主要参考的资料是
http://developer.android.com/tools/testing/testing_ui.html 一个完整的例子如下:
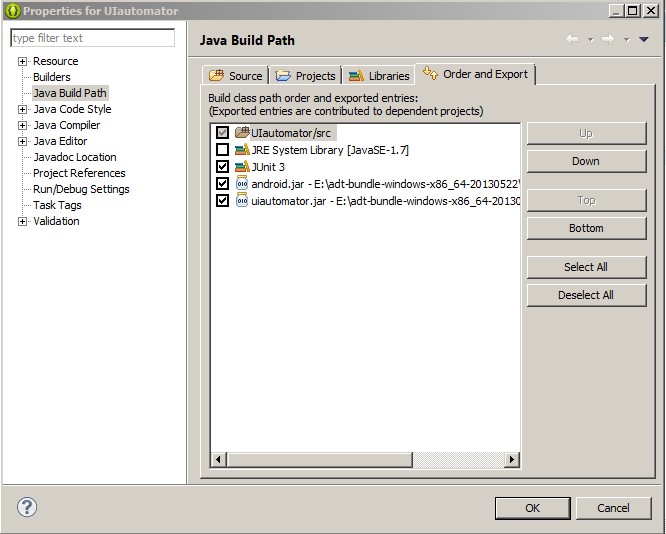
1. 首先设置好编译环境
http://blog.csdn.net/robinzhou/article/details/8447058
给两张我的环境的截图
其中在系统环境变量里面还要设置JAVA_HOME和ANDROID_HOME
我的ANDROID_HOME是E:\adt-bundle-windows-x86_64-20130522\sdk
我的JAVA_HOME是C:\Program Files\Java\jdk1.7.0_21
我的Path里面包括了以下的内容
C:\Program Files\Java\jdk1.7.0_21\bin;
E:\adt-bundle-windows-x86_64-20130522\sdk\platform-tools;
E:\adt-bundle-windows-x86_64-20130522\sdk\tools;
E:\apache-ant-1.9.1\bin
2. 建立package, 然后class,附上代码
package com.uia.example.my;

// Import the uiautomator libraries
import android.view.View;

import com.android.uiautomator.core.UiObject;
import com.android.uiautomator.core.UiObjectNotFoundException;
import com.android.uiautomator.core.UiScrollable;
import com.android.uiautomator.core.UiSelector;
import com.android.uiautomator.testrunner.UiAutomatorTestCase;

public class LaunchSettings extends UiAutomatorTestCase {

   public void testDemo() throws UiObjectNotFoundException {

      // Simulate a short press on the HOME button.
      getUiDevice().pressHome();

      clickStringByDec("Apps");
      clickStringByName("Apps");

      // Next, in the apps tabs, we can simulate a user swiping until
      // they come to the Settings app icon.  Since the container view
      // is scrollable, we can use a UiScrollable object.
      UiScrollable appViews = new UiScrollable(new UiSelector()
         .scrollable(true));

      // Set the swiping mode to horizontal (the default is vertical)
      appViews.setAsHorizontalList();

      // Create a UiSelector to find the Settings app and simulate
      // a user click to launch the app.
      UiObject settingsApp = appViews.getChildByText(new UiSelector()
         .className(android.widget.TextView.class.getName()),
         "Settings");
      settingsApp.clickAndWaitForNewWindow();


      UiObject SecurityButton = appViews.getChildByText(new UiSelector()
      .className(android.widget.TextView.class.getName()),
      "Security");

      // Simulate a click to bring up the All Apps screen.
      SecurityButton.clickAndWaitForNewWindow();

      clickStringByName("Device administrators");
      clickStringByName("item name");
      clickStringByName("Cancel");

      // Validate that the package name is the expected one
      UiObject settingsValidation = new UiObject(new UiSelector()
         .packageName("com.android.settings"));
      assertTrue("Unable to detect Settings",
         settingsValidation.exists());
  }

   private void clickStringByName(String s){
	   UiObject NewButton = new UiObject(new UiSelector().text(s));
	   try {
		NewButton.clickAndWaitForNewWindow();
	   } catch (UiObjectNotFoundException e) {
		e.printStackTrace();
	   }
	}

    private void clickStringByDec(String s){
        UiObject NewButton = new UiObject(new UiSelector().description(s));
        try {
			NewButton.clickAndWaitForNewWindow();
		} catch (UiObjectNotFoundException e) {
			// TODO Auto-generated catch block
			e.printStackTrace();
		}
    }

}
该代码的意思是进入系统设置-〉安全-〉设备管理器-〉找一个设备管理器的item,然后选中-〉最后取消(当然你可以点击激活)
3. 运行该代码
这里的思路是要先编译成jar文件,然后传到安桌设备里面去,再运行
3.1 生成 build.xml
<android-sdk>/tools/android create uitest-project -n <name> -t 1 -p <path>
例如
android create uitest-project -n testc -t 1 -p e:\automation\UIautomator这样我之后的jar包的名字就是testc.jar, 我的java项目在e:\automation\UIautomator.
3.2 到项目目录下编译jar包
cd E:\automation\UIautomator
运行ant build
3.3 把文件传到安桌系统里面去
adb push bin\testc.jar /data/local/tmp/
3.4 运行该文件
adb shell uiautomator runtest testc.jar -c com.uia.example.my.LaunchSettings
搞定,可以操作系统设置了
关于这个例子,还是有点不是很清楚,还需要继续学习。


 2533
2533

 被折叠的 条评论
为什么被折叠?


