


初识spring
Spring简介
一、Spring 特性
①非侵入式:Spring 对应用程序本身的结构影响非常小。对领域模型可以做到零污染;对功能性组件也只需要使用几个简单的注解进行标记,完全不会破坏原有结构,反而能将组件结构进一步简化。
②控制反转:IOC——Inversion of Control,翻转资源获取方向。把自己创建资源、向环境索取资源变成环境将资源准备好,我们享受资源注入。
③面向切面编程:AOP——Aspect Oriented Programming,在不修改源代码的基础上增强代码功能。
④容器:Spring IOC 是一个容器,因为它包含并且管理组件对象的生命周期。组件享受到了容器化的管理,替程序员屏蔽了组件创建过程中的大量细节,极大的降低了使用门槛,大幅度提高了开发效率。
⑤组件化:Spring 实现了使用简单的组件配置组合成一个复杂的应用。在 Spring 中可以使用 XML和 Java 注解组合这些对象。这使得我们可以基于一个个功能明确、边界清晰的组件有条不紊的搭建超大型复杂应用系统。
⑥声明式:很多以前需要编写代码才能实现的功能,现在只需要声明需求即可由框架代为实现。
⑦一站式:在 IOC 和 AOP 的基础上可以整合各种企业应用的开源框架和优秀的第三方类库。而且Spring 旗下的项目已经覆盖了广泛领域,很多方面的功能性需求可以在 Spring Framework 的基础上全部使用 Spring 来实现。
二、IOC容器(反转控制)
1、IOC容器
1.1、IOC思想
①获取资源的传统方式
自己做饭:买菜、洗菜、择菜、改刀、炒菜,全过程参与,费时费力,必须清楚了解资源创建整个过程中的全部细节且熟练掌握。
在应用程序中的组件需要获取资源时,传统的方式是组件主动的从容器中获取所需要的资源,在这样的模式下开发人员往往需要知道在具体容器中特定资源的获取方式,增加了学习成本,同时降低了开发效
率。
②反转控制方式获取资源
点外卖:下单、等、吃,省时省力,不必关心资源创建过程的所有细节。
反转控制的思想完全颠覆了应用程序组件获取资源的传统方式:反转了资源的获取方向——改由容器主动的将资源推送给需要的组件,开发人员不需要知道容器是如何创建资源对象的,只需要提供接收资源的方式即可,极大的降低了学习成本,提高了开发的效率。这种行为也称为查找的被动形式。
③DI
DI:Dependency Injection,翻译过来是依赖注入。
DI 是 IOC 的另一种表述方式:即组件以一些预先定义好的方式(例如:setter 方法)接受来自于容器
的资源注入。相对于IOC而言,这种表述更直接。
所以结论是:IOC 就是一种反转控制的思想, 而 DI 是对 IOC 的一种具体实现。
1.2、IOC容器在Spring中的实现
Spring 的 IOC 容器就是 IOC 思想的一个落地的产品实现。IOC 容器中管理的组件也叫做 bean。在创建bean 之前,首先需要创建 IOC 容器。Spring 提供了 IOC 容器的两种实现方式:
①BeanFactory
这是 IOC 容器的基本实现,是 Spring 内部使用的接口。面向 Spring 本身,不提供给开发人员使用。
②ApplicationContext
BeanFactory 的子接口,提供了更多高级特性。面向 Spring 的使用者,几乎所有场合都使用
ApplicationContext 而不是底层的 BeanFactory。
③ApplicationContext的主要实现类
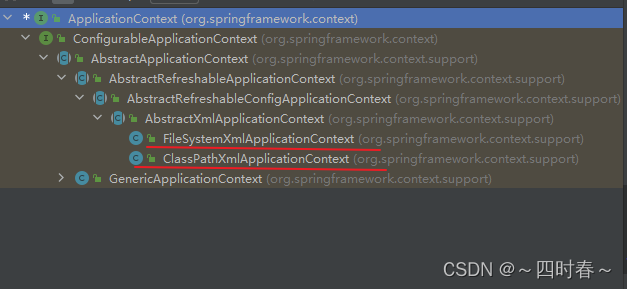
| 类型名 | 简介 |
|---|---|
| ClassPathXmlApplicationContext | 通过读取类路径下的 XML 格式的配置文件创建 IOC 容器对象 |
| FileSystemXmlApplicationContext | 通过文件系统路径读取 XML 格式的配置文件创建 IOC 容器对象 |
| ConfigurableApplicationContext | ApplicationContext 的子接口,包含一些扩展方法refresh() 和 close() ,让ApplicationContext 具有启动、关闭和刷新上下文的能力。 |
| WebApplicationContext | 专门为 Web 应用准备,基于 Web 环境创建 IOC 容器对象,并将对象引入存入 ServletContext 域中。 |
2、基于XML管理bean
2.1入门案例
①引入依赖
  <dependencies>
    <dependency>
      <groupId>org.springframework</groupId>
      <artifactId>spring-context</artifactId>
      <version>5.3.1</version>
    </dependency>
    <dependency>
      <groupId>junit</groupId>
      <artifactId>junit</artifactId>
      <version>4.13.1</version>
      <scope>test</scope>
    </dependency>
  </dependencies>
②创建类
public class HelloWorld {
    public void sayHello(){
        System.out.println("hello,spring");
    }
}
③创建spring配置文件并引入bean
<?xml version="1.0" encoding="UTF-8"?>
<beans xmlns="http://www.springframework.org/schema/beans"
       xmlns:xsi="http://www.w3.org/2001/XMLSchema-instance"
       xsi:schemaLocation="http://www.springframework.org/schema/beans http://www.springframework.org/schema/beans/spring-beans.xsd">
      <bean id="helloworld" class="org.example.HelloWorld"></bean>
</beans>
④测试
    @Test
    public void test(){
        ApplicationContext ios = new ClassPathXmlApplicationContext("springapplication.xml");
        HelloWorld helloworld = (HelloWorld)ios.getBean("helloworld");
        helloworld.sayHello();
    }
主要机构如下:
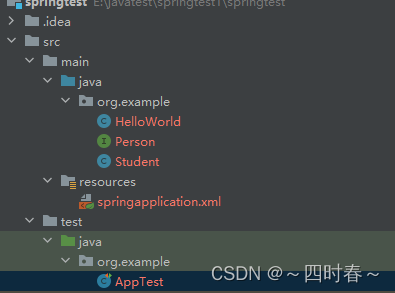
2.2获取bean
1、根据id获取bean
id 属性指定了 bean 的唯一标识,所以根据 bean 标签的 id 属性可以精确获取到一个组件对象。
①spring配置文件配置如下
<bean id="helloworld" class="org.example.HelloWorld"></bean>
②测试类
 @Test
    public void test(){
        ApplicationContext ios = new ClassPathXmlApplicationContext("springapplication.xml");
        HelloWorld helloworld = (HelloWorld)ios.getBean("helloworld");
        helloworld.sayHello();
    }**加粗样式**
2.根据类型获取bean
@Test
public void testHelloWorld(){
ApplicationContext ac = new
ClassPathXmlApplicationContext("applicationContext.xml");
HelloWorld bean = ac.getBean(HelloWorld.class);
bean.sayHello();
}
注意:
当根据类型获取bean时,要求IOC容器中指定类型的bean有且只能有一个
当IOC容器中一共配置了两个:
    <bean id="helloworld" class="org.example.HelloWorld"></bean>
    <bean id="helloworldOne" class="org.example.HelloWorld"></bean>
根据类型获取时会抛出异常:
org.springframework.beans.factory.NoUniqueBeanDefinitionException: No qualifying bean
of type 'org.example.HelloWorld' available: expected single matching bean but
found 2: helloworld,helloworldOne
3、根据id和类型获取bean
@Test
public void testHelloWorld(){
ApplicationContext ac = new
ClassPathXmlApplicationContext("applicationContext.xml");
HelloWorld bean = ac.getBean("helloworld", HelloWorld.class);
bean.sayHello();
}
2.3依赖注入(DI)
前提创建学生类:
public class Student  {
    private Integer id;
    private String name;
    private Integer age;
    private String sex;
    private Double score;
    private String[] hobby;
    }
注意:
创建的set和get以及构造器需要自己补全,在这块不做显示。
2.3.1set方法注入
spring配置文件中配置如下:
<bean id="studentOne" class="org.example.Student">
<!-- property标签:通过组件类的setXxx()方法给组件对象设置属性 -->
<!-- name属性:指定属性名(这个属性名是getXxx()、setXxx()方法定义的,和成员变量无关)
-->
<!-- value属性:指定属性值 -->
<property name="id" value="1001"></property>
<property name="name" value="张三"></property>
<property name="age" value="23"></property>
<property name="sex" value="男"></property>
</bean>
测试:
@Test
public void testDIBySet(){
ApplicationContext ac = new ClassPathXmlApplicationContext("spring-di.xml");
Student studentOne = ac.getBean("studentOne", Student.class);
System.out.println(studentOne);
}
2.3.1构造器注入
①在Student类中添加有参构造
public Student(Integer id, String name, Integer age, String sex) {
this.id = id;
this.name = name;
this.age = age;
this.sex = sex;
}
②配置文件如下:
<bean id="studentTwo" class="org.example.Student">
<constructor-arg value="1002"></constructor-arg>
<constructor-arg value="李四"></constructor-arg>
<constructor-arg value="33"></constructor-arg>
<constructor-arg value="女"></constructor-arg>
</bean>
注意:
constructor-arg标签还有两个属性可以进一步描述构造器参数:
index属性:指定参数所在位置的索引(从0开始)
name属性:指定参数名(当构造器参数不明确时,可以使用其指定参数)
测试:
@Test
public void testDIBySet(){
ApplicationContext ac = new ClassPathXmlApplicationContext("spring-di.xml");
Student studentOne = ac.getBean("studentTwo", Student.class);
System.out.println(studentOne);
}
2.4 为类类型属性赋值
①创建班级类Clazz
public class Clazz {
    private Integer cid;
    private String cname;
②修改Student类
在Student类中添加以下代码:
private Clazz clazz;
public Clazz getClazz() {
return clazz;
}
public void setClazz(Clazz clazz) {
this.clazz = clazz;
}
2.4.1 引用外部已声明bean
配置Clazz类型的bean:
<bean id="clazzOne" class="org.example.Clazz">
<property name="cid" value="1111"></property>
<property name="cname" value="财源滚滚"></property>
</bean>
为Student中的clazz属性赋值:
<bean id="studentFour" class="org.example.Student">
<property name="id" value="1004"></property>
<property name="name" value="赵六"></property>
<property name="age" value="26"></property>
<property name="sex" value="女"></property>
<!-- ref属性:引用IOC容器中某个bean的id,将所对应的bean为属性赋值 -->
<property name="clazz" ref="clazzOne"></property>
</bean>
引用外部bean时如果错把ref属性写成了value属性,会抛出异常: Caused by: java.lang.IllegalStateException:Cannot convert value of type ‘java.lang.String’ to required type
‘com.atguigu.spring.bean.Clazz’ for property ‘clazz’: no matching editors or conversion
strategy found
2.4.2 内部bean
<bean id="studentFour" class="org.example.Student">
<property name="id" value="1004"></property>
<property name="name" value="赵六"></property>
<property name="age" value="26"></property>
<property name="sex" value="女"></property>
<property name="clazz">
<!-- 在一个bean中再声明一个bean就是内部bean -->
<!-- 内部bean只能用于给属性赋值,不能在外部通过IOC容器获取,因此可以省略id属性 -->
<bean id="clazzInner" class="org.example.Clazz">
<property name="cid" value="2222"></property>
<property name="cname" value="远大前程班"></property>
</bean>
</property>
</bean>
2.4.1 级联属性赋值
创建classbean
<bean id="classTwo" class="org.example.Clazz"></bean>
为Student中的clazz属性赋值:
<bean id="studentFour" class="org.example.Student">
<property name="id" value="1004"></property>
<property name="name" value="赵六"></property>
<property name="age" value="26"></property>
<property name="sex" value="女"></property>
<!-- 一定先引用某个bean为属性赋值,才可以使用级联方式更新属性 -->
<property name="clazz" ref="classTwo"></property>
<property name="clazz.cid" value="3333"></property>
<property name="clazz.cname" value="嘴强王者"></property>
</bean>
2.5特殊类型类型属性赋值
2.5.1 为数组类型属性赋值
①修改Student类
在Student类中添加以下代码:
private String[] hobbies;
public String[] getHobbies() {
return hobbies;
}
public void setHobbies(String[] hobbies) {
this.hobbies = hobbies;
}
②配置bean
<bean id="studentFour" class="com.atguigu.spring.bean.Student">
	<property name="id" value="1004"></property>
	<property name="name" value="赵六"></property>
	<property name="age" value="26"></property>
	<property name="sex" value="女"></property>
	<!-- ref属性:引用IOC容器中某个bean的id,将所对应的bean为属性赋值 -->
	<property name="clazz" ref="clazzOne"></property>
	<property name="hobbies">
		<array>
			<value>抽烟</value>
			<value>喝酒</value>
			<value>烫头</value>
		</array>
	</property>
</bean>
2.5.2 为集合类型属性赋值
1、为List集合类型属性赋值
在Clazz类中添加以下代码:
private List<Student> students;
public List<Student> getStudents() {
return students;
}
public void setStudents(List<Student> students) {
this.students = students;
}
配置bean:
<bean id="clazzTwo" class="org.example.Clazz">
<property name="cid" value="4444"></property>
<property name="cname" value="Javaee0222"></property>
<property name="students">
	<list>
		<ref bean="studentOne"></ref>
		<ref bean="studentTwo"></ref>
		<ref bean="studentThree"></ref>
	</list>
</property>
</bean>
2、为Map集合类型属性赋值
②为Map集合类型属性赋值
创建教师类Teacher:
public class Teacher {

    private Integer tid;

    private String tname;
}
在Student类中添加以下代码:
private Map<String, Teacher> teacherMap;
配置bean:
<bean id="teacherOne" class="org.example.Teacher">
	<property name="teacherId" value="10010"></property>
	<property name="teacherName" value="大宝"></property>
</bean>
<bean id="teacherTwo" class="org.example.Teacher">
	<property name="teacherId" value="10086"></property>
	<property name="teacherName" value="二宝"></property>
</bean>
<bean id="studentFour" class="org.example.Student">
	<property name="id" value="1004"></property>
	<property name="name" value="赵六"></property>
	<property name="age" value="26"></property>
	<property name="sex" value="女"></property>
	<!-- ref属性:引用IOC容器中某个bean的id,将所对应的bean为属性赋值 -->
	<property name="clazz" ref="clazzOne"></property>
	<property name="hobbies">
		<array>
			<value>抽烟</value>
			<value>喝酒</value>
			<value>烫头</value>
		</array>
	</property>
	<property name="teacherMap">
		<map>
			<entry>
				<key>
				<value>10010</value>
				</key>
				<ref bean="teacherOne"></ref>
			</entry>
			<entry>
				<key>
				<value>10086</value>
				</key>
				<ref bean="teacherTwo"></ref>
			</entry>
		</map>
	</property>
</bean>
3、引用集合类型的bean
    <bean id="studentFive" class="org.example.Student">
        <property name="sid" value="1004"></property>
        <property name="sname" value="赵六"></property>
        <property name="age" value="26"></property>
        <property name="gender" value="男"></property>
        <!--ref:引用IOC容器中的某个bean的id-->
        <property name="clazz" ref="clazzOne"></property>
        <property name="hobby">
            <array>
                <value>抽烟</value>
                <value>喝酒</value>
                <value>烫头</value>
            </array>
        </property>
        <property name="teacherMap" ref="teacherMap"></property>
    </bean>
    <bean id="clazzOne" class="org.example.Clazz">
        <property name="cid" value="1111"></property>
        <property name="cname" value="最强王者"></property>
        <property name="students" ref="studentList"></property>
    </bean>
    <bean id="teacherOne" class="org.example.Teacher">
        <property name="tid" value="10086"></property>
        <property name="tname" value="大宝"></property>
    </bean>

    <bean id="teacherTwo" class="org.example.Teacher">
        <property name="tid" value="10010"></property>
        <property name="tname" value="小宝"></property>
    </bean>
    <!--配置一个集合类型的bean,需要使用util的约束-->
    <util:list id="studentList">
        <ref bean="studentOne"></ref>
        <ref bean="studentTwo"></ref>
        <ref bean="studentThree"></ref>
    </util:list>
    <util:map id="teacherMap">
        <entry key="10086" value-ref="teacherOne"></entry>
        <entry key="10010" value-ref="teacherTwo"></entry>
    </util:map>
    <bean id="studentOne" class="org.example.Student"></bean>
    <bean id="studentTwo" class="org.example.Student">
        <!--
            property:通过成员变量的set方法进行赋值
            name:设置需要赋值的属性名(和set方法有关)
            value:设置为属性所赋的值
        -->
        <property name="sid" value="1001"></property>
        <property name="sname" value="张三"></property>
        <property name="age" value="23"></property>
        <property name="gender" value="男"></property>
    </bean>
    <bean id="studentThree" class="org.example.Student">
        <constructor-arg value="1002"></constructor-arg>
        <constructor-arg value="李四"></constructor-arg>
        <constructor-arg value="女"></constructor-arg>
        <constructor-arg value="24" name="age"></constructor-arg>
    </bean>
使用util:list、util:map标签必须引入相应的命名空间,可以通过idea的提示功能选择
2.6、引入外部属性文件
①加入依赖
<!-- MySQL驱动 -->
<dependency>
<groupId>mysql</groupId>
<artifactId>mysql-connector-java</artifactId>
<version>8.0.16</version>
</dependency>
<!-- 数据源 -->
<dependency>
<groupId>com.alibaba</groupId>
<artifactId>druid</artifactId>
<version>1.0.31</version>
</dependency>
②创建外部属性文件
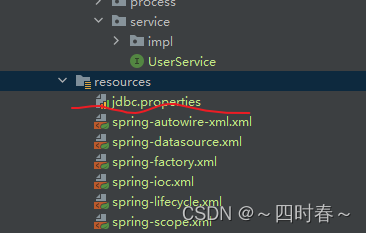
jdbc.driver=com.mysql.cj.jdbc.Driver
jdbc.url=jdbc:mysql://localhost:3307/ssm?serverTimezone=UTC
jdbc.username=root
jdbc.password=1234456
③引入属性文件
    <!--引入jdbc.properties,之后可以通过${key}的方式访问value-->
    <context:property-placeholder location="jdbc.properties"></context:property-placeholder>
④配置bean
    <bean id="dataSource" class="com.alibaba.druid.pool.DruidDataSource">
        <property name="driverClassName" value="${jdbc.driver}"></property>
        <property name="url" value="${jdbc.url}"></property>
        <property name="username" value="${jdbc.username}"></property>
        <property name="password" value="${jdbc.password}"></property>
    </bean>
⑤测试
@Test
public void testDataSource() throws SQLException {
ApplicationContext ac = new ClassPathXmlApplicationContext("springdatasource.xml");
DataSource dataSource = ac.getBean(DataSource.class);
Connection connection = dataSource.getConnection();
System.out.println(connection);
}
2.7、bean的作用域
在Spring中可以通过配置bean标签的scope属性来指定bean的作用域范围,各取值含义参加下表:
| 取值 | 含义 | 创建对象的时机 |
|---|---|---|
| singleton(默认) | 在IOC容器中,这个bean的对象始终为单实例 | IOC容器初始化时 |
| prototype | 这个bean在IOC容器中有多个实例 | 获取bean时 |
②创建类User
public class User {

    private Integer id;

    private String username;

    private String password;

    private Integer age;
}
③配置bean
<!-- scope属性:取值singleton(默认值),bean在IOC容器中只有一个实例,IOC容器初始化时创建
对象 -->
<!-- scope属性:取值prototype,bean在IOC容器中可以有多个实例,getBean()时创建对象 -->
<bean class="org.example.User" scope="prototype"></bean>
④测试
@Test
public void testBeanScope(){
ApplicationContext ac = new ClassPathXmlApplicationContext("springscope.xml");
User user1 = ac.getBean(User.class);
User user2 = ac.getBean(User.class);
System.out.println(user1==user2);
}
2.8、bean的生命周期
①具体的生命周期过程
bean对象创建(调用无参构造器)
给bean对象设置属性
bean对象初始化之前操作(由bean的后置处理器负责)
bean对象初始化(需在配置bean时指定初始化方法)
bean对象初始化之后操作(由bean的后置处理器负责)
bean对象就绪可以使用
bean对象销毁(需在配置bean时指定销毁方法)
IOC容器关闭
②创建User类
public class User {
    private Integer id;
    private String username;
    private String password;
    private Integer age;
    public User() {
        System.out.println("生命周期1:实例化");
    }
    public Integer getId() {
        return id;
    }
    public void setId(Integer id) {
        System.out.println("生命周期2:依赖注入");
        this.id = id;
    }
    public void initMethod(){
        System.out.println("生命周期3:初始化");
    }
    public void destroyMethod(){
        System.out.println("生命周期4:销毁");
    }
}
③配置bean
    <bean id="user" class="org.example.User" init-method="initMethod" destroy-method="destroyMethod">
        <property name="id" value="1"></property>
        <property name="username" value="admin"></property>
        <property name="password" value="123456"></property>
        <property name="age" value="23"></property>
    </bean>
④测试
    @Test
    public void test(){
        //ApplicationContext没有提供关闭的方法ConfigurableApplicationContext是ApplicationContext的子接口,其中扩展了刷新和关闭容器的方法
        ConfigurableApplicationContext ioc = new ClassPathXmlApplicationContext("spring-lifecycle.xml");
        User user = ioc.getBean("user",User.class);
        System.out.println(user);
        ioc.close();
    }
2.9基于xml的自动装配
1、自动装配:
根据指定的策略,在IOC容器中匹配某一个bean,自动为指定的bean中所依赖的类类型或接口类
型属性赋值。
自动装配是使用spring满足bean依赖的一种方法
spring会在应用上下文中为某个bean寻找其依赖的bean。
2、使用bean标签的autowire属性设置自动装配效果
①自动装配方式:byType
byType:根据类型匹配IOC容器中的某个兼容类型的bean,为属性自动赋值
若在IOC中,没有任何一个兼容类型的bean能够为属性赋值,则该属性不装配,即值为默认值null
若在IOC中,有多个兼容类型的bean能够为属性赋值,则抛出异常NoUniqueBeanDefinitionException
<bean id="userController"
class="org.example.controller.UserController" autowire="byType">
</bean>
<bean id="userService"
class="org.example.service.impl.UserServiceImpl" autowire="byType">
</bean>
<bean id="userDao" class="org.example.dao.impl.UserDaoImpl"></bean>
注意:
搜索整个配置文件中的bean,如果有一个相同类型的bean则自动装配,如果没有或超过一个则显示异常(即没有org.example.dao.UserDao或多于一个)。
②自动装配方式:byName
byName:将自动装配的属性的属性名,作为bean的id在IOC容器中匹配相对应的bean进行赋值
<bean id="userController"
class="org.example.controller.UserController" autowire="byName">
</bean>
<bean id="userService"
class="org.example.service.impl.UserServiceImpl" autowire="byName">
</bean>
<bean id="userServiceImpl"
class="org.example.service.impl.UserServiceImpl" autowire="byName">
</bean>
<bean id="userDao" class="org.example.dao.impl.UserDaoImpl"></bean>
<bean id="userDaoImpl" class="org.example.dao.impl.UserDaoImpl">
</bean>
注意:
(1)当一个bean节点带有 autowire byName的属性时。
(2)将查找其类中所有的set方法名,例如setCat,获得将set去掉并且首字母小写的字符串,即cat,去spring容器中寻找是否有此字符串名称id的对象。
(3)如果有,就取出注入;如果没有,就报空指针异常。


 388
388


 被折叠的 条评论
为什么被折叠?
被折叠的 条评论
为什么被折叠?
 到【灌水乐园】发言


