


一、背景:
有访问量的项目,数据库分领域隔离是比较明智的选择,万一后续流量上来,应用层扩容或者业务拆分,相对于数据层面的拆分,会简单很多。
用springBoot约定大于配置,但是涉及复杂的配置,往往力不从心,没有掌控感。此文目的是让有需要的同学可以step-by-step的去配置,避免走弯路,之前看到很多文章质量不佳,一旦实操,各种错误,令人崩溃,springBoot入门简单,但是理解他的约定还是有门槛的。
二、实验环境:
springBoot 2.1.1 + mybatis + mysql-8.4.0 + druid -1.1.17(连接池管理)+ jdk1.8
三、相关配置及代码
整体思路:本地mysql创建两个库,各有一张表,配置多数据源进行访问,最后写个UT进行验证。
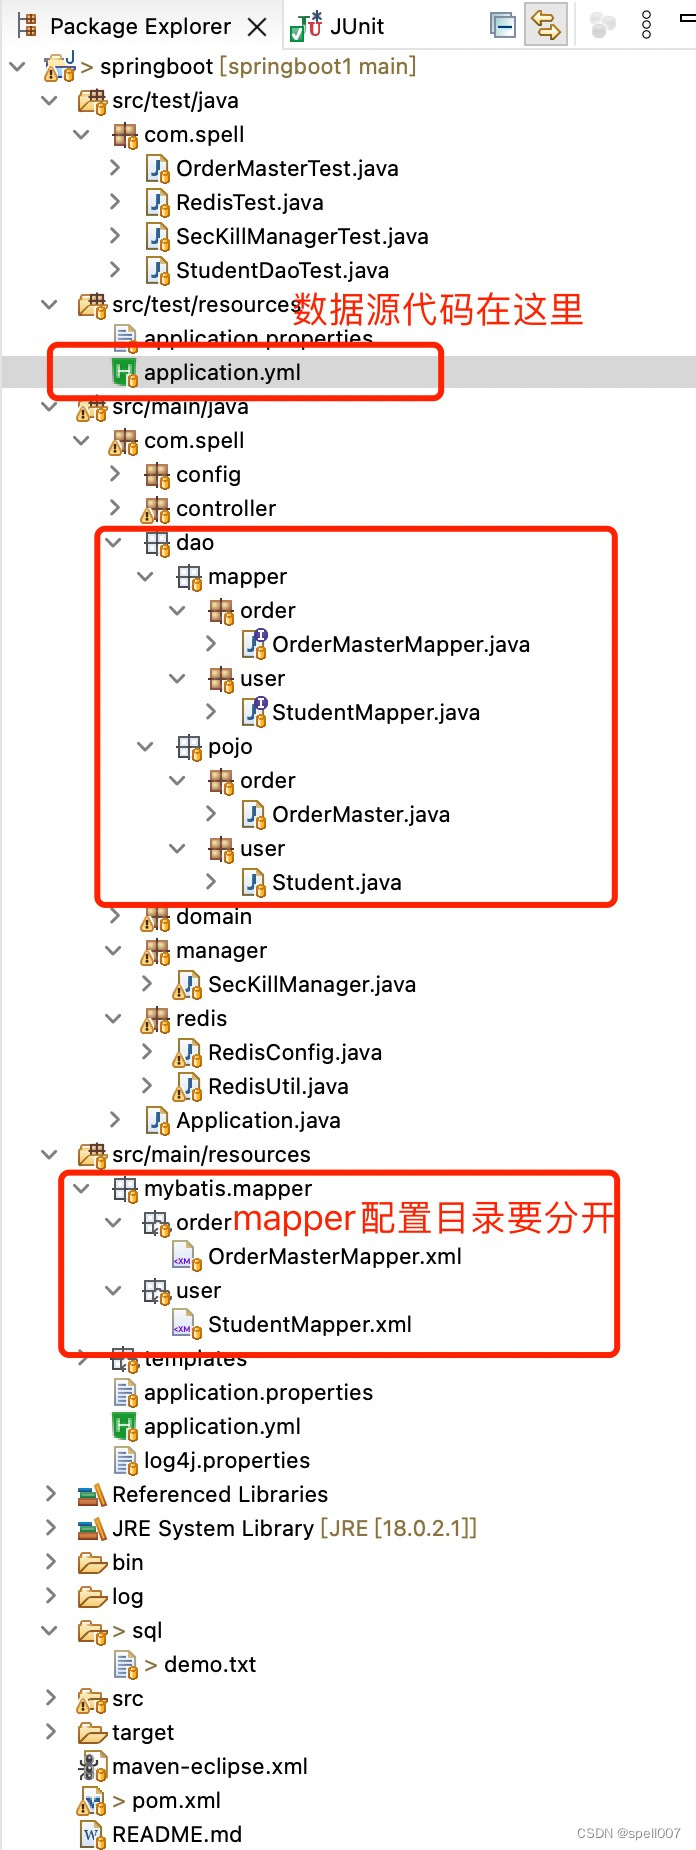
整体代码结构如下:
1、pom.xml配置mybatis及mysql、druid等的相关依赖
		<dependency>
			<groupId>org.springframework.boot</groupId>
			<artifactId>spring-boot-starter-test</artifactId>
			<scope>test</scope>
		</dependency>
		<dependency>
			<groupId>org.mybatis.spring.boot</groupId>
			<artifactId>mybatis-spring-boot-starter</artifactId>
			<version>2.1.0</version>
		</dependency>
		<dependency>
			<groupId>mysql</groupId>
			<artifactId>mysql-connector-java</artifactId>
			<version>5.1.47</version>
			<scope>runtime</scope>
		</dependency>
		<dependency>
			<groupId>com.alibaba</groupId>
			<artifactId>druid-spring-boot-starter</artifactId>
			<version>1.1.10</version>
		</dependency>
		<dependency>
			<groupId>com.alibaba</groupId>
			<artifactId>druid</artifactId>
			<version>1.1.17</version>
		</dependency>
2、创建数据库及表结构
在本地弄两个库(user, order_info),库里面各创建一张表
--创建用户库及表
create database user;
use user;
CREATE TABLE student(
    id int(11) NOT NULL AUTO_INCREMENT,
    name varchar(255) DEFAULT NULL,
    age int(11) DEFAULT NULL,
    PRIMARY KEY(id)
)ENGINE=InnODB DEFAULT CHARSET=utf8;


create database order_info;
use order_info;
--订单表,用于测试mybatis多数据配置正确性验证
CREATE TABLE order_master (
	order_id bigint(20) NOT NULL AUTO_INCREMENT comment '订单id',
  	order_no char(12) NOT NULL comment '订单号,唯一',
	buyer_id bigint(20) NOT NULL comment '买家ID',
	seller_id bigint(20) not null comment '商家ID',
	status tinyint(2) not null comment '状态:0-已下单,1-已发货,2-已收货,3-订单退货',
	order_amount decimal(15,2) default null comment '订单金额',
	pay_status tinyint(2) not null default 0 comment '支付状态:0-未支付,1-已支付',
	pay_time datetime  DEFAULT null  comment '支付时间',
	create_time datetime  DEFAULT NOW() comment '创建时间',
  	PRIMARY KEY (order_id),
  	unique(order_no)
) ENGINE=InnoDB DEFAULT CHARSET=utf8mb3;
3.配置数据源相关信息及mybatis访问目录
这里要特别注意,网上很多资料,都是在类似数据源user-db下面还配置“druid:" 节点,在下面配置了数据库连接池,实践证明会出现(No suitable driver found for xxx 或者 Failed to determine a suitable driver class)的错误。
spring:
  datasource:
      user-db:
        driver-class-name: com.mysql.jdbc.Driver # 数据库驱动
        url: jdbc:mysql://localhost:3306/user?useUnicode=true&characterEncoding=utf8&autoReconnect=true&failOverReadOnly=false&useSSL=false&zeroDateTimeBehavior=convertToNull  # url
        username: root # 账号
        password: root123 # 密码
        type: com.alibaba.druid.pool.DruidDataSource # 数据源类型,这里指定为Druid数据源
        # DataSource DruidDataSource连接池的基本配置信息
        #初始化连接池的连接数量 大小,最小,最大
        initial-size: 5
        min-idle: 5
        max-active: 20
        #配置获取连接等待超时的时间
        max-wait: 60000
        #配置间隔多久才进行一次检测,检测需要关闭的空闲连接,单位是毫秒
        time-between-eviction-runs-millis: 60000
        # 配置一个连接在池中最小生存的时间,单位是毫秒
        min-evictable-idle-time-millis: 30000
        validation-query: SELECT 1 FROM DUAL
        test-while-idle: true
        test-on-borrow: true
        test-on-return: false
        # 是否缓存preparedStatement,也就是PSCache  官方建议MySQL下建议关闭   个人建议如果想用SQL防火墙 建议打开
        pool-prepared-statements: false
        max-pool-prepared-statement-per-connection-size: 20
        # 配置监控统计拦截的filters,去掉后监控界面sql无法统计,'wall'用于防火墙
        filter:
           stat:
              merge-sql: true
              slow-sql-millis: 5000
      order-db:
        driver-class-name: com.mysql.jdbc.Driver # 数据库驱动
        url: jdbc:mysql://localhost:3306/order_info??useUnicode=true&characterEncoding=utf8&autoReconnect=true&failOverReadOnly=false&useSSL=false&zeroDateTimeBehavior=convertToNull  # url
        username: root # 账号
        password: root123 # 密码
        type: com.alibaba.druid.pool.DruidDataSource # 数据源类型,这里指定为Druid数据源
        # DataSource DruidDataSource连接池的基本配置信息
        #初始化连接池的连接数量 大小,最小,最大
        initial-size: 5
        min-idle: 5
        max-active: 20
        #配置获取连接等待超时的时间
        max-wait: 60000
 最低0.47元/天 解锁文章


 3446
3446


 被折叠的 条评论
为什么被折叠?
被折叠的 条评论
为什么被折叠?
 到【灌水乐园】发言


