


准备工作
新建一个类,继承于UIView。这里起名为GesturesToUnlockView。所有的画图工作将在这个View里完成。
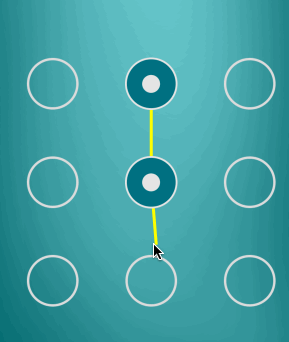
从上面的图我们可以看到,至少需要选中状态和非选中状态两种图片,以及一个好看的背景图。
然后考虑一下按钮的行列数,摆放的位置距离。
如果密码是否是固定的位数,
let s_width = UIScreen.mainScreen().bounds.size.width;
let s_height = UIScreen.mainScreen().bounds.size.height;
//    未选中的图片名
    let normalChoosePicName = "zzf_password_btn_normal";
//    选中的图片名
    let clickChoosePicName = "zzf_password_btn_click";
//  按钮行列数
    let btnNum : Int = 3;
//    存多少个密码
    let secretCodeNum = 4;
//    存密码的数组
    var secretArray:NSMutableArray!;
那么我们先把那些按钮给放下。找个你喜欢的位置,用两个for循环放几个按钮吧。
//    按钮摆放
    func putBtnsOnTheView(){
        let btnWidth = CGFloat(70);
        let xline : CGFloat = CGFloat((s_width-20)/CGFloat(btnNum*2));
        let normalImage = UIImage(named: normalChoosePicName);
        let clickImage = UIImage(named: clickChoosePicName);

        for(var i = 0; i < btnNum ; i++){

            for(var j = 0; j < btnNum;j++){

                let pic = UIImageView(image: normalImage, highlightedImage: clickImage);
                pic.frame = CGRectMake(0, 0, btnWidth, btnWidth);
                pic.center = CGPointMake((10+xline*CGFloat(2*j+1)),s_height/3+10+xline*CGFloat(2*i+1));
                pic.userInteractionEnabled = true;

                self.addSubview(pic);
                pic.tag = 5001+i*btnNum+j;

            }
        }
我们希望初始化的时候按钮就是摆放好了的,所以重写一下这个View的初始化方法
override init(frame: CGRect) {
        super.init(frame: frame);
        self.putBtnsOnTheView();
        self.backgroundColor = UIColor.clearColor();
}- 触碰事件和画图
在开始触碰屏幕的时候,初始化一个数组,用来存储划过的按钮们的tag值。
override func touchesBegan(touches: Set<UITouch>, withEvent event: UIEvent?) {
        if(secretArray == nil){
            secretArray = NSMutableArray(capacity: secretCodeNum);
        }
    }
然后是手指移动的时候
override func touchesMoved(touches: Set<UITouch>, withEvent event: UIEvent?) {
//        当前手指按到的坐标
        let pt = (touches as NSSet).anyObject()?.locationInView(self);
//        判断此时手指碰到了那个View
        let touchView = self.hitTest(pt!, withEvent: event);
        pointValue = NSValue.init(CGPoint: pt!);
//        绘图
        self.setNeedsDisplay(); //第一种方法
//        self.attachment();//第2种方法
//      判断是否是9个按钮之一
        if(touchView?.tag > 5000 && touchView?.tag <= 5000+(btnNum*btnNum)){
            var found = false;
            if(secretArray.count > 0){
                for temp in secretArray{
//                    判断是不是重复点击了已有的View
                   found = (temp.integerValue == touchView?.tag)
                    if(found){
                        break;
                    }
                }
            }
//            重复点击就返回
            if(found){
                return;
            }
//
            secretArray.addObject(NSNumber(int: Int32((touchView?.tag)!)));
            self.addDotView(touchView!);
            let tempImageView = touchView as! UIImageView;
            tempImageView.highlighted = true;
        }
    }

//    添加按过的点到数组中存起来
    func addDotView(dotview:UIView){
        if(dotView == nil){
            dotView = NSMutableArray(capacity: 0);
        }
        dotView.addObject(dotview);
//        密码判断 do something
    }
思路:手指在屏幕上面划过,判断这时候手指的有没有按在设置的9个按钮上。如果碰到了9个按钮中得一个,那么从数组中取出已经点击过的按钮,根据tag值判断是不是重复点击了。如果是重复点击的,那么就返回;如果是没有点击过的按钮,那么就把就把tag值存在数组里,并且高亮按钮。
关于画图这里可以有两种方法,我们只说第一种方法,想了解另外一种方法可以在最后下载代码看看。
    override func drawRect(rect: CGRect) {
        if(pointValue == nil){
            return;
        }
        let context = UIGraphicsGetCurrentContext();
        CGContextSetStrokeColorWithColor(context, UIColor.yellowColor().CGColor);
        CGContextSetLineWidth(context, 4);
        var lastDot:UIView!;
        var from:CGPoint!;
        if (dotView == nil){
            return;
        }
        for temp in dotView
        {
            from  = (temp as? UIImageView)!.center;
            if (lastDot == nil){
                CGContextMoveToPoint(context, from.x, from.y)
            }else{
                CGContextAddLineToPoint(context, from.x, from.y);
            }
            lastDot = temp as! UIView;
        }
        let pt = pointValue.CGPointValue();
        CGContextAddLineToPoint(context, pt.x, pt.y);
        CGContextStrokePath(context);
        pointValue = nil;
    }
选择已经存过的按钮,让它们之间连接起来。最后一个按钮再和现在手指的位置连接起来。
- 最后的扫尾工作
当手提起,不接触屏幕后,就应该把屏幕上所有的按钮都设置成非高亮的状态。
 override func touchesEnded(touches: Set<UITouch>, withEvent event: UIEvent?) {

        self.clearDotViews();
        for temp in self.subviews{
            if(temp is UIImageView){
                let tempImageView = temp as! UIImageView;
                tempImageView.highlighted = false;
            }
        }
//        画图
        self.setNeedsDisplay();
//        self.attachment();
    }

func clearDotViews(){
        if(dotView == nil){
            return;
        }
        dotView.removeAllObjects();
        if(secretArray == nil){
            return;
        }
        secretArray.removeAllObjects();
    }
有现成的工程可以下载下来看看 代码下载


 481
481

 被折叠的 条评论
为什么被折叠?
被折叠的 条评论
为什么被折叠?
 到【灌水乐园】发言


