


window.setInterval("alert('a')",2000);//每个2秒执行一次alert
window.setTimeout("alert('a')",3000);//3秒后执行alert

navigator.appName
navigator.appVersion
navigator.appMinorVersion
JS之标签位置
 <body>
    <input type="text" name="username" value="默认" id="usernameId">
 </body>

 <script>
    var a = document.getElementById("usernameId").value;
    document.write(a);
 </script>
</html>`
js的函数、绑定时间、document对象、表单提交和验证、解析json
函数
创建函数的3种方式
方法一:
function add1(a,b){
    alert(a+b);
}

//调用函数
add1(1,2);
function add1(a,b){
alert(a+b);
}
//调用函数
add1(1,2);方法二:匿名函数
var result = function(a,b){
    alert(a+b);
}

//调用函数
result(1,2);
var add2=function(a,b){
alert(a+b);
}
//调用函数
add2(2,3);方法三:Function构造函数
var params = "a,b";
var method = "var sum; sum=a+b;return sum";
var result = new Function(params,method);

//调用函数
result(1,2);
var params = "a,b";
var method = "var sum;sum=a+b;return sum;";
var result = new Function(params,method);
//调用函数
alert(result(1,3));js中函数是没有重载的
验证js中函数是没有重载的
<script>
    function add1(a,b){
        alert(a+b);
    }
    function add1(a,b,c){
        alert(a+b+c);
    }

    function add1(a,b,c,d){
        alert(a+b+c+d);
    }

    add1(1,2);//Nan
    add1(1,2,3);//Nan
    add1(1,2,3,4);//10
<script>
前2个值都是Nan,最后一个是10。
模拟java中函数的重载
js中调用函数,需要把参数传递过去,在函数中有一个数组arguments,是用来保存这些参数的,我们可以用arguments模拟重载的效果。
function add2(){
    var sum=0;//sum必须初始化
    for(var i=0;i<arguments.length;i++){
        sum = sum+arguments[i];
    }
    alert(sum);
}

add2(1,2);
add2(1,2,3);
add2(1,2,3,4);
全局函数
|函数|说明|
|eval(str)|把string当做js代码来执行|
|encodeURI(str)|对String进行编码|
|decodeURI(var)|对编码后的字符串进行解码|
|isNaN(var a)|判断a的类型是不是number,或者可不可以转换成Number。是number,返回false;不是,返回true。。NAN:not 啊 number|
|parseInt(str)|把string解析成int|
var a="alert('Hello World')";
eval(a);
var a=encodeURI("ABCD1234中华人民共和国");
document.write(a);
document.write(decodeURI(a));
var b = "3";
var c = 3;
var d = "abc";

document.write(isNaN(b));//false
document.write(isNaN(c));//false
document.write(isNaN(d));//truedocument.write(parseInt("3")+",");//3,,
document.write(parseInt("3")+2+",");//5,
document.write(parseInt("3")+2+"A");//5A
document.write(parseInt("3")+"A"+2);3A2js事件
HTML绑定js事件的3种方法
方法一: 直接在html中写onclick
<input type="button" id="btn1" value="btn1" onclick="method1();"/>

<script>
    function method1(){
        alert("btn1");
    }
</script>
方法二: document.getElementById(“btn2”).事件属性=方法名称
<input type="text" id="btn2" value="text"/>
<script>
    document.getElementById("btn2").onclick=method2;
</script>
方法三:document.getElementById(“btn2”).事件属性=function(){ 方法体}
<input type="button" id="btn3" value="bnt3">
<script>
    document.getElementById("btn3").onclick=function(){
        alert("btn3");
    }
</script>
js常用事件
常用事件:
onfocus onblur;
onkeypress;
onmouseover onmouseout;
onsubmit
<input type="text" id="id1" name="username" value="" onfocus="onfocus1();" onblur="onblur1();"/>
<input type="text" id="id2" name="username" value="请单击键盘" onkeypress="keypress1(event);" />
<input type="text" id="id3" name="username" onmouseover="mouseover1();" onmouseout="mouseout1()">
<form onsubmit="submit1();">
登录名:<input type="text" name="useername" value="" >
<input type="submit">
</form><script>
function onfocus1(){
document.getElementById("id1").value="";
}
function onblur1(){
document.getElementById("id1").value="focus";
}
//A65 a97 enter:13
function keypress1(obj){
alert(obj.keyCode);
}
function mouseover1(){
document.getElementById("id3").value="over";
}
function mouseout1(){
document.getElementById("id3").value="out"
}
function submit1(){
alert("submit");
//return false;
}
</script>document对象
document代表整个文档,所我们可以获取到里面的任何对象。
常用的4个方法:
write();
getElementById();//没加s
getElementsByName();//结果是数组,所以是加了s
getElementsByTagName();//结果是数组,所以是加了s<html>
</body>
<input type="text" id="id1" name="username" value="value1"/><br/> <br/>
<input type="text" name="username" value="value2"/><br/> <br/>
<input type="text" name="username" value="value3"/><br/> <br/>
<input type="button" value="getElementByName" onclick="method1();">
<input type="button" value="getElementByTagName" onclick="method2();">
</body>
<script>
function method1(){
var names=document.getElementsByName("username");
alert(names.length);
for(var i=0;i<names.length;i++){
alert(names[i].value);
}
}
function method2(){
var names=document.getElementsByTagName("input");
alert(names.length);
for(var i=0;i<names.length;i++){
alert(names[i].value);
}
}
</script>
</html>innerHTML
innerHTML有2个作用:
1. 获取标签里的内容
2. 给标签设置内容
<body>
    <div id="div1" style="width:300px;height:200px; border:solid red 2px;">你好,中国。</div>
    <br/>
    <input type="button" value="innerHTML插入值" onclick="insert();">
    <br/>
    <input type="button" value="innerHTML取值" onclick="get();">
</body><script>
function insert(){
// "<table border='3'><tr><td>a</td><td>b</td></tr></table>" "Hello World"
document.getElementById("div1").innerHTML="Hello World";
}
function get(){
var a = document.getElementById("div1").innerHTML;
alert(a);
}
</script>表格
<body>
    行:<input type="text" id="tr"/>列:<input type="text" id="td"/>
    <br/>
    <input type="button" value="动态生成表格" onclick="generate();">
    </body>
<div id="div"/>
<script type="text/javascript">
//注意:<div></div>,标签的/放在前面,不是<div/>,下面放在<div/>会导致列之间有空格
function generate(){
var tr=document.getElementById("tr").value;
var td=document.getElementById("td").value;
var table="<table border='1'>";
for(var i=0;i<tr;i++ ){
table=table+"<tr>";
for(var j=0;j<td;j++){
//table=table+"<td>"+"a"+"<td/>";
table=table+"<td>a</td>";
}
table=table+"</tr>";
}
table=table+"</table>";
var div = document.getElementById("div");
div.innerHTML=table;
}
</script>
form

表单的3种提交方式
- form自带的type=”submit”
- 超链接提交
- button提交
form自带的type=”submit”
<form id="form1" action="hello.html">
    用户名:<input type="text" name="username">
    密码:<input type="password" name="password">
    <input type="submit" value="提交">
</form>
超链接提交
<form id="form1" action="hello.html">
    用户名:<input type="text" name="username">
    <input type="button" name="btn" value="提交" onclick="submit();"/>

    <!--超链接-->
    <a href="hello.html">超链接提交</a>
</form>
button提交
在button的函数中,获取form标签,然后调用submit();
<form id="form1" action="hello.html">
    用户名:<input type="text" name="username">
    密码:<input type="password" name="password">

    <input type="button" name="btn" value="提交" onclick="submit();"/>
</form><script>
function submit(){
var form1=document.getElementById("form1");
form1.submit();
}
</script>BOM
BOM: Browsse Object Model,浏览器对象模型。
- Window
- Windwo Screen
- Window Location
- Window History
- Navigator
- 弹窗
- 计时事件
- Cookie
Window
获取width height
width:
var width1 = window.innerWidth;
var width2 = document.body.clientWidth;
var width2 = document.documentElement.clientWidth;
height:
var height1 = window.innerHeight;
var height2 = document.body.clientHeight;
var height3 = document.documentElement.clientHeight;
其它方法:
window.open();
window.close();
window.moveTo(100,200);
window.resizeTo();
Screen
获取屏幕的宽高
window.screen.availWidth
window.screen.availHeight
Location
window.location 对象在编写时可不使用 window 这个前缀。 一些例子:
一些实例:
location.hostname 返回 web 主机的域名
location.pathname 返回当前页面的路径和文件名
location.port 返回 web 主机的端口 (80 或 443)
location.protocol 返回所使用的 web 协议(http:// 或 https://)
History
window.history.back();
window.history.go()
Navigator
<body>
<div id="example"></div>
<script>
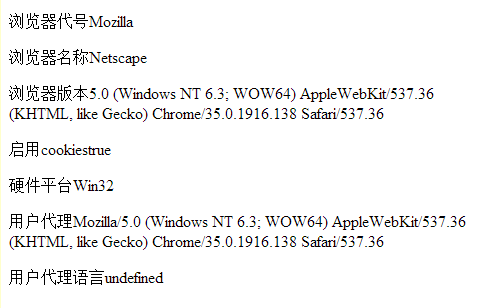
text = "<p>浏览器代号"+navigator.appCodeName+"</p>";
text+="<p>浏览器名称"+navigator.appName+"</p>";
text+="<p>浏览器版本"+navigator.appVersion+"</p>";
text+="<p>启用cookies"+navigator.cookieEnabled+"</p>";
text+="<p>硬件平台"+navigator.platform+"</p>";
text+="<p>用户代理"+navigator.userAgent+"</p>";
text+="<p>用户代理语言"+navigator.systemLanguage+"</p>";
document.getElementById("example").innerHTML = text;
</script>
</body>弹窗
JS中有3种弹窗:警告框、确认框、提示框。
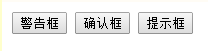
<body>
<input type="button" onclick="myFunction1()" value="警告框" />
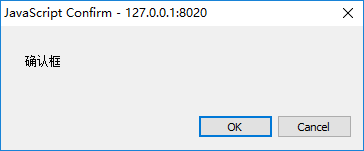
<input type="button" onclick="myFunction2()" value="确认框" />
<button onclick="myFunction3()">提示框</button>
<p id="btn2"></p>
<p id="btn3"></p>
<script>
function myFunction1() {
alert("警告框");
}
function myFunction2() {
var a = confirm("确认框");
var x;
if(a) {
x = "你按下了确认键";
} else {
x = "你按下了取消键";
}
document.getElementById("btn2").innerHTML = x;
}
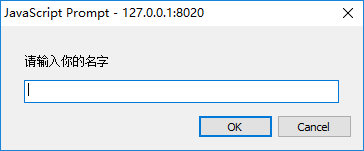
function myFunction3(){
var a = prompt("请输入你的名字","");
if(a!=null & a!=""){
document.getElementById("btn3").innerHTML="hello,"+a;
}
}
</script>
</body>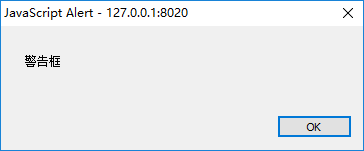
计时事件
var a = window.setInterval(function() {myTimer()}, 1000);
window.clearInterval(a);
点击第一个按钮,每隔3秒弹窗就会出现。
点击第二个按钮,取消时钟。
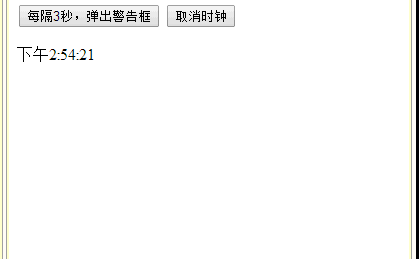
<body>
    <button onclick="myFunction1()">每隔3秒,弹出警告框</button>
    <button onclick="myFunction2()">取消时钟</button>
    <p id="p1"></p>

    <script>
        function myFunction1() {
            window.setInterval(function() {
                alert("3s")
            }, 3000);
        }

        var a = window.setInterval(function() {myTimer()}, 1000);

        function myTimer() {
            var a = new Date();
            var b = a.toLocaleTimeString();
            document.getElementById("p1").innerHTML = b;
        }

        function myFunction2() {
            window.clearInterval(a);
        }
    </script>
</body>


 356
356

 被折叠的 条评论
为什么被折叠?
被折叠的 条评论
为什么被折叠?
 到【灌水乐园】发言


